NOTE: Parking at Edith Gap was greatly restricted starting in fall 2020. If you attempt to park there, be sure to pay attention to the the new ‘No Parking, Tow Away’ signs. Unless you are very certain you are legally parked, we suggest following the updated route outlined below, starting from the horse trailer parking area for the Stephens Trail about a mile lower on the mountain.
Kennedy Peak is an beautiful seven-mile out-and-back hike in the Lee District of George Washington National Forest. It gives hikers gorgeous views of the bends in the Shenandoah River.
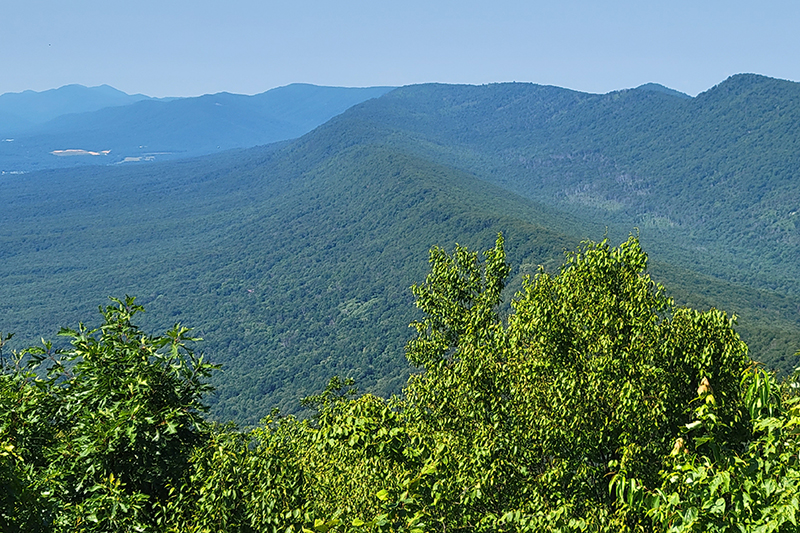
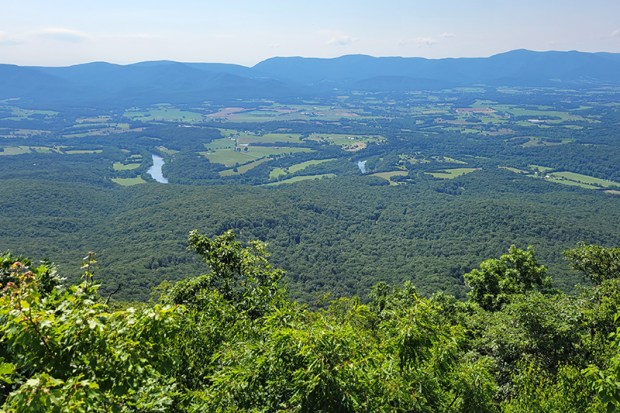
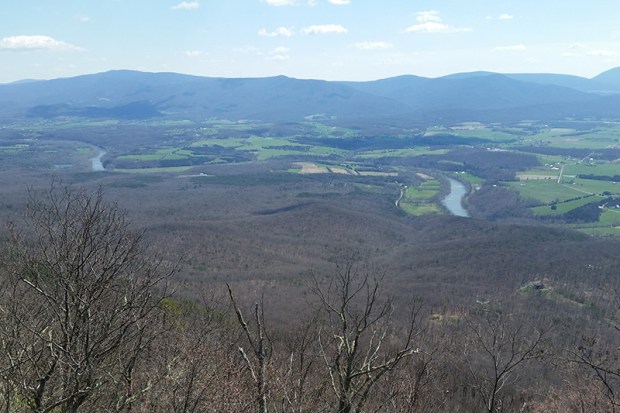
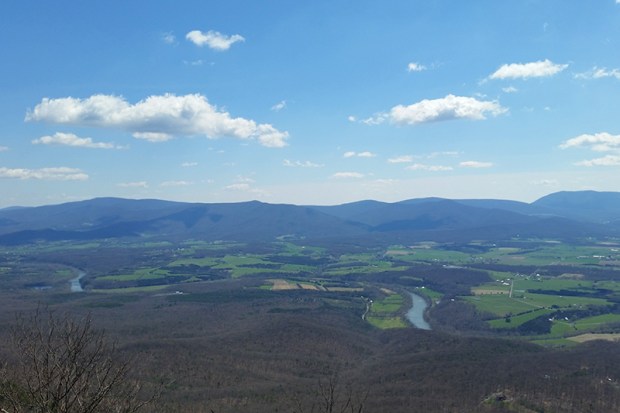
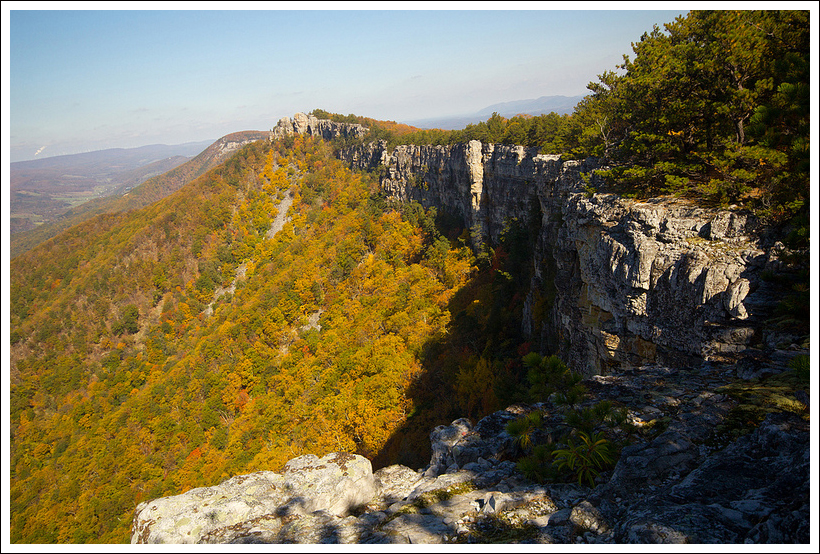
The view from atop the Kennedy Peak Tower
Christine Says…
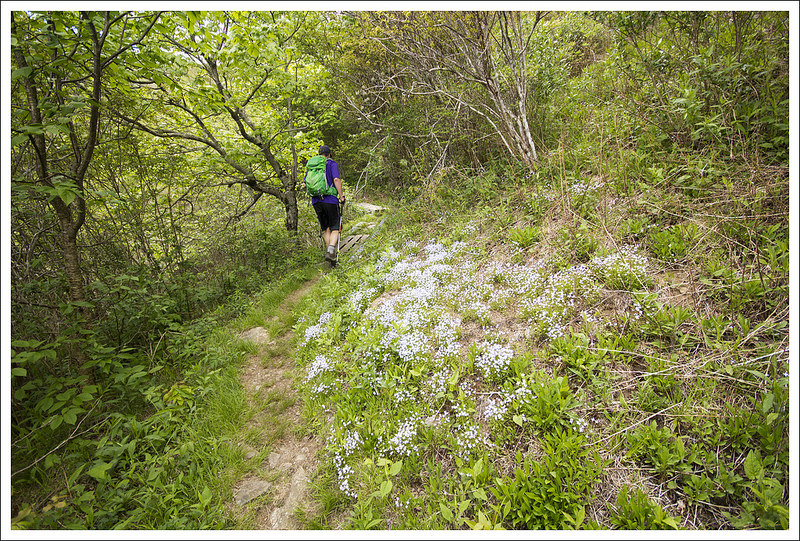
I love this hike. We’ve hiked it in winter and fall before, but this was the first time we’ve hiked it in the spring. Sunday afternoon was the kind of day that is custom made for hiking. It was dry, sunny, breezy and in the low 70’s. The trail was lined with brilliant, pink rhododendrons. All the trees were covered with new, spring green leaves and/or blossoms. Butterflies were fluttering all around the trail, taking pauses on the blooming trees and wildflowers. It was, in a word, idyllic.
Box Turtle, Swallowtail on Rhododendron, Indigo Bunting
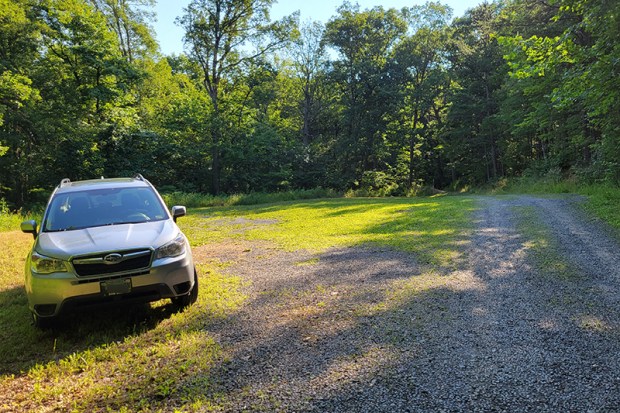
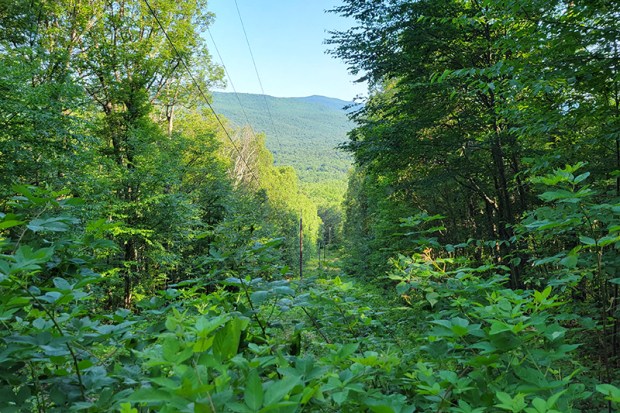
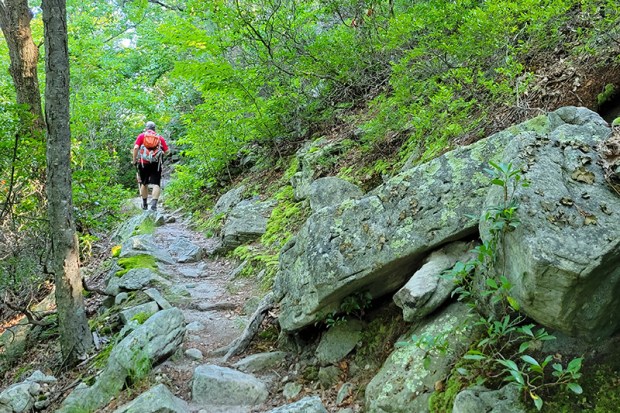
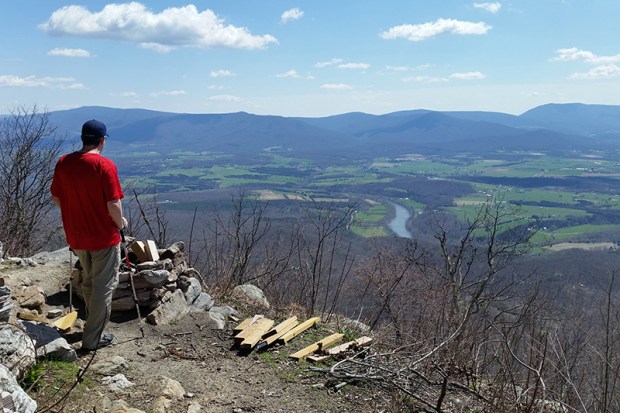
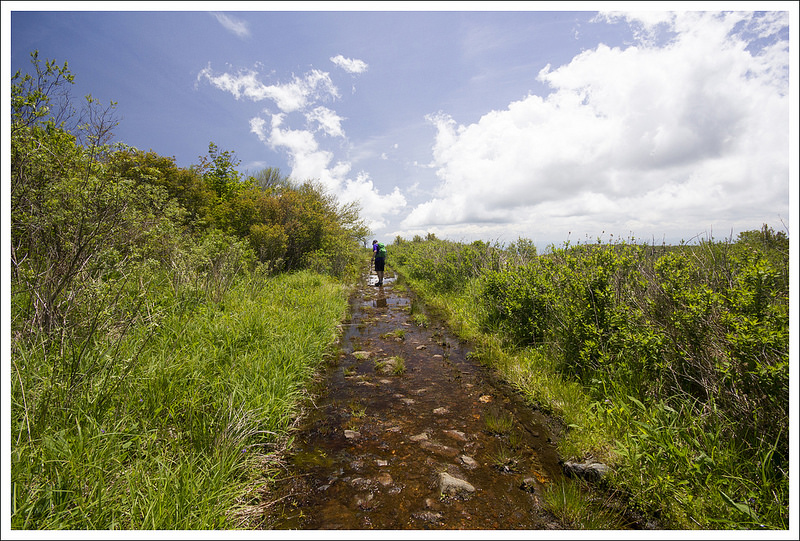
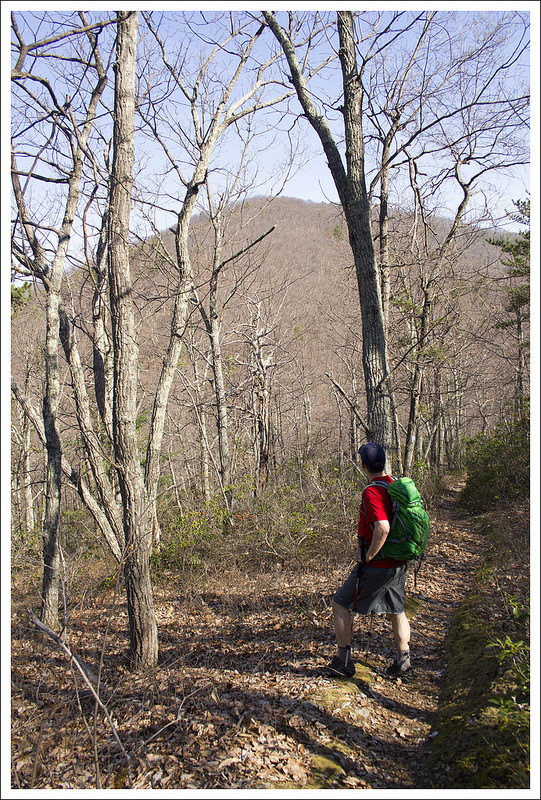
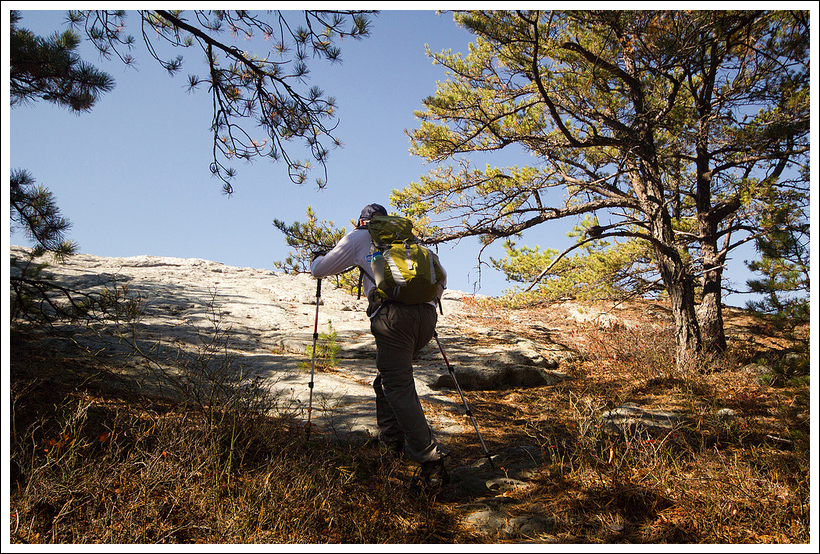
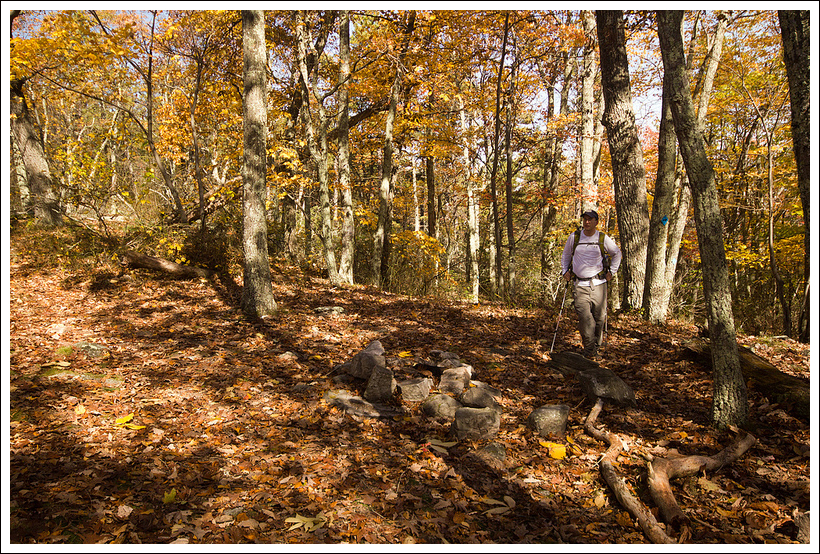
We began in the Stephens Trail/horse trailer parking area on VA675. The Stephens Trail departs from the back of the parking area. You should look for the orange-blazed Massanutten Trail at the head of the parking lot. The trail climbs moderately uphill for .9 miles. At the top of the climb, you’ll exit onto VA675 at Edith Gap (the old parking area). On the road, take a sharp left, staying on the orange-blazed Massanutten Trail.
Hiking uphill along the Massanutten Trail, headed to Edith Gap.
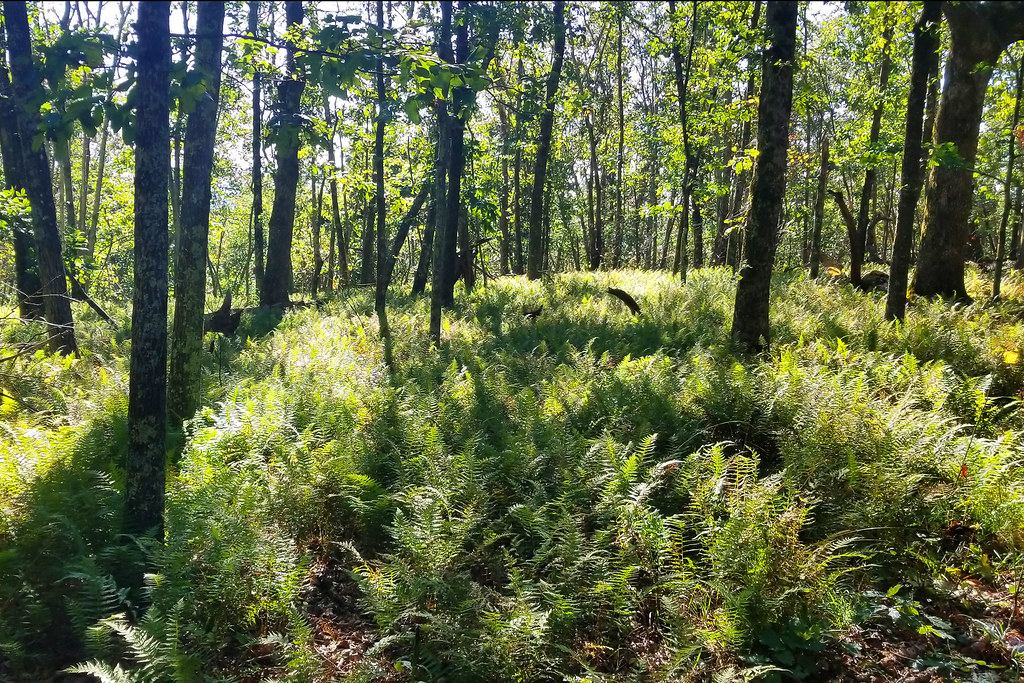
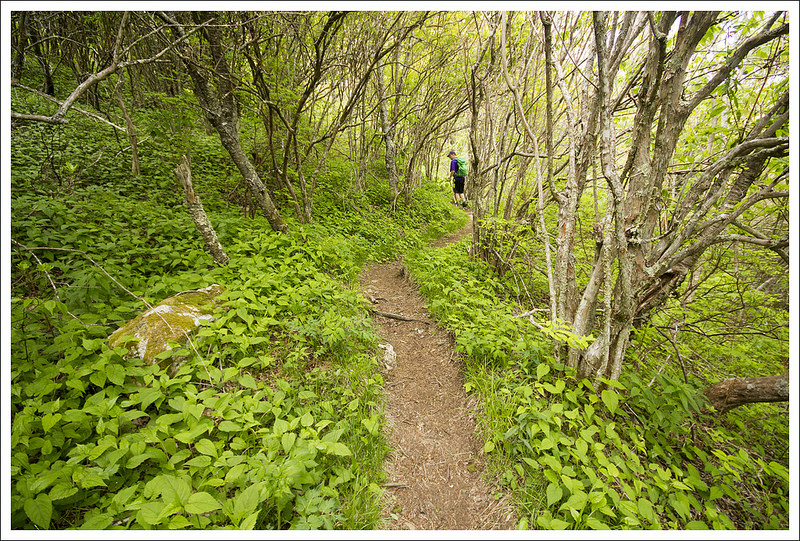
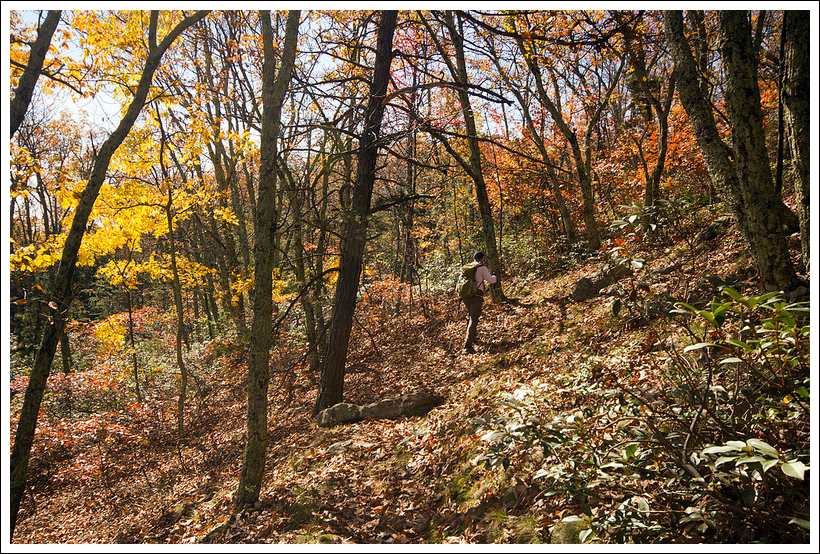
The part of the trail starts off as a wide, almost road-like track. This part of the hike is extremely easy – climbing just a couple hundred feet over the next 1.75 miles.
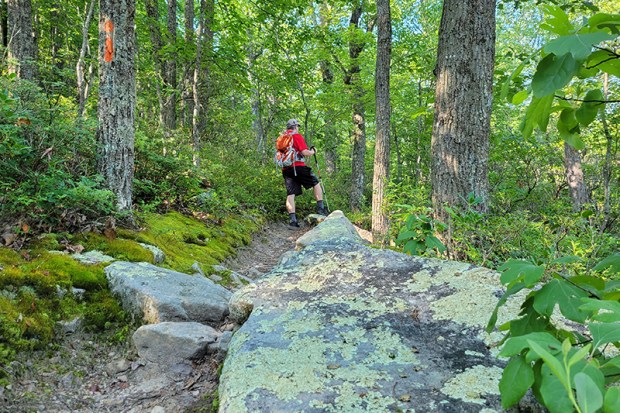
At around mile 2.65, the trail takes a sharp, hairpin turn and begins to climb more steeply over increasingly rocky terrain. At this sharp switchback, you may be tempted to continue straight along a visible path, but be careful to make the turn and follow the orange blazes uphill. This slightly tricky misdirection has been blocked off by logs and rocks, but enough people have missed the turn that the false path remains well-trodden. We once followed it out of curiosity and it doesn’t lead anywhere. It eventually fades out into the forest.
Don’t miss this switchback!
After the switchback, the trail continues uphill for another half mile. There is a small outcropping on the left with a obstructed views and a tiny campsite (room for a hammock or a one-person tent). After you pass this spot, continue a couple tenths of a mile to the junction with the Stephens Trail. (Note: If you want to make a longer day, adding about two more miles to your route, you can descend back to your car via the Stephens Trail. We’ve heard it’s not very scenic and is often muddy and manure-covered, so we chose the out-and-back.)
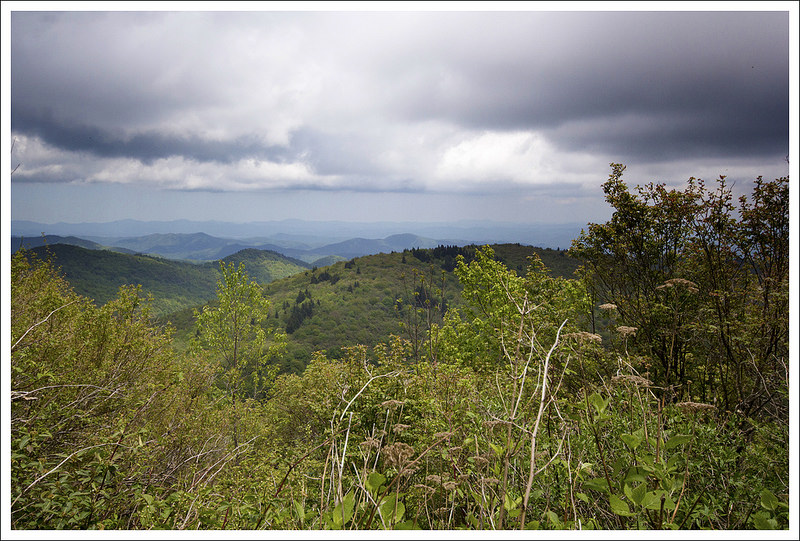
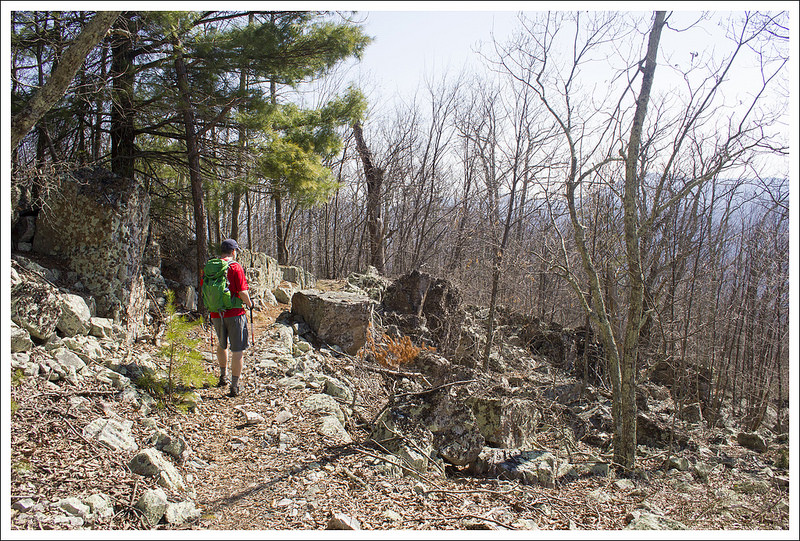
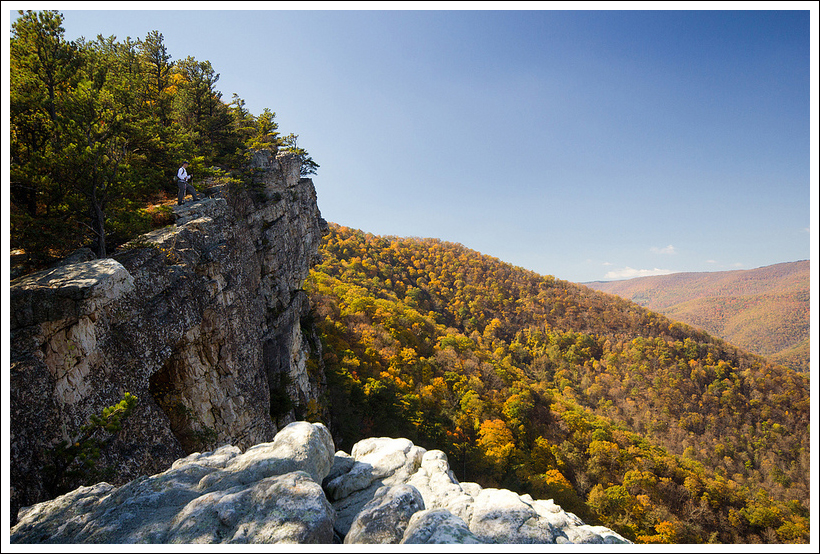
At the junction, you will turn right and follow the signs toward the fire tower. The tower is a little over .2 miles from the junction. The last stretch to the fire tower is steep and rocky. It’s really the only challenging section of the hike. The tower is a sturdy one-story structure with great views looking into the valley and Shenandoah National Park beyond.
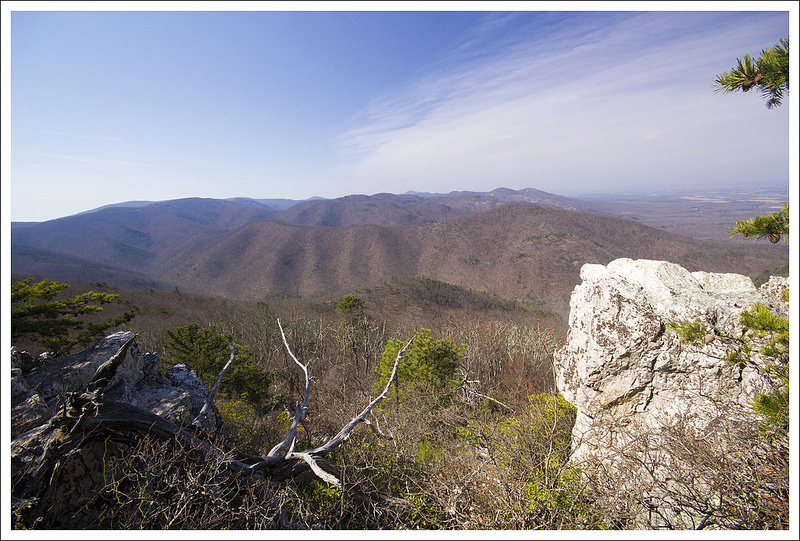
When we got to the summit, we had the observation tower all to ourselves. We watched birds in the treetops, spotted lizards climbing around on the rocks and took in a fantastic view of the Shenandoah River and the Page Valley. It was one of the least hazy days we’ve had in a while, so we could clearly see Shenandoah National Park from this summit. Lots of vultures were soaring overhead, and even though they’re kind of creepy, they were casting cool bird-shaped shadows onto the mountain top. I always like it when they do that.
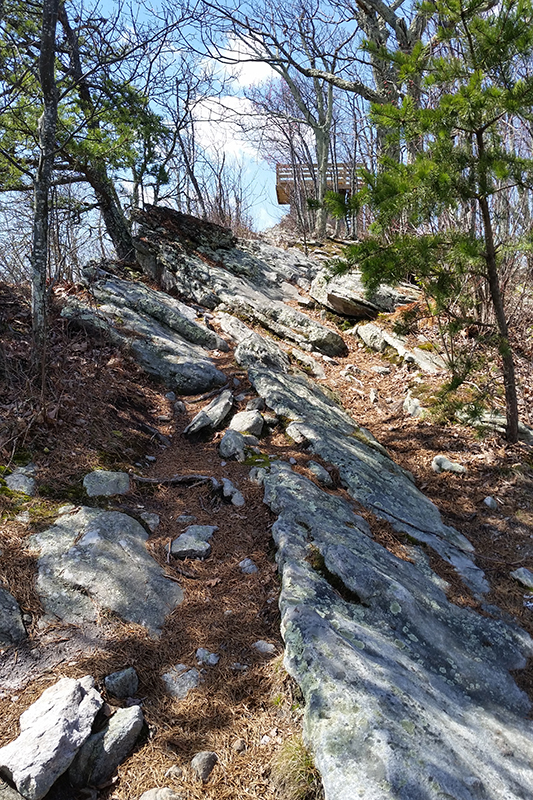
The trail is pretty rocky for the last half mile.
Sunday was the only time we’ve hiked Kennedy Peak in the afternoon. Adam and I tend to be morning hikers — it helps us avoid the crowds. But, the light is definitely prettier in the afternoon on Kennedy Peak. If you hike it in the morning, the sun shines right in your face at the summit. That makes it hard to appreciate the great view, and makes it nearly impossible to get any decent photos.
Adam Says…
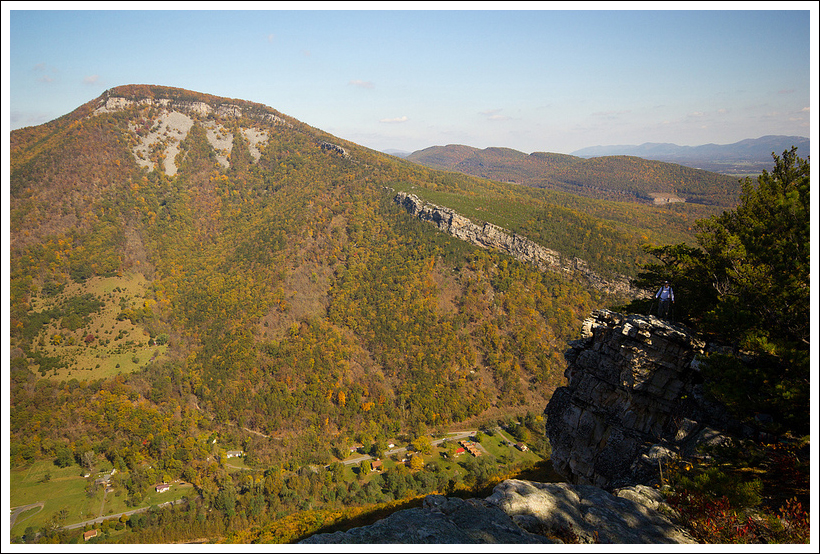
This is one of our favorite hikes. This hike is not very steep and the payoff is wonderful. This is a good multi-use trail, since there are campsites and good footing for horses. There are a couple of campsites at the beginning of the trail, near the road. The nicest campsites are further up the trail. Once you are on the fire tower trail, you will find a couple of places where you can have some nice lookouts over the valley and the Shenandoah River. From some points, you can see several bends in the River. Once you reach the top, there is an observation tower where you can chill for a while before heading back down.
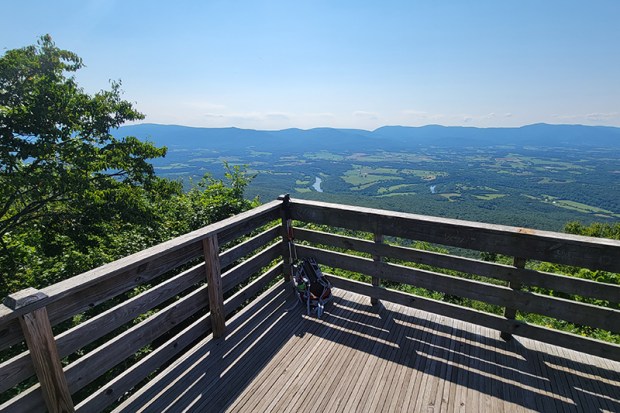
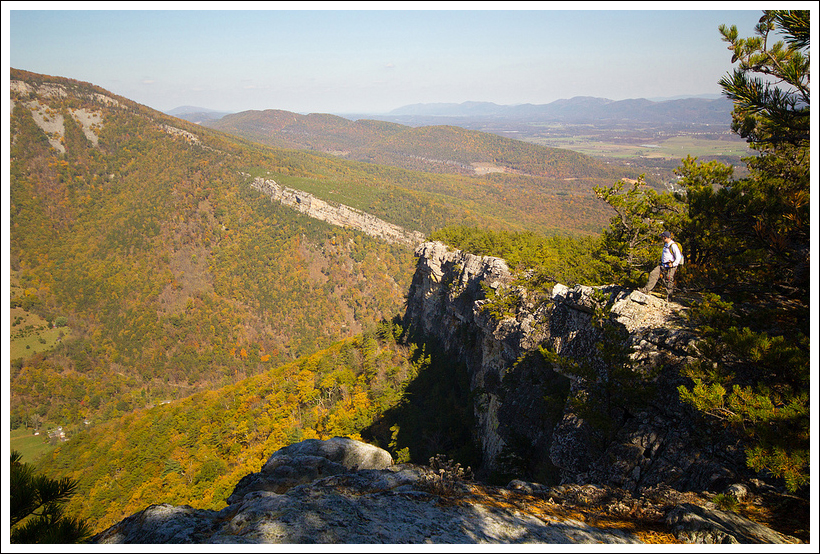
Views from the other side of the tower.
If you are into geocaching, look for the Presidential Peek Cache! After your hike, be sure to visit Camp Roosevelt – a great spot for a picnic.
Trail Notes
Distance – 7 miles round-trip
Elevation Change – 1300′
Difficulty – 3. The trail for the first miles is moderately uphill. The next two miles are either flat or gentle rolling terrain. The last third of a mile up to the observation tower is steeper, but very manageable.
Trail Conditions – 3. The trail is well-maintained, but there are a lot of rocks, so you’ll need to watch where you step.
Views – 4. You can really see some nice views close to the top.
Waterfalls/streams – 0. This trail is dry as a bone.
Wildlife – 2. Seems like a great bird-watching area. We saw an Indigo Bunting, Goldfinch, Wood Thrush, and Eastern Towhee. Also spotted a box turtle and Eastern fence lizard. We saw a bear when we hiked it in spring 2017.
Ease to Navigate – 4. Other than the one tricky spot at the switchback, it would be nearly impossible to get lost.
Solitude – 2. This trail is well-loved by a lot of locals, but the bulk of area tourists stick to the trails in Shenandoah National Park. You may see a few groups of hikers along the way, but it’s rarely a crowded trail.
All Photos
Directions to trailhead: The parking lot is the Stephens Trailhead on VA675. Coordinates: 38.72795, -78.51536
Adam Says… We were so pleased to find this hidden gem of a hike in Virginia! This hike has some jaw-dropping views, an interesting “cave” to explore, and great camping with not a lot of elevation difference.
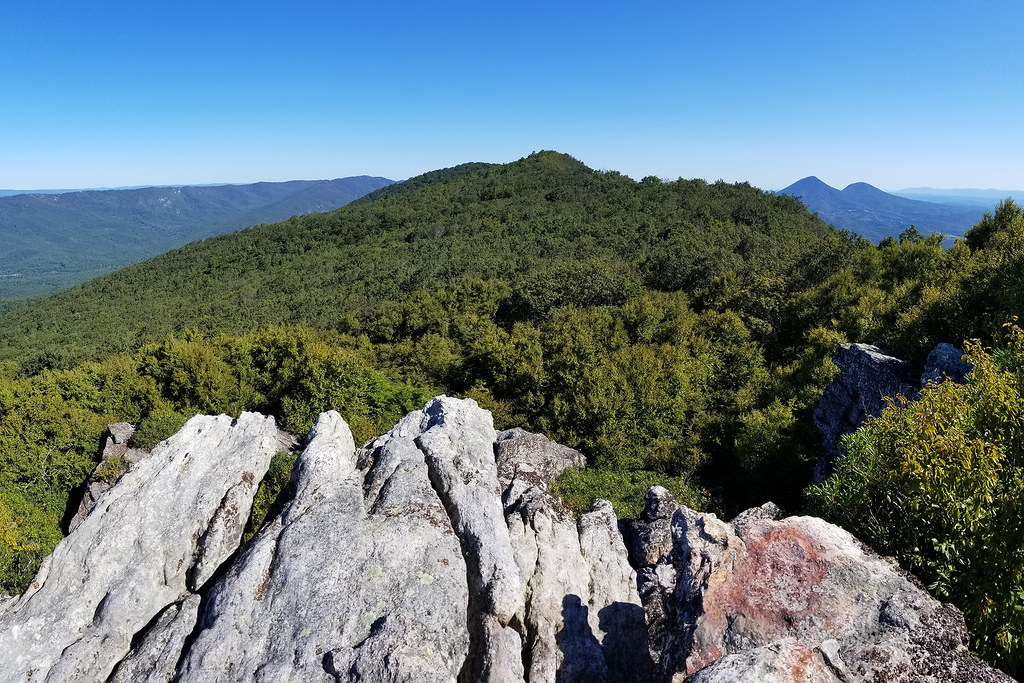
The parking area has space for about four cars to park. From the parking area, head down about 10 yards further down the road and you will see two trails on the opposite side of the road from where you park on the right. Both of these spur trails connect to each other, so it doesn’t matter which one you pick. Climb up the short spur and the trail goes off to the left. The trail starts off hiking on a ridgeline. From .2 miles to .4 miles, you will notice a few short spur trails to the left. Climbing up these short spur trails leads to some amazing views that shouldn’t be missed. We always enjoy views without many signs of civilization and you get that here as you can soak up views of Big and Little House Mountains. I imagine that a lot of people could come to this trail to get such an amazing view with so little effort – great place for a sunrise view! We soaked in the view for a short time but decided we would get better pictures when we weren’t looking into the sun, so we picked a favorite overlook to return to at the end of the hike to reward ourselves.
Taking in view from the first quarter mile of the hike.
Once the section of views is done, the trail moves into a more wooded area. At .5 miles, you see the only trail sign for the hike at a trail intersection with a small fire road (maybe used by bikes or hunters?) through the woods. Continue on the main trail. Pay attention to red blazes marking private property.
The trail from this point is mostly a flat walk through the woods with only some occasional rises or falls in elevation. The trail is not as well-blazed as many others, so we found it a bit difficult at times to make sure you were still on the trail. If you do this during the fall, this could be especially tricky if leaves have covered a lot of the trail. However, you are mostly walking on a ridgeline, so you likely won’t stray too far. There are a few stretches where we found the trail could use some maintenance since there were taller areas of knee-high brush that you were walking through. You do also get a few glimpses of obstructed views to the east.
A lot of the trail passed through flat areas with abundant ferns.
At 3.2 miles, you come to a great couple of campsites that have some open views to the east. While there isn’t a nearby water source, this would be a great campsite if you lug your own water in for an overnight trip.
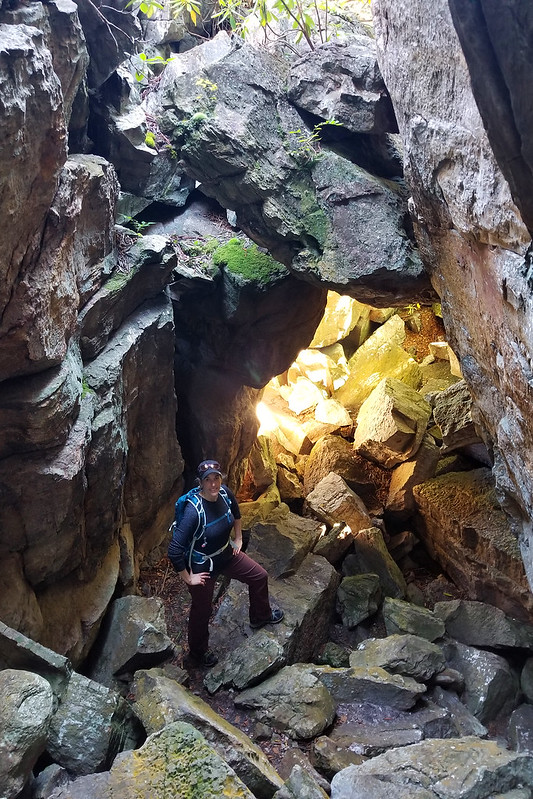
Continue on the trail past the campsite and at 3.4 miles you come to some stone steps that lead to the area known as Pete’s Cave. The rocks in this area remind me of rows of shark teeth that probably need to go to a dentist. This is an interesting area to explore, but please know your limits! This is a dangerous area with cracks and holes you could fall into or get an ankle stuck or hurt. We crawled through one area that had a cave-like feel to it, but there was a skylight that let some light in so you didn’t feel too claustrophobic. At the top of this “cave”, there was one area where I was able to scramble up to the top of a large boulder and got some incredible views to the west, but getting back down was a bit more sketchy. Again, be careful in this area if you choose to explore.
A nice (dry) campsite along the Pete’s Cave Trail
The trail climbs steeply up the other side which also leads to some nice views to the west. Go back the way you came to get back to your car and make sure to reward yourself with more of those views close to the finish line.
While Petes Cave is not a true cave, it’s still pretty fun to explore.
Christine Says… I really enjoyed this hike. The views were outstanding, there were very few people on the trail, and the “cave” at the end was fun to explore. There are several paths to the rocky outcroppings above the cave. Don’t miss checking those views out – they’re as nice as the views earlier in the hike. The trail continues beyond the caves, but apparently it’s just a walk in the woods – nothing noteworthy to see. It eventually descends back into the valley.
Trail Notes
Distance – 6.8 miles
Elevation Change – 1000 ft.
Difficulty – 2. There are rolling hills all along this hike, but generally it is easy terrain.
Trail Conditions – 3. The trail was overgrown in some parts, but overall easy to follow and walk.
Views – 4.5. Spectacular panoramic views of Big House and Little House Mountains to the east and just past Pete’s Cave, there are views to the west.
Streams/Waterfalls – 0. Non-existent and no water sources.
Wildlife –3. We saw some deer and a few birds from the overlook.
Ease to Navigate – 3. We didn’t have a lot of difficulty, but needed to mark it down some due to the lack of blazing and some of the trail was overgrown which made it a bit more difficult.
Solitude – 4. We did this trail early and didn’t see many people, but I would expect it would be busier on most weekends. The viewpoints generally have a few places to spread out and soak in the scenery.
Pamplin Historical Park, located in Petersburg, Va is a hike that demonstrates a pivotal piece of civil war history that takes you through battlefields that led to the folding of the Confederate troops.
If you’re interested in history, but still want to get some vigorous walking in, Pamplin Historical Park is a great place to visit.
Adam Says…
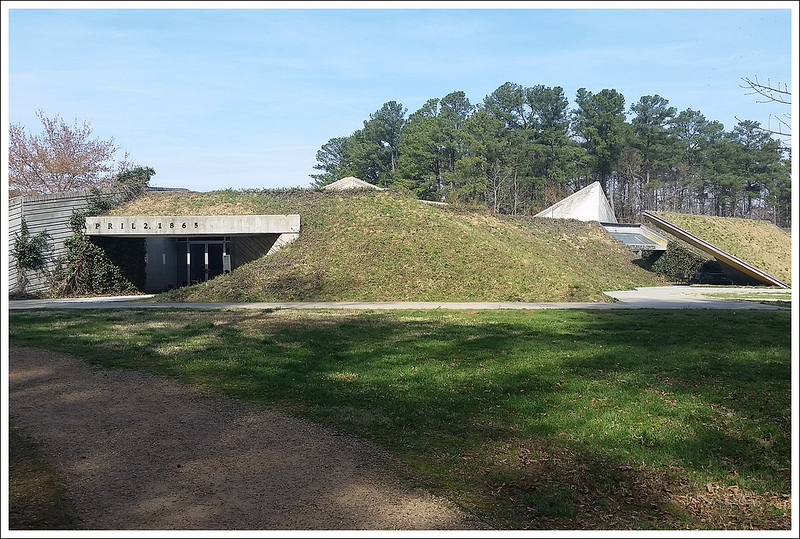
We are always looking for new and interesting places to hike in Virginia. We were contacted a couple of months ago by Diane Willard, Director of Administration, Marketing, & Membership Services for Pamplin Historical Park about visiting their park and telling others about the trails they had on their property. As I was visiting the area in late March, I was able to squeeze in a visit. Please note, there is an entrance fee -as of 2016 adults $12.50, seniors 62+ $11.50, and children (6-12) $7.50. The park is open seven days a week from Spring to Fall from 9AM-5PM daily, so plan accordingly.
The focus of the park is to bring visitors into the history of the Civil War from one dramatic date – April 2, 1865. On this day, the Sixth Corps Union troops under General Horatio Wright broke through the Confederate line at Petersburg. The Confederate forces were working on maintaining a line of defense that stretched for 40 miles from north of Richmond, the Confederate capital, to southwest of Petersburg. A rough winter and desertion had dwindled General Lee’s troops to 60,000 while Grant’s troops were double that size. The day before, General Grant had cut through the Confederate supply lines and killed about 5,000 troops at Five Forks. This line on April 2nd tried to hold off the Union troops, but in the early morning Union forces got to the Confederate trenches but nearly 4,000 Union troops were killed. The battle raged on throughout the day, but by the end of the day, the Confederate troops decided to retreat and abandon the line. Petersburg and Richmond were evacuated and a mere week later, General Lee surrendered to General Grant at the Appomattox Court House.
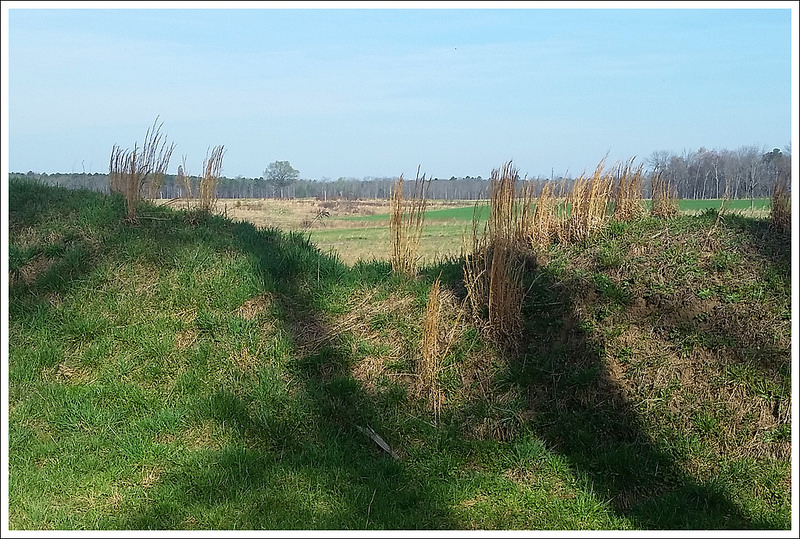
Civil War Trench from the Fortification Exhibit; Below: National Museum of the Civil War Soldier, views of the battlefield, trail views go from woods to open fields
There are several miles of hiking trails through this park and it also connects to the Petersburg Battlefields Trail if you want a longer hike. I would recommend printing this map of the area, so you can get an idea of the landscape to start the hike. The main entrance is known as The National Museum of the Civil War Soldier. Leaving the building through the side entrance, you walk past a demonstration and then pass by the Tudor Hall plantation on the right. Continuing ahead, you walk past a Fortification Exhibit which gives you a closeup view of a trench and the defense systems around them. You then pass the Battlefield Center on the left and and begin the real hike on the Breakthrough Trail. The Breakthrough Trail has a Main Loop, Short Loop, and Intermediate Loop. Knowing I was going on a bit further, I started in .2 miles on the Main Loop. The main loop is mostly wooded as you go through an area known as Arthur’s Swamp. At .4 miles, you reach a junction where you can break off and take the Short Loop, but I continued on the Main Loop. At .85 miles, you come to a junction where you can continue on the Main Loop or begin the Headwaters Trail. I picked up a brochure at the junction and saw that The Headwaters Trail would actually connect as a large loop, so I decided to take the longer Headwaters Loop. Along the way, you get to see several Confederate rifle pits, small dugouts that formed strategic encampments. At 1.35 miles, you reach a short path that has a sign explaining an original logging bridge. From here you can break off the Headwaters Trail and make your way on to the Petersburg Battlefields Trail. The idea of checking out how these trails connected intrigued me, so I took this trail. From here, you are leaving the Pamplin Historical Park boundary. You go through some woods but then are left with great farmland views where you can imagine the feelings of the soldiers that were crossing this field. You can only begin to think about how many people lost their lives on that fateful day to stand up for their beliefs.
Battlefield Center. Below: historic placards along the trails, wooded walkways, school trips learning about trench warfare and getting into formations
Continuing on this trail allows you to get some open scenery, which is great for spotting birds in the fields. I walked on an open path and then at 1.65 miles, followed the sign pointing towards the parking lot. This trail continued to skirt around some open fields of farmland. At 2.4 miles, the trail takes a sharp turn to the left where you come across some large earthworks, serving as barriers protecting the Union line. I walked along these for a short distance and saw the trail continued further, but decided to make my way back. On my way back, at 3.25 miles, I came to the junction of the sign (one way leading to the parking lot, the other pointing to the Petersburg Battlefield Trail). Instead of taking a right, I decided to take a left to walk along the farmland and get more views, but I turned around after just .2 miles to get back to the trail I knew. From the junction sign follow the sign pointing to the Petersburg Battlefield Trail and at 3.6 miles, you finally rejoin the Headwaters Trail. At 4.0 miles, you reach a junction with the Woodlands Trail, which also leads back to the start, but I continued on the main Headwaters Trail. In a short distance, you begin to see the large Confederate Earthworks, forming that historic line the Confederates tried to maintain. The trail crosses over a break in the earthworks and then takes a sharp left turn to parallel the earthworks. At 4.4 miles, you reach another junction where you have an option on which side of the earthworks that you like to walk along the Intermediate Loop. At 4.5 miles, you reach a junction with the Woodlands Trail again and at 4.6 miles, you meet a junction with the Main Loop. Staying straight on the Intermediate Loop, it joins the Short Loop in a short distance. I took a right here and reached the Battlefield Center at 4.8 miles. I explored inside the Battlefield Center and then took in the Tudor Hall Plantation before returning to the main entrance at the National Museum of the Civil War Soldier.
If you are a civil war history buff, this would be a great place to hike and explore. I was thoroughly impressed with how much has been put into the care of the trails and the exhibits themselves. You could easily spend most of the day exploring the trails and grounds here. This would be a great hike to go as a family to learn about the history and if you have children, they may enjoy reading about the civil war on the placards along the way. I must say that I was pleasantly surprised at how great the trails were maintained here. I went in expecting that I could walk along some short, easy trails, but with adding the spur to the Petersburg Battlefield Trail, you can get a more serious hike into your day.
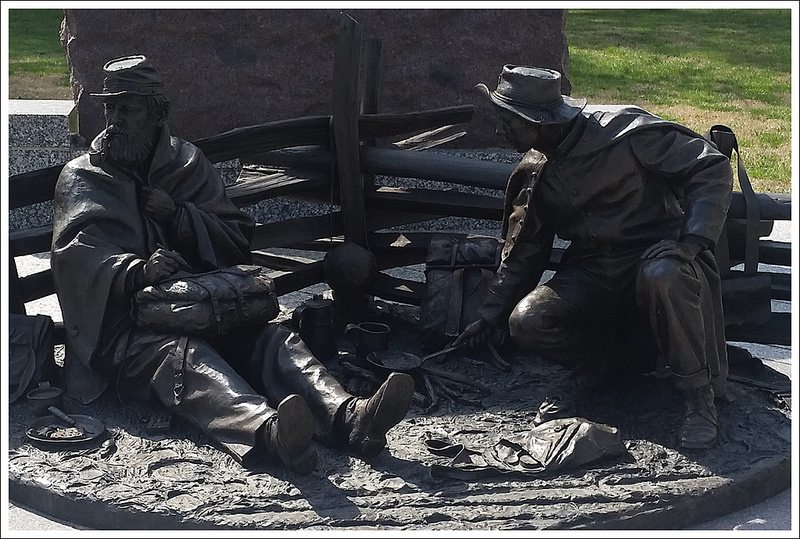
The Tudor Hall Plantation. Below: Open field views, statue at the entrance station.
Directions to trailhead: From Richmond, take I-95 south to I-85 south, to Exit 63-A (U.S. 1 south). Proceed one mile to Park entrance on the left. The Park is 30 minutes south of Richmond, VA. Coordinates: 37.182980, -77.480095
This year marks the 100th Anniversary of the National Park Service. Woodrow Wilson created the National Park Service on August 25, 1916.
We know a lot of you will want to take some trips out to some of our national parks, whether that is our local Shenandoah National Park or Blue Ridge Parkway, or visiting some other parks like Yellowstone, Yosemite, or the Grand Canyon.
We recently picked up a few books to review and thought these were all great resources in planning your next adventure.
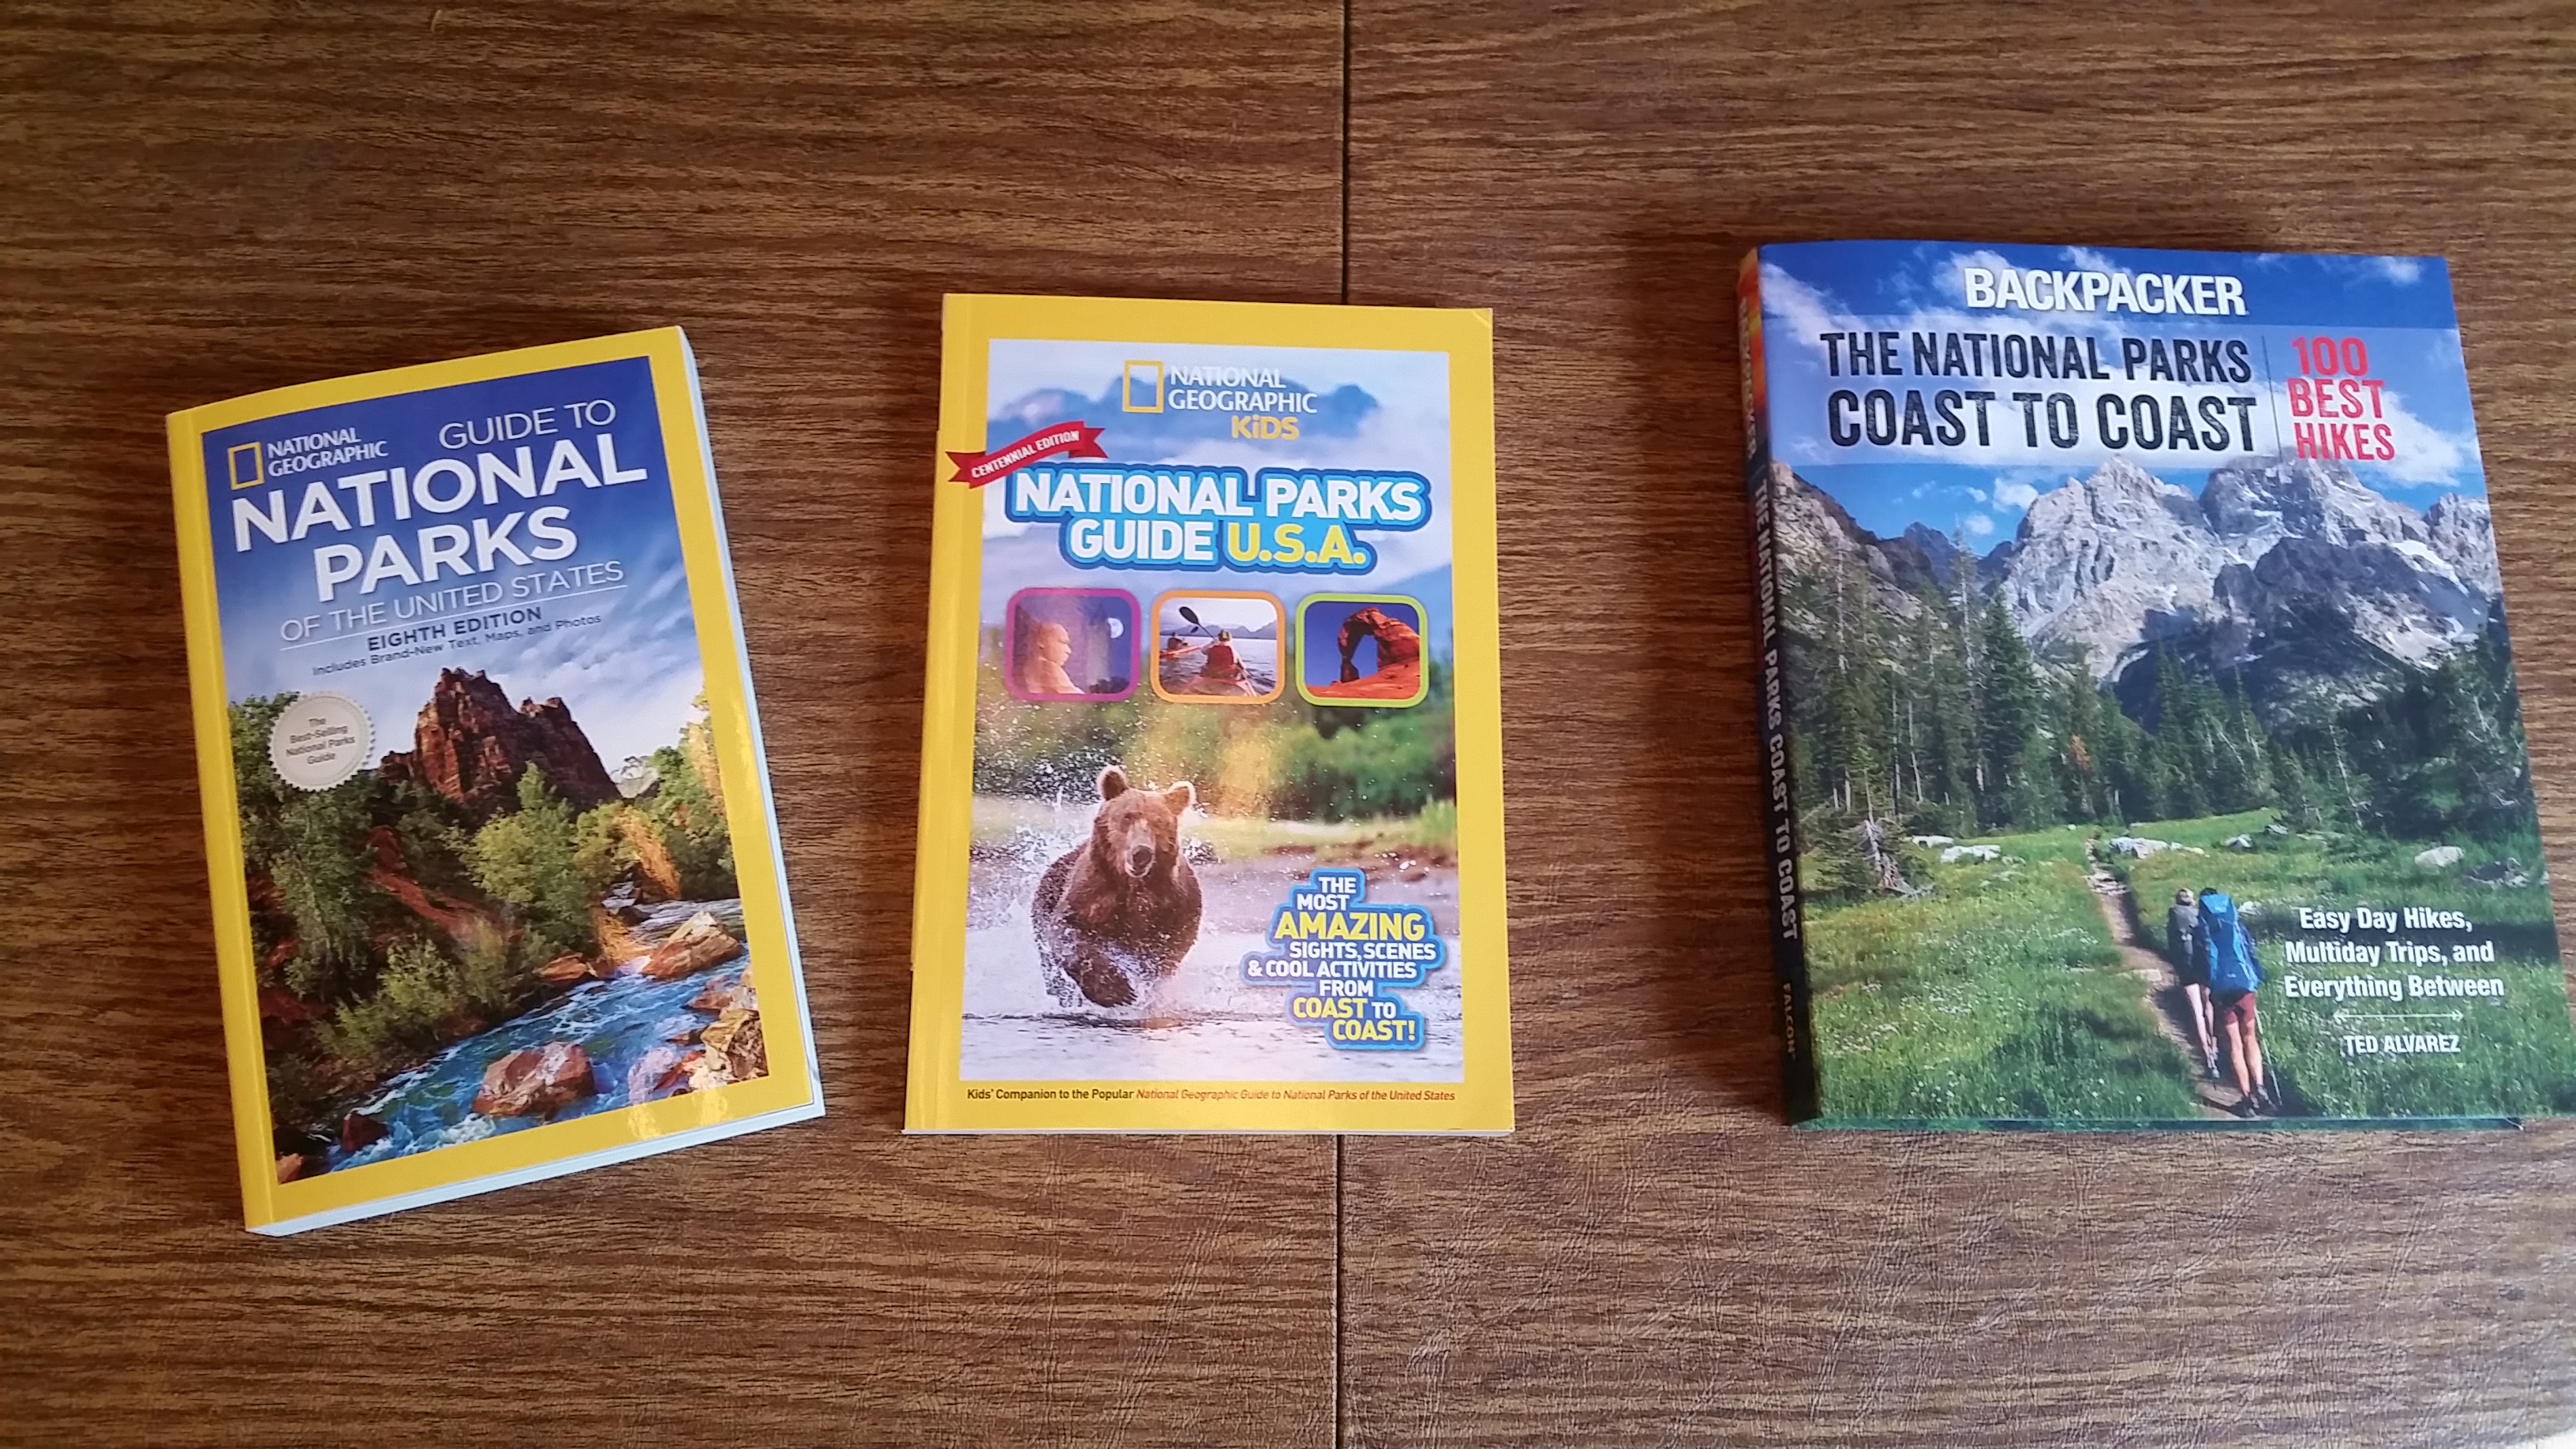
National Geographic Guide to National Parks of the United States: Eighth Edition
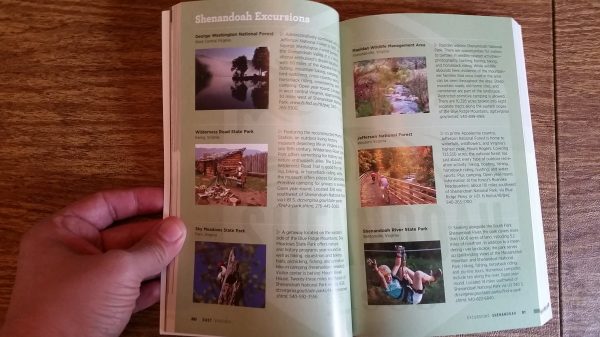
Excursions in the nearby area
This book is the ultimate companion to the national parks. The book is broken down into regions of the country (color-coded at the bottom) and alphabetized by park name within each region. Each park covered includes a map of the region and a brief history of the park. They also point out highlights of each park, camping and lodging available, and information on hikes you won’t want to miss. Many of the park write-ups also include information on other excursions within the area. They also feature for each park advice on how to visit the park – understanding how many days you should take explore the area and the best season can help you make some great decisions on how to make the most of your trip. Of the parks we have visited, I found their write-ups spot on and the photography is always magnificent. This book has a ton of information packed into its near-500 pages and after flipping through for a short while, you will want to plan many vacations to parks you haven’t seen yet (or plan another trip on all the things you may have missed.
While you are looking through the official National Geographic Guide, this book is a great companion guide for your kids. I would gauge this is more geared towards kids that fall within the late elementary school to early high school ages. The material is definitely more condensed, but does include a map of each park. For each write-up there is information on Ranger Tips, Take It Easy (for relaxing ideas), Be Extreme (for adventurous ideas from white-water rafting to caving to paragliding), Best View, and All About Animals. Each of the write-ups also include a checklist, so parents can help them work towards those goals to take in the most out of each park. And because both of these books are done by National Geographic, you know the photography will be amazing. This book would also be a great thing to buy for your kids to teach them about the National Park Service and all the features these parks provide.
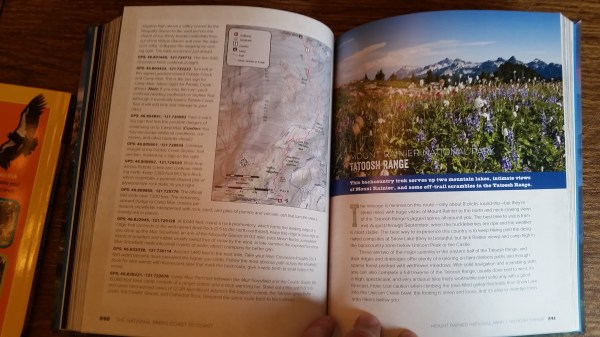
Backpacker The National Parks Coast to Coast: 100 Best Hikes
by Ted Alvarez
Left page: GPS waypoints for specific points on your hike; right page: overview of each hike
While the first two books give you a wonderful overview of each park, Backpacker put together this 385 page book that give you expert advice on specific hikes within each park. For most of the parks listed, there are 1-5 hikes selected. Most of the ones with more than one hike are larger, more popular destinations like Grand Canyon, Mount Rainier, Olympic, or Zion. Some of the hikes listed are simple day hikes, but the bulk are backpacking trips that can be just a simple overnight to a week-long adventure. Each of the hikes covered include a detailed map and GPS coordinates along the way, which should give you the precise information you need to start your hike. . Distance, time required, contact information, difficulty, and trailhead directions are listed at the beginning of each hike. This book has the ultimate thrill-seeker in mind and if you have a sense of adventure and wanting to get deep into the beauty of each park, they have provided some excellent advice. While I feel I won’t be able to do but a percentage of what is covered in this book, every one of these could be considered a bucket-list adventure. The photography is also amazing, with a big splash page for each park.
We also learned that National Geographic is celebrating the 100th anniversary of our National Parks Service by offering the chance to win a spectacular family vacation for four to Grand Canyon, Bryce, and Zion National Parks. Here are the details and a link to the enter which will be live on April 1st.
“This fabulous 8-day family adventure from National Geographic Expeditions is a dream trip come true. Discover the incredible geological treasures of the American Southwest and marvel at the rainbow colors of the high desert; explore the Grand Canyon’s North Rim on foot or mule; hike amid Zion’s wonderland of slot canyons, hanging gardens, and waterfalls, and splash through the Narrows of the Virgin River; wind through Bryce Canyon’s whimsical maze of red rock spires, and go on a scavenger hunt. Stay in historic park lodges with Old West atmosphere, and take part in activities and excursions geared for explorers of all ages. The National Geographic National Parks Sweepstakes runs from April 1-August 31, 2016. To enter or obtain full Official Rules go to: NationalParksSweeps.com.”
And if anyone wins this vacation, Christine and Adam would be glad to be adopted into your family for this adventure.
This 6.6 mile loop offers some of the area’s most amazing high-elevation, Appalachian bald scenery! It was right up there with Roan Mountain. The views are 360 degrees and showcase mountains in every direction. If we were to hike it again, we’d do it as an out-and-back and skip the return arm of the loop along Graveyard Ridge and Mountains to the Sea.
Hiking Black Balsam and Tennent reminded us of both the Whites (in New Hampshire) and Roan Mountain (in Tennessee). Such spectacular, wide-open views! Below: The most scenic parts of the hike followed the Art Loeb Trail; The Graveyard Ridge section was wet and had a stream crossing; The end of the hike took us across numerous boardwalks/bridges.
Adam Says…
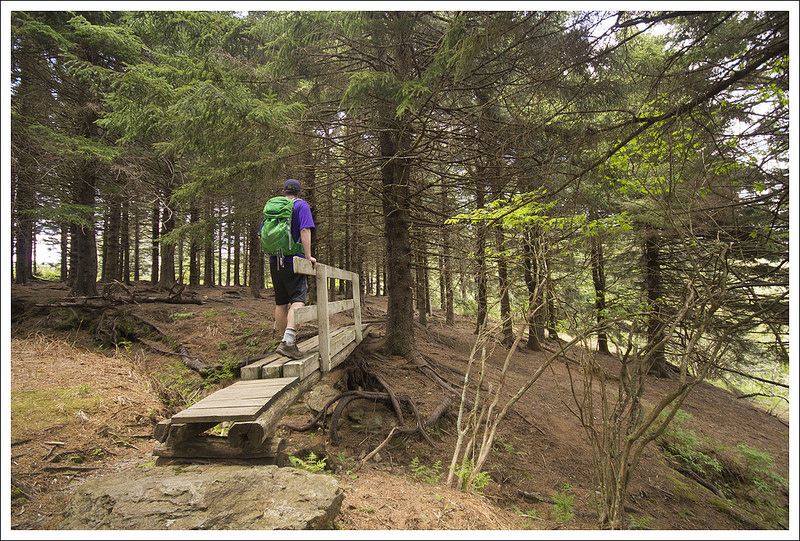
When we were planning our trip to the Smokies, we decided we wanted to spend the first few days near the Asheville, NC area and check out a few hikes along the Blue Ridge Parkway. We had set out in the morning to check out the Graveyard Fields waterfalls. On a trip here many years ago, we remembered how beautiful the series of waterfalls were. We brought a book with a description of the hike that would include a visit to Black Balsam and Tennent Knob on the loop. However, we didn’t have a map of the area other than what our book had provided. After driving along the parkway for some time, we pulled up to where the parking lot would be (mile marker 418.8) and it was all blocked off by fencing. It appears they are doing some major renovations of the parking area and stairs down to the Second Falls. They had blocked off any access to the trail and instead had signs saying that you could access the trail from many miles away. We were very disappointed, but decided to drive up further along the Parkway. We took a right on the gravel road 816 (mile marker 420.2) and followed that until we saw a trail marker to the right that led up to Black Balsam Knob. We were relieved we were going to be able to see the balds and I realized we were picking up our loop trail but just a little differently than we had originally intended.
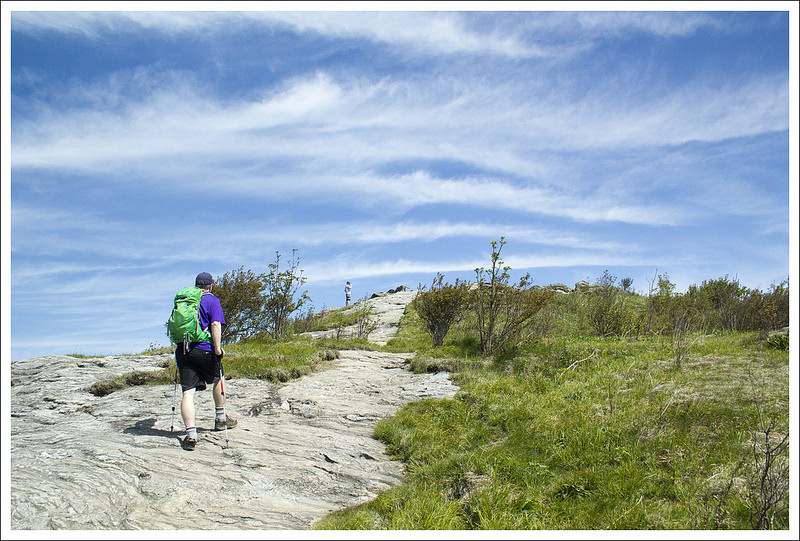
From the road, you start on the Art Loeb trail. In a few hundred feet, you will see a side trail to the right. This is the Mountains to Sea Trail that will be your return from the loop. Stay straight to continue on the Art Loeb Trail as it ascends past amazing vistas. You will reach the summit of the Black Balsam Knob at .9 miles and will see many campsites at the top. On a clear day from here you will have 360-degree views all around with the Smokies to the west and Mt. Mitchell to the north. The trail took a sharp left at this point as you continue on the Art Loeb trail. On Black Balsam Knob, there are many other trails cut-in over the years along the balds which makes it tricky to know if you are on the right trail. As we left the summit area, we came to a junction between two trails that both looked legitimate. One seemed to go over a hillside and the other went to the left and around. We took the one to the left and saw a very worn sign that read “Art Loeb” so we knew we made the correct choice. The trail wrapped around the hillside and went through a narrow path with waist-high shrubbery growing along the trail. Our legs got a little scratched along the way, but we pressed on. After a while the trail went through a few switchbacks while descending and then flattened out. At this point, we could see Tennent Mountain ahead of us, so we felt comfortable that we were going the right way. Soon, the shrubbery opened up into a clearing and we climbed up the rocky path and reached the summit of Tennent Mountain at 2.5 miles.
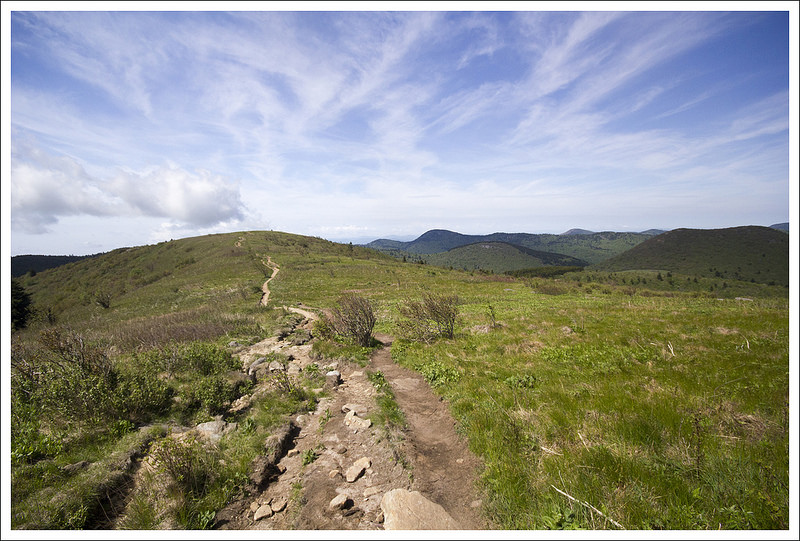
Hiking across open, grassy balds at 6,000 ft. is such a treat! Below: The trail looks like a ribbon across the mountain tops; Lots of colorful tents on Black Balsam Knob; You can see a glimpse of the parking lot at the trailhead.
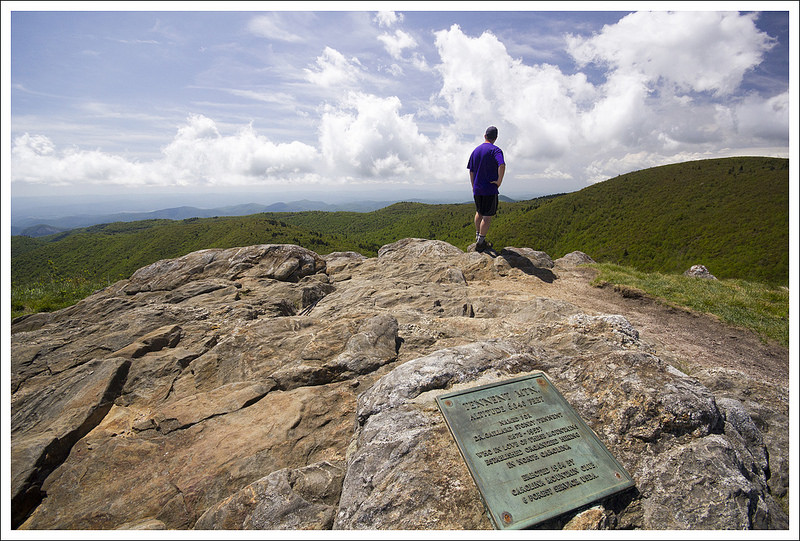
The summit of Tennent Mountain was just as scenic with more views in every direction. From here we could also see Looking Glass Rock, one of the most iconic images along the Blue Ridge Parkway, in the distance. We had our lunch on the top of this spot and then made the decision to do the full loop instead of just the out-and-back to the summits. We continued forward on the Art Loeb Trail. From here, there were a few more nice views but then the trail descended into a more wooded trail. The trail passed a few more campsite options before we reached the area known as Ivestor Gap at 3.1 miles. Ivestor Gap is a large open junction point where many trails converge. There was a map that showed where we were, but none of the trails were marked to let us know which was the right one to take. When you reach Ivestor Gap, take the larger trail to the right that looks like an old road. This was the Graveyard Ridge Trail. We were on this for only .3 miles, before passing a small spring in the rocks on the lefthand side of the trail, and took a sharp right to stay on to the Graveyard Ridge Trail, another unmarked junction [staying straight on the trail would begin the Greasy Cove Trail]. The Graveyard Ridge Trail was very rocky and had a lot of water on the trail, so there was some times of rock-hopping and getting your shoes wet. While on this trail, you may have a few glimpses at Tennent Mountain above to see where you came from and there are a couple of spots for viewpoints.
At 5.1 miles, we reached another junction. Deciding to forego the trip to see the waterfalls to Graveyard Fields (which would have probably added another 4.5 miles roundtrip to our hike), we took a sharp right up the Mountains to Sea Trail. This trail was extremely steep and at times felt like a bushwhack as the trail was very overgrown. In about .5 miles, you’ll gain over 500 feet of elevation, so it is a slow effort. Eventually at 5.75 miles, the trail reached the top of the bubble and you got a few more views from a rocky outcropping. Blazes were painted on the rock that led the way as the trail descends below. The trail moves away from the ridgeline before switching back – it feels like the wrong direction, but it’s not. The trail descends for a few hundred feet before climbing up again. You’ll pass over several wooden footbridges along this section of the trail. At about the 6.5 mile mark, the trail goes into a deep wooded area again and you reach the junction again with the Art Loeb Trail. Turn left and you head back to 816 in a short distance.
Spectacular views with every step! Below: In the saddles between the high points, the trail was narrow and lined by dense shrubs; Adam stands atop Tennent Mountain; Summit of Tennent Mountain.
At the top of Tennent Mountain, there is a plaque on the rocks dedicated to Gaillard Stoney Tennent (1872-1953) who “established organized hiking in North Carolina.” I couldn’t find any more connections or information about Tennent online, but this sounds quite impressive.
If you are interested in Geocaching, there are several you could find along the trail (and it wouldn’t hurt to have a GPS handy):
While we tried to cover some extra ground on this trail by making it a loop (and leaving the option to inspect the waterfalls), I would recommend doing this trip as an out-and-back to Tennent Mountain. The trail system is very confusing here since trails are rarely marked and junctions are not labeled (we’re a little spoiled here in Virginia). We had to ask several people along the way if we were going in the right direction, so I can imagine a lot of people will feel lost at some point along this trail. All that being said, the views from Black Balsam Knob and Tennent Mountain are breathtaking. On a clear day, you can see for hundreds of miles and can see ridgeline after ridgeline of mountains around you with few glimpses of anything resembling civilization. Don’t miss this one if you are looking for a hike along the Blue Ridge Parkway!
Christine Says…
Our first full day in Asheville, we got up early and had an amazing breakfast at Biscuit Head. Seriously – if you’re in Asheville, go eat those biscuits! We had planned a 5.2 mile hike starting near Graveyard Fields on the Blue Ridge Parkway. We drove the hour from Asheville to the trailhead to find the area completely closed off with an 8-foot tall chain link fence and orange plastic mesh. Even the wooden stairs leading to the entire larger trail system were blocked off. So, we grabbed our Falcon Guide for Hiking the Blue Ridge Parkway and started scrambling for alternatives. We settled on a different hike that would still let us see Black Balsam Knob, and give us the option to visit the waterfalls (if we had energy to spare).
Who wouldn’t want to spend all day enjoying views like these! Below: Views from the ridge after crossing the summit of Tennent Mountain; Adam approaching Ivestor Gap; Shining Rock Wilderness sign at Ivestor Gap.
The Falcon Guide offered vague (at best) descriptions of the hikes along the parkway, so we weren’t really sure how long the hike would be, what kind of elevation change we’d experience, what the terrain would be like or even the names of all the trails we would traverse. We had a rough map of the area in the book, so we could make some educated guesses, but we definitely went into this hike with a lot less information than we normally do.
We found the trailhead parking area packed – the lot was full and cars lined both sides of the rough, potholed road. We started off on a white blazed trail that climbed gently to sweeping views from bald Black Balsam Knob. The first great views are less than a mile of relatively easy hiking from the trailhead, so we saw tons of people. There were at least 3-4 tents sent up atop the bald. It was gorgeous – but it was a zoo!
From there, the trail got a little confusing. There are so many social paths to campsites worn into the mountain. We had a hard time knowing for sure that we were still on the white-blazed Art Loeb trail. There weren’t any blazes to be seen, and the only sign was so weathered that it looked like a blank piece of wood on a post. We stood pondering our book/map for a few minutes, when a foursome passed and confirmed that they had hiked this area many times and we were indeed on the correct trail. A little later, we passed an actual Art Loeb trail sign.
Adam hikes in the stream that was the footbed on the Graveyard Ridge Trail. Below: Adam at the junction of the Graveyard Ridge and Mountains to Sea trails; Painted trillium; The early part of the Mountains to Sea trail was essentially a bushwhack.
The trail descended through thick, dense scrub – lots of berry bushes and rhododendron. Eventually the trail opened back up and we began another ascent to the summit of 6,000 ft.+ Tennent Knob. This outlook was even more spectacular than Black Balsam. We could see for miles in every direction. We stopped at this point and had lunch on the trail. I had packed an apple, a Kind bar and some cookies from a bakery in the top of my pack. The strong sunshine had warmed the cookies to the point that they tasted like they had just come out of the oven. So good!
After the summit of Tennent Knob, we descended again before reaching Ivestor Gap. At the Gap, there was a troop of Boy Scouts at the information station. We consulted our map again before heading down another unmarked trail that we believed to be correct.
The trail at this point became wet and streamlike. We came across another hiker and his backpacking beagle! The beagle was really sweet and apparently a good hiker – able to do 12 mile days! The man was filling up his water bottles at a spring along the trail. Right after the spring, the there was a trail junction. We took the sharp hairpin turn onto the unmarked Graveyard Ridge Trail. It was a mostly flat, but very sloppy trail. It was wet and muddy for most of the way.
The Mountains to Sea trail eventually became less of a bushwhack, but it was still tricky to follow in places. Below: Near the end of our hike, storm clouds filled the sky over the high peaks; One of the trickier spots along the Mountains to Sea trail – the blazes were not readily visible and the trail went the opposite way it seemed it should; Pretty wildflowers along the trail.
We eventually reached one of the only marked junctions on the hike, with a sign pointing toward the waterfalls and parkway one way and the Black Balsam Parking area the other way. This is where we picked up the Mountains to the Sea trail. This trail was also white blazed. The trail was more of a bushwack than anything for a while. It was very narrow and overgrown and headed steeply uphill. We soon came to a rocky ledge with more nice views… and no sign of the trail continuing. Again… we got the book out and were getting ready to make another guess. The trail we needed to follow seemed to go in completely the wrong direction. Adam looked at me and said ‘I’m just not confident this is the right trail!’ Fortunately, a couple hikers came up behind us. They told us they were following the same loop we were, had done it before and had gotten lost before! However, this time they were confident and able to point us in the right direction. The trail that looked totally wrong turned out to be exactly correct!
From the ledge, we descended into dark woods, traversed numerous wooden footbridges across swampy areas and made one final ascent back to the parking area along the road. All in all, we hiked 6.6 miles. It was a great hike with spectacular scenery from Black Balsam and Tennent. If I were to recommend the hike to others, I’d also suggest doing it as an out-and-back to see just the two bald summits. The loop option was poorly marked and didn’t offer much in way of scenery.
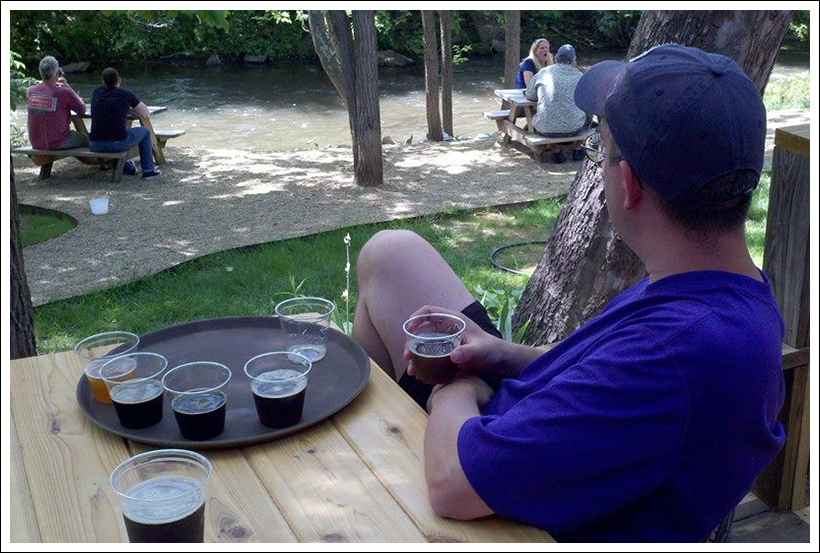
The last section of the hike had lots of planks, bridges and boardwalks that crossed swampy areas. Below: After the hike, we drove back to Asheville via Waynesville and stopped at Frog Level Brewery – nice stream-side setting and good beer!
After our hike, we decided to drive back to Asheville through Waynesville. We heard it was a cute town and that Frog Level Brewing was worth a visit. We were able to easily find the Brewery, and ended up enjoying samples at a nice picnic table by the river. Nice finish to the day!
Difficulty – 3. The real difficulty is the Mountains-to-Sea Trail as it goes brutally up the mountain in some points.
Trail Conditions – 2. The trail up to Black Balsam was the best maintained. The Art Loeb Trail around Black Balsam to Tennent Mountain was very brushy and overgrown. The Graveyard Ridge Trail had a ton of water on the trail and The Mountains-to-Sea Trail was also very overgrown.
Views – 5. Amazing views from Black Balsam and Tennent Knob.
Streams/Waterfalls – 1. Just a couple of small crossings through some water on the trail, but nothing scenic.
Wildlife – 1. We didn’t see anything other than a few birds on this trail.
Ease to Navigate – 1. You may often feel unsure if you are going the right way. Trails are not blazed well and junctions are not marked. The connection to the Graveyard Ridge trail is not marked. There are also lots of other trails that have been cut through by hikers, but they aren’t labeled, especially near the top of Black Balsam Knob on the Art Loeb trail.
Solitude – 2. On a nice day like we had, there were lots of others on the trail.
Directions to trailhead: At Mile Marker 420.3 on the Blue Ridge Parkway, turn onto 816. Stay on that road for about 1 mile. Park on the side of the road and you’ll see the trailhead on the right side of the road.
This easy 4.5 mile out-and-back along the Appalachian Trail offers great views in many places! It would be a perfect family hike or a leg-stretcher for folks riding along Skyline Drive.
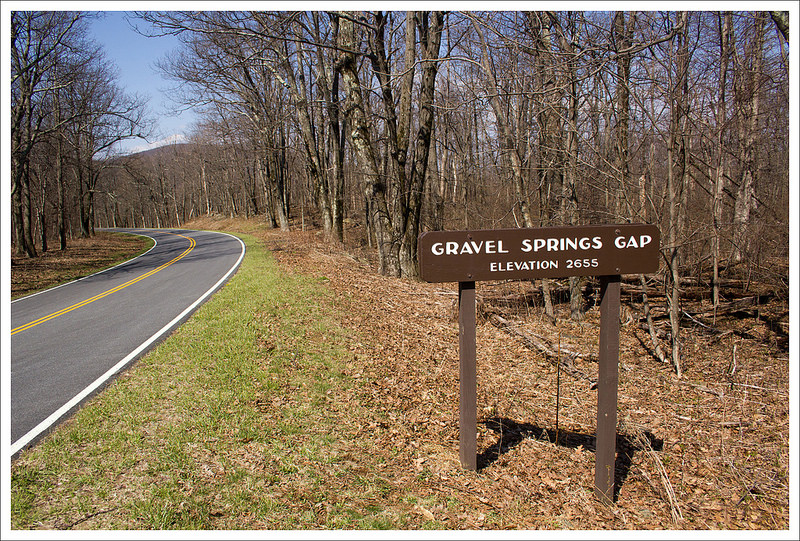
Adam takes in the view from North Marshall. Below: This hike starts from Gravel Springs Gap; Christine on the AT; Adam approaching South Marshall’s summit.
Adam Says…
This is one of those hikes where you get a lot of payoff for minimal effort. There are some great views from both South Marshall and North Marshall along the way, making this an excellent family hike. Technically, both peaks are part of the larger Mount Marshall, though they feel like two distinct mountains. We had covered the Marshalls on a longer section hike along the Appalachian Trail, but we felt this would be a great out-and-back that most people could do.
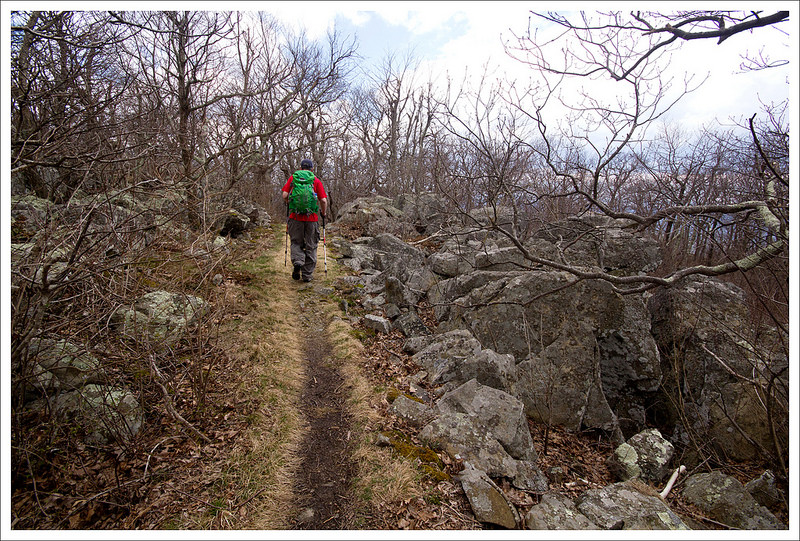
We started our hike from the Gravel Springs Gap parking lot. We crossed the road and picked up the white-blazed Appalachian Trail heading north. The trail goes through a wooded area and has a gradual ascent. After .9 miles, you reach your first grand set of views on your climb up South Marshall. Continuing a little further, there are a couple of other viewpoints along the ridge. At 1.1 miles, you reach the highest point of the trail over South Marshall and begin your descent. At 1.6 miles, you cross Skyline Drive to continue on the Appalachian Trail and begin your ascent up North Marshall.
These views from South Marshall are the first on the trail. Below: Great view from South Marshall; Christine enjoys the rocky summit; There is another viewpoint along South Marshall’s ridge.
The trail up North Marshall is a steeper section than what you experienced at South Marshall. Around 1.7 miles, you reach a very steep, rocky section, resembling a stony staircase up the side of a hill. At the top of this staircase, you see a large, monolithic rock. On our climb towards this rock, we heard a loud crow that was cawing at us madly. The toughest part of the climb was now over. I noticed a small, unmarked path around this monolithic rock and decided to explore. I was pleased to find a few rock outcroppings on this path that led to more spectacular views and you can even see Skyline Drive snake through the mountains. The crow continued to announce his displeasure and I’m guessing there was a nest we were nearing. As I made my way around one of the rock outcroppings, I stuck my hand in a big pile of bird droppings – I’m guessing the crow got his last laugh. After cleaning up, we rejoined the trail. Around 2.2 miles, we reached the last set of views from North Marshall. We continued just a little further to reach the summit, marked only by a small metal survey marking post in the ground, to bag a second peak on the trail. We made our return trip from this point, reaching our car at 4.5 miles.
After crossing Skyline Drive, the climb of North Marshall begins.
The North and South Marshall Mountains were once known as Bluff Mountain, but were renamed in honor of John Marshall, who served as the fourth Chief Justice of the United States, serving for 35 years (the longest-serving justice in our history). He was appointed by President John Adams and previously served as Secretary of State and leader of the Federalist Party.
Christine Says…
We’ve been spending a lot more time hiking than writing lately! That’s a great thing (for us), but it’s leaving us quite a backlog of posts to pull together. This hike of The Marshalls is a route I wanted to cover for families and other people looking for shorter/easier hikes. I feel like most of the moderate hikes in Shenandoah are already heavily traveled and well-known. The Marshalls offer spectacular views, but I doubt many casual hikers even know they’re there!
We had great weather at the beginning of our hike. It was sunny and breezy – perfect for hiking. It was still early enough in the season that trees in the mountains were bare and only a few wildflowers were starting to bloom. Whenever we came to open vistas, we could see the vivid green color of spring trees starting to creep up the mountainsides from the lower elevations in the valley. It was beautiful!
More great views are to be found along an unmarked path that departs the Appalachian Trail. Below: The views from the unmarked path were fantastic; Adam making his way down from his perch.
When we hiked this area last time – on a backpacking tip in 2012, we skipped climbing the unmarked trail to the cliff-sides on North Marshall. I’m glad we stopped on this trip, because the rocks were fun to climb and provided some especially nice off-trail views.
After the cliff views, we reached the trailside view from North Marshall pretty quickly. I couldn’t remember if there were any additional views along the ridge, so we walked along a couple more tenths of a mile until we found the survey marker. After the survey marker, the trail descends into the deeper woods.
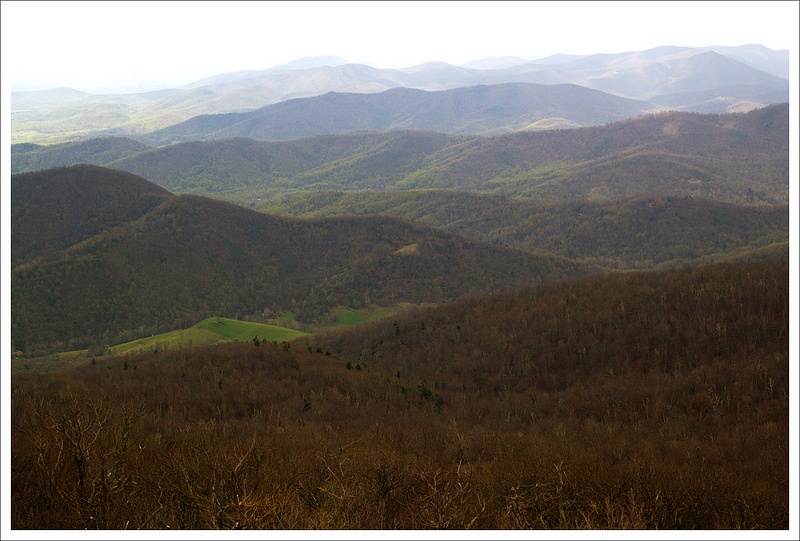
The view from North Marshall with the approaching front. Below: Walking the North Marshall ridge; South Marshall’s view was a lot different when we passed by on the return leg of our trip!
On our return hike, the weather shifted quickly. What had been a pleasant, sunny day quickly turned cloudy and windy as a front approached. We could see shadowy columns of rain off in the distance and the clouds looked dark and angry. We hiked faster than usual back to the car. We made it back to the car before any rain fell.
We decided to drive home through Luray so we could grab something quick for lunch. In this case – fried chicken! It’s not something I eat very often, but I always feel that hiking earns me an occasional indulgence. 🙂
Trail Notes
Distance – 4.5 miles (Check out the stats from Map My Hike)*
Elevation Change – About 900 ft.
Difficulty – 2. There is only one steeper section on the North Marshall Mountain, but it a short stretch.
Trail Conditions – 4. The trail was in excellent shape.
Views – 5. There are so many spots to get views on this hike.
Streams/Waterfalls – 0. Non-existent.
Wildlife – 2. You may see deer on this hike and a few soaring birds.
Ease to Navigate – 4. Just follow the white-blazed AT. Be careful and keep your bearings if you venture off the trail to get the views near the monolithic rock climbing up North Marshall.
Solitude – 3. Since this trail is in the northern section, expect to see more people that are visiting from Northern Virginia/DC. You should expect to see others near some of the view outcroppings.
Directions to trailhead: In the northern district of Shenandoah National Park. Park at Mile Marker 17.6 at the Gravel Springs Gap parking lot. Cross Skyline Drive to pick up the Appalachian Trail, heading north-bound.
* MapMyHike is not necessarily accurate, as the GPS signal fades in and out – but it still provides some fun and interesting information.
The full Rocky Mount lariat is known as one of the Shenandoah’s most punishing hikes, but if you do it as an out-and-back (like us!), you get a moderate 6.8 mile hike with great views and a lot of solitude! Our route eliminates the less scenic Gap Run Trail on the back side of the mountain.
Adam takes in the view from the summit of Rocky Mount. Below: A view of Rocky Mount from the parking area on Skyline Drive; Wild violets along the trail; Adam walks through the mountain laurel.
Adam Says…
We’ve covered most of Shenandoah National Park already – there aren’t many trails we haven’t written about! But, Christine did some research and found a hike we hadn’t done yet. We entered the park at Swift Run Gap. We needed to buy a new annual pass, since ours had expired. The park ranger asked where we were going and we said, “Rocky Mount”. She looked at us with a disapproving pause and questioned why we would want to do that one. Christine told her we had covered most of the rest of the Park and the ranger just handed back our pass with a shake of her head. After leaving the fee station, we began to wonder how tough this hike really was. We had heard it was one of the toughest in the park due to the elevation gain split over several tough climbs. Most of the reviews we read were based on the Rocky Mount-Gap Run lariat loop which incorporates the Gap Run Trail. The back side of the mountain, which uses the Gap Run Trail, is repeatedly described as very steep and lacking in any noteworthy scenery. So, we decided to do this one as an out-and-back hike that hit the big view payoffs.
The weather was quite warm based on what we had grown accustomed to during the cold winter. The temperature was already in the 60s and it was barely 9:00 a.m. We parked at the Twomile Run Overlook and then walked north for a short distance. After the barrier wall ended on the western side of the road, we saw the concrete post on the left which marked the beginning of the blue-blazed Rocky Mount trail. The trail begins with mostly descending through the woods. You drop down about 700 feet (some level sections, some steep sections) until you reach the junction with the Gap Run Trail at 2.2 miles. We stayed straight at this point and began a steeper ascent. The trail climbs along a path that wraps around Rocky Mount, leading to a few (mostly obstructed) views along the way. At 3.4 miles, the climb ends near the summit and you can see a short side path to the left leading to a rock outcropping. Here is where the best views on the mountain can be seen.
Adam takes in a view of Rocky Mount through the trees.
We paused for a while to take some photos and eat some lunch. However, there were biting bugs that were trying to eat me alive. It took away from the experience! After swatting and flailing like a man possessed, I covered my body in DEET. Those insects were probably drooling over their first available human meal after months of starvation. For some reason, they preferred me over Christine, who got quite a chuckle over my melodramatic gesticulations. One thing that I don’t like about hot weather hiking are the insects. Hopefully this isn’t a sign of what’s to come for the rest of the warm season. We headed back the way we came, arriving back at the junction with the Gap Run Trail at 4.7 miles. The trail then starts a rather long climb back up. We finished the climb and got back to the trailhead to make the out-and-back trip 6.6 miles.
Christine Says…
An out-and-back route was the perfect way to tackle Rocky Mount – we enjoyed all of the views and suffered none of the slogging! Certainly, there are some folks who like tough climbing and don’t need spectacular scenery to have an excellent day on the trail. I’m not one of those people! If I’m going to have a great time a tough hike – there must be views or waterfalls or a near 100% guarantee of seeing wildlife. Don’t get me wrong, I love the cardio challenge. It’s just not enough to make me endorse a hike as a must-do hike.
The trail gets rockier near the summit. Below: Trail junction with Gap Run; Views from the trail – sometimes we had nice views, sometimes they were tree obstructed; The summit of Rocky Mount.
The day we hiked Rocky Mount was unseasonably warm. I loved being back in shorts and a tank top again! My mom always tells me that I should wear long sleeves and long pants to avoid ticks, but honestly the only ticks I’ve ever found attached to me have been on days that I DID wear full-coverage clothing and repellent. I think it’s just easier to spot ticks moving on bare skin and flick them off before they attach. I’ve also had good luck with using a combination of DEET and treating my clothing with permethrin. Ticks are such a huge problem in our part of Virginia, and the recent increase in cases of Lyme disease is shocking and scary. The threat isn’t enough to keep me off the trail, but I am definitely vigilant about preventative measures and doing thorough tick checks. Typically, if you remove a tick within a few hours of it attaching, there isn’t time for Lyme disease to transmit into your blood stream. OK… end of my public service announcement!
Adam did a thorough job describing the terrain and distances. I’ll just add that I found the ascents at both the middle and end of the hike to be fairly moderate. They were probably a little tougher that day since we weren’t accustomed to the warmer weather yet. It was in the low 80’s by the end of the hike. The trail also had quite a bit of direct sun exposure. The route will be shadier as the park gets leafier, but right now there is still a lot of light coming through the canopy. I got a little bit of sunburn on my shoulders, but I was glad that the bare trees gave us views that we wouldn’t have been able to enjoy later in the season.
Christine enjoys views through the trees on the walk back. Below: Adam takes in views; More views; pine needle covered trail.
We ate lunch on the rocky outcropping near the summit of Rocky Mount. For whatever reason, the biting flies just weren’t bothering me. Poor Adam – he’s not exaggerating when he describes his flailing. He was pretty close to having a full insect-driven meltdown! After lunch, we returned the same way we came and headed back to our car.
Over the course of the hike, we didn’t see a single other hiker! When we got back to the parking area, there was one guy who had just come off the trail, but he had done the loop in the opposite direction and our paths never crossed. Rocky Mount is definitely one of the less-traveled trails in the park, but I think it is definitely worth doing. I thought the views were well worth the climbs! Ambitious hikers might enjoy the extra challenge of the mountain’s backside, but for me the 6.6 mile out-and-back was just right!
Trail Notes
Distance – 6.8 miles
Elevation Change – 1,937 ft.
Difficulty – 4. The hike to the summit wasn’t too tough, but the return trip has a long, slogging uphill climb.
Trail Conditions – The trail was well-maintained with only one blowdown on the entire trail. The path was very clear and only covered by leaves in a few places.
Views –4. Great 180-degree views for miles from the rock outcropping.
Streams/Waterfalls – 0. Nothing to report.
Wildlife – 1. We didn’t see any wildlife on the trail, but we saw a ton of signs of either bobcat or coyote droppings on the trail. Pressing forward from the summit, we did startle a hawk resting on a log.
Ease to Navigate – 4. As soon as you follow the trailhead, you just head straight on the Rocky Mount Trail. The side path for the views at the rock outcropping isn’t marked, so it could be possible to just walk right past it.
Solitude – 4. We didn’t see anyone else on the trail, but at the trailhead we did run into a solo hiker that had finished the entire loop.
Directions to trailhead: In the Southern Section of Shenandoah National Park, park at the Twomile Run Overlook at MM 76.2. Head north a short distance. When you reach the end of the retaining wall, you’ll see the concrete post marking the trailhead (around MM 76.4) on the left (western) side of the road.
This 6-mile hike is a bit challenging – tough climbing and a little hard to follow – but payoffs at the end make the effort well worth your while. The views are spectacular – some of the best in the mid-Atlantic!
Amazing views from Chimney Top! Below: Adam checks out the trail information board; The spine of the mountain offers many magnificent views, if you’re willing to do a little climbing.
Adam Says…
Our first experience hiking on North Fork Mountain was on my birthday in 2012 (birthday hikes are a tradition for us!) We decided tackle a little piece of the the trail from the base of the mountain to the well-known outcropping of Chimney Top. This August day ended up being one of the hottest days of the year. While hiking up the backside of this mountain, there was absolutely no breeze so the air was stifling. We were quickly questioning why we chose this one, but we had to press on for tradition’s sake. We reached the ridgeline and walked along for a while. We eventually came across a few rocks that seemed to denote a path up. We semi-bushwhacked up this trail and came to a rock column and climbed up to the top to enjoy the views. We thought this may have been Chimney Top. When we got back home and did more research, we realized we hadn’t found the true Chimney Top, so we vowed to return – and we did… on our sixteenth wedding anniversary in fall 2013.
The first outcropping offers stunning views. Below: The view in the other direction from the first outcropping,
It was a perfect October day with the leaves just a shade past peak. One of the difficulties about this trail is there are no solid online resources for maps and even using our mapping software (alltrails.com), the full trail doesn’t appear on any kind of topo maps. We used our MapMyHike app on our phones to try and get accurate readings and I traced that outline on a topo map through alltrails.com to try and get a good resource if you want to attempt this hike.
We arrived at the small parking area and made our way up the trail. The trail meanders for the first two miles through the woods with some slow switchbacks to help you gain elevation. The thick canopy is high above you, but you will notice you will rarely feel much wind on this side of the mountain. Around 1.5 miles, you make a steeper ascent up the mountain and reach the top of the ridgeline around 2.0 miles. Once you reach the top, you can see down below to the North Fork of the South Branch of the Potomac River and WV-28/55 on the other side. Both times we have been, you can see dots of people fishing in the river. Across the way, you will see ridges of mountains with Canaan Valley hidden behind them. Looking along the ridgeline, you’ll see sheer cliffs of rock, making this quite a remarkable scene. From this ridgeline, we continued along the path. The trail stays on the ridgeline allowing for several opportunities to check out the views for the next .5 mile. Around 2.5 miles, the trail has been rerouted away from the ridgeline and you descend the mountain. The signs say that it was to protect the nesting/hatching peregrine falcons, who have nested on the cliff faces. The signs are at least five years old, and October is not nesting season, so we’re not sure if the signs are still valid.
Fall color was pretty nice! Below: The trail is often rocky and rough; Adam walks along the increasingly hidden trail.
The trail continues through this terrain for another .5 miles and then starts to gain elevation again. At 3.0 miles, we came to a well-established campsite and could see the ridgeline just above it. I walked over to the ridge, but the views were fairly obstructed. I then saw a smaller campsite to the right of the trail. Going to that campsite, I walked a short distance behind it on a small trail towards the ridgeline to discover the elusive Chimney Top. The photos we will place should lead you to the proper campsite that leads to the correct trail. We ate some lunch from the top of the cliffs near Chimney Top Exploring a little around this area, you are able to see a most-impressive cliff face (where I’m assuming is the section protected for peregrine falcons).
After we ate our lunches and took in the scenery, I decided I wanted to try to climb up Chimney Top. I had to find some good footholds, but I was able to get up without too much trouble, but please be careful if you try to do the same. There are many sheer drops from here, so I wouldn’t advise any unsupervised children to be given free reign on this hike. Head back the way you came to make this a 6 mile out-and-back.
I do believe that the scenery from this spot is one of the most dramatic and beautiful views you will get in Virginia and West Virginia. The trail was called the best trail in West Virginia by Outside magazine in 1996 and I can see why. Some people like to backpack the entire 34 miles of North Fork Mountain. Since you are at the top of the ridgeline for this hike, there isn’t a reliable water source to be found so you would need to pack in a lot of water for this backpacking trip. I would strongly recommend trying this hike on a beautiful spring or fall day.
Christine Says…
I’ll admit – I’m the reason it’s taken over three months to get this hike posted. A foot injury, a lingering cold, and the unusually frigid temperatures have sent me into a state of lassitude. I haven’t felt particularly motivated to hike or write. I’m sure I’ll snap out of it completely sooner or later. But today, I decided to give myself a little push and get this post live!
Fall foliage and amazing views. Below: Adam checks out one of the campsites; A nice view of the cliff face along the mountainside.
We were really excited to try this hike again. Our trip on Adam’s birthday had been rewarding even though we missed out on the main view. We started the morning with a big breakfast at Bright Morning Inn (Pumpkin Pancakes with Walnuts and Maple Butter Sauce!). It’s one of our favorite places to eat in Canaan Valley/Davis – everything is always excellent there!
After parking, we started climbing the mountain, following the familiar ground we had covered the previous summer. We spent a little time exploring the first of several impressive rock outcroppings on this hike. While there, we took some time to chat with the only other two people we saw on the trail – a couple from Pennsylvania. They were recent empty-nesters and were returning to backpacking for the first time in 20+ years. They still had all their gear from the late 80’s/early 90’s – external frame packs, old fashioned sleeping pads, and I think I may have seen something cast iron! It looked like a heavy load!
After leaving the first view, we pushed along the trail, passing the spur trail to our lunch spot from the 2012 attempt. This spot is marked by a rock cairn and the worn footpath is well established.
I thought this rock formation near Chimney Top looked like a tortoise. Below: More views; Adam checking out another rock outcropping along the way.
The route follows a series of rolling hills after passing the spur trail. I thought the trail was pretty hard to follow along this section. It’s a reroute, and vestiges of the old trail are still apparent. It may have been because the trail was under so many leaves, but I still think the reroute isn’t fully established. As we continued along, I asked Adam how much further we should go. According to old information, we had hiked far enough to be well past Chimney Top. As it turns out, the reroute is just longer and follows a wide arc around the preserved cliff face.
Eventually, we reached a spot with numerous campsites. That’s usually a good indicator that you’re near something desirable to hikers/campers. In this case, spotting the campsites let us find yet another unmarked trail that led out to the spectacular view from Chimney Top.
We spent quite a while up there, enjoying the fall foliage and awesome views, eating our lunch and taking photos. The hike back went very quickly… mostly downhill and along a route that felt a little more familiar.
Difficulty – 3.5. The trail has some decent climbing on it. Both times we’ve hiked it, there wasn’t any wind until the top, so the temperatures can be stifling.
Trail Conditions – 1.5. Trails are largely unmarked with reroutes not always clear. Finding the actual viewpoint of Chimney Top can be a little challenging. Watch out for loose rock on the ridgelines in case you go to check out any views.
Views – 5. Absolutely stunning views and great ridgeline walking.
Streams/Waterfalls – 1. From way above, you’ll see North Fork Gap. There isn’t a water source on this trail.
Wildlife – 1. We barely saw squirrels, but you may have some views of preying birds. Watch out for timber rattlesnakes on the rocky ridgeline.
Ease to Navigate – 2.5. There is basically one trail to follow here, but it can be tricky finding Chimney Top.
Solitude – 4.5. Typically, you’ll only see a few people on this trail. Most will go to the first overlook and stop.
Directions to trailhead: From Seneca Rocks, WV head northeast on WV-28N/WV-55E for 15.2 miles. Take a right on to County Route 28/11/Smoke Hole Road. You immediately cross a bridge where you may see people fishing in the stream. In about .4 miles, there is a small parking lot on the right-hand side. You’ll see the brown board which denotes the start of the trailhead.
* MapMyHike is not necessarily accurate, as the GPS signal fades in and out – but it still provides some fun and interesting information.
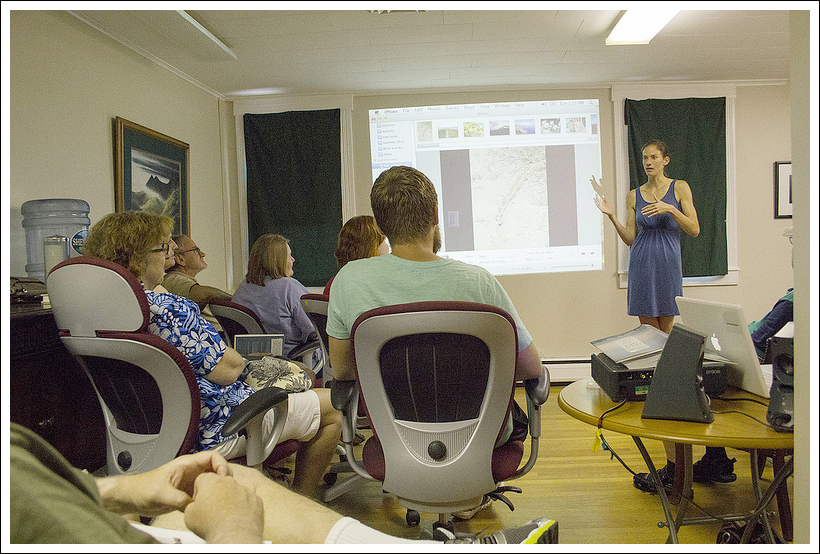
Jennifer Pharr Davis presents at the Appalachian Trail Conservancy Headquarters in Harpers Ferry, WV. Below: Virginia Trail Guide was honored to meet the family!
Back in July, we had the pleasure of meeting Jennifer Pharr Davis (and family) at the ATC Headquarters in Harpers Ferry, WV. She was there to talk about her hiking experiences and help promote her latest book, Called Again. Jennifer holds the record for the fastest hike of the Appalachian Trail, completing the 2150 miles in 46 days, 11 hours, and 20 minutes. Her husband, Brew was there to support her along the trail, meeting her to provide food, shelter, and love along the way. In 2012, National Geographic named her as one of the Adventurers of the Year for her amazing accomplishment. She also holds records for hiking the Long Trail in Vermont and Bibbulmun Track in Australia.
During her presentation at the ATC Headquarters, Jennifer showed pictures of some of the places she has hiked around the world and talked about her experiences hiking the AT. We both left the talk truly inspired and I think a few minutes listening to Jennifer would have the same effect on anyone!
In 2005, she established her company, Blue Ridge Hiking Company, with the mission of “making the wilderness accessible and enjoyable through written and spoken word, instruction and guiding.” She has authored three North Carolina hiking guides and two books about her experiences on the Appalachian Trail. Her husband also wrote a book about supporting her through the record-setting hike. You can purchase her books through her website. Jennifer was kind enough to do a brief Q&A with Virginia Trail Guide. Check out what she had to say!
In Called Again, it was pretty clear that the New England states (especially New Hampshire) were tough on your body. I think most regular hikers have had days on the trail that aren’t fun, when everything hurts, when the weather turns, etc. What do you think about or do that gives you the strength to push through the pain/frustration and make it to your next goal?
The trail has taught me a few lessons that help keep me going during those tough stretches:
Live in the moment. You might not think you can make it to the top of the mountain… or to your car, but I bet you can take one more step and maybe even hike one more mile. Just take it one step and one mile at a time.
It is WORTH it. I wouldn’t take back a single “BAD” day on the trail. Those are the days that strengthen my mind and my body the most. They give me the best stories for my books, Becoming Odyssa and Called Again. AND, the bad days give you a heightened appreciation for the good days.
A bad day on the trail is still better than a good day in an office! We were made to spend time outdoors in motion. It is much more natural than spending all day in a chair.
As I read Called Again, I was impressed by how much of the ‘traditional’ AT experience you were able to still have on your speed record hike. You witnessed beautiful sunrises/sunsets, saw wild animals, ate tons of food, shared time on the trail with an ever-changing cast of people and walked through a lot of weather. Do you have a favorite moment or memory from your most recent thru-hike that is unrelated to attaining the speed record?
Making awesome trail friends. Two unexpected and unplanned thru-hikers came out to help us through the mid-Atlantic. I didn’t really know Rambler, and I had never met Dutch. But after a couple of days of hiking together, I now consider them to be two of the dearest men that I have ever met. I made so many awesome trail friends that summer! I think I appreciated the friendships even more that summer, because the encouragement, laughter and companionship was so helpful. I will never forget hiking up Blackstack Cliffs in the rain and mud listening to my friend Hampton recount all his dating blunders. I could hardly hike I was laughing so hard.
In the beginning of Called Again, you shared some stories about hiking with your husband, Brew. I think a lot of couples who hike together read that section of the book while nodding and thinking ‘yes!’. There are always going to be different paces, changing moods and energy levels. What tips can you offer for communication methods to help maintain sanity and harmony for couples/groups that hike together?
The trail really helps couples to focus on teamwork, communication and forgiveness. Usually Brew and I have it out the first week of hiking together. But after lots of talks, and plenty of forgiveness we are closer than ever for the rest of the trail. Remember that you are only as strong as your weakest link. If one person is miserable, you will both probably be miserable. Also, just because you are hiking together – you don’t always have to hike together. Consider splitting up for the morning or afternoon and meeting back up in time for the next meal. Finally, share the responsibilities of a thru-hike. I was an experienced thru-hiker when I met Brew, and it wasn’t til I started having him plan the trips, buy our resupply food, and select our camping spots that he really started to enjoy OUR hikes.
Can you describe a little about what Blue Ridge Hiking Company does?
We encourage everyone, especially women and kids, to GET OUTDOORS. We try to do that through writing, speaking, and guiding. I have authored two A.T. memoirs, and 3 N.C. hiking guides. Brew even wrote a book called 46 Days. We travel around so that I can give trail based talks at schools, businesses, outdoor stores, libraries, etc… And sometimes we offer very specific workshops for folks ready to take on the trail. Blue Ridge Hiking Company also offers guided hiking trips near Asheville, North Carolina. Right now, I have four contract guides who help me get folks out on the trails. Our most popular offerings are half and full day hikes, but we also lead custom overnight trips.
On your Blue Ridge Hiking Company website, I read that one of your personal goals is to encourage more people to get outdoors, especially women and children. What are some easy and non-intimidating ways for people to get started with hiking or backpacking?
I encourage people to start in their comfort zone. If you don’t want to go alone, then set out with a friend, pet, or protection. If you aren’t in great shape, don’t make your first outing a 10-mile ascent. If you enjoy the wilderness, you will want to go back to the wilderness. If you go back, your comfort zone will probably increase and you will be willing to try new and often more difficult hikes. I believe that when people experience and enjoy nature they are more likely to protect and preserve the wilderness.
Our readers are mostly located in Virginia. Do you have a favorite place along the AT in Virginia that you remember or an interesting story that happened to you in Virginia?
GRAYSON HIGHLANDS! It is really special. I love it there. I got to meet David Horton going up the Priest in 2005, and he has become one of my good friends, on and off the trail. Also, one day in the Shenandoah National Park, I GOT to see 14 bears. That was really cool. I always say, that if any state alone the A.T. has to have over 500 miles of trail then I am glad it is Virginia!
This wonderful little network of trails gives you the opportunity to view Linville Falls from every angle! You can choose short/easy routes or longer/harder routes depending what you’re in the mood to do. When all was said and done, we hiked a little over 3.5 miles and enjoyed several views of the falls.
Adam enjoys a bird’s eye view of Linville Falls. Below: The forest service information station; the trail network offers many options; beautiful blooming rhododendron.
Adam Says…
To finish our trip to North Carolina, we had to visit Linville Falls along the Blue Ridge Parkway. While overcast days are better days for photographing waterfalls, we had to take what we were given. The sun was high in the sky and it was quite hot on the hike, but we knew this wasn’t going to be too long of a hike.
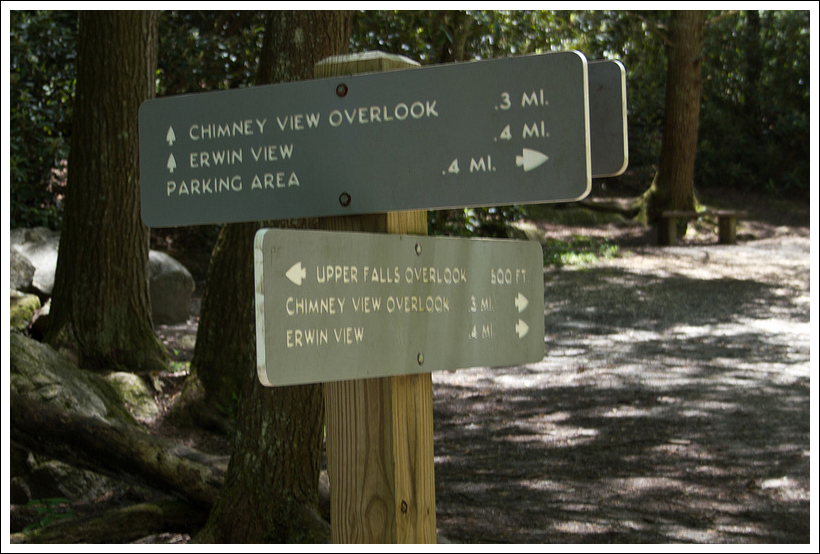
We drove up the gravel Wiseman’s View Road and went first to the USFS Visitor’s Center. Two women were inside and gave us some information on how to tackle the falls. We were looking for a place to eat lunch before the hike and they recommended Famous Louise’s Rock House, especially for their pies. We took their advice and refueled for the hike. We ventured back up Wiseman’s View Road and parked in the large gravel lot at the to the left of the road. The trail starts from the eastern side of the lot and begins with a steep descent.
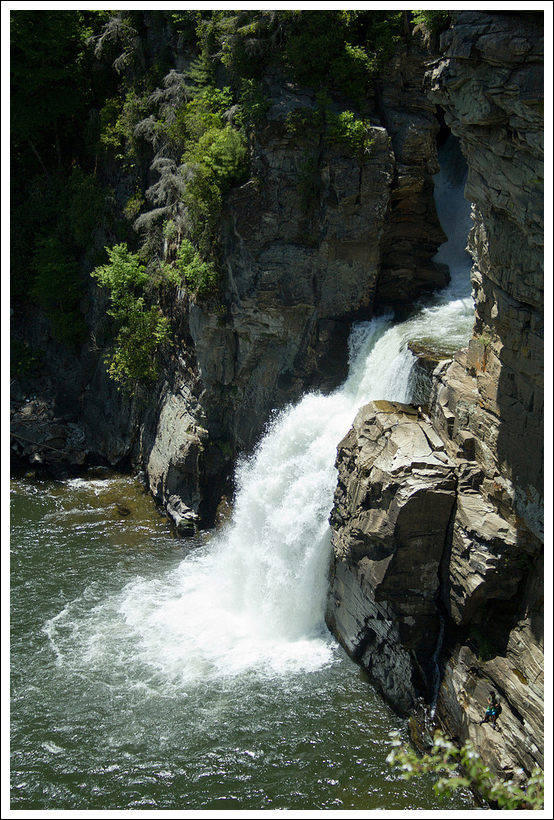
At about .2 miles of a descent, we reached a junction. We took a right here to make our way to the series of overlooks of the falls. In a short distance, we reached another smaller junction with the trail to the Upper Falls, but we decided to approach that on the way back. Since there are so many choices to make about the order in which you take in the views, I will not list all the distances; but you can tell from the downloaded map the distances to each. We opted first to take a left for the trail to Chimney View, which provided a viewpoint to see the upper and lower falls. From this point, we backtracked to the main trail and took a left. Shortly, we came on to the side trail on the right for the Gorge View. The views from here showed the canyon of the gorge but the views didn’t allow you to see the bottom of the canyon. Next was the end of the main trail, which ended at Erwins View. This view gave you the furthest view away from the falls, but it was still spectacular. We backtracked and made our way back to the Upper Falls viewpoint. From here, you could see the water plunge down the falls from a closer distance.
The upper falls view. Below: A view into the gorge; Adam hikes along.
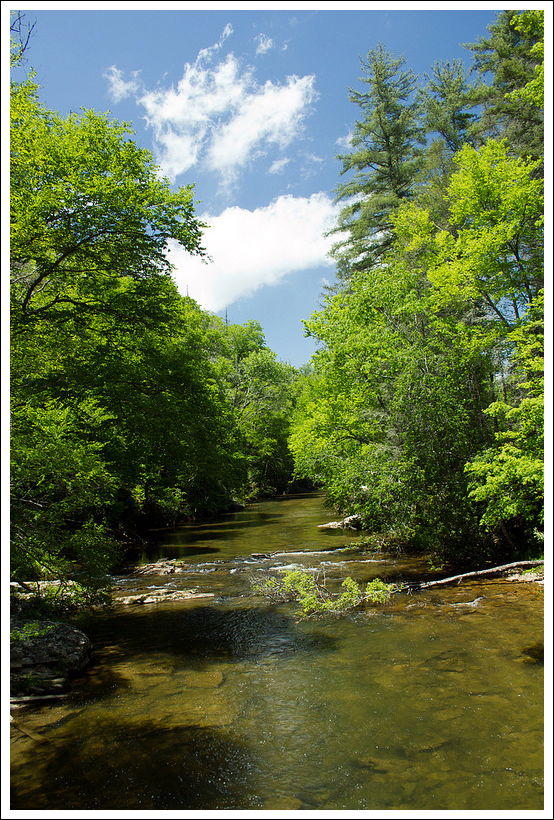
From seeing people on the opposite side of the water and very close to the falls, we decided to take the trail down to the Linville Falls Visitor Center. The trail was wide, road-like and going slightly downhill. We eventually came to a bridge over the Linville River and the Visitor Center was on the opposite side. We grabbed a few cold waters from the center and talked to the rangers about the trails on the other side. We were fairly tired by this point, since we had done so much hiking during the week, but the temptation of the falls kept us pressing forward. From the front of the Visitor Center, the trail headed into the woods on the eastern side of the building. In a few feet, the trail branched and we took a right to head to the next overlook. This trail branched off after about .3 miles. We took a right at the junction, descending to reach the Plunge Basin overlook at .5 miles. This point gave you a vantage point to see the water shoot through the gorge and down below. We watched one man standing on the cliffside below, fishing from a precarious position. We then made our way back to our car by returning to the Visitor Center, back across the bridge, and taking a right to the trail junction that led us back to our vehicle.
We had a great time visiting Linville Falls and this is definitely a hike that most people could do with their families. A return trip in the peak of fall color with an overcast sky is something we will try to do. While many waterfalls allow you to get very close to them, the trails here mostly keep you at a distance. However, the view of the gorge with the waterfalls is breathtaking.
Christine Says…
Linville Falls was a perfect hike to end our trip through Tennessee and North Carolina – short and very easy! Ten hikes packed into eight days was pretty rigorous and I had the sore knees, bruises and sunburned arms to show for it! Truth be told, I was secretly pleased that the ninth day of our voyage was stormy and rainy, because it meant we’d go home a day early instead of biking the 33+ miles of the Virginia Creeper. Don’t get me wrong – I LOVE biking the Creeper, but I was exhausted from our whirlwind trip. Maybe we ought to relax more on vacations – like normal people! Nah…. probably not. 🙂
Linville Falls were a gift to the National Park Service from John D. Rockefeller. So many of our favorite parks would not have existed without his generosity. Acadia, Shenandoah, Yosemite, the Grand Tetons, and the Smokies were all established, in part, due to his financial support.
The plunge view of the falls. Below: The Linville River; Beautiful desserts from Storie Street Grille.
Adam did a thorough job describing all the different paths we took, so I don’t have a lot of details to add about the terrain. The only thing I would say is that you can walk to the bottom of the falls. It’s about about .8 miles of hiking (some steep). We opted to skip the view from the bottom on this trip, mainly because we were tired and could tell that the base of the falls was extremely crowded.
I enjoyed stopping in the visitors center and talking to the park ranger. He was a pretty serious hiker and we enjoyed trading trail tips. He suggested Crabtree Falls, NC for a future hike. I was also fascinated by the cross section of an enormous tree hanging in the center. It fell when the Linville Gorge flooded in September of 2004. The hurricane-related flooding was so severe, that it washed away half of the visitor’s center and left many gigantic, toppled trees in its wake. Water is such a powerful force!
Linville Falls has one of the highest water volumes of any waterfall in the Blue Ridge, so it’s not surprising that it floods so easily. The high volume of water also makes the gorge perilous for people. Swimming is not allowed in the river near the falls, but numerous fatalities have still occurred in the area.
After finishing our hiking for the day, we retreated back to our cabin at the Pineola so we could get showered and dressed for dinner. We decided to go fancy for our last evening in the area, and enjoyed a fabulous dinner at the Storie Street Grille in Blowing Rock, NC. In addition to lovely outdoor patio seating, hey had a great wine line, beautifully prepared entrees, and amazing desserts. Even though I’d already had pie a la mode earlier in the day, I could not pass up their dark chocolate – coconut bread pudding. Adam’s banana creme brulee was equally delicious. It was a fitting end to a fabulous trip!
Our next post will actually be a Virginia hike – shocking! But then we’ll be going back to some more out-of-state posts. We’re headed for the White Mountains of New Hampshire in a couple weeks, and are hoping to bring back at least a couple posts from that area. Stay tuned!
Difficulty – 1. The trail does have a little climbing up and down on the trail, but most people should be able to do it without too much trouble. We saw people of all ages and all levels of fitness on the trail, so it should be doable by anyone willing. The options for different viewpoints allow for people to choose what they can handle and decide when to stop.
Trail Conditions – 4.5. Most of the trail is either gravel or dirt and is well-worn.
Views – 4. Great views of the gorge and waterfalls.
Streams/Waterfalls – 5. There are many viewpoints to see the waterfalls. The only challenge will be to enjoy it with few others around.
Wildlife – 1. You may see squirrels and some birds flying around, but it would be unlikely to see much else.
Ease to Navigate – 4. There is a large branching of side trails here, but using the map should guide you along.
Solitude – 0. With such a close proximity to the Blue Ridge Parkway along with the ease of difficulty, this hike is crowded.
Directions to trailhead: From US 221, turn on to NC 183. In .7 miles, turn right on to Wisemans View Road at the large curve. The parking lot is a short distance on the left and the trail starts from the eastern side of the parking lot.
* MapMyHike is not necessarily accurate, as the GPS signal fades in and out – but it still provides some fun and interesting information.