Grandfather Mountain – Calloway Peak (NC)

North Carolina Hikes

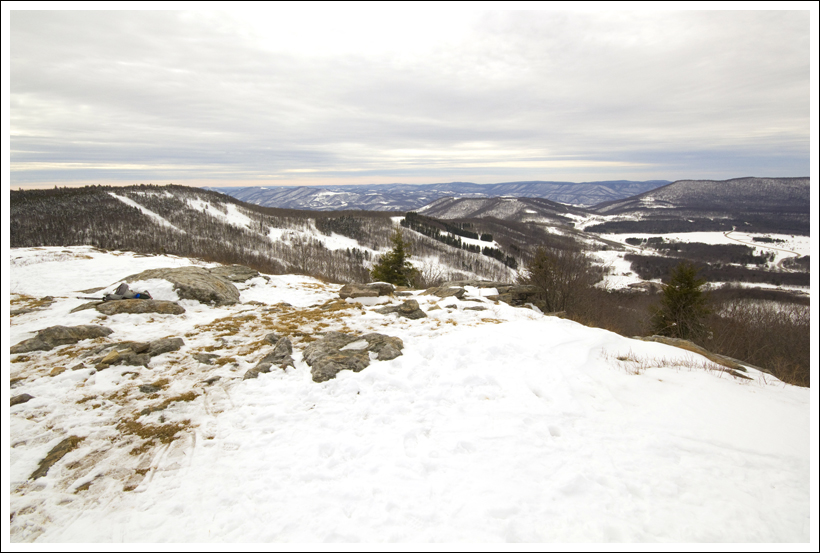
This five-mile hike is demanding, thrilling and beautiful!  It has everything from ladders and cables to amazing views of the Watauga Valley and the Blue Ridge Parkway.  If you’re a fit hiker looking for something a little different – Grandfather Mountain definitely fits the bill!

View the Full Photo Album From This Hike

Attic Window Peak View
Sand Myrtle crowns Attic Window Peak on Grandfather Mountain, making the view all the more lovely. You can see the ‘Sugar Cube’ sitting on the mountain top off in the distance. Below: Hiker parking on Grandfather Mountain; A view looking back on the Mile High Swinging Bridge; Native pink azaleas.

Hiker Parking Swinging Bridge View Pink Azalea

Adam Says…

We have a love-hate relationship with Grandfather Mountain.  I definitely enjoy the hike more than Christine, but both times we have hiked it, things haven’t gone as great as planned.  The views on Grandfather Mountain  are amazing, but some of the physical and mental challenges definitely take their toll.

The last time we hiked up Grandfather Mountain, we only made it a little past Attic Window peak.  Christine wasn’t feeling well that day, so we decided we make a second attempt on this trip and make it to the highest peak, Calloway Peak.

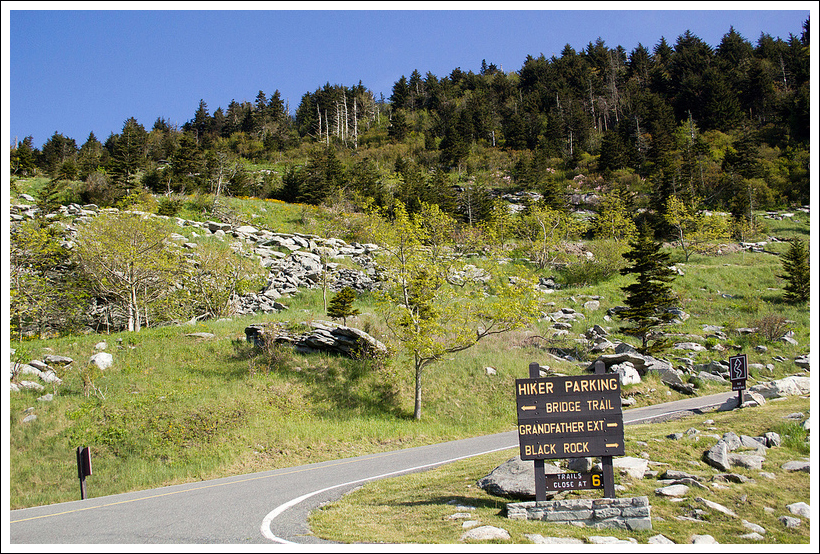
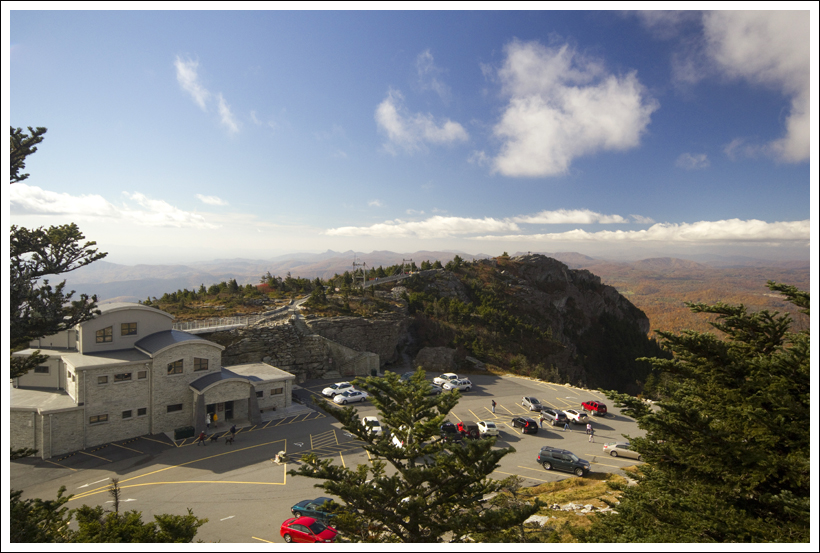
We were some of the first people on the trail that day.  The lady at the entrance gate (it costs $18 per adult) gave us a parking sign to put in our car window.  This is used in case someone goes missing on the mountain and they need to perform a rescue.  We were told they wanted us back at our car by an hour before closing.  We parked in the lower Trails Parking area and were the first car in the parking lot.  We quickly set off on to the Bridge Trail, which winds through a series of switchbacks, crossing underneath the Mile High Swinging Bridge, before reaching the upper parking lot at .4 miles.  We made a quick trip into the gift shop and then took a quick trip across the Mile High Swinging Bridge.  The wind was quite calm this time on the trail; last time, the bridge was singing and the wind was so strong, Christine could barely walk across the parking lot.  I have a big fear of heights when it comes to man-made things (roller coasters, ziplines, ladders, etc.), so the swinging bridge is always a gut-check for me.   The fact that the wind was calm made it easier for me.  We walked on to the rocks on the other side and enjoyed some spectacular morning views to the west.

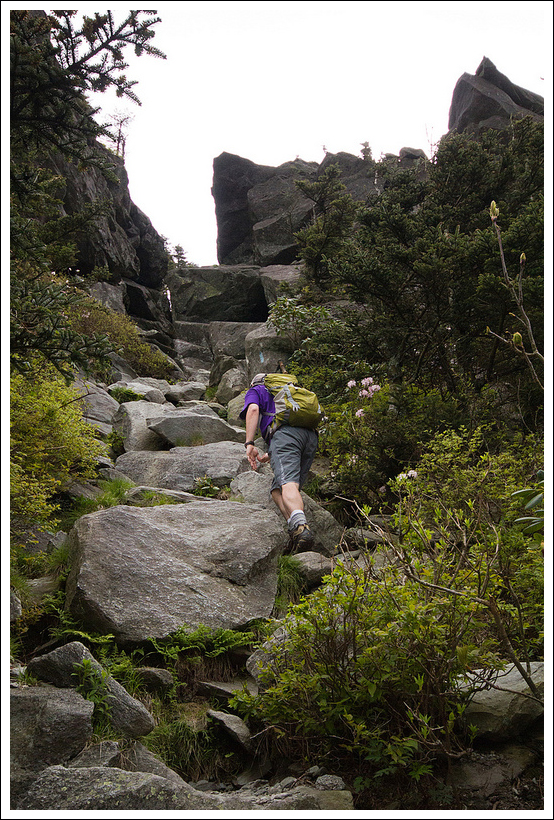
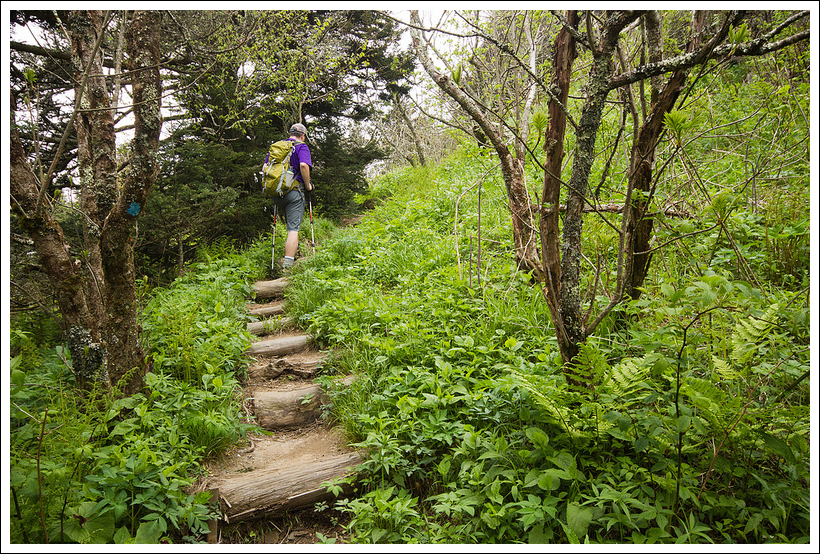
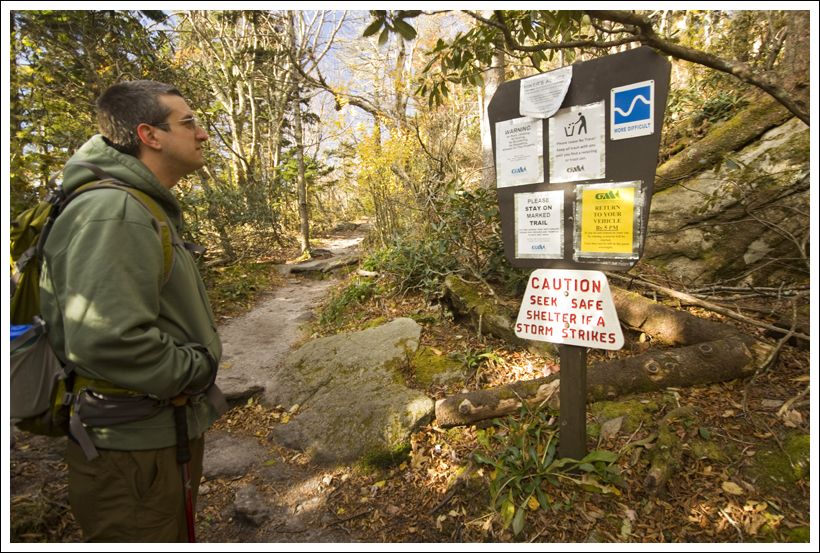
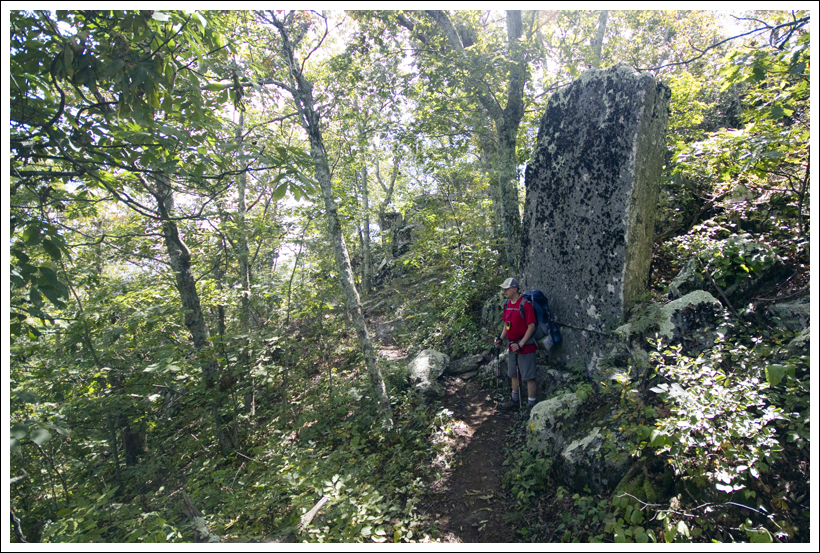
Crossing back across the bridge, we made our way down the stairs and across the parking lot to the large wooden sign to begin our real hike on the Grandfather Trail.  We climbed up a few stairs and started our hike on the blue-blazed trail.  The first part of the trail isn’t too tough.  You reach an open area called The Patio at .6 miles and at .7 miles you reach the junction with the Grandfather Extension Trail.  Continue past this trail and at .8 miles, you will pass the scenic Grandfather Gap area.  Just ahead is a junction where the Underwood Trail branches off at .9 miles.  We continued on the Grandfather Trail and here is where it can be challenging.  Your first introduction to the difficulty of the hike is when you come across some cables that are helpful to grab onto to help yourself climb up or down the trail.  When it is wet, the rocks can be steep and slippery, so it is helpful and often necessary to grab onto these.

Cables
Adam uses cables to assist him across a steep, slick rock. Below: Adam enjoys the views; Christine hiking along the easy part of the Grandfather Trail; Climbing one of the first ladders en route to MacRae Peak.

Enjoying Views Near the Bridge Christine Hikes the Grandfather Trail Climbing Ladders

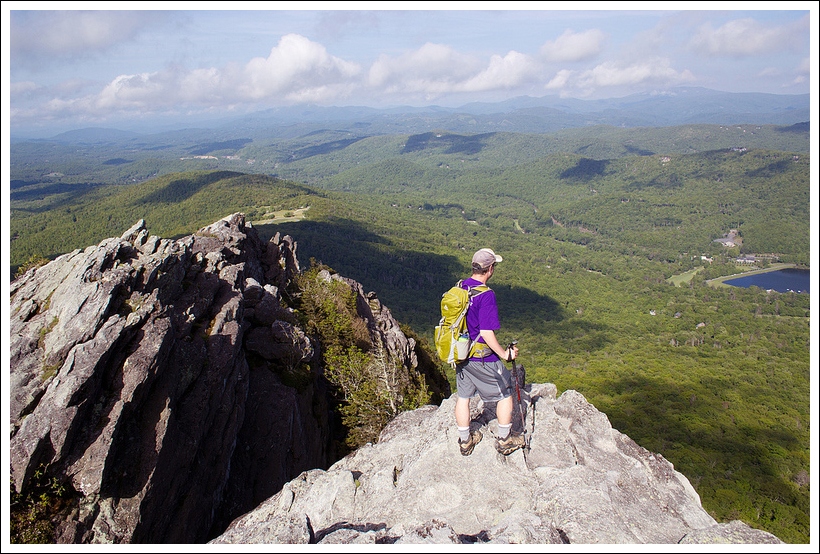
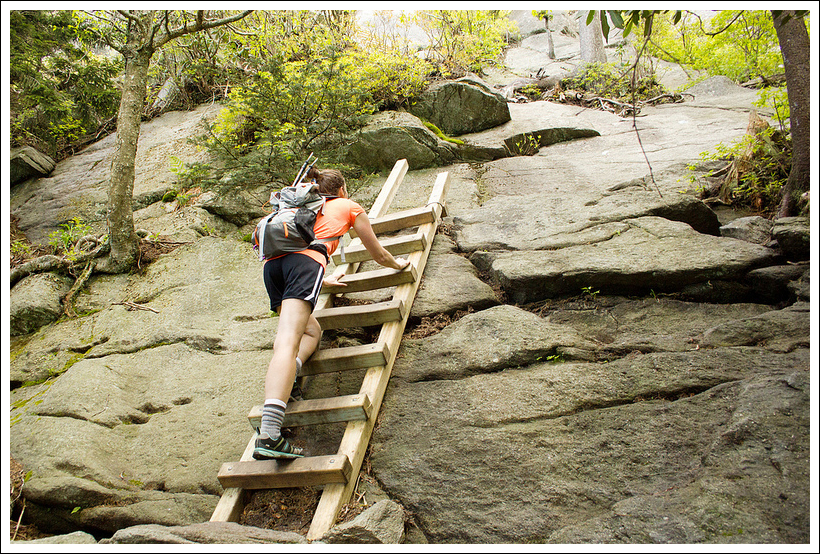
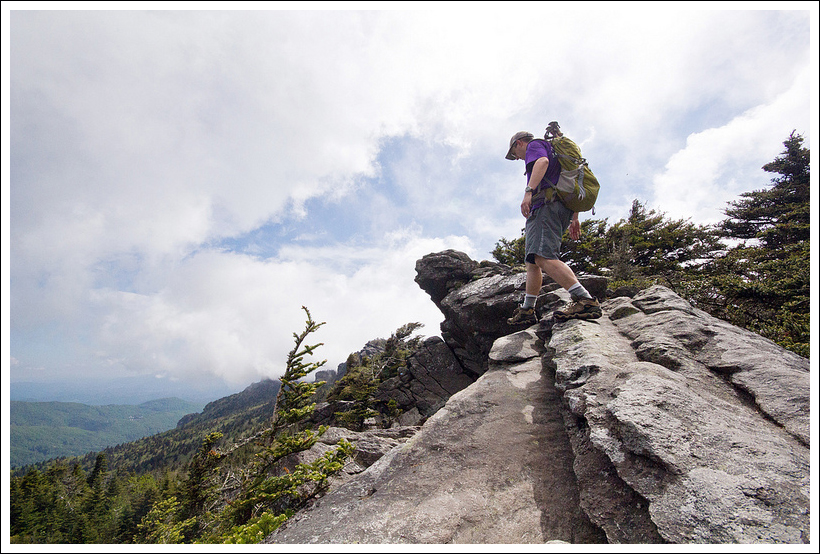
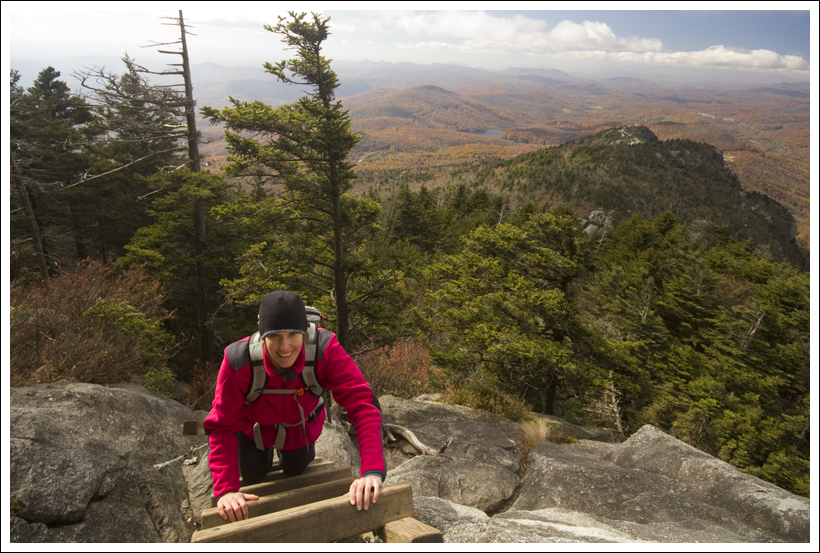
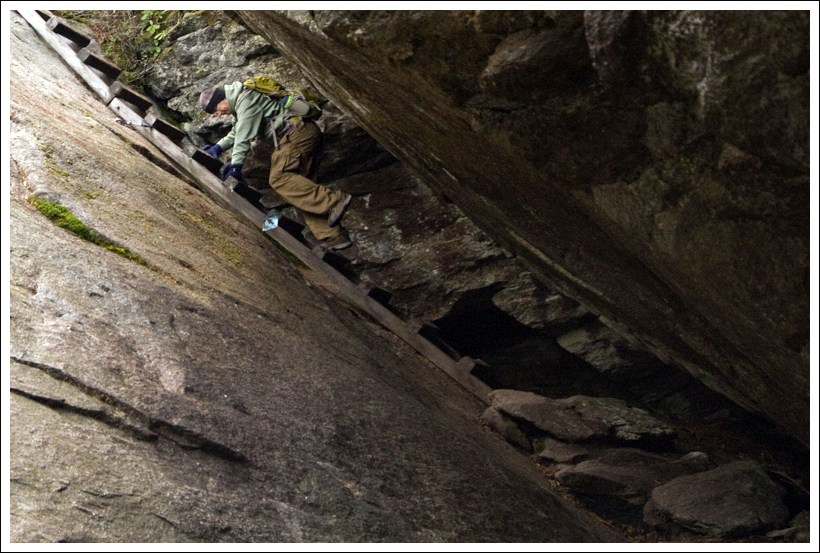
In a short distance as you are making way toward MacRae Peak, you have to navigate a series of ladders.  The first one starts off as you squeeze along a rock that will have you hunched over and you climb up a tall ladder that is at an angle along a large rock face.  This climb wasn’t as scary, but it is just a taste of what is to come.  If you’re feeling uncomfortable climbing this ladder, I would recommend turning around.  After climbing this first ladder, you will come upon more series of ladders.  Some of these go directly up the cliff side and you are looking at huge drop-offs on the side.  The first time I was definitely scared going up, but I felt more comfortable on this climb.  The ladders are bolted into the rock and the ladders are placed at just enough angle that I didn’t feel I was going to plummet to my death.  Once you navigate up through the ladders and climb up where it begins to level off, you are rewarded with more amazing views around you.  We continued further and reached the sign to MacRae Peak at 1.3 miles.  The sign rests at the bottom of another ladder.  Climbing up to the top of the ladder, you then need to grab a cable to help pull yourself up to the summit boulder of MacRae Peak.  The 360-degree views at this point are stunning on a clear day.

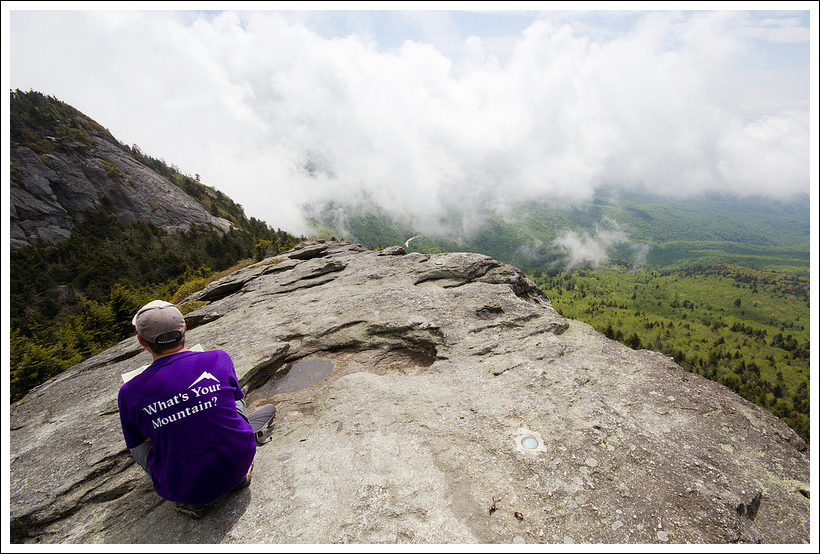
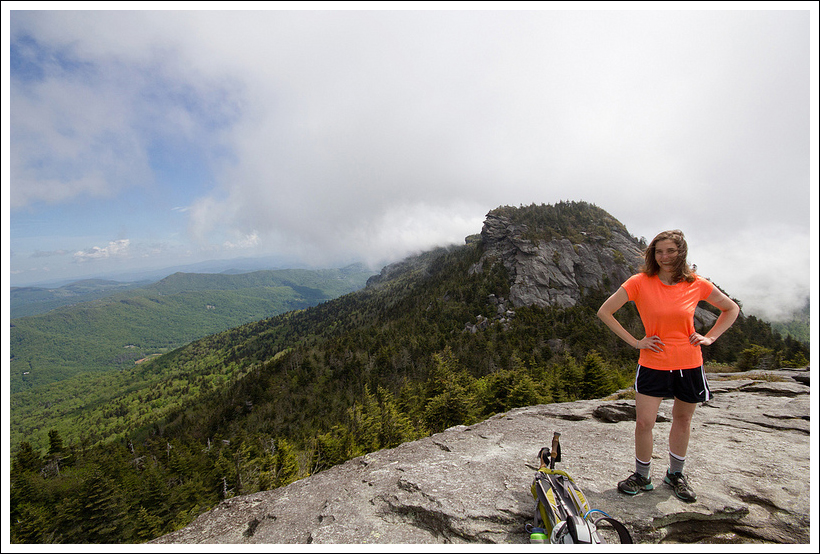
We took a short break at the top and then made our way back down the ladder to continue our hike.  The trail begins to climb down and at 1.4 miles, you see another junction with the Underwood Trail.  Continue the Grandfather Trail downhill with some big steps and cables.  The trail then begins to climb again up to the Attic Window.  You navigate through an area called The Chute, which has you climbing up a short but very steep area of small boulders to make your way to the top.  As you crest the top at 1.6 miles, you can wind around to a rock outcropping known as Attic Window Peak, which serves as a great viewpoint.  We had spotted someone sitting at the top of Attic Window Peak from MacRae peak.  He was still there when we arrived and I noticed he was taking in the views while reading The Great Gatsby by F. Scott Fitzgerald.  He was asking if any of the other views were worth the trip, since he came up via the Profile Trail.  He was interested in seeing the Mile High Swinging Bridge, but when we saw him later on the trail, we learned that he decided to just go back the way he came.

Negotiating the Rocks
Christine climbs the rocks. Below: Adam on a set of multiple ladders, Coming off the top of the ladder onto exposed cliffside; A well-earned view!

Adam on the Ladders Adam Climbs Nice Views

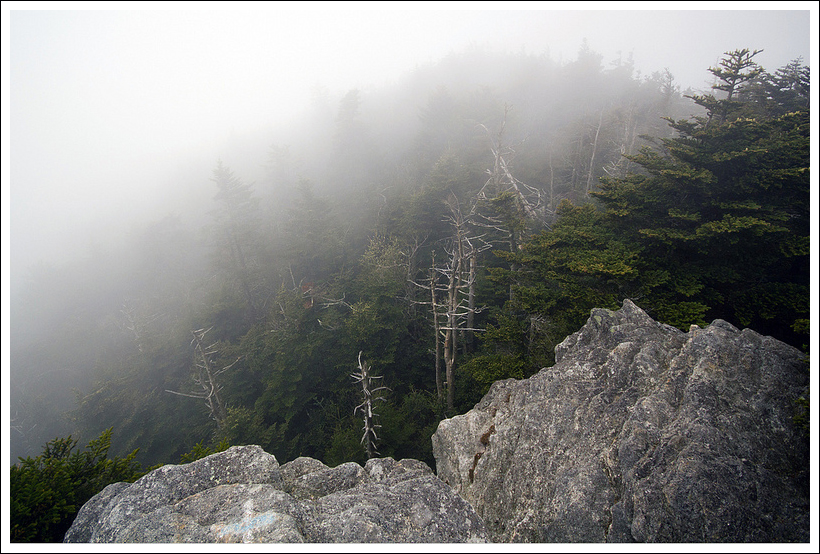
From Attic Window Peak, the trail goes downhill again, but then passes through a level area as you walk along a ridgeline with some great northwestern views (and a view of the steep Profile Trail).  At 1.9 miles, you reach another overnight camping area known as Alpine Meadow.  The trail descends again down another gap, before making the way up to Calloway Peak.  At this point, the clouds were rolling in and sticking to the mountain, so our visibility was going away fast.  We climbed up the Calloway Gap area and reached the junction with the Profile Trail at 2.3 miles.  We pressed on, passing by the Cliffside Campsite at 2.4 miles.  The trail continued to climb up some switchbacks.  A sign came up at 2.7 miles which pointed the way to the Watauga View.  Knowing there wasn’t much a view as we hiked in the fog, we made our way to the Calloway Peak.  The trail at this point climbed up a couple of more technical ladders.  We reached a rock that was the Calloway Peak at 2.8 miles.  There was no sign designating this as the peak, but from ground markings, we could tell this is where the white-blazed trail of the Daniel Boone Scout Trail met the blue-blazed Grandfather Trail.  I’m sure there is a view from the rocks here, but we could barely see 10 feet in front of our face.  Disappointed, we made our way back down the ladders and took the side trail to the Watauga View.  The view was barely there, but we stayed long enough to eat our packed lunch before making our way back.  The views on the way back were getting swallowed by the clouds settling on the mountain, so we lost a lot of the views on the way back.

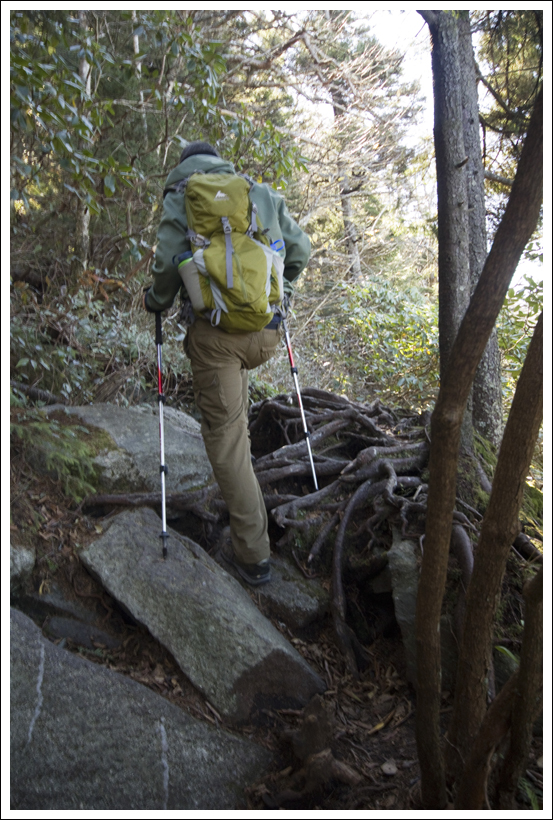
At 3.7 miles, we reached the junction with the yellow-blazed Underwood Trail.  We decided to take that trail back to avoid some of the ladders.  This trail is incredibly rocky and my knees were in so much pain after a short distance on this trail.  I think if we do this trail again, I would rather take the ladders than this hellish, downhill knee-destroyer.  Every step, I felt shooting pain in one of my knees and I wondered if I would need to be rescued (at least there was a sign in our car).  We navigated down one large ladder and finally reached the junction with the Grandfather Trail again at 4.2 miles.  I turned around to flip the bird to the trail for my personal enjoyment and reached the Grandfather Extension Trail junction at 4.4 miles.  We took this red-blazed trail, which goes gradually downhill through a series of switchbacks until we reached the parking lot for our car at 5.0 miles. It was a tiring day, but if you are up for an adventurous hike, this is one you should definitely try.

Christine Says…

Oh… Grandfather Mountain – what can I say about this place.

On one hand, it’s a beautiful, rugged and exciting place to hike. On the other hand, things always seem to go wrong when I hike there – I’m sick, my technology fails, I injure myself. Maybe this mountain is trying to tell me something?

Adam on MacRae Peak
Adam enjoys the view from MacRae Peak. Below; Christine on MacRae Peak; Climbing the rocky trail.

Christine on MacRae Scaling Rocks

The first time we hiked Grandfather, I developed a 101 degree fever, and ended up having to turn around near Attic Window Peak (the original goal had been to make it to Calloway Peak). I was just too dizzy and fatigued to hike anymore.

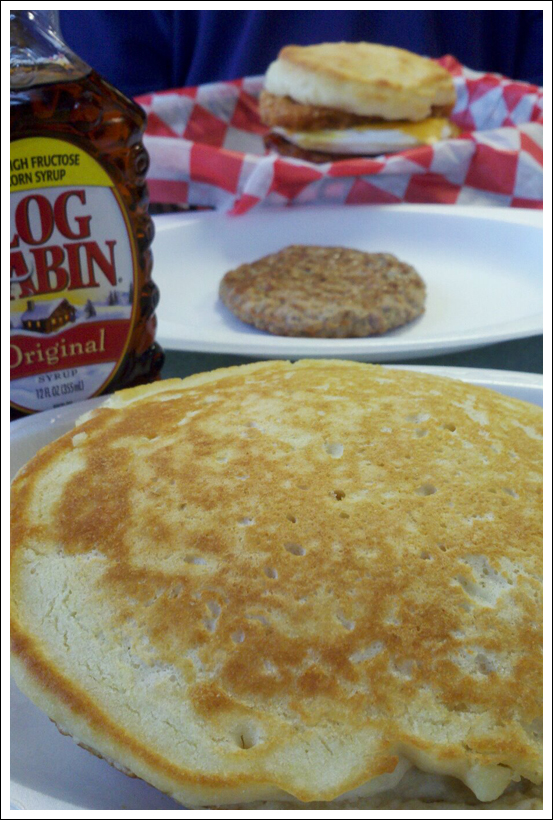
I was really excited to revisit the mountain and finish the hike we tried to do last fall. The morning started off with a great breakfast at the River Dog Café. We paid our entry fee to the park and headed up the mountain. The hiker parking lot was completely empty, skies were sunny and the wind was fairly gentle. It was pretty much the opposite of our last trip up the mountain.

We hiked up to the Mile-High Swinging Bridge. This time, we took the time to climb around the rocky outcropping on the far side of the bridge. Back in the fall, the wind had been so strong that we didn’t dare go out on the rocks!

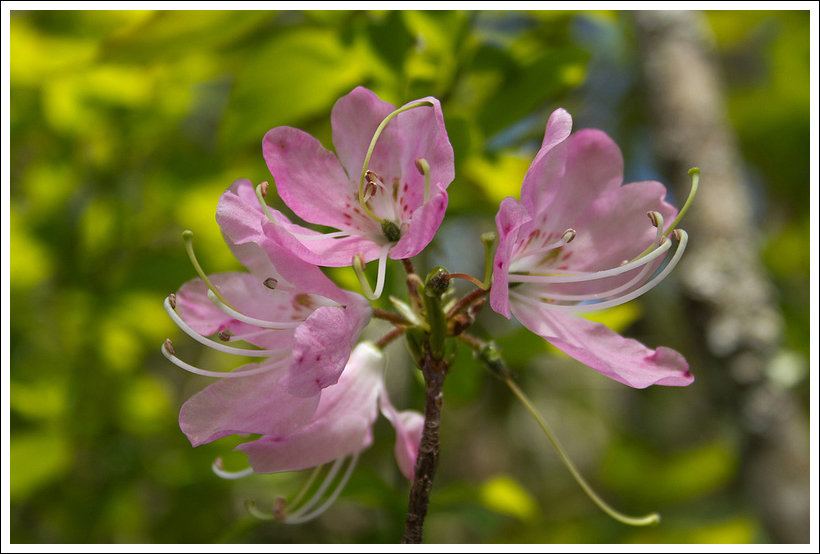
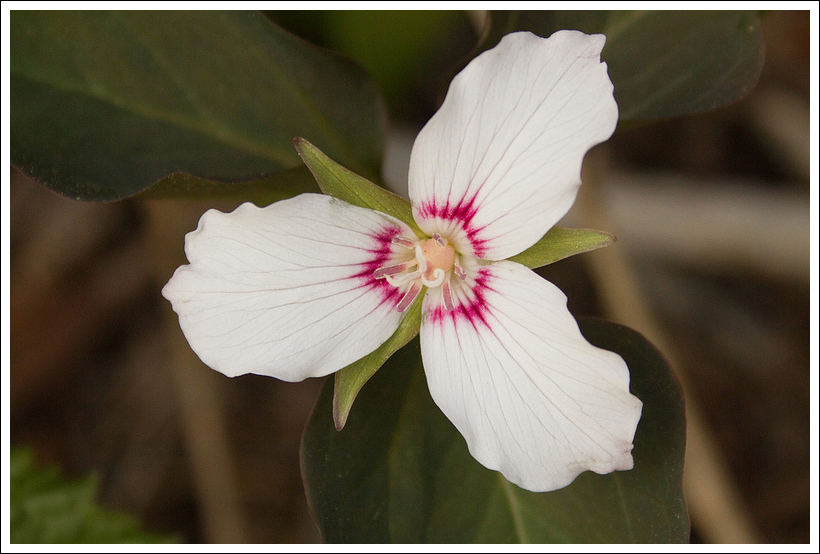
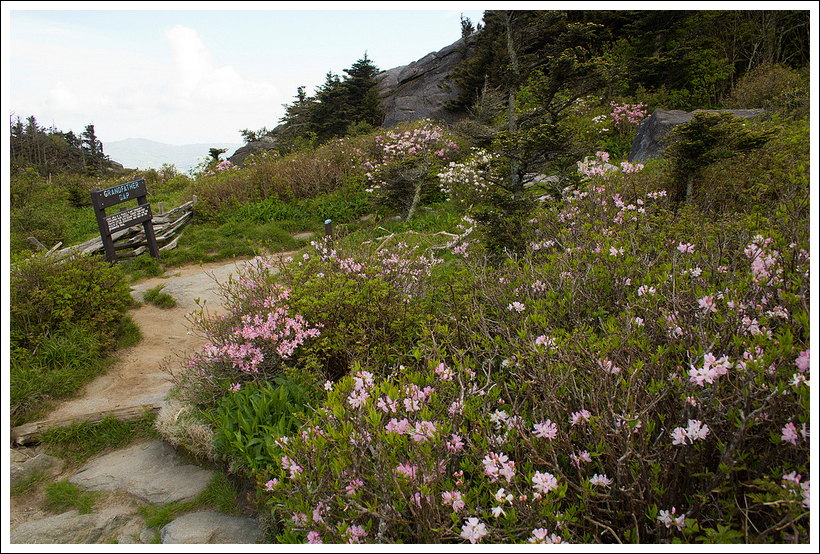
We started up the Grandfather Trail, which departs from the upper parking area. We had the trail mostly to ourselves this time. We really didn’t see anyone else at all until the latter part of the hike. I enjoyed seeing the wild pink azaleas in bloom. Grandfather Gap was especially colorful with blossoms.

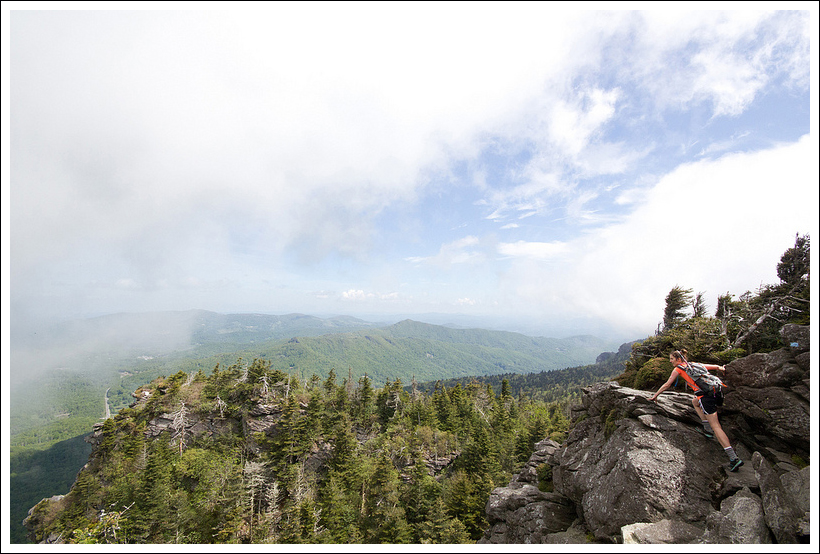
We negotiated the cables and ladders before coming to MacRae Peak. We scaled the ladder to the top and enjoyed the view from the big rock. One side of the mountain was clear, but the other was covered with low clouds and fog. The breeze pushed the clouds against the side of the mountain. They would hang along the ridge for a few minutes and then roll over and dissipate on the clearer side of the mountain. It was fun to watch the low clouds moving so quickly.

The Subway
Adam crawls through the Subway.  Below: Climbing up the Chute;  Beautiful sand myrtle; Painted trillium along the trail.

The Chute Sand Myrtle Painted Trillium

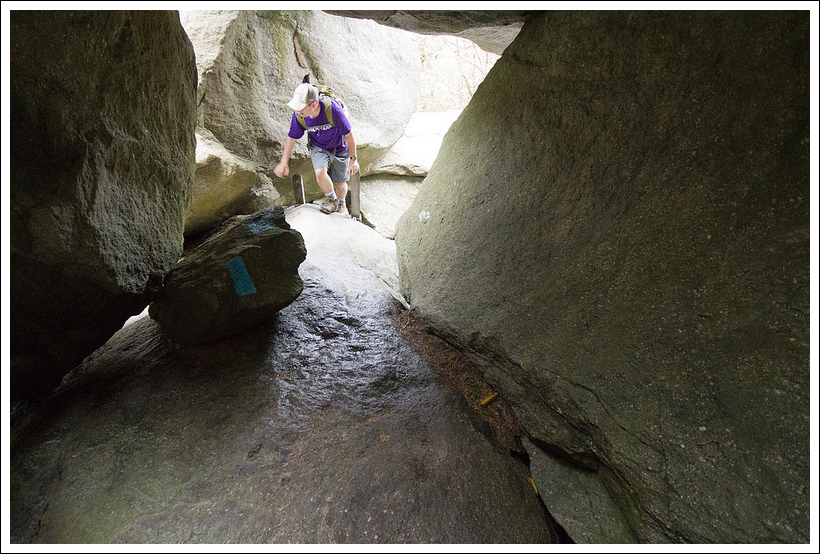
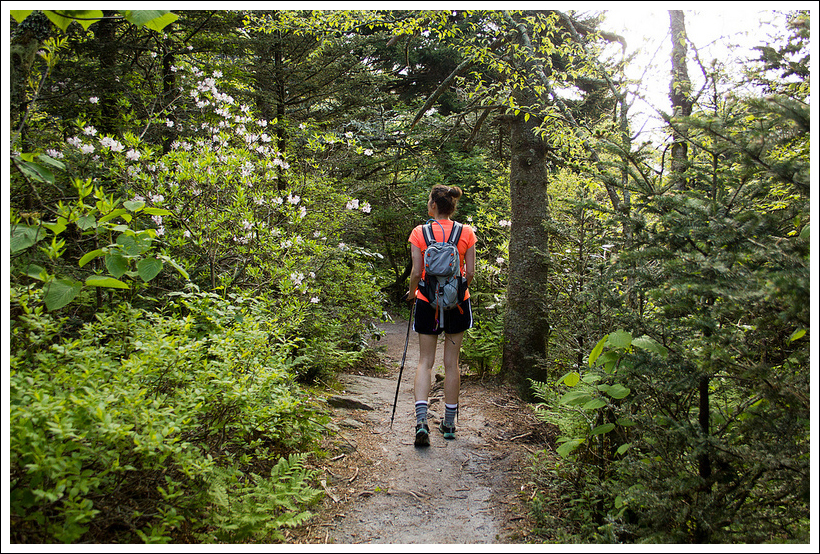
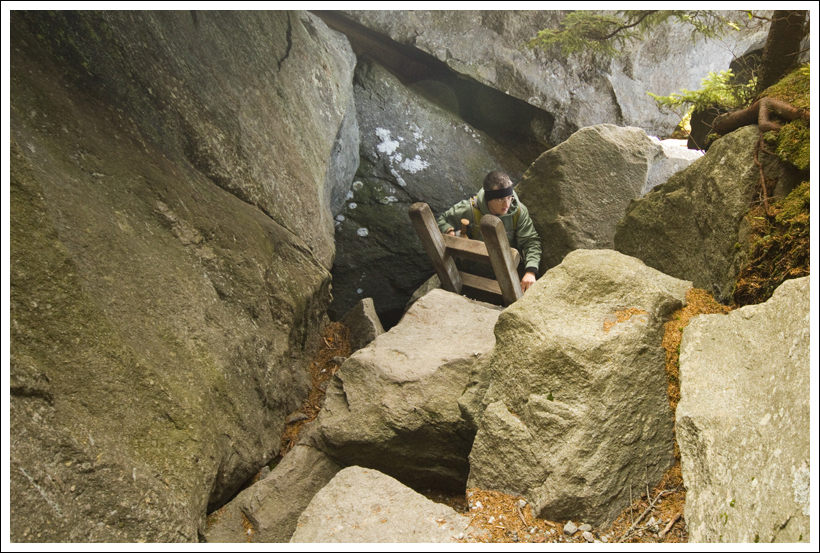
From MacRae, we descended steeply through a slick and rocky gap. The descent was short and ended at an immense rock jumble called ‘The Subway’. Ladders and blazes lead you through openings between giant boulders. On the other side, you soon face ‘The Chute’. The chute is a narrow, steep rock scramble that you must negotiate to reach Attic Window Peak.

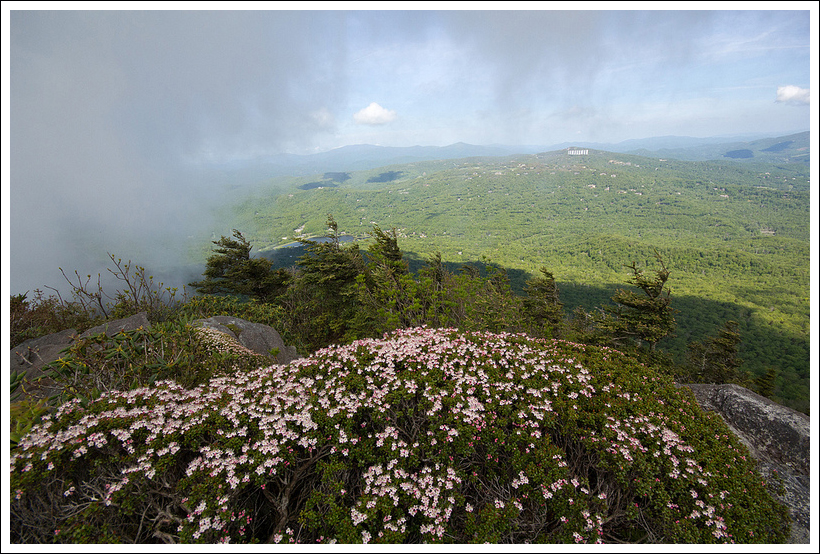
From Attic Window Peak, the hike offers some more moderate ridge walking with spectacular views all along the way. The rocky spine was covered with blooming sand myrtle, so it was especially pretty on this visit. In fact, when famed naturalist John Muir visited this mountain, he described this ridge as “the face of all Heaven come to earth.”  Luckily, John Muir got to visit this area before some idiot approved the Sugar Mountain construction project.  I swear, ‘The Sugar Cube‘ (the main building’s nickname) has to be one of the worst eyesores in Appalachian nature.  I guess its construction did inspire a change in legislation, so mistakes like that are less likely to happen again.

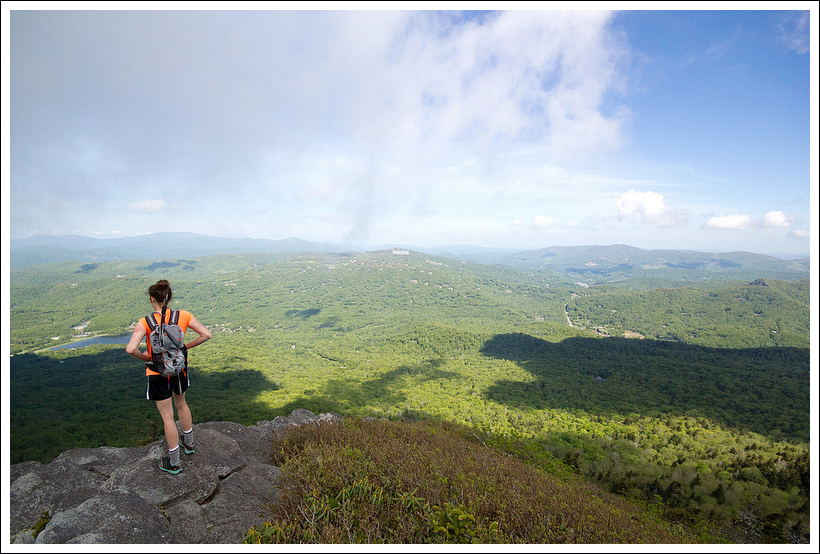
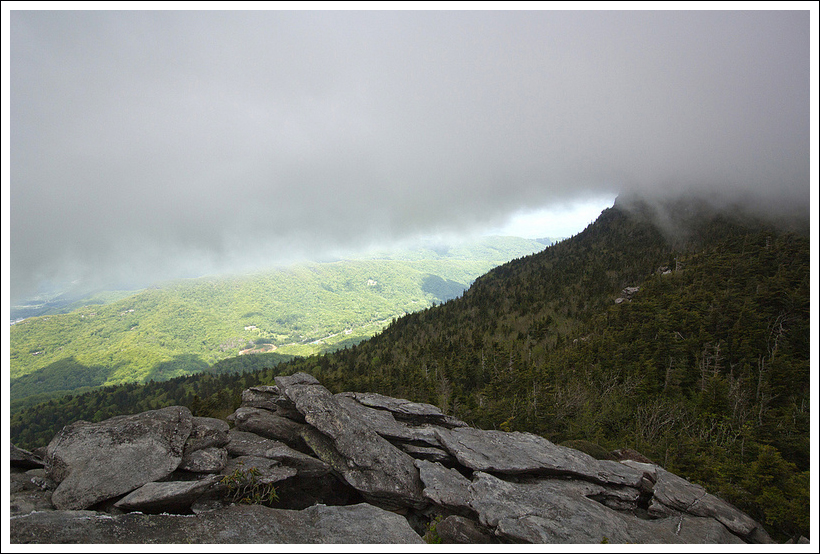
From the crest of the mountain, the trail descends again before beginning the final ascent toward Calloway Peak. The uphill hike passes through rich, mossy evergreen forest. On the way to Calloway, don’t miss taking a few minutes to walk out to the Watauga View. It’s a lovely rocky outcropping that looks into the Watuaga Valley. It was also the last place we had a view on our hike! On the way to Calloway, a massive cloud bank moved in and parked atop the mountain. It was like it was stuck and couldn’t quite make it over the peak. Watauga View was also the place I noticed that my smart phone had crashed at some point and wouldn’t restart (sorry – no MapMyHike stats). Normally, this would be a small annoyance, but just the night before my MacBook Pro self-destructed. Such technology angst!

Watauga View
The Watauga View was partially obscured by clouds. Below: Hiking toward Calloway Peak; Foggy Calloway Peak

Climbing Toward Calloway Calloway Peak

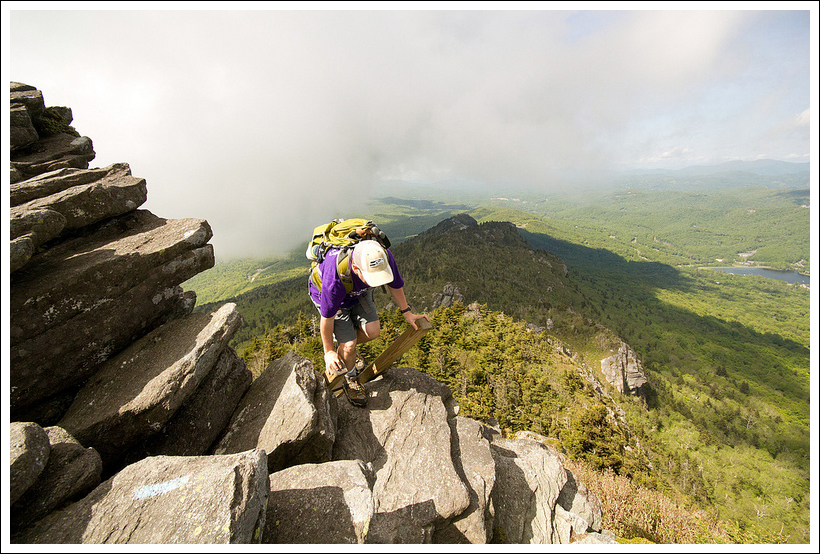
We finished the climb to Calloway (which required a couple more ladders), spotted the elevation benchmark and wondered what the view would have been like on a clear day. Had we continued hiking, we would have continued on the Daniel Boone Trail and soon reached the Hi-Balsam backcountry shelter. But the peak was our turnaround point.

We made our way back along the ridge before eventually reaching the junction of the Underwood Trail. I remembered the Underwood Trail as very rocky and difficult. And it certainly was! I think at this point of the hike, the exhaustion of six straight days of hiking kind of kicked in. We really struggled, physically and mentally, with the tough terrain on this stretch of the hike. I guess I was fatigued and not being careful, because my foot slipped and I felt a twinge in my knee. I shook it off and kept going, but after that I felt a nagging, sharp pain under my knee cap. It came and went, so I did my best to ignore it. (I continued to ignore it on our last two hikes of the trip the next day, and ended up at the orthopedist and off the trail for a month after our trip.)

When the Underwood Trail ended near Grandfather Gap, I was thrilled to be back on easier footing. The rest of the hike went by quickly and easily. After we got back to our car, we spent some time walking around the Nature Center. We saw bears, eagles and mountain lions and enjoyed eating giant cookies and icy soda.

Like I said at the beginning, I both love and hate this trail. It offers so much in terms of scenery and physical challenge, but it’s a tough hike and I always seem to pay some kind of price for hiking there. Maybe I’ll hike it again someday… maybe.

The Dreaded Underwood Trail
The Dreaded Underwood Trail. Below: Grandfather Gap; Almost back to the hiker parking area.

Grandfather Gap Almost Back

Trail Notes

  • Distance5.0 miles.
  • Elevation Change – 2084 ft
  • Difficulty –  5.  Having to use cables and climb ladders should tell you something.  While this route was only five miles, you will go very slowly during most of the hike due to the steepness of the terrain.
  • Trail Conditions – 4.  The trail is well-maintained, but that doesn’t make it easy.  There are lots of rocky parts to navigate, especially on The Chute up Attic Window and the footing on the Underwood Trail is grueling.
  • Views – 5. The best views are from the Mile High Swinging Bridge, MacRae Peak, and Attic Window Peak.  The clouds were covering the area at Calloway Peak for us, but I could tell the views from the Watauga View would have been spectacular also.
  • Streams/Waterfalls – 0.  None.
  • Wildlife – 1.  We didn’t really see anything beyond birds.
  • Ease to Navigate – 4.  All junctions are labeled and the trail is fairly easy to follow.  We have seen people get turned around at certain points (including us previously).
  • Solitude – 1.5.  I would expect to see people along the trail and lingering especially at the viewpoints.  Starting out early in the day should help with the solitude.

Directions to trailhead: The entrance to Grandfather Mountain is located on US 221, two miles north of Linville, North Carolina, and one mile south of the Blue Ridge Parkway at milepost 305.  Signs for the entrance are well-marked and an entrance station is right off the road with large gates.  Travel up the road by car until you reach the parking lot designated for hiking trails.  The trailhead for the Bridge Trail is on the left side of the parking lot as you are driving up. Coordinates for the hiker parking area are 36.096145, -81.831802.

Snowshoeing: Bald Knob from White Grass (WV)

If you’re looking for a great place to enjoy snowshoeing or cross-country skiing in the mid-Atlantic, don’t miss a visit to White Grass!  Their extensive network of trails offer something for every skill level.  Their terrain is beautifully groomed and the people who run the resort are so friendly and helpful.

If you don’t own snowshoes/cross-country skis, White Grass has them available to rent!

Christine at Summit of Bald Knob
Christine enjoys the view from Bald Knob. Below:  The morning started off cloudy; Learning about winter trees with the naturalist; Lots of old cross country skis.

Morning Sun Naturalist Shack and Skis

Adam Says…

It has been over a year since we went snowshoeing.  Our area of Virginia was robbed of any meaningful snow for the past two years, so we decided to cross the border to West Virginia to catch the elusive snow.  Christine’s parents had bought us each a pair of Tubbs Frontier snowshoes for Christmas over a year ago, but it wasn’t until now that we were able to break them in.  We were both very pleased with how they felt on our feet.  They felt lighter than many I had tried before and were a little more sleek than some others I had tried.  This enabled me to not feel too fatigued using them and I also didn’t feel like I had to walk like a cowboy in fear they would cross over and cause me to trip.

We had heard great things about White Grass from other friends of ours that had been there for cross-country skiing.  White Grass maintains a great website where they will post weather conditions, snowfall, pictures, and trail maps.  Check it out to get the best up-to-date information.  They will typically be open December-early March to access their 40km of trails.

When we first arrived at White Grass, we checked in at the lodge.  They informed us they were having a naturalist from the Canaan Valley Wildlife Refuge take a group out in about five minutes for a free snowshoe trail talk.  We grabbed our shoes and met up with him.  We were part of a small group of about 7 (including two little children).  The goal of the walk was to teach us about the different trees that can be found in Canaan Valley, how to identify them, and threats to their future.  We spent about an hour walking. The naturalist did a great job of teaching us many things about trees that I didn’t know before.  After the walk, we decided to make make our way over to Hellbender Burritos for two Gendarme burrito bowls to power us up for our big snowshoe trip in the afternoon.

Spring Orchard Trail
We started out along the Springer Orchard Trail. Below: Trail junction; Warming huts along the trail; Adam snowshoes along groomed trails.

Trail Junction  Warming Hut  Adam Snowshoeing

We returned to White Grass and paid our $20 trail use fee.  We asked the woman in the shop for some trail suggestions, and she kindly mapped out a route that would take us to the top of Bald Knob.  The trails criss-cross often and the maps, posted at each junction, a little confusing.  We found ourselves asking other skiers and snowshoers where they had been to help us navigate through the labyrinth of junctions.  We left the lodge and started on the Springer Orchard Trail, on the opposite side of the large Weiss Knob Slope that heads directly down the mountain.  We stayed on this trail for about .35 miles, passing the Plum Orchard trail, until we reached the Highland View trail.  We took a left on this trail and continued upward, crossing past several other confusing junctions.  We stayed on the Highland View Trail for about .35 miles, until we made it up to its end at the Sawmill Flats shelter at .8 miles.  The shelter was a small warming hut.  There were a few ammo boxes that included snacks and there were some containers of bird seed that you could throw out to chickadees.  From this point we made our way following the signs for the Double Trouble trail.  We reached the junction at 1.0 miles, took a right, and headed up the Double Trouble trail.  At 1.3 miles, we reached the Weiss Knob Ascent trail, took another right and made our way to the Roundtop shelter.

The shelter here was also filled with snacks and bird seed.  The birds here were more accustomed to people and would actually eat the seed out of your hand if you wait patiently.  We were also told that someone had left a Gatorade bottle of moonshine at the shelter.  I picked it up and saw some stuff floating in the bottle and decided to pass.  I find it is a good rule of thumb to at least know the person that has made the moonshine for you.  There’s no need to go blind without anyone to blame. 🙂

Christine and Adam at Roundtop Hut
Christine and Adam at Roundtop Hut. Below: Adam feeds a chickadee; Deeper snow as we climb upward; Snow draped on evergreens.

Adam Feeding a Chickadee Deeper Snow Snow on Spruce

We continued from this point following the signs to Bald Knob.  You will cross a Boundary trail and then make a right on the Bald Knob Trail to wind up the mountain.  The trail then takes a sharp right and a junction where you can continue to hike up the Bald Knob Trail.   We reached the summit at around 2.1 miles.  The scenery was breathtaking and you could see skiers on the Canaan Valley Ski slopes and mountains off in the distance covered in snow.  The wind is strong here at the top, so we didn’t stay incredibly long, but made our way back down.  We returned down the Bald Knob Trail to the Roundtop shelter and back down the Double Trouble trail.  However, instead of heading back to the Sawmill Flats shelter, we followed Double Trouble until it led us to the Lift Shack, crossing over the Weiss Knob slope.  Right behind the Lift Shack, we then took the Barton’s Bend Trail until we reached the Falls Overlook trail.   We took a left on the Falls Overlook Trail and then a left on the Three Mile Trail until it brought us back to the White Grass lodge.  Our return trip was around 2 miles, taking our snowshoe hike to be around 4.2 miles.

I had three big highlights on this trail.  Feeding birds out of my hand, the peaceful scenery through the spruce on the Bald Knob trail leading to great views, and looking back and seeing my wife smile.  I told her that her face was going to be sore from all the smiling she was doing.  We really had a wonderful time at White Grass and we can’t wait to return.  We will probably take the Three Mile Trail all the way up to the Roundtop Shelter next time.

Christine Says…

I love some parts of winter – the snow (too bad there can’t be snow without cold), the potential for workplace closures, and most of all snowshoeing!  For Christmas of 2011, my parents bought us snowshoes.  And well… many of you will remember winter of 2011-12 as ‘the winter that never happened’ in Virginia.  The only measureable snow we had was in October.  The rest of the season passed – mostly warm and sunny – leaving our snowshoes to gather dust in the garage.  This winter hasn’t been much better, but thankfully we live just a couple hours from Canaan Valley.  Even though the areas lies less than 90 miles away as the crow flies, they have vastly different weather.  It’s almost like a small chunk of Canada dropped into a bowl located in the mid-Atlantic.

Christine and a Chickadee
Christine feeds a chickadee.

Bald Knob Trail Roundtop Hut Christine on Snowshoes

We got up early on a Sunday morning and drove over to White Grass – one of the only big Nordic centers in our region. The entire drive, we saw nothing but bare grass and muddy fields.  I’ll admit that I was a little worried that we were driving over for nothing.  But as we grew closer, bare fields gave way to a dusting of snow and then smooth, billowing drifts.  On the final drive up to White Grass, the road was not even cleared.  As we pulled in to the parking area, an exuberant, bearded man gesticulated dramatically, guiding us to a parking spot. Every employee of the resort that we talked to during the day was super friendly and full of information happily shared about the area.

We headed into the lodge to get information and pay our trail use fees.  The lodge is warm, cluttered and cozy, lacking the slick, commercial feel of most ski operations.  Even though it wasn’t yet 10:00 a.m., it was packed with people chatting and enjoying hot beverages.  The woman at the cash register told us we had arrived just in time to go on a free snowshoe walk with a naturalist.  We had about five minutes to gear up and meet the group.  She told us to run on ahead and to pay our trail fee later on.  We ran back to the car, grabbed our snowshoes/poles, put on our layers, got the camera gear packed up and made it back just in time for the walk.  The walk was more talking than active snowshoeing, but I enjoyed learning more about the areas fragile ecosystem.

The snowshoe walk finished up a little after 11:00, so we decided to drive into Davis for an early lunch before our longer snowshoe trek.  At lunch, we learned something interesting – you can’t buy a beer in West Virginia on Sunday until 1:00 p.m.  The restaurant was pretty crowded, and I don’t think I saw a single table not try to order a beer. I guess everyone was visiting from out of town and didn’t know the law.

Christine Snowshoeing
Christine snowshoes uphill.  Below: Approaching Bald Knob, Bald Knob View, Enjoying the Summit

Approaching Bald Knob Bald Knob View Adam and Christine

After lunch, we headed back to Whitegrass.  With our trail feed paid and our route mapped out, we headed up the trail.  When I heard that we were walking up to the summit of Bald Knob, I was a little hesitant at first.   Hiking up to the summit of Bald Knob didn’t necessarily conjure pleasant feelings; rather I remembered the last time I attempted to climb that peak.  It was probably about 15 years ago when I was not a regular hiker and generally quite out of shape.  Adam and I had hiked Bald Knob from the Canaan Valley Ski Resort side.  We made it to the top, but it involved tears and suffering on my part.  I remember the trail being unbearably steep and thought it was going to kill me.

However, this time, I found the terrain easy, pleasant and totally manageable – even on snowshoes!   One of the nice things about White Grass is that the trail grooming takes some of the exertion out of snowshoeing.  When you snowshoe on fresh, unpacked powder, the shoes do keep you aloft on the snow — but only to a degree.  In fresh powder, you sink down and a certain level of ‘slogging’ is required.  At White Grass, most of the trails are packed and machine-groomed.  There are usually a pair of cross-country ski tracks worn into the snow, and then smooth packed trail alongside.  As snowshoers, we’re careful to stay off of the ski tracks, as the blades on the bottom of shoes can easily chew up the established tracks.

Walking the trail system at White Grass was so fun!  As Adam mentioned, I smiled the entire way!   I loved chatting with other people we met along the way.  I was enthralled by the gorgeous, snow-draped scenery.  I had a blast hand-feeding the chickadees at the warming up.  I have a slight phobia of flying things (bad experience with a bat and several moths over the years), so at first I looked away and closed my eyes as the chickadees fluttered down.  But after a few landings, I opened my eyes and watched the birds perch.  When they land, they are weightless; the only thing you feel is a slight pinch from their gripping feet.  One chickadee sat on my hand long enough to eat several seeds.  So fun!

When we made it to the summit of Bald Knob, I stood in awe of the beautiful, snowy valley laid out before me. The wind was whipping and clouds were moving in, so we didn’t stay long.  The walk down went by so quickly — all downhill.  We were back at the main lodge within an hour.

Expansive View
Even though Whitegrass is popular and heavily used, you never feel like it’s crowded. Below: Adam checks out the old, abandoned ski lift apparatus; Adam says hello to a friendly Whitegrass dog.

Old Lift Building Whitegrass Dog

I’m hoping that we’ll get another chance to visit White Grass one more time this season.  If we do get to go again, I definitely want to plan a meal at the White Grass Cafe.  The food people were eating in the lodge looked amazing!  We would have eaten there, but we already had plans to eat at another local favorite – Sirianni’s.  We love their pizza and can’t visit the area without going there to eat.

If we make a return trip, I’ll also be sure to take a few photos of the actual facilities – the lodge, the cafe, etc.  In the rush to meet the naturalist on time and my eagerness to spend as much time as possible on the trail, I neglected to take any photos of the facilities.  They are really cute, so I feel bad that I forgot.

Trail Notes

  • Distance – 4.2 miles.  This is approximate.  It was hard to gauge mileage when the trails crossed each other so frequently and were labeled on the maps in kilometers.
  • Elevation Change –  973 feet
  • Difficulty – 2. The trail did go uphill most of the way up, but the grade was only seriously steep in a few spots.
  • Trail Conditions – 4.  The trail was in excellent shape.  They spend a lot of time grooming the trails, so it was fine to have both snowshoeing and cross-country skiing on the same trails. 
  • Views4.  The views from Bald Knob are some of the best you’ll see of Canaan Valley.
  • Waterfalls/streams – 1. Only a few streams that you pass on the trail.
  • Wildlife – 2. Red squirrels, Chickadees, and pileated woodpeckers were spotted.
  • Ease to Navigate –1.5. You have to pay very close attention to the trails and maps at the junctions to keep your bearings.
  • Solitude –2.  The trails in this area are heavily trafficked, so expect to see others.  We still felt that we had plenty of room for ourselves though as people are spread across all the distance of trails.

Directions to trailhead:  The best directions can be found here  From Route 32 at Canaan Valley, take Freeland Road.  Follow the signs to White Grass.

MacRae Peak – Grandfather Mountain (NC)

North Carolina Hikes

This hike follows the Grandfather Trail across series of ladders and cables to the summit of MacRae Peak.  After climbing MacRae peak, we continued a little way along the trail before turning back right after Attic Window Peak. It’s a truly amazing hike with phenomenal views.

View the full photo album from this hike on Flickr

Top of MacRae Peak
Christine and Adam enjoy the view atop MacRae Peak. Below: Adam checks out the sign at the beginning of the Swinging Bridge Trail; A view of the bridge from the trail; the valley from the bridge.

Start of Bridge Trail Swinging Bridge View from the Swinging Bridge

Adam Says…

Hiking up Grandfather Mountain is nothing short of an adventure and one that I will not forget.  This will challenge you as much mentally as it will physically as you have to decide how far you can go.   Choosing to navigate up ladders on the side of a mountainside with nothing to save you from a nasty fall makes this hike one not for the faint of heart.  I have a fear of heights, but especially when it comes to trusting in man-made things that tested me a few times on this hike.  But  Christine and I kept saying, “I can’t believe we just did that” when we passed through these obstacles and the adrenaline kept us going.

We drove into Grandfather Mountain through the main entrance off 221.  If you are planning on doing any hiking on Grandfather Mountain, I would recommend starting as early as possible.  Starting later than when the park opens could lead to an extremely long line of cars waiting to enter on a weekend or pretty summer/fall day.  There is an admissions fee to get into the park ($18/adult with discounts for seniors and children at press time).  Another reason to start early is this hike does take a while.  While it is only a relatively short distance, you will want to take time to enjoy the numerous views and you will need to take time going up the ladders.  With a lot of people on the trail, there could be a bottleneck through some of these passes.  The park closes before nightfall and they do have rangers hiking along the trail to make sure that people get off the mountain in time.  If you don’t get back to your car by nightfall, they post they will send out a search.

Adam Crosses the Swinging Bridge
Adam crosses the Swinging Bridge. Below: A look back at the Top Shop from the beginning of the Grandfather Trail; Adam looks at MacRae Peak

Looking Back at the Bridge Complex Adam Looks at MacRae

At the entrance to the park, the ranger warned us that the winds were between over 30 mph at the top.  We made our way up the drive and stopped by Split Rock, a picnic spot and witnessed the drop in temperatures and wind firsthand.  We then made our way to the Nature Museum and wildlife habitat.  We walked around briefly and picked up a hiking trail map from the Nature Museum cashier.  We continued our drive along the curvy road up until we reached a parking lot attendant.  Since we were hiking, he instructed us to park in the lower lot to begin our hike.

From the parking lot, we took the Bridge Trail, a non-blazed trail that includes switchbacks through a hardwood forest.  After a short distance, we started hearing a mechanical, whistling sound.  This was the sound of wind whipping through the Mile High Swinging Bridge that lay above us.  At .4 miles, we reached the Mile High Swinging Bridge and visitor center.  The wind was blowing so hard up here.  I felt that I didn’t have warm enough clothes, so we went inside the visitor center to buy a hat and gloves to replace the ones I’d forgotten back at our hotel.  The wind was blowing much harder than 30-40mph.  I would guess that it was closer to 60mph.  My pants sounded like flags beaten by high winds and it was hard to even take a step ahead of you.  From the visitor center, we went up the stairs to reach the bridge.  Christine was eager to go across, but I had a lot of trepidation.  The bridge was “singing” more than “swinging”, but I was wondering if it was safe to cross.  Christine made her way across and per an earlier agreement,  if I was going to make her hike up Grandfather Mountain, I had to hold my end of the bargain and  walk across this 228 foot bridge.  Being 6 feet tall, the side railings barely reached my hips and I was worried that a strong enough wind would have blown me off.  The bridge has its name because the elevation here is 5280 feet above sea level making it a mile high.  The bridge actually only spans two rock formations that has an 80 foot drop, but it is still unnerving.  After making it across the bridge and back, we continued the hike.

Climbing Up the Grandfather Trail
Most of the way was steep and rocky.

Christine was having a difficult time making her way across the parking lot to the trailhead.  I would see her take one step forward and the wind blew her two steps to the side.  We made it to the other side and debated on if we could do this hike with such high winds.  I convinced Christine to go a little further, hoping that the brush would slow the wind and after a short distance we didn’t feel the affect of the wind.  We began the hike up using the Grandfather Trail, a blue diamond-blazed trail.  At .8 miles (including the hike from the parking lot), we reached a junction with the Grandfather Extension trail.  We kept going forward on the Grandfather Trail and at .9 miles, we reached Grandfather Gap, an open area that gives you great views.  Continuing on at 1.4 miles, we reached a junction with the Underwood Trail.  We stayed again on the Grandfather Trail and in a short distance the first ladder appeared.  This was a long ladder (the first of nine total) that helped you navigate through a tight gorge between two rocks, but was not that scary.  Shortly after this ladder, the real fun started where we had to do some rock scrambling, sometimes with the assistance of cables before coming up to a series of ladders.  These ladders were definitely more frightening as you had to often climb up one ladder and then take a step to the left and climb up another ladder.   We saw several people that got to the ladders and then wisely turned around as they didn’t think they can handle it.   Knowing your limitations is definitely important.  These ladders eventually led up to to one area that you were climbing up ladders on the side of the mountain with an insane drop to the side.  We made it up this final ladder and took a moment to reflect on what we did and take in the views from the side of the mountain.  We continued on the trail for a short distance and at  1.4 miles we reached a ladder on the side of the rock leading to the summit of MacRae Peak at 5845 feet.  You climb up this 20 foot ladder and then grab a cable at the top of the ladder to pull yourself up the rock.  You can find the benchmark for the peak at the top of the rock, giving you 360 degree views all around you, including the bridge to the southwest.

Christine Climbs a Ladder
Christine climbs a ladder on the Grandfather Trail. Below: One ladder went between two giant slabs of rock; Adam pulls himself up a sheer rock face; More ladders along steep, cliffside terrain.

Climbing Between Slabs Cable Pull Ladder Climb

We climbed back down the ladder and then continued on the Grandfather Trail to the next peak.  At 1.5 miles, we reached another junction with the Underwood trail.  Continuing on the Grandfather Trail, we went up to The Chute, a rock scramble that leads to the top of Attic Window Peak.  The scramble wasn’t too tough, but did require you to climb up on all fours at some points.  We reached the top at 1.7 miles and passed the overnight Attic Window campsite.  Continuing on the trail, we reached a junction with the Indian House Cave, a short but steep side trail that leads to a cave wall that was a shelter to Native Americans back in the day as artifacts were found here when it was first discovered.  We continued back on the Grandfather Trail and the trail here begins to be more of a ridge walk.  We took some time to find some nice spots to take in the views, eat some snacks, and then made our way back.  At the junction with the Underwood Trail at 2.2 miles, we ended up taking this Yellow Diamond blazed trail to avoid the ladders on the return.  This was a steep and rocky trail back without much to see and there is still one large ladder to climb down on the way, but it feels safer than the ones leading to MacRae Peak.  At 2.7 miles, we reached the opposite end of the Underwood Trail, rejoining the Grandfather Trail, by taking a right.  At 2.9 miles, we reached the junction with the Grandfather Extension trail and then took this Red Diamond blazed trail downhill through some switchbacks for .6 miles (with some more views along the way) until we reached our car at 3.5. miles.

Many people just drive to the upper parking lot to experience the Mile High Swinging Bridge and then return.  It is definitely a highlight of Grandfather Mountain, but we were so glad that we hiked past this feature.  The bridge used to be a wooden suspension bridge (erected in 1952) and used to sway more in the wind, but the side rails and floorboards were replaced with steel in 1999.

Adam Enjoying the View Near the Top of MacRae
Adam enjoys the view near the top of MacRae.  Below: The Blue Ridge Parkway winds its way through forest below Grandfather Mountain; the last ladder to the top of MacRae; Beautiful rugged scenery on Grandfather Mountain.

View From MacRae summit ladder Landscape on Grandfather Mountain

Grandfather Mountain was originally named Tanawha Mountain by the Cherokee, meaning “glorious hawk or eagle”.  It was named Grandfather Mountain by pioneers as one view of the mountain does look like an old man’s face staring up into the sky.  Daniel Boone once hunted in this area and John Muir after climbing Grandfather Mountain in 1898 proclaimed that the air during his climb had healed him of a bronchial cough.

Overall, I will say this has been one of my favorite and most memorable hikes that I have ever done.  The views are absolutely gorgeous around you, as you can see for miles around on a clear day.  Once you reached a viewpoint, you thought that it couldn’t get any better; but then you would take a few more steps and be even more impressed.  We definitely plan on returning to tackle the hike all the way to Calloway Peak, the tallest peak at 5946 feet.

Christine Says…

It’s kind of ironic that John Muir proclaimed that Grandfather Mountain’s air cured him of bronchitis. I was sick as a dog when I hiked this trail, and the air did not have any magical curative properties for me!  In fact, I think it may have helped precipitate my garden-variety bronchitis into a full-blown, month-long battle with pneumonia.

Some readers might wonder why I didn’t do the sensible thing and actually rest while I was sick.  I wish I had been smarter, but we had planned this trip several months earlier and were there to celebrate our 15th wedding anniversary.  There was no way I was going to miss it.  So… stupidly, I pushed myself mercilessly so that I could see and do all the things we had planned.  I had a great time on the trip, and especially this hike – but I definitely paid a high price for all that fun.

More Ladders Near the Chute
Adam approaches the rock scramble known as The Chute.  Below: The Chute

The Chute

Illness aside, this hike is probably near the top of my list of all-time favorite hikes.  The scenery was breathtaking.  Every boulder I rounded, every opening I stepped into; I practically gasped with disbelief at how truly beautiful nature can be.  The ladders and cables were a perfect balance of scary and fun. I felt challenged and rewarded in equal measures.

Our adventure started off in the hiker parking area on Grandfather Mountain.  The trail from the parking lot to the bridge was short and easy.  Almost immediately, we could hear the harmonic hum of the wind whipping through the bridge.  Evidently, the ‘singing bridge’ is a more accurate moniker than ‘swinging bridge’.  We spent a little time at the ‘Top Shop’.  We both crossed the bridge.  I was very proud of Adam for crossing.  He does not like heights and the bridge was not a happy place for him!

The bridge didn’t scare me at all, but the wind’s strength did!  The main trail system on Grandfather Mountain starts directly above the parking area.  The sign marking the trailhead is loaded with many, many warnings and cautionary tales.  On the way over the the trailhead, the wind literally blew me off my feet!  I rolled like a tumbleweed across the parking area – pretty remarkable for a full-grown, adult woman!  It was the strongest wind I’ve ever encountered — even topping the weather we experienced on Mt. Washington.  I told Adam that I thought it was stupid to hike in such strong wind, but he encouraged me to hike a little along the trail, in hopes that the trees and other obstacles would shelter us from the wind. Thankfully, he was right and the wind wasn’t bad for most of the hike.  

All of the ladders and cables were sturdy and securely fixed to the rock, so I never felt like I was in any real danger.  They greatly aided us in traversing some very steep terrain.  When you look at MacRae peak from a distance, it looks so steep and practically unscalable.  When you finally climb the last ladder to the highest point of the peak, you truly feel on top of the world!  We shared the peak with a group of Boy Scouts and a group of Amish men.  Quite an interesting mix of folks!

Beautiful views from Attic Window Peak
Beautiful views from Attic Window Peak.  Below: Tent site on Attic Window Peak; More gorgeous vistas

Tent Site More Views on Grandfather Mountain

After leaving MacRae, we continued along the Grandfather Trail in the direction of Calloway peak.  The trail took us through a fun and challenging rock scramble called ‘The Chute’.  Near there, we met one of the Grandfather Mountain rangers.  He was out hiking the trail to sweep for hikers in trouble and for people who might be cutting time short to make it back to the parking area by 5:00.

After the Chute, we passed the Attic Window Peak backcountry tent site.  After that, we walked a short way along an open, razorback ridge or rock.  We had more spectacular views looking toward Banner Elk and in the direction of Calloway Peak.  Along this ridge, we stopped for a snack.  While I was eating my Luna bar, I measured up the distance to Calloway peak.  I wasn’t feeling any better.  I was cold, stuffy, achy and exhausted.  As much as I wanted to reach Calloway peak, I wanted some soup and a hot bath even more.  I apologetically told Adam that I couldn’t go any further.  I could tell he was disappointed, but he willingly turned back.

Cliffside View
Adam enjoys cliffside views. Below:  Fall foliage from Grandfather Mountain; Our last ladder down the Underwood Trail, Fall Foliage; Rocky and rooty footing on the Underwood Trail.

Fall Color Final Ladder Grandfather Extension
Underwood Trail Adam Climbs Down the Underwood Trail

On the return, we took the Underwood Trail.  It was quite steep and rocky, but only required one downward ladder climb.  Eventually, we reached the junction of the Grandfather Trail and the Grandfather Extension.  The extension led us back down to the hiker parking area without having to cross the Swinging Bridge parking lot again.  That little section of trail had one pretty view from a bridge and lots of fall color.  We got back to the car and made our way back down the mountain.  I could not believe the line of cars waiting to get into Grandfather Mountain.  It stretched for several miles!  Insane!  I guess it’s a good idea to get an early start when you visit Grandfather.  All in all, it was a super day and a great hike.  I can’t wait to go back sometime when I’m not sick!

Trail Notes

  • Distance – about 3.5 miles
  • Elevation Change – about 1600 feet
  • Difficulty – 4.5.  The ladders and cables make this a tough hike.  The climbs over the mountains make this hike take a lot longer than you would normally on this distance.
  • Trail Conditions – 4.  The trail was in good condition.  Ladders and cables were sturdy and secure, but rainy/icy/snowy weather will make the rock climbing treacherous.  If you have a fear of heights, ladders or precipitous edges, this hike might not be for you.
  • Views5.  AMAZING!
  • Waterfalls/streams – 0. There are no streams on this hike.
  • Wildlife – 0. This area is heavily traveled, so it’s unlikely you’ll see wildlife.
  • Ease to Navigate –4. The junctions at all the trails are well-marked.  We got a little turned around through one of the rock scrambles.
  • Solitude – 1.5.  Expect to see lots of people on this trail unless you go at an off time.  But we never felt too crowded where we couldn’t enjoy things by ourselves.

Directions to trailhead:  The entrance to Grandfather Mountain is located on US 221, two miles north of Linville, North Carolina, and one mile south of the Blue Ridge Parkway at milepost 305.  Signs for the entrance are well-marked and an entrance station is right off the road with large gates.  Travel up the road by car until you reach the parking lot designated for hiking trails.  The trailhead for the Bridge Trail is on the left side of the parking lot as you are driving up. Coordinates for the hiker parking area are 36.096145, -81.831802.

Beacon Heights (NC)

North Carolina Hikes

The walk to Beacon Heights is just another short, easy leg-stretcher we did on our fall trip down the Blue Ridge Parkway.  Beacon Heights has the bonus of offering two separate, but equally spectacular, vistas at the summit.

Beacon Heights View
Adam takes in spectacular foliage from the view atop Beacon Heights.

Rolling Mountain Scenery Beacon Heights Trail Sign Beacon Heights Boulder

Adam Says…

The Beacon Heights trail, like the Rough Ridge trail nearby is a trail that gives you great views for minimal effort.  This trail has two different expansive viewpoints at the top.

We started off our hike by parking in the parking lot at mile 305.2 on the Blue Ridge Parkway.   Across the parkway, you can see Grandfather Mountain looming overhead.  Behind the parking lot is another parallel road, SR 1513.  We crossed that and found the trailhead easily.  The trail goes up and comes to a junction shortly.  Take a right at this junction to follow the Mountains-to-Sea/Beacon Heights trail.  At .2 miles, you reach another junction as the Mountains-to-Sea trail and the Beacon Heights trail splits.  Take a left on the Beacon Heights trail.  At .3 miles, you reach a junction where the trail splits where their is a stone bench.  Each junction leads to views from Beacon Heights.  The path to the left leads to an outcropping that provides great views to the north and west.  The path to the right leads to another outcropping with views mostly to the east.  Either spot provides plenty of room to spread out and take in the scenery.  Head back the way you came for about a .7 mile round trip.

Due to the shortness of the hike, you should expect a lot of people at the top.  I’ve heard this trail referred to as a “leg stretcher” and that is an accurate description.  It is not too difficult, so there isn’t much of a need to get geared up for an intense hiking experience.  My favorite of the two viewpoints was at the junction to the left of the bench, since it did provide views of Grandfather Mountain from the top.   With a cell tower visible on the other junction, it takes a little away from the view for me.

Beacon Heights View
The view on the right side of the bench.

Christine Says…

This was the last mini-hike of three we did in one day near the Linn Cove Viaduct.  It was a great way to finish the day, and a good way to work off some of the English Pub fare we enjoyed for lunch.  The walk was short and followed a gentle uphill grade.

The two views at the top were beautiful, and the fall color was simply spectacular!  If we had planned our day a little more thoroughly (and if I hadn’t been so sick), I would have liked to park near Beacon Heights and then follow the Tanawha Trail from Beacon Heights all the way over to the Rough Ridge area.  It would have been a great out-and-back with lots of scenery and view pay-offs.

After Beacon Heights, we briefly discussed tacking on another short hike up to Table Rock, but in the end I was just too worn out to go any further.  Adam and I agreed at the end of the day that we must make a return trip to the area to make up for all the stuff we missed seeing on this trip.

Trail Notes

  • Distance – About .7 miles
  • Elevation Change –  120 ft
  • Difficulty – 1. This is a fairly easy hike.  It’s slightly uphill, but almost anyone should be able to make it up.
  • Trail Conditions – 3.5.  The trail is in great condition, but rain could leave a few areas slick.
  • Views4.5.  Just docked it half a point for the cell tower visibility.
  • Waterfalls/streams – 0. There are no streams on this hike.
  • Wildlife – 0. This area is heavily traveled, so it’s unlikely you’ll see wildlife.
  • Ease to Navigate –4. Follow the signs to Beacon Heights and you won’t have a problem.
  • Solitude –1.  We saw quite a few people on this hike.

Directions to trailhead: Follow the Blue Ridge Parkway to mile marker 305.2  Park in the parking lot or along the road.  Behind the parking lot is another parallel road to cross and you will see the trailhead on the other side.

Blackbird Knob – Dolly Sods (WV)

This 5.8 mile out-and-back hike along the Blackbird Knob trail gives you a sampling of many of the beauties offered by the Dolly Sods Wilderness area. While you don’t get any high-up, panoramic vistas, you still get amazing views across the high plateau.

Adam and Wookie in Dolly Sods
Dolly Sods is spectacular in the Fall. Below: Trailhead along the forest road; Off to a chilly start! The morning was breezy and in the 30s; Dolly Sods is famous for turning crimson in the fall.

Forest Road Off to a Chilly Start Berry Bushes Turn Crimson

Adam Says…

Fall is here!  At least it has arrived in Dolly Sods.  For those that haven’t been to visit out this wilderness area on the eastern side of West Virginia, you will be impressed by the terrain.  I have read many times that the terrain and climate up here is more similar to Canada than the surrounding areas of West Virginia and Virginia.  You will quickly notice that the vegetation is just different here – you’ll see spruce and conifers in one direction and blueberry bushes and boggy areas in another.

After hyper-extending my knee on our last backpacking trip, I was thinking another trip the next weekend would be a little too much of a re-injury risk.  But, we wanted to do something fun since it was Christine’s birthday, so I suggested that we spend the weekend in Canaan Valley to enjoy some of the early fall color.  The last weekend of September is usually the Leaf Peepers Festival in Canaan Valley, but we were hoping for some fall color the week before and we weren’t disappointed.

Wilderness Wookie Enjoys Dolly Sods
Wookie rests on a warm rock in the sun. Below: Christine checks out a trail marker.  There are very few signs and no blazes in Dolly Sods; Fall color is starting to pop; Walking past a colorful maple.

Trail Sign Fall is Starting Walking Past the Maples

I feel it is necessary to put out a few warnings about Dolly Sods.  First, the trails are not well-marked.  They typically will have some trails marked at intersections, but there are no blazes on the trails and if you wander off on something that looks like a trail, you could become lost.  Second, the road to get to and through Dolly Sods is very rough.  You won’t see many Toyota Prius-like cars on this road.  We approached it from Canaan Valley and there are some scary roads to drive up.  You are on a road barely able to fit two cars with a large drop-off on the side.  We were almost hit by some locals barreling down a blind curve on the road and they only missed hitting us by a couple of inches.  The road through Dolly Sods is also extremely rough and filled with potholes.  We’ve gotten a flat tire up here before and hope to never experience that again.  You’ll need to drive very slowly and steer away from any potholes or sharp rocks sticking up.  Four-wheel drive is not completely necessary, but it may give you ease of mind.  Third, good maps are hard to find.  As I mentioned on our Rohrbaugh Plains post, probably the best maps are available online.  If you are looking for printed maps, we’ve bought quadrant maps of the Dolly Sods area from the nearby Seneca Rocks Discovery Center, but I’ve found some flaws with these marking trails properly (the quad for Blackbird Knob showed the knob on the wrong side of the trail).  The online maps area also from 2006 and the quads are mostly from 1995.

For the hike to Blackbird Knob, we parked on the eastern side of the road just north of the Red Creek Campground area.  You should see the large trailhead sign on the western side of the road just past the campground area.  You quickly cross a boardwalk over a boggy area and then you will pass a large open area of pine forest to the right.  In .3 miles, you will come to a grey sign that shows the trail goes to the left deeper into the woods.  You may not see a trail to the left, but follow the sign and you will begin to see cairns that will lead you back to where the trail is more apparent.  At .5 miles, the trail opens up to a larger field with nice views around you.  The trail begins to descend at this point, but you will still see some views as you are walking through an open field.  At mile 1.1, you reach Alder Run, which requires a small rock-hop to get across.  You will then go slightly uphill through the forest again, but it will soon open up to more views.  The trail then goes back into the woods and you will arrive at Red Creek at 1.6 miles.  You will need to do more substantial rock-hopping to get across, but we didn’t have any trouble.  The trail goes steeply uphill at this point.  At 1.8 miles, the trail again opens up to spectacular views.  You will shortly come across a junction with the Upper Red Creek Trail at 1.9 miles.  Stay straight on the trail and you’ll duck back into forest.  At 2.1 miles, you’ll reach another junction with the Red Creek Trail, which leads back to the campground.  Stay straight again and it will finally open up to spectacular views.  You are then making your way along the circumference of Blackbird Knob.  Gorgeous fields with ridge views to the left give you many options to take in the sites.  There are boulders on the hillside that seem to be placed by nature as auditorium seats to enjoy this area of wilderness.  We continued along the trail until about 2.9 miles, when the trail was going to continue back into the woods.  We turned back and returned the way we came.

Berry Bushes
Color everywhere! Below: Fall foliage scenery along the Blackbird Knob Trail. Below: Enjoying the fall color.

Dolly Sods is Spectacular in the Fall Fall Color in Dolly Sods Maple

Time for a few confessions.  We had packed our bags fairly quickly to head out for our hike.  I forgot to pack the lunch that we were going to eat on the hike.  All that I brought with us was a small bag of nut-heavy trail mix.  Christine has a mild nut allergy, so we were a little concerned about food.  I remembered that I left some Combos in the car, so we were saved with that.  But, I need to learn to be a little better prepared when going into this area.  As I mentioned before, maps of Dolly Sods are hard to find and trails are not marked very well.  We were surprised how many people just came out here and were hiking without maps.  We ran into a few guys that were unsure of where they were going.  I showed them where we were on our map and they said they would just go on ahead and hope they can catch a trail that will eventually loop them back to where they were.  Not the smartest strategy.

We really enjoyed our trip to Dolly Sods to explore this area.  Since we hadn’t received much fall color yet in Virginia, it felt like we had a private advanced screening of the color that we’ll experience here in a few weeks.

Christine Says…

Dolly Sods is somewhat of a phoenix that has risen from the ashes.  Its rugged beauty is actually a mask that belies years of abuse and damage.  Until 1930, Dolly Sods was heavily logged.  Entire mountainsides were stripped bare of their pristine, old-growth forest.  The largest tree ever harvested in West Virginia came from this area – a magnificent white oak – about 1000 years old and nearly as big as a Giant Sequoia.  Once the hillsides were barren, woodchips, fallen pine needles and small trees dried in the sun and became perfect fodder for catastrophic fires.  Flames consumed more than 24,000 acres, scorching the earth down to bare rock.  After the logging industry closed up, the government purchased the land.  In the 1940s, Dolly Sods was used as a training range for the military.  As recently as 2006, a significant amount of unexploded ordnance was still being found along trails.

Red Creek
Red Creek gets its red color from tannins.  Below: Adam and Wookie cross; Fall color and a rocky stream bed; Trail marker in Dolly Sods.

Stream Crossing Fall Along the Creek Trail Sign

Despite all the damage the land has endured, it is still one of the most breathtaking places in the entire mid-Atlantic.  I don’t think it’s hyperbole to say that there is nothing else like it.  We were lucky enough to visit this fall on one of those perfect, technicolor, early fall days.  The sunshine was sparkling, the sky was crystal clear and deep blue.  Already, maples were turning to flame-color and entire hillsides of fern were glowing and golden.  While Dolly Sods is rugged as a whole, the Blackbird Knob Trail is gentle and without much change in elevation.  Because it was an easy hike, we decided to bring Wookie along.  He was so excited to finally be on a hike!

We started out along a clear path through the woods, but at the first trail sign, we became a little confused.  The obvious, worn path led in the opposite direction of the directional marker on the trail sign.  We sat and pondered for a moment.  We consulted a map.  We didn’t see any sign at all of a trail leading in the arrow’s direction, so we assumed a prankster had turned the sign.  We took the trail a short way uphill before it dead-ended in a thicket of laurels.  We backtracked and followed the arrow’s direction.  For a short while, we were just walking through the woods, but eventually we spotted the cairn and then finally we were back on worn trail.  This is very typical of Dolly Sods!

The first open view came shortly after our brief detour.  From a pile of rocks, we could see all across the high plateau.  Distant hillsides were already covered with red foliage.  The open meadows were covered with crimson berry bushes and tall, tawny grass.  We all stopped to enjoy the perfect fall day –  I snapped photos and Wookie stretched out on a warm rock.  After a brief stop, we continued along.  A few minutes later, we passed a pair of backpackers.  Then we passed three more.  Then we passed five more.  Passing backpackers became pretty much the ‘norm’ for the rest of the hike.  All in all, I’m sure we saw thirty or more people out for the weekend. Typically,  I think of Dolly Sods as being rather remote and isolated.  On this particular weekend, it was not the case.  People were everywhere!

Ferns and Fall Color
It was a technicolor day in Dolly Sods.  Below: Adam hikes across the open terrain; Fall color all along the hillside; Christine enjoys the fall color.

Hiking Along Fall Color in Dolly Sods Christine Enjoying the View

Throughout the hike, the trail passed in and out of trees and open spaces.  We crossed Alder Creek and Red Creek.  Both were running, but on the low side.  I’ve heard that streams are often uncrossable in Dolly Sods in the spring.  It’s hard to imagine that when you see them running so meagerly in the early fall.  Red Creek was especially lovely.  Tannins give the water a rich, reddish color.  I suppose the name ‘Red Creek’ is very well-suited for this body of water!

When we reached the end-point of the hike, we stopped for a snack.  As Adam mentioned, he forgot our lunches.  So, he ate peanuts and cashews, while I picked all of the remaining M&Ms out of the trail mix.  It was enough to tide me over for the walk back to the car.  Honestly, it was such an easy hike that it really didn’t require that much energy.  It also left me nice and hungry for an early dinner at Hellbender Burritos.  For a tiny town, Davis, WV has two very good restaurants (the other is Sirianni’s Pizza Cafe).  At Hellbender, I got my favorite Gendarme burrito.  It’s basically a steak and cheese in a bowl – medium rare chunks of steak, smothered with grilled onions and peppers and then doused with queso.  Yum! And even better (or worse… depends on how I look at it), I discovered Harpoon Pumpkin Cider.  I’m a very picky beer person, but I really like most hard cider, and this seasonal pumpkin cider might be the best thing I’ve ever had to drink!  Sadly, it’s very, very hard to find in our area.  Even the local beverage shop can’t special order it and it’s nowhere to be found in stores.

Wookie Says...Wookie Says…

Sometimes the tail says it all.  What I mean by that is that on this hike for most of the way, my tail stayed nice and curled.  When I get tired, it tends to start drooping like a flag slowly being brought down the pole.  But I really enjoyed myself in Dolly Sods Wilderness.  This was my first trip out there.  Christine and Adam often call me, “Wilderness Wookie”, but this was the first time I have been in true designated wilderness area.

Wookie Crossing Red Creek
Wookie crosses the stream. Below: Adam and Wookie hike on the return leg of the out-and-back; Adam enjoys fall color; Don’t miss a visit to Bear Rocks when you’re in Dolly Sods.

Wookie and Adam Hike Hillside of Color in Dolly Sods Don't Miss a Visit to Bear Rock

My highlights of the trip were when first reached the open field around .5 miles.  I spread out on a nice rock, sniffed the brisk, fall air and enjoyed the views.  I also really enjoyed eating a few cashews from the base of Blackbird Knob.  Christine poured a little rock in a natural bowl in the rock and Adam gave me some nuts to help me re-energize for the return trip.

My lowlights of the trip were crossing Red Creek and the initial boardwalk.  The boardwalk made me a little uncomfortable since there were spaces where my paws could have slipped through.  Crossing Red Creek was a little more troublesome.  I really don’t like getting my feet wet.  But, I took a wrong step and got my front paws wet.  I jumped back away from the water and then made a successful second pass.  My tail immediately went down to let Adam and Christine know that I didn’t like getting wet.  I don’t mind mud as much and my feet did get quite muddy along the trail.  But by the time that we got back to the car, most of the mud had come off.

Going almost six miles is a little taxing for a pug.  For some reason, I don’t see a lot of other hiking pugs out there.  When we got to the car, I immediately fell asleep and was snoring loudly by the time that we got moving.  Of course, when we got back home I had to strut my stuff and tell my brothers, Yoda and Mojo, that I went on a great hike.  I’m glad it’s finally getting a little cooler again so I can get back on the trails.  Wilderness Wookie is ready to do some more fall hiking!

Trail Notes

  • Distance – 5.8 miles.
    (Check out the stats from MapMyHike)*
  • Elevation Change –  440 feet
  • Difficulty – 1.5. The trail is not that steep at all, so most people should be able to handle it.
  • Trail Conditions – 3.  The trail was in decent condition and was not overly rocky or muddy today.  I do think mud could be a problem after larger rainfalls though. 
  • Views3.  While you don’t get views from a big overlook, the scenery along the way is quite gorgeous.  Open fields and views of mountain ridges in the distance give you a lot to see.
  • Waterfalls/streams – 4. Red Creek gives you a reliable water source and picturesque stream views.  There are plenty of backcountry campsites near the stream if you are planning an overnight backpack trip.
  • Wildlife – 3. While we didn’t see any large wildlife on this trip, the area has plenty of wildlife.
  • Ease to Navigate –2.5. As we’ve mentioned, trails are not blazed and only some junctions are marked with signage. 
  • Solitude –2.  We saw over 30 people on the trail.  Most of these were backpacking groups.  If you go on a nice weekend from Spring-Fall, expect to see others.

Directions to trailhead: From Seneca Rocks, go North on WV 28 for 12 miles.  Take a left on Jordan Run Road.  Go one mile up Jordan Run Road and take a left on to Forest Road 19.  In 6 miles, Forest Road 19 comes to a T on to Forest Road 75.  Take a right, heading north on the gravel Forest Road 75.  Drive for five miles until you pass the Red Creek Campground parking on the left.  Park on the opposite side of the road where the grey trailhead marker is located.

* MapMyHike is not necessarily accurate, as the GPS signal fades in and out – but it still provides some fun and interesting information.

Three Ridges Wilderness

This 13.2 mile circuit can be done as a day-hike, but we recommend extending the beauty and wildness into an overnight backpacking loop. Take your time, and you’ll be treated to panoramic views, lovely mountain streams, demanding climbs and peaceful campsites.

View the full photo album from this backpacking trip on Flickr.

Christine Takes in a View of the Priest from Three Ridges Mountain
Christine takes in a a view of The Priest from Three Ridges mountain. Below: Welcome to the Three Ridges Wilderness;  Over half of the circuit follows the Appalachian Trail; Nothing beats a campfire in the evening.

Welcome to Three Ridges Wilderness Adam Hikes the Appalachian Trail Great Campfire

We had long been planning a three-day backpacking trip across Mt. Rogers, but as the day of the trip drew closer, we started seeing the term ‘Appalachian soaker’ thrown around in weather forecasts.  We’re fine with passing showers and fleeting thunderstorms, but we didn’t want to get pinned down on Mt. Rogers on a wet and stormy night.

Fortunately, the weather in central Virginia was far more favorable, so we ditched our Mt. Rogers plan, and decided to hit another backpacking circuit on our list – Three Ridges.   This route, which makes use of the Appalachian Trail and the Mau-Har Trail, is known as one of Virginia’s most rugged hikes.  Everything we read about the circuit in advance of our trip emphasized the hike’s strenuous nature. With roughly 6,800 feet of elevation change, you’re almost never walking on flat trail.  It’s a constant onslaught of heart-pounding climbs and knee-grinding descents. But along with the challenging terrain, you get spectacular views, beautiful streams and lovely campsites.

We started out early Saturday morning.  The first stop was fuel… for ourselves.  We had a huge breakfast at The Chuckwagon in Harrisonburg.  If you have a chance, stop by and indulge in one of their homemade 4-inch biscuits  (Adam’s favorite is ‘The Round-Up’) or a stack of their amazingly fluffy pancakes.  (Sadly… Chuckwagon closed in January 2013) With full stomachs, we made our way to Reed’s Gap at mile marker 13.7 on the Blue Ridge Parkway.

When we got to the parking area, the lot was already jam-packed, mostly with heavy-duty construction vehicles left idle for the weekend.  Just as we were about to give up and find a parking spot further down the parkway, one car pulled out and left an opening for us!

Some of the Meadow Mountain Climb was Rocky
Adam makes the initial climb up Meadow Mountain. The climbing was occasionally rocky, but never terribly steep.

We started the Map My Hike app on Christine’s phone, hoisted our packs, and headed south along the Appalachian Trail.  From the parking area, the trail hugs the edge of a meadow, which was full of blooming yellow ragweed and purple thistle.  It was such perfect weather for backpacking – sunny skies, low humidity and a crisp breeze.  The trail almost immediately began to climb uphill over Meadow Mountain.   The climbing was steady, but never difficult, for about .8 of a mile.

At the top of the ridge, there was a small dry campsite with obstructed views.  Department of the Interior boundary markers were all along the ridge.  We spotted at least three or four right next to the trail.  After walking briefly along level ridge, the trail descended to Maupin Field Shelter.  The shelter site had tons of space for tents (many of the tent sites were flat, soft and grassy), a typical AT three-sided hut, a metal bear-hang post and a picnic table.  The area also had an informational kiosk with trail notes and wilderness-usage policies.  There was also a child’s orthodontic retainer tucked into a Ziploc and pinned to the board.  We’re guessing there is now one retainer-less Boy Scout and a less than happy mother!

Christine Climbing Bee Mountain
Christine climbs the stone steps up Bee Mountain.

After Maupin Field Shelter we began climbing again, over Bee Mountain.  The climbing was slightly more strenuous, but definitely manageable.  In several places, rock steps were set into the trail to make the climbing easier.  Along the way, we started playing ‘Categories’.  It’s pretty basic – each player designates a category, then players take turns naming items that fit within that category.  For example, categories might include Movies Based on Comic Books or Items You Need on a Backpacking Trip. It’s pretty mindless, but it kills time.  Whoever successfully names the last item for the given category wins the round. The best category of the day was Complaints Uttered When Hills Are Steep. We won’t share the specifics of our trail talk here, but it was pretty funny to reflect on this topic!  Bee Mountain didn’t offer any views and was followed by a short descent before tackling the more serious climb up Three Ridges Mountain.

The climb up Three Ridges consisted of several steep pushes, with nice stops for views all along the way.  The first view, Hanging Rock, was very impressive, so we decided to break for lunch and enjoy the amazing vista.  As we ate our Panera bagels (Cherry-Vanilla with Justin’s Chocolate Hazelnut Butter for Christine and French Toast with Peanut Butter for Adam), we noticed two dogs fitted with radio collars – doubtlessly bear hunting dogs set loose in the woods for pre-season practice.  Both dogs were female; both were emaciated and showed signs of over-breeding.  We hate to cast aspersions or generalizations on any group of people, but we are not fans of hunters that use this type of technology to hunt bears.  Both of the dogs were pretty persistent about trying to steal our food.  The bolder dog, who was heavily perfumed by a skunk encounter, came within inches of snatching Christine’s bagel right out of her hand.

Bear Hunting Dog Looking at The Priest from Hanging Rock
One of the bear hunting dogs we encountered seemed to be enjoying a view of the Priest from the Hanging Rock Overlook. Below: Adam climbing the first uphill section of Three Ridges Mountain; Southbounders (BeeSting, Fats and Happy) contemplate the Priest and their upcoming climb;  The view from Hanging Rock.

Climbing Three Ridges Mountain Sobos and Adam on Hanging Rock Hanging Rock

While we sat at the overlook, we had a chance to chat with three Southbound AT hikers – Happy, Fats and BeeSting.  All three had started in Pennsylvania in August and were making their way toward Georgia.  Happy was already there when we arrived, so we got to talk with him for a good bit while he waited for his companions to show up.  He was from Las Vegas and on his first long-distance hike.  He told tales of his shoes breaking down on the Pennsylvania rocks, getting caught in a vicious cold-front driven storm on Bearfence Mountain, and his epic weight loss (40 pounds in less than a month!).  He was a nice kid and we enjoyed talking to him and telling him about some of the things he has to look forward along the trail in Virginia – The Priest, Spy Rock, Cove Mountain, McAfee Knob the Grayson Highlands.  He told us the friendliest place he’d stopped on the trail was the town of Waynesboro.

After a while, Fats and BeeSting came along.  They were a young couple from Montgomery County, Pennsylvania.  We didn’t talk to them as much, because we wanted to press on and make our way to camp by mid-afternoon.  Happy left a few minutes ahead of us, and we were sure we wouldn’t see him again.  Thru-hikers are known for keeping a blistering pace!

Upon leaving the vista, there was quite a bit more uphill climbing before we finally reached the true summit/highpoint of Three Ridges Mountain.  At the highpoint, we ran into a group of three women out on the same circuit we were hiking.  We chatted briefly about the great weather before leaving them to enjoy their lunch.

Christine and a Nice Three Ridges View
Christine enjoys the view on a perfect late-summer day.  Below: The actual high point of Three Ridges is in the trees; Adam walking through ferns along the trail.

Three Ridges Highpoint Adam Walking Through the Ferns

After the high point, the long, seemingly endless descent to Harper’s Creek began.  It wasn’t always super-steep.  Sometimes it almost leveled off.  As we were walking along,  we saw a bear dash off through the brush.  We were both glad that the bear hunting dogs hadn’t pestered the bear into a tree.  A few steps later, we heard an exuberant voice shouting into the wind  – ‘Woooooo!’  ‘Yeaaaaaah’!  ‘Echo Echo Echo’ and ‘I’m on TOP of the WORLD’.  As the voice drew nearer, we guessed it was Happy having a ‘mountain moment’.  Sure enough, he called to us through the trees so we could share the nice view spot he had found a little ways off the trail.

We left the spot before he did, knowing that there would be more views along the way. One unnamed view on the left side of the trail was especially beautiful.  We stopped for photos and a pack-less rest. A bit further along, we saw a huge flat, upright rock that looked just like a tombstone.  Immediately past that, we noticed a faint trail that climbed up steeply through the woods to a jumble of rock.  We guessed correctly that we had found Chimney Rock.  It was a great place to sit, and every bit as scenic as the very first overlook on Three Ridges.  We enjoyed looking down into the valley, dotted with homes, streams and a large Christmas tree farm.  The Priest, one of Virginia’s most beautiful and distinct mountains, loomed impressively across the way.

Adam Enjoys the View of the Priest from Chimney Rock
Adam enjoys one of the many spectacular views from Three Ridges Mountain. This particular stop came at a rocky outcropping known as Chimney Rock. Below: Views, views and more views!

Chimney Rock, No People Adam and his Backpack

After Chimney Rock, the last real vista was a wide flat shelf of rock overlooking the scene below.  After that, the downhill got pretty bad.  It was the bone-jarring, steep, type of downhill that makes your knees beg for mercy!  We both slipped a couple times on the descent.  It was probably all the fallen acorns – if your boot hits them just right, they sort of function like tiny roller-skate wheels.  Adam managed to hyperextend his knee on one slip, and hiked in a significant amount of pain the rest of the day.  Christine hit a loose flat rock and rode it like a surfboard until she finally landed hard, but unharmed, on her rear end.

Honestly, the uphill on this hike is moderately hard, but the downhill is brutal.  Anyone in reasonable condition should be able to handle the physical demands of the ascents along the trail, but if you have bad knees, the descents are nothing short of punishing. We both tried to keep our packs on the light side for this trip.  Christine’s pack was 22 pounds and Adam’s was 29… but that was before water.  After a dry week, we weren’t sure if Harpers Creek would be flowing, so we both carried quite a bit of extra water – 3.5 liters for Christine and 4 for Adam.  We knew there was a chance we wouldn’t need it, but when it comes to water it’s always better to be safe than sorry.

The Downhill Trail Was Rocky
The climb down from the summit of Three Ridges was grueling and rocky! Below: The trail went over many large boulders; It passed thick stands of rhododendron and mountain laurel; We were thrilled when the Harpers Creek shelter site came into view.

The Downhill was Punishing Climbing Downhill from Three Ridges Scout Camp

After over two miles of switchbacks, dangerous acorns and tricky rocks, the colorful domes of tents came into sight.  We had reached Harpers Creek Shelter – our stop for the evening. We found the shelter itself empty, but most of the tent sites adjacent to the shelter had already been claimed by a large group of Boy Scouts from Fluvanna County.

We found a mostly flat and smooth tent site across the creek, about 50 yards south of the shelter.  We figured it was a perfect spot – we were close to the shelter and could use it for a ‘kitchen’.  Also, the privy was on our side of the stream, but far enough from the tent that it wouldn’t be annoying when people went to use it.

For the most part, Harpers Creek wasn’t flowing.  There were several shallow pools in the streambed, which gave us plenty of access to water, but also provided a perfect breeding ground for mosquitoes.  Christine immediately noticed bites forming welts on her legs, so she quickly changed out of her shorts and into long pants.  She tried to change behind a large boulder, but she’s pretty sure the Boy Scouts saw her in her underpants, but hey… modesty sort of goes out the window in the backcountry.

Within twenty minutes, the tent was up, the sleeping pads were inflated, and sleeping bags were in place.  We set aside all the food, cooking implements, water filter and bear bags to take over to the picnic table at the shelter.  The Harpers Creek shelter was small and kind of dingy.  There was no shelter log.  Actually, the only thing in the shelter was a sodden pair of ‘tighty-whiteys’.

Adam set about collecting water.  We recently picked up a very handy collapsible bucket made by Sea to Summit.  It folds down to about the size of a deck of cards and weighs just a few ounces.  But, it allows us to collect up to nine liters of water at once.  Typically, we pump water through our Katadyn straight into the bucket.  Then we cover the bucket with a bandanna and usually have plenty for dinner, breakfast and bottle refills.

While Adam filtered water, Christine worked on collecting wood for a campfire.  It was already starting to get chilly, so it was a perfect night for a fire.  As is the case at most shelters, good firewood is hard to find.  There is always plenty of tinder/kindling, but the larger, long-burning pieces of wood are at a premium.  In the backcountry, we only use downed wood that we can break by hand.

Our Camp on Harpers Creek
Our camp on Harpers Creek. Below: Setting up our ‘kitchen’ at the Harpers Creek shelter; On the menu for dinner; Adam feeds the fire.

Setting Up Our Kitchen at the Shelter On the Menu Adam Fuels the Campfire

Christine made a teepee-style campfire with larger pieces of wood on the outside, and a tinder-packed center.  All of the wood collected from the forest floor was cold and damp, so the fire had a hard time catching at first.  A little squirt of alcohol-based hand sanitizer took care of that problem, and within a few minutes a small fire had sprung to life.

With the campfire going, water collected and the campsite set, it was time for dinner!  We keep saying we’re going to prepare our own fancy homemade backpacking meals, but when the time comes we always seem to find ourselves reaching for Mountain House or Backpacker’s Pantry.  It’s just easier, and for the most part, the packaged food is really tasty (notable exception – Natural High’s Banana Cream Pie – worst dessert EVER.) Our menu for the evening included Chili Mac with Beef as the entrée and Cheesecake for dessert.  Christine brought several sticks of cheddar cheese to mix into the chili and single-serving plastic bottles of Merlot. It was quite the feast!

After dinner, we put up our bear hang.  Oddly, this shelter did not have a metal post like most AT shelters in this part of Virginia.  We had to find a tree with a free branch.  After the food was secured, we settled into our camp chairs and enjoyed the fire.  Some people we’ve met along the trail think the camp chairs are a waste of pack space, but they fold down to about the size of a water bottle and weigh just about a pound.  We find them well worth the extra weight for the back-resting comfort they provide. We might not carry them on a long multi-day trip when every bit of pack space counts, but for a weekend trip, we like having creature comforts.

Adam Told Ghost Stories
Entertainment unfolds by the campfire. Below: Our tent at night.

Our Tent at Night

As we sat by the fire, we watched a little piece of comedy unfold on the other side of the stream.  A couple of the older Scouts had been assigned the task of hanging the group’s food.  We watched as they missed getting the rock and rope over the tree branch, dozens and dozens of times.  The boys took turns making fun of one another for their off aim.  Eventually, they got the rope over a branch.  They celebrated with a high-five and a ‘Woot!’.  But, the branch snapped off the tree as soon as they tried to hoist the weight of many food bags. Eventually they went for help and settled on a less-than-perfect, but still functional tree.  All in all, it took them over an hour to get their food hung.

Our campfire died around 9:00, so we headed back to the tent.  Adam read by headlamp and Christine listened to a book on her iPod.  For one of the first times ever, we both fell asleep quickly and slept soundly through the night.  We were actually awoken by voices and headlamps at what seemed like the middle of the night.  Christine rolled over and asked Adam ‘Is it around midnight and these kids are up late or is it morning already?’  It turned out that the Scouts were awake and cooking/packing up at 5:30 a.m.  We lazed around in the tent for another hour until the sun came up.

The Scouts actually hiked out around 7:00, just as we were getting breakfast together.  Usually, we’re the early risers and the first out of camp!  We made maple-brown sugar oatmeal with freeze-dried bananas and coffee and hot chocolate for breakfast.  We both ate two packs, knowing that we had a tough day of hiking on the Mau-Har Trail.

Christine is Ready to Tackle Day 2
After a good night of sleep, Christine is ready to tackle day two! Below: Adam changes out of his Crocs and back into boots; The Appalachian Trail departing Harpers Creek.

Changing Back Into Boots The Appalachian Trail Leaving Harpers Creek

After breakfast, we broke down camp.  Adam’s hyperextended knee was still pretty sore, so Christine stowed some of his gear in her pack to make his load a little lighter.  While she was transferring gear, she noticed that a mouse had chewed through the little mesh compartment on the hipbelt of Adam’s pack!  The only thing in the compartment was a set of car keys, so we’re really not sure why it was appealing to a mouse.  It reminded Adam of one of his favorite books as a kid – The Mouse and the Motorcycle.  He thought this mouse was trying to make a sequel with their car.

We left Harpers Creek around 8:00.  On our way out, we passed four or five other groups that had been tenting near the shelter.  All told, there were probably somewhere between 25 and 30 people camped along the creek that night. Quite a tent city!

After leaving the shelter site, we followed the Appalachian Trail for almost a mile, largely uphill, to its junction with the Mau-Har Trail.  The odd trail name is a combination of Maupin and Harpers – the names of the two shelters the trail runs between.  The Mau-Har was designed by a man named Angelo Filippi.  One funny review we read of the hike evidently thinks ‘designed’ is too kind a word for the trail.  The review states:

“We started from Reeds Gap and heading down the Mau-Har, cussing Angelo Philippe [sic] the whole dang way. I swear he unfolded a map, put it on the ground, pulled out a piece of string, dropped the string onto the map and said “There! That is where the trail should go!” What a jerk!”

Start of the Mau-Har Trail
The start of the Mau-Har Trail. Below: The Mau-Har trail starts innocently enough; Then it starts to climb more steeply downhill; And then it gets even steeper than it already was!

Mau-Har Starts Pleasantly The Mau-Har Gets Steep Then the Mau-Har Gets Even Steeper

To be fair, the trail was clearly designed to follow scenic Campbell Creek as closely as possible and following a creek that goes tumbling through a deep gorge is going to require some rugged climbing.  The Mau-Har trail descended very steeply to the creek.    Adam grimaced in pain from his knee injury on every downhill step.  The weight of his pack, combined with the steep trail was almost more than he could bear.  This was some of the gnarliest downhill we’ve ever done.

Eventually, we got to the spur trail that leads to a series of small waterfalls. Adam decided to stay put and rest his knee while Christine explored the falls. She took off with the camera, hoping to get a few documentary shots for the blog.  A few minutes later, Adam decided to follow.  He had heard there was a geocache hidden by the falls (known as “firedogs fishbowl”), but he had forgotten to input coordinates into his GPS.  He looked for it, but without coordinates it was pretty close to impossible to find.  The waterfalls were all very small due to low water flow.  In spring, with snowmelt and heavier rain, the creek is probably spectacular!

Christine at the Waterfall
Water volume in Campbell Creek was fairly low. Below: The section of the Mau-Har that follows Campbell Creek is very steep; Some sections require you to pull yourself over the rocks; Christine is happy for a more moderate grade.

Uphill on the Mau-Har Struggling Up the Mau-Har Happy for More Moderate Climbing

From the waterfall spur trail to the Maupin Field shelter, the Mau-Har climbs very steeply uphill.  At first, the trail is very rocky as it passes through the canyon.  You wind your way between and over boulders.  Sometimes you have to stow your trekking poles in one hand to pull yourself up over a big step.  It reminded us very much of hiking the gorge at Little Devils Stairs.  The terrain was very similar.  After leaving the canyon, the trail becomes less rocky, but no less steep.  A series of sweeping switchbacks carry you relentlessly uphill.  Eventually the grade becomes more moderate in the last half mile before you arrive at the Maupin Field shelter.

Near the end of the climb, Adam announced that he was going to stop at the shelter and ‘eat every single bit of anything edible left in his snack bag’.   Two packs of oatmeal, bananas and hot chocolate burn off pretty fast when the climbing is tough!  He proceeded to eat a Luna Bar, ShotBlox, a bag of cashews and a bunch of mini candy bars.  He reined himself in and skipped eating a dry packet of cocoa mix.

At Maupin Field, we read the shelter log.  Entries talked about the skunky, food-nabbing bear dogs (someone had named them Bagels and Muffins). A southbounder left a warning to northbounders about 20-30 miles of dry hiking.   Someone even left a really nice pair of ladies LaSportiva for someone to claim.

Maupin Field Shelter
Adam relaxes at the Maupin Field Shelter. Below: One of the stream crossings near Maupin Field Shelter; Adam checks out the shelter log; The Mau-Har’s end point at the shelter.

Stream Near Shelter Checking Out the Shelter Log The Mau-Har Starts Next to Maupin Field Shelter

The last 1.6 miles retraced our route from the morning before.  We had a gradual climb up and over Meadow Mountain and then back to our car at Reeds Gap.  We drove back toward home along the Blue Ridge Parkway, stopping at Humpback Rocks to wash our hands with soap and running water.  Our last stop was the Sonic in Waynesboro for more ‘refueling’.  We definitely earned some tater tots and CreamSlushes!

Three Ridges turned out to be a great alternative to our planned Mt. Rogers trip!  While the terrain was challenging, we think most people accustomed to backpacking/hiking would be up for the challenge and would enjoy the beautiful and wild scenery offered by this loop.

The one issue we would like to bring up is a discrepancy about the length of this hike.  Most sources list the loop at 14.4 miles.   Based on our information (maps, GPS, trailer marker posts), here is how we would break down the segment distances on the trail.

0.0 miles – Start from parking lot on Reeds Gap, heading south on the Appalachian Trail and begin your ascent.
.8 miles – The trail reaches the first ridge and shortly begins to descend through some switchbacks
1.6 miles – Reach the junction with the Fire Road (which heads to Love Gap).  Take a left to stay on the Appalachian Trail and pass a few side trails that lead to campsites at the Maupin Field Shelter.  The trail begins to climb again.
2.0 miles – Reach the summit of Bee Mountain
3.7 miles – Reach some great views from Hanging Rock.  Continue to climb further up through the woods.
4.2 miles – Reach the summit of Three Ridges
5.8 miles – Great viewpoint of the eastern ridge
5.9 miles – Reach the tombstone and take an immediate right up the path to reach Chimney Rock and the best views on the trail.  Rejoin the trail and descend steeply.
7.5 miles – Arrive at Harpers Creek Shelter across the creek and your stay for the night.  The next morning, cross back over the creek and continue on the Appalachian Trail.
7.6 miles – Cross Harpers Creek and the trail begins to ascend very steeply.
8.5 miles – Reach the junction with the blue-blazed Mau-Har trail.   Turn right and follow the trail that parallels Campbell Creek.
10.0 miles – Reach a sign designating a short yellow-blazed trail to a few waterfalls.  The waterfalls are only a  few hundred feet off the Mau-Har trail.  Retrace your steps and continue on the Mau-Har trail.
11.5 miles – Reach the Maupin Field Shelter.  Continue straight past the shelter to rejoin the Appalachian Trail.
11.6 miles – Take a left on the Appalachian Trail to retrace your steps back to your vehicle.
13.2 miles – Return to the Reeds Gap parking lot.

Returning to Reeds Gap
Returning to Reeds Gap. At this point, Adam said he was 90% sure he was going to survive the trip. Below: Christine had a great time!

She Survived

Trail Notes

  • Distance 13.2  miles
    (Check out the stats from MapMyHike [Day One] [Day Two])*
  • Elevation Change – About 3900 feet
  • Difficulty – 5.  This hike is no joke.  The downhill areas are steepest on the Appalachian Trail coming down from Chimney Rock and the uphill on the Mau-Har trail is equally brutal.
  • Trail Conditions – 2.5.  The trail starts off quite nicely, but once you reach Three Ridges, expect a rocky slide downhill and loose footing uphill for much of the hike. The Mau-Har Trail was pretty overgrown in places.
  • Views– 5.  Absolutely amazing.  Chimney Rock and Hanging Rock provide some of the nicest views.
  • Streams/Waterfalls – 3.  You’ll be near a stream most of the second day and there are a few small waterfalls.  The water wasn’t flowing too strongly though.
  • Wildlife –3.   We did see a bear.  Oh yeah, and the mouse ate through part of Adam’s backpack, so there is some wildlife out there.
  • Ease to Navigate – 4.  The trails were fairly well marked and signs were at the junctions.
  • Solitude – 2.  This is a tough hike, but it is popular for backpackers, trail runners, and day visitors to the shelters.

Directions to trailhead: On Blue Ridge Parkway, south of Humpback Rocks.  Park at mile marker 13.7 at Reeds Gap in the large lot.  Head south on the Appalachian Trail, marked with white blazes on a tree near the left of the open field. 

Pemetic Mountain – Acadia National Park (ME)

Special: Acadia Edition

This 2.9 mile segment hike starts from Bubble Pond, crosses Pemetic Mountain and comes out at Jordan Pond. You will either need access to two cars or the free Island Explorer Shuttle Bus.

Adam on the Pemetic Summit
Adam enjoys views from the Pemetic summit. Below: Christine climbs steeply up the trail; Views of Eagle Lake in the morning clouds; Adam walks across Pemetic in the direction of Jordan Pond; Jordan Pond.

Uphill Climb Foggy View of Eagle Lake
Adam Hiking Down Jordan Pond

Adam Says…

We had hiked up Pemetic Mountain as an out-and-back on previous trips up to Acadia National Park, but we decided that we wanted to try a different route this time to incorporate both sides of the mountain.

We started from the Bubble Pond parking lot early in the morning.  This lot has space for about 20 cars.  If you’ve been to Acadia before, you will know that there will be a lot more traffic than what this lot can accommodate.  The proximity to the carriage roads makes this a popular spot for cyclists to park.  By 10 a.m. this lot will likely be full and you will have to park elsewhere.

From the parking lot, we walked, taking a left, over the Bubble Pond bridge and down the carriage road.  Within about 200 feet you will see a sign for the trailhead to Pemetic Mountain.  The trail starts off with a steep grade through the deep woods, climbing up through exposed roots and rocky surfaces.  The rain had come down heavily the night before, so this made for some slippery footing.  After about .8 miles, the trail began to open up to a nice viewpoint where you could see across to Cadillac Mountain and down to the southern edge of Bubble Pond.  The trail begins to open up at this point as you will continue to rise until you climb above the treeline at the one mile marker.  In 1.2 miles, you reach the summit post of Pemetic Mountain, giving you panoramic views of the mountains, lakes, and ponds around you.

Bubble Pond Bridge
The Bubble Pond Bridge. Below: Bubble Creek was flowing heavily due to the previous day’s flooding rains; The first part of the hike is along the carriage trail;  The trailhead marker; Adam climbs over rocky terrain.

Bubble Creek Carriage Road to Trailhead  Trailhead Marker Rocky and Rooty Trail

From the summit, we decided to take a different path down and went down the South Pemetic Mountain Trail (you can also take the Northwest Pemetic Mountain Trail to form around a 4 mile loop with the Carry Loop).  This led across the open granite face of the mountain and we followed cairns along the way to ensure we were going the correct way.  The views on the way down this way were also spectacular.  At the edge of the exposed mountaintop, we reached a junction with other trails around the 2 mile marker.  We headed to the right towards the junction with the pond trail.  This put us back below treeline down a steep decline that was slicker than the way we went up.  We were both glad we brought our trekking poles to balance us on the wet granite trail.  At 2.4 miles, we reached the junction with the Pond Trail.  We took a right on this which descended until leveling out.  We crossed a small rockway bridge which took us right to the Jordan Pond House.

Lush Forest
The woods were beautiful. Below: Steep climbing; Tricky and complicated footing; The higher we climbed, the foggier it became.

Adam Climbing Complicated Footing Into the Fog

We went to the front of the house and caught one of the Island Explorer buses waiting out front which carried us straight back to the Bubble Pond parking lot and our vehicle.

Usually I am a little skeptical about bus systems and how convenient they are to use, but the Island Explorer system in Acadia won us both over for convenience and ease of use.  We used them earlier in the week to rent bikes and ride along the carriage roads.  They had a few bike shuttles running in the morning from the center of Bar Harbor.  We just lined up and we only had to wait about 15 minutes before the bus came to load up our bikes and took us to Eagle Lake.  I brought a bus schedule with me on this hike and there were buses coming by the Jordan Pond House about every 20 minutes that could take you back to Bubble Pond.    And if you start your hike early enough, you can be back at Jordan Pond to enjoy a nice lunch with popovers outside with your view of Jordan Pond and The Bubbles.  There is not much of a better reward for a great hike than that.

While we were relaxing at the top of Pemetic Mountain, Christine and I were ranking our favorite hikes in Acadia.  Over the years, we have done most of the hikes up here and there are so many great trails here.  But after much pondering, here is how I would rank my favorites:

  1. Cadillac Mountain South Ridge
  2. Penobscot Mountain/Sargent Mountain Loop
  3. Gorham Mountain
  4. Cadillac Mountain North Ridge to Dorr Mountain Loop
  5. Pemetic Mountain

Christine Says…

Before I share my thoughts about the Pemetic hike, I wanted to talk a little about the impact of inclement weather when hiking in Acadia.  Some years, we head to Acadia and have a full week of bluebird skies and seventy-degree days.  Those years are always glorious and memorable. Other years, the island seems to stay trapped under a stationary area of low pressure – with ongoing rain, fog and humidity. 2012 happened to be one of those years.  We had a few nice (though still hot and muggy) days, but more days ended up foggy and rainy.

Normally, if it rains on a hiking trip, you throw on your rain gear and press on.  However, with all the slick, exposed granite in Acadia, it can be a dangerous place to hike when it’s been raining. Evidently, the summer of 2012 was quite rainy and a very bad summer for hiker injuries in the park.  In the several weeks before we arrived, a man slipped, fell and broke his leg on Dorr Mountain, another woman slipped and seriously injured her back on Gorham Mountain, and sadly another young woman (an experienced hiker) slipped and fell to her death on the Precipice Trail.  Hiking in wet, rainy conditions is not something to be taken lightly on Acadia’s unforgiving terrain. If it’s raining, and you still want to hike, try the Carriage Roads instead.  They’re lovely and always safely passable.

Pemetic Summit
The Pemetic Summit.  Below: Adam climbs over granite as we approach the summit; A foggy view of Bubble Pond; A view of Jordan Pond from the summit; Adam enjoys the view.

Nearing the Pemetic Summit  Foggy View of Bubble Pond
Jordan Pond from Pemetic  Flat Granite on Pemetic Summit

The day before we hiked Pemetic, Mount Desert Island and Acadia received a lashing of bad weather. Streets flooded, ponds jumped their banks, and waterfalls poured off the mountainsides in places where there normally isn’t any running water. The rain lasted most of the day before finally slowing to a drizzle in the evening hours. In the morning, it was still wet and foggy, but the forecast called for the clouds clear off by mid-morning. It was our last day of vacation, so we wanted to get out there and do one last hike, even if it meant slogging through a bit of mud and taking our time to be careful on slippery terrain.

We decided to climb Pemetic Mountain, which is tucked into the space between Bubble Pond and Jordan Pond. We’ve hiked it before. I remembered it being steep, and covered with a tangle of roots and loose rock. I took a hard fall there a few years ago. I slipped on a layer of wet pine needles on granite and fell about ten feet onto a dead, and very spiky, spruce. One of the broken limbs stabbed through my shirt, into my back and left a puncture wound with a large surrounding bruise. Ouch!

Needless to say, we took great care climbing up this time, choosing our steps wisely and making sure footholds were secure. I remembered the trail being much tougher and steeper than it was, but I’m in better shape now than I was a few years ago. The wooded part of Pemetic is stunningly beautiful – lush and green. There are evergreens all up the mountainside, with their tall straight trunks leading to an umbrella-like canopy of green. The forest floor is colored in a patchy pattern of soft-red of pine needles and vivid green moss.

The Bubbles
A view of the Bubbles across Jordan Pond. Below: The trail downhill went through forest; The Island Explorer Bus.

Adam Hiking Down Island Explorer Bus

As we climbed, the woods became increasingly foggy. It was beautiful in a quiet, mysterious kind of way, but I worried that we would miss out on any views from the top. The first viewpoint we came to was at a small outcropping overlooking Bubble Pond. Banks of fog moved across the opening, sometimes we could see the pond and sometimes we could not. We took a short break for water and continued toward the summit. For a short stretch after the view, the trail dipped back into the forest until finally stepping out onto open granite for the final push to the summit. At the summit, we ended up having a decent view of Jordan Pond and Frenchman Bay beyond. There was still a lot of blowing fog and low clouds, but the openings between them were generous enough to make the view worthwhile.

We chatted with a few other hikers at the summit about different hikes on the island, enjoyed the views, and ate some trail mix. We took photos at the summit marker, looked for hikers across the way on Penobscot and Sargent, and then made our way down the opposite side of Pemetic. The granite dome of the mountain was impressive on the downhill hike – smooth and expansive, offering more views of the offshore islands. Eventually, we ended up back in thick, evergreen forest for the steepest part of our downhill climb.

At the base of the mountain we met the Pond Trail which took us slightly around Jordan Pond and then back to the Jordan Pond House. We contemplated getting popovers a la mode, but Adam really wanted to head back into town for lunch. We ended finishing our hike at just the right time! An Island Explorer Bus headed toward Bubble Pond was waiting for us to hop right on. It was such an easy way to hike Pemetic without doing one trail as an out and back.

By the time we finished hiking, every trace of clouds and fog had cleared off!  After lunch, we actually did a second hike – Gorham Mountain, which is one of our perennial favorites!

Trail Notes

  • Distance 2.9  miles (makes use of the Island Explorer Shuttle)
    (Check out the stats from MapMyHike)*
  • Elevation Change – About 950 feet
  • Difficulty – 2.5 The hike up and down Pemetic Mountain is quite steep, but with the short distance isn’t too grueling.
  • Trail Conditions – 3.  The trail is well-maintained and clear, but the roots and rocks make all of the hiking in Acadia a little difficult.
  • Views– 5.  Panoramic views for miles on a clear day. 
  • Streams/Waterfalls – 3.  The parking area for the trail is alongside Bubble Creek.  The Pond Trail also runs alongside a small stream – and of course, Jordan Pond is lovely.
  • Wildlife –2.   We only saw a few red squirrels on the trail.  You may see some migrating hawks if you are lucky.  An occasional loon may be spotted in one of the ponds, but typically only around dawn.
  • Ease to Navigate – 3.5.  The trail wasn’t that hard to follow as long as you followed the blazes or cairns. 
  • Solitude – 3.  With proximity to Bubble Pond for bike riding and Jordan Pond, this is a fairly popular hike.  Expect to see people lingering at the summit, but the mountaintop is so large that you should be able to stake out your own area for solitude.

Directions to trailhead:  From Bar Harbor, head west on US-233 for about a mile.  Enter Acadia National Park on the left and take a right onto the Park Loop Road.  Travel about 1.9 miles until you see the Bubble Pond parking lot on the left.  Head down towards Bubble Pond on the carriage road.  The trail head starts off on the left about 200 feet along the carriage road.

* MapMyHike is not necessarily accurate, as the GPS signal fades in and out – but it still provides some fun and interesting information.

St. Sauveur Trail – Acadia National Park (ME)

Special: Acadia Edition

Virginia Trail Guide is back in Acadia National Park for three new hikes!  It feels like we’ve been hiking everywhere but Virginia lately!  🙂

The 3.2 mile out-and-back St. Sauveur Trail gives you a ridge walk to a tree-covered summit.  From the summit of Sauveur, a short lollipop loop takes you out to Valley Peak for views of Somes Sound, Northeast Harbor, and the Cranberry Islands.

View from Valley Peak on the St. Sauveur Trail
A beautiful view from Valley Peak on the St. Sauveur Trail.

Adam Says…

We made it to Acadia National Park, but we had a rough start of things.  Our biggest adversary on vacation always seems to be Mother Nature.  Weather in New England tends to change often and weather on Mount Desert Island is even more unpredictable.  When we were viewing projected online 10-day forecasts for the area, we would see a week full of rain one day and then see a week of sunshine the next day.  As the departure day for us got closer, the weather tended to look more bleak.  We even debated canceling the trip, since a week full of rain would definitely make it hard to do the things we enjoy.

The drive up was filled with torrential rain. Then, the first two days after we arrived were also rainy.  Finally, on Monday, it looked like we would have almost a full day of sunshine so we prepared to run ourselves ragged with fun.  Now, a 3.2 mile hike doesn’t sound like it should be tough, but it was the last thing we were to do that day.

Before we hiked the St. Sauveur trail, we decided to rent bikes and do our favorite loop of a bike ride around Witch Hole, Eagle Lake, Jordan Pond and Bubble Pond.  We walked from our hotel about 1.5 miles to the town of Bar Harbor to rent bikes.  We took the Island Explorer shuttle to Eagle Lake and started our ride.  We ended up biking about 20 miles on the carriage roads and back into Bar Harbor.  We arrived back to the bike rental shop and walked back to the hotel.  After already covering 23 miles, we decided  we needed to make the most of things – and what better way than to head out on another hike.  The person that rented our bikes to us recommended the St. Sauveur trail.  He said after traveling all over the country he found the views from here to be the best he has ever seen.  Convinced, we decided to pursue his recommendation.

The Sauveur Trailhead
The trailhead for this route starts across from Echo Lake at the parking area for Acadia Mountain. There is another parking area further down the road for St. Sauveur, but it follows a different route to the summit. Below: The trail quickly splits in two directions, one takes you to Acadia Mountain, the other goes to Sauveur and Valley Peak; The ridge walk was pleasant; Everything in Acadia seems to be covered with granite and pines.

The Trail Splits Ridge Walk on Sauveur Trail Granite and Pines

We drove towards Southwest Harbor and began our hike at the Acadia Mountain parking lot.  There were tons of cars in the parking lot, but most of the people here were swimming in Echo Lake across the road (one of the few lakes that allow for swimming in the area).  We climbed up the stairs that mark the beginning of the trail into the woods.

In .1 miles, up the trail, you come across a junction with the St. Sauveur Trail.  Take a right at this intersection and continue up the gradual trail.  The trail does take some tricky turns up the mountain at some points, so be on the lookout for blue blazes and cairns which will help you to navigate the trail.  Since the St. Sauveur Trail is not used as heavily on this stretch, there were a few areas where we were making our way through low bushes to follow the trail.

At .7 miles, you reach another junction with the Ledge Trail, but continue straight.  At 1.2 miles, you reach the peak of 679 ft. St. Sauveur Mountain, marked with a summit post.  Continuing past the summit marker, you can follow the Valley Peak trail.  This is a loop trail, but we took the path to the right first.  This leads to the 521 ft. Valley Peak at 1.6  miles, providing great views of Somes Sound, Greening Island, Northeast Harbor, and the distant Cranberry Islands.  We went back to the St. Sauveur Trail through the other branch of the loop from Valley Peak.  We were immediately given even better views before making our way up a steeper path up to the St. Sauveur Trail and return trip back to the parking lot for our 3.2 mile trip.

Red Squirrel
Red squirrels are much cuter than Virginia’s gray squirrels, and they’re everywhere in Acadia. Whenever you hike, you’ll hear them chattering and even ‘yelling’ at you from the trees. Below: The summit of St. Sauveur is tucked into the trees.  For the view, you must proceed to Valley Peak; Some parts of the trail dip into deeper woods.  One section even crosses a short section of boardwalk.

Sauveur Summit Sauveur Boardwalk Sauveur Trail in the Woods

The St. Sauveur Mountain was named after the St .Sauveur mission that was established in the nearby area.in 1613.  The French established several Jesuit missions in Maine to try to convert and the Wabanaki Native Americans to Catholicism, while providing refuge from the British.  The British destroyed the mission within 13 weeks of it being established, starting wars between the British and French with the Wabanaki caught in the middle.  There were 150 years of battles over these types of territories as the French wanted this area to be New France while the British wanted this area to be New England.

There was a definite moment on the trail  (probably just a quarter of a mile from the end) where I just felt too exhausted to continue.  I laid my trekking poles on the ground and sprawled across the trail.  I collapsed there for a few minutes but found it within myself to just finish the last bit of downhill.  Needless to say, I slept well that night.

Christine Says…

After three straight days of rain, I was really looking forward to our first nice, sunny day in Maine.  When I woke up in our hotel room Monday morning, I crept out of bed and peeked through the side of the curtain… hoping to be greeted with brilliant sunshine.  What I actually saw was drizzly fog, but I felt pretty confident that it was going to dry up and burn off.

We went for an early breakfast at Café This Way, which is another one of our favorite breakfast spots on the island.  It has a cozy, eclectic décor and really delicious coffee and food.  After breakfast, we went back to the hotel to plan the day.

We decided to rent bikes and ride around the carriage trails.  Parking in Bar Harbor and throughout Acadia is very limited – there are few spaces and most of them (especially those in town) are limited to 2-3 hours.  So, we decided to leave the car at the hotel and walk into town.  From the Village Green, we were able to catch a bike shuttle into the park – for FREE!  The Island Explorer makes it so easy to get around the island.

Our bike ride was so fun!  I always enjoy this loop so much that we ride it almost every year we visit the area.  We enjoyed lunch and popovers at Jordan Pond House.  We saw Martha Stewart riding a stunning Fresian horse.  We saw four deer – including three fawns.  And we thoroughly enjoyed all the pond views and the smell of pine on the breeze.

We rode our bikes all the way back into town instead of taking the shuttle, returned our rentals and walked back to the hotel.  We refilled our water bottles and headed right back out – to hike St. Sauveur and Valley Peak.  We found a parking spot right along Rt. 102, next to trailhead.  As soon as I got out of the car, I saw a man hiking down the trail – with a ferret!  Weird…

Adam Enjoys the View from Valley Peak
Adam enjoys the view from Valley Peak. Below: Various views from Valley Peak.

Cove View Sailboats Walking on Cliffside

When I first stepped onto the blocky granite steps at the trailhead, I questioned the wisdom of our decision to continue the active portion of our day.  After 23 miles of biking and walking, my quadriceps were pretty tired!  But when you have nice weather in Acadia, you are obligated to GO until you can go no more.

The early part of the St. Sauveur trail climbed steadily and gradually upward.  We scrambled over and between granite boulders, stepping carefully across the root and pine needle covered trail.  The low blueberry and huckleberry bushes scraped our legs along the narrow trail.  I could hear red squirrel chattering angrily at us from the trees overhead.  One hid under a boulder and then went scampering underfoot when we passed.  Red squirrels are infinitely cuter than the gray squirrels we typically see in the mid-Atlantic.

After climbing uphill for a while, the grade of the trail became gentler.  We walked along the ridgeline, occasionally dipping into thicker forest, until we eventually reached the tree-covered summit of St. Sauveur. I snapped a quick photo of the summit marker before we continued on to take in view from Valley Peak.

Somes Sound
Looking back into Somes Sound. Below: Christine enjoys the views; Adam is exhausted.

Christine Enjoys the View from Valley Peak Adam is Exhausted

The summit of Valley Peak is mostly downhill from the St. Sauveur.  You’ll know you’ve reached it when you see views opening to the sea.  From rocky outcroppings and cliffsides, you’ll take in stunning views of Somes Sound and the bay.  I always enjoy naming the islands, watching the sailboats and looking at the impressive homes (they call them cottages) along the coastline.

We stayed on Valley Peak for a while, enjoying the views and the cool breezes. On the return trip, we took the other side of the lollipop loop.  It was more open and offered more views than the way we had come.  I was glad for more chances to take in views of the sound.

The return arm contained one steep climb back up to the summit of Sauveur.  From there, the remainder of the hike was either flat or downhill. Close to the end, we even had one more nice view across the island, overlooking Echo Lake.

Somewhere on the downhill climb, I noticed that I didn’t hear footsteps behind me anymore.  I turned to check on Adam, and found him lying across the trail, arms and legs splayed.  I asked if he was OK. He responded ‘I’m just so exhausted.  I can’t go anymore’.  But, somehow he managed to prevail and eventually made it back to the car.  It felt so good to get back to the hotel and shower!  We finished the day with a big dinner at a new restaurant called Cherrystones and an early night to bed.  With sunshine in the forecast for the next two days, we definitely needed to rest up for more adventures!

Trail Notes

  • Distance 3.2 miles out-and-back with a lollipop trail out to Valley Peak.
  • Elevation Change – about 650 feet
  • Difficulty – 2.
  • Trail Conditions – 3.  The trail goes over a lot of pink granite native to the area.  The first .7 miles were a little overgrown, but once you reach the ridge top, the conditions are great.
  • Views– 4.  The best views are from Valley Peak, which on a clear day will provide gorgeous, panoramic views for miles.
  • Streams/Waterfalls – 0. Non-existent.
  • Wildlife – 2. We saw a cute red squirrel and some juncos along the trail, but not much else.  You may be able to see some gulls and vultures from the viewpoint or other birds of prey if you are lucky.
  • Ease to Navigate – 3.  There were some tricky spots along the first .7 miles and there could be a few more blue blazes and cairns to help navigate the way. Signs are only at the junctions.
  • Solitude – 3.  We did find a few people at the Valley Peak overlook.  Most people seem to choose Acadia Mountain over this trail, but the views are better here. 

Directions to trailhead: From Somesville, ME head south towards Southwest Harbor on Route 102 for 3 miles.  The parking lot for the Acadia Mountain trail is on the left, across from Echo Lake.

Little Devils Stairs

We hope you enjoyed our special Great Smoky Mountains Edition!  Now we’re back to Virginia!  Although… honestly, the heat has kept us mostly off the trail lately.

The 5.5 mile Little Devils Stairs hike climbs through an impressive gorge along Keyser Run and loops back past a family cemetery that pre-dates the park.

Canyon Walls Along Little Devils Stairs Hike
it is Adam makes his way past rugged canyon walls on the Little Devils Stairs hike. Below: The parking lot at the end of Keyser Run Rd. provides access to the fire road and the Little Devils Stairs trail; When we hiked in early June, water was still flowing in the stream (but not much); Red columbine bloomed abundantly.

Start of Little Devils Stairs Hike Keyser Run Was Flowing Red Columbine

Adam Says…

To try and beat afternoon rain in the forecast, we decided to hike Little Devils Stairs early in the morning.  To cut back a little on the distance along fire roads, we decided to start the hike from the perimeter of the park (near Sperryville) rather than from Skyline drive.

The trail begins immediately going into the forest from the parking lot and is a very gradual ascent along Keyser Run.  After about .9 miles, the trail then begins to climb more steeply as you are climbing up the “stairs” along the gorge.  The climbing can be quite steep, at times requiring you to use your hands to also help balance or pull yourself up.  Over the next mile, you gain 1000 feet of elevation on your climb.  Along the way up the climb, you will come across several smaller waterfalls and will have to cross over the stream in a few places.  At 1.75 miles, the climb tapers off and the trail moves away from the gorge.  At 2.1 miles, you reach the junction with the Keyser Run Fire Road.  Take a left on this fire road and begin your descent.  The road was fairly uneventful, but it is a good place to spot butterflies and you may see a snake sunning itself on a part of the road.  At 3.9 miles, the road begins to enter the forest again and you will see some more old-growth hemlocks along the road that create a canopy over the road.  At 4.2 miles, you will reach the Bolen family cemetery.  Just ahead is the junction with the Hull School Trail, but stay on the fire road veering to the left.  At 5.4 miles, you will reach the park boundary and at 5.5 miles, you will return back to your vehicle in the small parking lot.

Steep Uphill on Little Devils Stairs
Adam climbs up the steepest part of the Little Devils Stairs hike. Below: There are many tiny waterfalls along the Little Devils Stairs hike; Christine contemplates the rocky climb through the gorge; Adam makes one of the many stream crossings.

Waterfall and Canyon Walls in Little Devils Stairs Pretty Keyser Run Christine Contemplates the Rocky Trail One of Many Stream Crossings on the Little Devils Stairs Hike

The highlight of this hike is definitely the gorge that was created along this geological fault line that eroded quickly.  At one point along the trail, you can see a sheer cliff face of rock.  I can easily imagine people rock climbing up this gorge wall with the proper technical gear.   I have seen Little Devils Stairs and Big Devils Stairs listed in a book about rock climbing in Virginia, so you may luck out and see some people navigating up to the top.

A sadder note along the trail is the Bolen family cemetery.  While we may enjoy the national park that is here, there were many families that were forced to uproot their lives and move out of the area as the government took over the land.  The cemetery of the family still stands and was rededicated in 2002.

Waterfall at the Top of Keyser Run
The largest of the falls was at the very top of the gorge. Below: There are many fallen trees, especially hemlocks in the gorge; We saw a lot of these flowers along the trail;  After exiting the gorge, most of the remainder of the trail is along the Keyser Run Fire Road.

Fallen Hemlocks Wildflower Along Little Devils Stairs Keyser Run Fire Road

Christine Says…

Little Devil Stairs is another hike we’ve had on our list of trails we wanted to add to the website for quite a while.  We’ve hiked it before –  the last time was probably about a year before we started this website. It’s a decent hike, but I’ll admit it’s not one of my favorites in the park.  The section of the hike that passes through the gorge is fun, tough and interesting – but that’s only a little over one mile of the entire five and a half miles.  Way more than half of the hike is along a fire road.  And if you’ve read our site with any regularity, you know how I feel about fire roads (they’re boring!)

The drive to the trailhead was really pretty.  We passed by Luray, over Thornton Gap and down past Sperryville.  There were lots of winding country roads, meadow views and meandering stone walls on the way to the parking area.  When we got there, we were the only car.  I absolutely LOVE having a trail all to myself!

We started off climbing gently uphill through the woods, crossing several spots of dry streambed. The insect activity on this particular day was insane.  I alternated walking like a normal person with walking like a crazy person, arms flailing all around my face, trying to bat away the clouds of gnats and midges.  Between the bugs, the humidity and the heat – summer hiking can be really tough.

Bolen Cemetery
Adam reads headstones in the Bolen Cemetery. Below: The gate leading to the cemetery; A memorial poem from the cemetery’s re-dedication;  We saw lots of indian pipes along the hike.

Why Are the Mountains Blue - Bolen Cemetery Indian Pipes

I had been pretty concerned about the dry streambed crossings, but once we reached the gorge, the water flow picked up a bit.  Little Devil Stairs is definitely a hike you want to do when there has been a significant amount of recent rain.  The primary appeal of the gorge is the constant string of small waterfalls and rapids that pours down the ‘stairs’.  When the weather has been wet, Little Devils Stairs is lovely and wild.  The sound of running water hemmed in by stone walls constantly surrounds you. However, when the weather has been dry, the hike is nothing but steep uphill through a rugged, overgrown and brushy gorge.  The towering rock walls are still impressive, but without running water, something is missing from this hike.

With a thousand feet of elevation gain in just under a mile, the path up can be a real quad-burner if you’re not in decent shape.  It’s mostly walking along trail, but there are several sections where you must scramble up over giant stair-like rocks.  The top of the gorge is marked by the largest of all the waterfalls along Keyser Run.  After you pass the final fall, the trail grade becomes more gentle and passes through pretty, quiet forest.  In a short time, you’ll reach the Fourway Junction.  People hiking Little Devil Stairs from Skyline Drive will come down the trail at this junction.  For us, it was the point where the ‘hike’ ended and the fire road walking began.

Frittilary
We saw lots of butterflies on this hike! Below: I’ve never seen a yellow moth like this one before. I think it’s an Io moth because it had the ‘eye’ marking on it’s wings, though you can’t see them in the photograph; On the drive back through the park we spotted a pair of black bears mid-courtship (this is the male);While eating lunch at Big Meadows we met this cute biker dog.

Yellow Moth in Shenandoah Mated Pair of Black Bears - Boar Harley-Davidson Chihuahua

We considered jogging down the trail to make the distance pass more quickly, but I wanted to keep my camera and telephoto out in case we saw wild flowers, butterflies or bears!  The heavy camera kept bouncing on my hipbone, so I had to slow to a walk (I got a huge bruise anyhow).  And indeed – there were plenty of butterflies and wildflowers to photograph along the way.  We didn’t see a bear on the trail, but we did see one later as we drove back through the park.

The last point of interest along the fire road was the stop at the Bolen Cemetary.  It’s a beautiful spot for a final resting place – surrounded by a stone wall and shaded by elegant maple trees planted by the original property owner.  It’s one of the more meticulously maintained cemeteries in the park.  If you walk amongst the headstones, you can’t help but notice how young most people died.  So many babies, children and young adults rest under these markers.  When I was researching information about this trail, I came across a wonderful feature article from Blue Ridge Country magazine about the family reunions that still take place at the cemetery.  I enjoyed reading all the recollections of Beulah and Mary Bolen about their life in the area before the park existed.

After leaving the cemetery, the remaining distance along the fire road went steeply downhill.  We arrived back at our car fairly quickly and headed to Big Meadows to have some lunch in the park.  After lunch, the skies opened up and it poured down rain the rest of the day.  I’m glad we got a chance to get out before the weather changed!

Trail Notes

  • Distance 5.5  miles
  • Elevation Change – About 1650 feet
  • Difficulty –  3.  The climb up Little Devils Stairs can be strenuous in parts, but the fire road is easy walking.
  • Trail Conditions – 3.  The climb up the stairs is rocky and you do have to cross Keyser Run as the trail criss-crosses over in several places.
  • Views– 1.  From near the top of the gorge, you may get an obstructed view, but nothing spectacular.
  • Streams/Waterfalls – 3.5.  You are walking along Keyser Run through the first couple of miles of the hike.  The waterfalls are mostly small, but still nice to see.
  • Wildlife – 2. There are signs of bear scat in the area, but we didn’t see much wildlife other than a snake along the fire road.  You will hear lots of warblers and other birds as you enter the hemlock forest near the end of the hike.
  • Ease to Navigate – 3.5.  The blue blazes for the Little Devils Stairs hike are not as prevalent in some places and may require you to look around for the next one, especially in the fall when leaves cover the trail.  Posts at the trail junctions provide some great direction.
  • Solitude – 3.  Except on weekends, I wouldn’t expect to see a lot of people on this trail.

Directions to trailhead:  Off of 211 north of Sperryville, take a left on County Road 622/Gidbrown Hollow Road.  Follow this road for a few miles and then take a left on County Road 614/Keyser Run Road.  At the end of this road, you will reach a small parking lot.  The trailhead starts to the right of the parking lot, marked by a concrete post.

Chimney Tops (TN)

Special: Smokies Edition

Introductory Guide to Visiting Great Smoky Mountains National Park

Chimney Tops is a steep four-mile hike that leads to great views from a pinnacle.  Rock scrambling and climbing are required to reach the view.

The Climb Up Chimney Tops
Photos don’t do the steepness of Chimney Tops justice. If you look closely, you’ll see tiny people about two-thirds of the way up. Below: The parking lots was overflowing. We had to park at an overlook further up Newfound Gap Road and walk back to the trail; When we visited, the trail up Chimney Tops was undergoing rehabilitation; A bridge over the river -much of this hike followed flowing water.

Crowded Lot Trails Forever Initiative Bridge Over the River

Adam Says…

After we made our hike to Laurel Falls, we decided to add another hike to Chimney Tops.  There were signs up on both sides of the park stating that the Chimney Tops trail was closed on Monday-Thursday for trail maintenance from late April through Mid October.  The Trails Forever crew (which is a partnership of the park and Friends of the Smokies)  is working on improving the trail conditions. Since it was a Friday and the first day that week the trail was open, we expected a lot of people on this trail.

The parking lot for the trail was full, so we had to drive further up the road until we reached an overlook that provided space to park.  We made it back down to the trailhead and began our hike.  At the entrance, there is a large sign that shows a description of the trail and also demonstrates the steepness of the climb at the top and that it will require rock scrambling.  The sign is not a joke at all and should deter people that aren’t able to handle the steep incline of the trail.

The hike starts off going downhill and quickly comes to a wooden bridge over the West Prong of the Little Pigeon River.  The first half mile of the trail gives you many spots to view the rapidly flowing waters of the Road Prong of the Little Pigeon River.  The trail continues to ascend steadily and leads away from the Road Prong.   At .9 miles, the trail intersects with the Road Prong trail.  Take a right and head up the Chimney Tops trail.  The trail will become very steep at this point and not stop until you are near the top.  You will witness some very tough climbing for the next 1.1 miles that will have you taking regular breaks to keep your heart from pounding out of your chest as you navigate up a rocky slope up the mountain.    You gain about 1000 feet of elevation in this distance.  Eventually, the trail flattens at 1.8 miles and even goes slightly downhill before rising again to reach the slate pinnacles of Chimney Tops in 2.0 miles.

Pretty Cascades
There were lots of pretty cascades to view along the hike. Below: Another pretty, tiny waterfall; Adam spotted this newt/salamander on the bridge.  We nudged him to safety so he wouldn’t get stepped on; The trail was very rocky and steep (although this photo doesn’t look it)

Tiny Waterfall A Newt Rocky Trail to Chimney Tops

Signs warn visitors again to be cautious and not venture past the first pinnacle. You can only imagine how hazardous this rock scramble is, since it is a sheer drop if you make a mistake.  The slate had a lot of handholds and footholds to grab onto and help propel yourself up the rock face.  In the mid-day sun, the black surface was quite hot and I didn’t want to keep my hands in one place too long.  We made our way up about 75% of the way and then felt that we didn’t want to risk things any further.  The views were simply astounding though.  We scooted back down on our butts very carefully.  Most people decided on not going all the way to the top but there were a few brave souls that pushed themselves up to the peak.

I will say that this hike did have wonderful views and a fun rock scramble at the end.  However, the Chimney Tops trail climb was quite brutal.  I’m sure a lot of people are not able to make it all the way up due to the steep incline.

Christine Says…

Chimney Tops is another trail that seemingly everyone visiting the Smokies wants to hike.  Although it’s only four miles, the route to the top is deceptively steep and challenging.

The four-days-a-week closure of the trail definitely causes more people to queue up for the hike on Friday through Sunday.  The parking lot was completely full when we arrived around 10:15.  But it was well worth the wait and facing the crowds. The trail rehabilitation being done in the Smokies is amazing!  We had seen the work done recently on Forney Ridge, and are sure Chimney Tops will be just as nice when it’s completed. Friends of the Smokies is a large part of the effort to maintain and rebuild trails.  They are a non-profit organization to help protect and maintain the Great Smoky Mountains National Park.

The trail starts off crossing a number of small bridges over rushing streams.  The water in the Smokies is truly spectacular!  I’ve never seen a place with so many cascades, rapids and waterfalls.  I enjoyed stopping and photographing a few spots along the water.  Whenever I found a spot in the shade, I got out my mini-tripod and played around with long exposures.  We even spotted a newt/salamander on one of the footbridges. That was neat to see!

The View from Chimney Tops
The view from the pinnacle on Chimney Tops. Below: We saw a few red squirrels in the Smokies.  They are way cuter than our grey squirrels; Adam carefully climbs the pinnacle;  People scoot back down on their rear ends.  Falling here could possibly be fatal.

A Boomer or Red Squirrel Adam Climbs the Pinnacle at Chimney Tops People Carefully Climb Down Chimney Tops

After a short descent from the parking lot, the first bit of the trail is uphill, but for the large part is gradual with decent trail conditions.  The middle mile of the hike is pretty tough!  Although this was one of the shortest hikes we did during our week in the Smokies, this section of climbing was doubtlessly the steepest.  Much of it traversed wet, slick, muddy, rocky, rooty terrain and it was relentlessly uphill.  Terrain like this is the reason I became a dedicated trekking pole user.  Poles take so much strain off your knees and make traversing trail like this much safer and easier.

After a short section of tough climbing, the trail became more moderate and continued to climb uphill via a series of switchbacks.  At the top of the ridge, the trail became nearly level and passed through gorgeous stands of blooming Catawba rhododendron.  A warning sign threatening injury and/or death let us know that we had arrived at the pinnacles on Chimney Tops.  This sign is 100% serious.  The pinnacle of Chimney Tops is steep, slick and long enough for a fall to result in death.

We stashed our trekking poles behind a tree because we knew we’d need all four limbs free and available to climb the rock face.  I looked at the pinnacle for a while, debating on whether or not I was going to climb up to the top.  I knew if I didn’t climb up, I would miss the views and would have done all that uphill hiking for nothing.  But, a view isn’t worth getting hurt (or worse).  Some long-time readers of this blog might remember that I have vertigo and really struggle with maintaining my sense of balance and equilibrium on terrain like this.

In the end, I decided I was feeling pretty secure.  The rock face, while steep and precipitous, had plenty of solid toe and hand holds.  I climbed up the rocks, sticking close to the ground and testing every single toe and handhold before committing to my next move.  Eventually, I reached a perch that offered a beautiful view of distant mountains and decided that I had climbed high enough.  I probably stopped about three quarters of the way up.

I snapped a few photos and told Adam it was time for me to climb down.  I was starting to feel dizzy and a little uneasy.  I had been sitting facing downwards on the rock, and I think looking at the sheerness of the descent made my head spin a bit.

A View of Chimney Tops from the Road
A view of Chimney Tops from the road.

I sort of crab-crawled and slid down the pinnacle on my rear end, carefully placing my toes and hands into sturdy grips.  After a minute, I realized that the downward going was actually pretty easy and secure.  That allowed me to pick up my pace a bit.

At the bottom, we saw quite a few people who hiked up and then decided not to tackle the pinnacle.  While they missed a spectacular view, it’s definitely smart to not push beyond what you feel is safe.

The hike downhill went pretty quickly – again, thanks to the trekking poles’ added support and balance.  We saw so many people hiking up that were clearly not regular hikers – skinny jeans, sandals, no water, etc.  A lot of people stopped us to ask ‘How much farther?’ I salute all of the hiking newbies who make it to the summit of Chimney Tops.  While the hike is on the shorter side, it definitely provides some more technical terrain and some serious elevation gain over a short distance.  If I were to recommend hikes for beginners, Chimney Tops would probably not be one of them.

Don’t get me wrong, it was a fun, rewarding hike with excellent views and beautiful streams and cascades, but I think there are probably better hikes for people just starting out.  I think that newcomers often look at total distance and think ‘Oh… I can walk four miles’, when in reality an eight mile hike with easier terrain and less climbing would probably be more suitable and enjoyable.

Trail Notes

  • Distance4.0 miles
  • Elevation Change – 1300 feet
  • Difficulty –  4.  The second mile of the hike is very steep.
  • Trail Conditions – 3. There is some loose rock on the steep climb.  Use caution on how secure your footing is going up and down.  The trail is very worn due to its popularity.
  • Views– 4.  From the peak of Chimney Tops, you will get great views of mountains for miles.
  • Streams/Waterfalls – 3.5.  The prongs of the Little Pigeon River give you lots of opportunities to watch the water flow rapidly.
  • Wildlife – 2.5.  You will not see larger fauna up here normally due to the popularity of the trail, but we did see a cute red squirrel, heard the cackling of a pileated woodpecker, and many other birds.
  • Ease to Navigate – 4. There is only one trail junction to turn, so this should be very easy to follow.
  • Solitude – 0.  One of the most popular trails in the Smokies.  In 2012, with a limitation on the days it is open, it will likely be even more crowded. 

Directions to trailhead:  The parking lot is 6.7 miles south of the Sugarlands Visitor Center on Newfound Gap Road.  Park in the large parking lot and you should see the opening to start the hike.