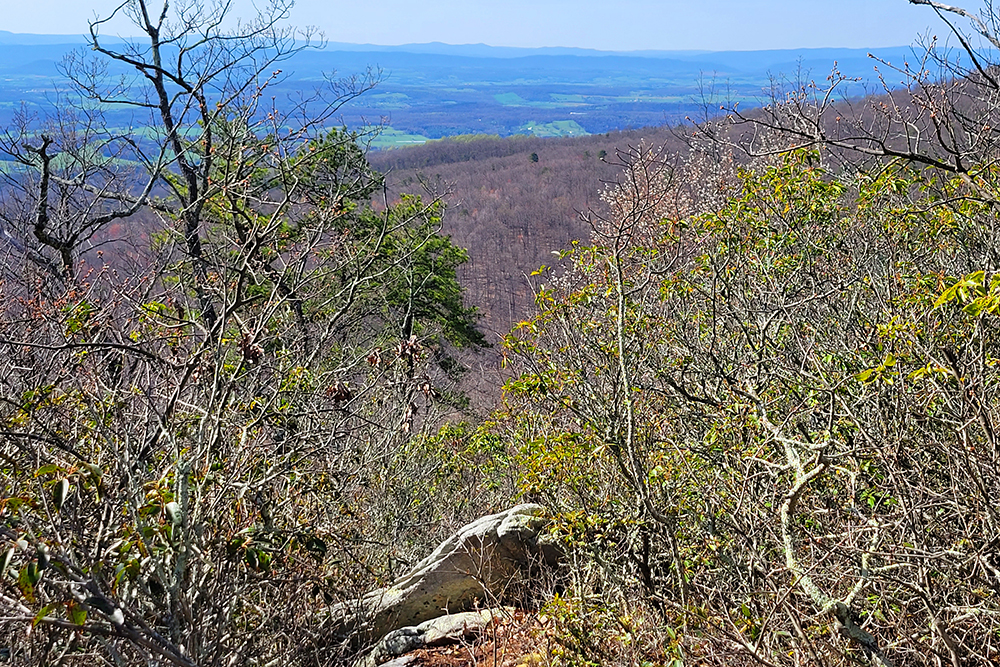
The section of the Appalachian Trail from Beagle Gap to Rockfish Gap gives you nice, open views of the mountains and farmland surrounding the city of Waynesboro.
Adam makes his way along the Appalachian Trail up to the top of Bear’s Den Mountain. Below: Adam and Wookie pose at the Beagle Gap sign; This white blaze looked like it was painted on a headstone; Adam passes some giant rocks along the trail.
Adam Says…
Those that have been following our blog may know that we have been working on hiking the Appalachian Trail through Shenandoah National Park in smaller sections. On this day, we decided to handle the stretch between Beagle Gap to Rockfish Gap in the south district. We left one vehicle at the junction of I-64 before the pay station at the park’s south entrance. We then drove into the park and parked at the Beagle Gap parking area (not the Beagle Gap overlook).
The Appalachian Trail crosses the road at this gravel parking lot. We crossed the road from the parking lot and headed through the gate. Take a left as soon as you go through the gate and walk through the field . The south-bound AT then climbs rather steeply through some open areas and crosses over a fire road early on the trail. At .5 miles, you reach a communication tower and some old tractor seats. I’m sure that many AT thru-hikers have enjoyed taking a brief rest on these seats. At one point, I’m sure these seats provided a nice place to view the western sunset, but now the trees in front have blocked some of the scenery from view. Continue past this area and keep following the white blazes to stay on the trail. At the one-mile marker, you will come to another communication tower. Stay on the white-blazed AT and the trail begins to descend. At 2.0 miles, the trail reaches McCormick Gap and crosses Skyline Drive. Cross the road and you will come to a small ladder stile that will lead you on to private land.
This part of the trail is on private land, but hiking on the AT is allowed. As soon as you cross over the stile, you will see a weathered sign pointing the way to continue on the Appalachian Trail. This section of the AT is very steep as it winds up Scott Mountain. At 2.4 miles, the trail levels off and you will begin to enjoy some obstructed views (probably very limited during the spring and summer months) of Waynesboro and the farmlands around the city. At 3.0 miles, you will begin several miles of very gradual descent (with some uphills thrown in) until you come out onto Skyline Drive. Continue to follow the road for a brief walk back to your car, crossing a bridge over I-64 before reaching your vehicle.
This is one of the few open, meadow-like sections of the Appalachian Trail in Shenandoah National Park. Below: This section of the trail uses an easement on private land; Some colorful dried plants on the mountainside; An open and barren view from Bear’s Den Mountain.
The hike from Beagle Gap to Rockfish Gap was an interesting section of the AT. The way up to the communication towers included some of the more open areas of the park. Most hikes in Shenandoah National Park involve hiking through the woods, but this first two-mile section gives you nice views around. When we got to the communication tower, it was interesting to think of what would have been here before these towers existed. I can just imagine people in the 1950s hiking up from the road to view the sunset and perhaps having a picnic at the top. You can also read an interesting history on the area on PATC’s website here which explains the use of Rockfish Gap during the Revolutionary War. I’m glad we did this hike before Spring hit, since many of the views through the woods would have been obstructed with leaves on the trees.
Christine Says…
Well, winter is over and we didn’t meet our goal of finishing the entire AT through Shenandoah. In fact, we’re still less than a quarter of the way there. The road through the park was closed so often this winter, that it was really tough for us to get to the sections we needed to hike. The section we hiked most recently, Beagle Gap to Rockfish Gap was a shorter segment than we usually like to hike. Adam’s knee was bothering him, we wanted to take Wookie and we had a limited amount of time, so the 5.7 mile segment ended up being perfect for the day.
Old tractor seats are planted in the ground next to the radio towers on Bear’s Den Mountain. Below: The radio towers; Wookie enjoys relaxing on a tractor seat.
The day was so pretty and warm! The skies were crystal clear and blue, but there weren’t really any signs of spring in the mountains yet. I led Wookie on his leash – which was a little bit tricky to do with my trekking poles. He kept yanking them slightly forward or to the side, especially on uphills and downhills. Wookie is actually really well-mannered on a leash – but he likes to walk up and down hill much faster than I do! I envy his energy.
We took a short break atop Bear’s Den Mountain to enjoy the open views. The radio towers are a distraction from the natural beauty of the area, but I suppose they’re necessary. Upon leaving the summit, the trail was actually a little bit confusing. There were some unmarked side trails that crossed the path. The fire road that runs alongside the trail was also somewhat misleading. Luckily, the AT through Shenandoah is generously marked with white blazes and even when we took the wrong path, we were quickly able to notice the lack of blazes and set ourselves right.
Adam climbs the stile heading south out of McCormick Gap. Below: A beat up old AT sign; Wookie and Adam share some trail mix; The PATC does a great job maintaining trails and shelters along the AT in Shenandoah.
I noticed that this section of Appalachian Trail was a bit more up and down than typical for the park. The climb down and up through McCormick Gap is actually quite steep – especially the southbound climb up leaving Skyline Drive. That was really the only tough section of this hike.
Once we were out of McCormick Gap, the remainder of the hike was a gentle series of rolling ups and downs (mostly). We passed a lot of giant boulders, had a snack, crossed a shallow stream, and enjoyed the views looking down into Waynesboro. We passed a couple other hikers headed north and saw one southbound backpacker. Soon, Skyline Drive and the distant interstate came into view and we were back at the car.
Wookie Says…
When I heard Christine and Adam talking about hiking from Beagle Gap, I knew I had to come along. I was assuming that this was an area that beagles gathered, so I thought it would be great. But alas, there were no beagles around. We hiked up to the communication towers and I got to sit on the old tractor seats. I was a little skeptical at first, but I found a good seat to enjoy the views and relax a little. I had two big highlights on the hike. The first was meeting Winnie. Winnie was another pug that I met on the trail. Her master was a PATC member that actually maintains this section of the trail. It was impressive to learn that Winnie’s master also backpacked the entire Shenandoah National Park over ten days for her 70th birthday! I’m always a little nervous meeting new dogs on the trail, but it’s nice to see some other hiking pugs out there. My second highlight had to be the snack that I had. Adam gave me a few bites of Cinnamon Apple Pie trail mix which included some dehydrated apple bits, cinammon-covered yogurt, and pecans. It was a great boost to give me some energy to finish the hike. Overall, the trail wasn’t too tough for me. There are a few steep sections in the beginning and from McCormick Gap up to Scott Mountain, but by the end I was proudly leading the way.
Trail Notes
Distance – 5.7 miles
Elevation Change – 800 feet
Difficulty –2.5. There are a few uphill steep sections heading southbound, but the longest stretch of them is .3 miles.
Trail Conditions –4. The trail is well-maintained and the footing was great.
Views – 3.5. The best views are during the beginning of the trail before you reach the communication towers. There are obstructed views towards the second half of the trail.
Waterfalls/streams – 0. Non-existent.
Wildlife – 1. Other than birds, we didn’t see much wildlife here.
Ease to Navigate –3. The only tricky section was around the communication towers. You just want to be sure you follow the white-blazed trail. I believe the other trails from the communication towers will still bring you the same way, but I would stick to the white blazes.
Solitude– 3. We only ran into a few people on this trail. During the summer, the hike from Beagle Gap to the summit of Bear’s Den Mountain is quite popular, though.
Directions to trailhead: On Skyline Drive, park at mile 99.5 at the Beagle Gap gravel parking lot on the eastern side of the road. The trail begins across the road on the western side and through the gate.
The Beaver Lake trail is a 2.5 mile loop around a 24 acre (and shrinking) lake in Pocahontas State Park.
Reflections on Beaver Lake. Below: Some of the trail around the lake is traversed by boardwalks; Two docks overlook the lake; a shallow stream feeds the lake.
Christine Says…
We happened to be in Richmond for the CAA Men’s Basketball Tournament (JMU lost in the first round – Boooooooo!) last weekend. Since we had some free time on Saturday morning, we headed over to Pocahontas State Park for a short leg-stretcher hike. It was a warm, but cloudy, day – spring is definitely in the air. On our way to the park, we even saw some cherry trees starting to flower.
I was surprised by how big Pocahontas State Park is – especially so close to Richmond. As it turns out, Pocahontas is actually Virginia’s largest state park. After paying our $5.00 parking fee, we headed over to the CCC Museum and Nature Center area, where our trail began.
The hike traces the perimeter of Beaver Lake, using a series of gentle paths and boardwalks. We followed the trail counterclockwise. The near side of the path was relatively flat, while the far side climbed up a small ridge and followed a series of easy ups and downs.
Adam finds a geocache. Below: Trails in the park are clearly marked; Fallen trees have been carved into chairs; An abandoned beaver dam.
Beaver Lake is slowly being consumed by the landscape around. Erosion and plants are reclaiming the water, and turning the area into a freshwater marsh. There wasn’t much growing when we visited, but in the spring and summer, the area is covered with water lilies, cattails, and other aquatic plants. We saw a few buffleheads on the water, but they were too far off to get a decent photo. We also saw evidence of beavers – an old dam and lots of gnawed trees. Though, I doubt any beavers still live in the lake. It’s probably too shallow.
One of the things I really liked along the trail were the tree stumps that had been sawed into chairs. What a clever way to make use of a fallen tree!
The hike was short and easy, so we were done within the hour. I’m really looking forward to nicer weather, longer hikes and hopefully several overnight backpacking trips. On the way back to the hotel, we even got the chance to stop by REI! That was a real treat for us because we only have one very small outdoor store in our area. We were able to pick up some new backpacking gadgets and I got a new pair of hiking shoes. I can’t wait to try them out!
Adam Says…
When we were thinking about checking out the CAA Men’s Basketball Tournament, I suggested that we try to find a hike in the area. I had been a few years ago to Pocahontas State Park and thought it would be a great place to start.
It is great that Richmond has a nice park just about 20 minutes away in Chester, VA. This park is quite popular with people trying to get outdoors without having to drive too far. This park is definitely a multi-use area. We saw lots of mountain bikers through the park and we saw several trail runners on the Beaver Lake Trail. The footing is perfect for trail running and only has a few hills, making it great exercise or cross-country training.
Buffleheads on the lake. Below: The park has a lot of holly growing; The first buds of spring; The trails are popular with bikers.
We parked at the nature center and found the signs for the blue-blazed Beaver Lake trail. The trail passed by an old furnace and then descended until you reach the lake. At the lake, there is a nice pier to view the water and do some birdwatching. We then took the trail counter-clockwise, which went around the lake. During most of the beginning of the trail, the lake was in view. We were serenaded by frogs in the lake, which reminded us both of the sounds of didgeridoos. Along this northern part of the lake, there are a couple of places to get close-up views of the lake. After about .75 miles, the lake shows evidence of being shrunk from what it once was as a boardwalk leads you across the swampy, marshy remains of the lake. I can only imagine the mosquitoes along the marsh during the summer.
After reaching the halfway point, the trail begins to climb up the hillside, being rather steep in some sections. The trail winds around and crosses a small stream at 1.5 miles. The trail then climbs up the hillside until views of the lake are seen again around 1.75 miles. You will then descend for a short distance and continue the trail walking along the southern side of the lake. Around 2.1 miles, you will come to a nice view of a dam at the lake. After crossing the bridge at the bottom of the dam, you will take a short ascent. You can either make your way back to the pier at this point or take the orange-blazed spillway trail back up, passing by the CCC museum, before reaching your vehicle.
There is a dam and spillway at the end of the lake.
For any geocachers, there were two geocaches to find along this trail:
The Death of Beaver Lake – an earthcache that explains the geological features of the lake succession
Piglet’s Cache – a nice geocache in honor of someone’s pet
I enjoyed our trip to Pocahontas State Park. If you’re ever in the area and want a decent leg-stretcher, try out the Beaver Lake Trail.
Trail Notes
Distance – 2.5 miles
Elevation Change – Maybe 150-200 feet
Difficulty – 1.5. There are several easy climbs on the ridge side of the lake.
Trail Conditions – 4. The trail is very well-maintained and easy to walk on.
Views – 3 The lake views were lovely.
Waterfalls/streams –3. The stream through the woods was pretty and the dam creates a nice waterfall at the end of the lake.
Wildlife –3. This seems to be a good place to see water birds.
Ease to Navigate –5. The trail is a well-marked loop.
Solitude –1. This park is located next to densely populated Richmond. We saw lots of trail runners, hikers, bikers and dog-walkers.
Directions to trailhead: From Route 10/Iron Bridge Road in Chester, VA turn on to Beach Road/State Route 655 (near shopping center). Continue on this road following the signs for Pocahontas State Park. Enter the main entrance on State Park Road. Pay the parking fee ($5 on weekends) and park at the nature center. You should be able to start seeing signs from the parking lot to the Beaver Lake Trail.
The Saddleback Mountain Loop is a hike for people that are looking for a convenient day hike of moderate length – about six miles. There aren’t any great views, but it is an enjoyable walk.
Adam walks under a fallen, gnarled tree on the Saddleback Trail.
Adam Says…
Sorry it has been awhile everyone. We’ve had a crazy fall and haven’t been able to get out as much as we had hoped.
We have had a plan this winter to try and do sections of the Appalachian Trail through Shenandoah National Park. We thought we would start with a shuttle trip to cover the section from Swift Run Gap to Lewis Mountain. We made our way up to the Swift Run Gap entrance to Shenandoah Park and talked to the ranger at the gate. He told us that the entire drive was closed, but we could do some day hikes around the area. He said there was snow and ice on the road and they were also worried about more bad weather moving into the area later that night. Boooo! We went back to the car, upset that our plans couldn’t work out the way we wanted. Rather than admitting total defeat, we decided to try a loop hike that included Saddleback Mountain. It was close enough to the entrance gate that we could walk into the park from Route 33.
Skyline Drive Closed for Snow. Below: The trailhead had a small amount of snow; The trees overhead were all bare; We saw a little bit of milkweed still hanging on.
Throughout the hike we got a few glimpses of Skyline Drive through the woods and we never saw any snow. I talked to a friend of mine who is married to a ranger and he said that often they close the road because they don’t want to have people get trapped up there. Then, the rangers have to deal with them, since they typically close during hunting season at 5PM. I also found out they send one ranger north to inspect the Central section and one ranger drives up from Waynesboro to view the Southern section. We found out later that the Southern section ended up remaining open all day, so we could have done a different hike. Oh well, at least we were able to cover something we hadn’t done yet for the blog.
The hike starts where the Appalachian Trail crosses the road at the border between the Southern and Central Districts of Shenandoah National Park. Heading north up the white-blazed trail, the trail ascends steadily. After a few tenths of a mile, you will see an unmarked path to the right that leads to an old family cemetery. It was nice to pay some respects to the families that lived and died here on the mountain. Continuing back on the AT, the trail continued to slowly ascend. At 1.4 miles, you reach a junction with the blue-blazed Saddleback Mountain Trail. Take a right on this trail to make this hike a loop. The Saddleback Mountain Trail goes around the mountain, which was a nice break from climbing uphill. We saw a few nice icy formations and some heavier patches of snow on this shadowy side of the mountain. At 2.6 miles, you will come to a PATC maintenance hut. These huts are scattered throughout the park that serve as places where PATC volunteers can have access to some tools to help repair sections of the trail. There is an open outhouse here and a spring nearby, but we found that the spring was mostly dry. We continued past the PATC maintenance hut for .2 miles on a fire road until we met the junction with the AT. Head south on the AT and you will have 2.7 miles until you reach the original trailhead. As I mentioned before, the Saddleback Mountain goes around the mountain, so when you start the trail you will again be heading uphill until you reach the summit. The summit was not marked, but it was nice to have a downhill trip back to the car.
The shady side of the mountain had a little snow. Below: We took a short side trail to take a look at an old cemetery; Even though there was a little snow on the ground, the morning temps were well above freezing; We saw some recent bear scat and scratches along the trail.
On our way back downhill, we ran into two hikers that were there hoping to catch up to the Valley Hikers group that were evidently doing that hike to South River Falls. They got a late start but said there was a note on a car telling them where they went. We talked to the couple for a while before parting ways. When I got back home, I checked my email and it looks like the Valley Hikers changed their itinerary completely and were not doing the South River Falls after all. I hope the couple didn’t get too discouraged on their trip. Valley Hikers is a great group to join if you are interested in meeting up with some other people in the Shenandoah Valley that enjoy hiking. Members are of all skill levels and they do a good variety of hikes and an occasional backpacking trip. I do belong to the group, but I have yet to meet up with them to do a hike.
When Skyline Drive is open, you can also do a shorter version of the Saddleback trail, starting from the South River Falls picnic area. From that direction, you would have just a few tenths of a mile of an uphill hike to the summit area.
I’m glad we were able to get out and do a hike after our hiatus. Even though this trail doesn’t have a lot of great views, it is a nice walk in the woods and it was good to get some exercise outdoors on a cool winter day.
Christine Says…
With our original plans foiled, we sat in the car for a few minutes and deliberated our options – go home or figure out an alternate hike route that allowed us to walk into the park from outside the pay station. I’m really glad we decided to go for the latter, because the hike (while rather uneventful) turned out to be a pleasant way to spend the morning. It was great to get back out on the trail after a month of sloth (the flu and three weekends of art shows severely limit the ability to hike!)
PATC Maintenance Building. Below: Adam checks out the map at the first trail intersection; Someone left pennies on top of each of the cement trail marker posts; We saw some pawprints in the snow – maybe a fox or bobcat – they were too smudged to determine for sure.
As we started up the Appalachian Trail, I couldn’t help but remember that this was the exact spot we met our friends from The Traveling Circus back in May. The trail looks pretty different now than it did back then – bare trees and fallen leaves instead of a lush tunnel of green. While the woods might be prettier in the spring, summer and fall, there is still something I really enjoy about winter hiking. I like the lack of bugs, the fact that I don’t get sweaty, the solitude and the glimpses of views through the trees that you miss the rest of the year.
A few tenths of a mile up the trail, we took a short spur to take a look at an old cemetery. Headstones we saw dated back to the turn of the twentieth century. Many of the people buried here lived in the park throughout the 1800’s up until they were forcibly removed in the early 1900’s by the US Government. I think there were many older unmarked graves as well, but we took a few minutes to read each of the headstones still left standing.
After leaving the cemetery, the trail climbed gently, but endlessly, uphill to the junction of the Saddleback Mountain Trail. There really wasn’t anything remarkable about the trail to this point – no amazing scenery, just the occasional peek through the trees at the valley and Skyline Drive below. Adam and I laughed at how bare of the snow the drive was every time it came into view. We really don’t understand why it was closed at all.
We turned onto the Saddleback Trail and enjoyed a relatively flat walk skirting around the shoulder of the mountain. Near the end of the trail, we passed a PATC maintenance cabin and a pit toilet.
We stopped to rest a few minutes. I noticed a thermometer on the hearth outside the cabin and saw that it read 40 degrees – pretty balmy for a winter hike! The morning we hiked, a bit of a southerly air flow arrived. The warmer air came in aloft, creating the rare phenomenon that it was much warmer in the mountains than it was down in the valley.
From the PATC cabin, we passed the South River spring (a boxed spring intended as a water supply) and headed up a short fire road to meet back up with the Appalachian Trail. We turned south, and walked along the AT, climbing up to the summit of Saddleback Mountain. The summit of Saddleback is covered with trees and does not offer a view.
After crossing the summit, the hike was an easy, all-downhill stroll back to the car. Even though we didn’t get to hike the route we originally planned, this Saddleback loop made a great substitute and we had a fun morning.
Difficulty – 2 There is some steady uphill, but it is manageable.
Trail Conditions – 3.5. Since most is on the AT, the trail is very well-maintained, but rocky and steep in spots.
Views – 1. We only had a few views through the trees, that I’m sure would not be there when leaves are on the trees.
Waterfalls/streams – 1. Two springs near the shelter.
Wildlife –3.5. We did see deer and heard the echoing sounds of a pileated woodpecker. There was also fresh bear scat in the area and possible tracks in the snow.
Ease to Navigate –4. This is fairly easy to follow if you read the concrete posts at the junctions.
Solitude –4. You may see some hikers on the AT due to the proximity to the South River picnic area.
* MapMyHike is not necessarily accurate, as the GPS signal fades in and out – but it still provides some fun and interesting information.
Directions to trailhead: Once you go through the Swift Run Gap entrance station, park your car across the street from the stop sign. The Appalachian Trail sign is straight ahead and head north.
This 3-mile hike leads to the old Snead Farm. It’s one of the few hikes in the park that really shows off what life at the turn of the twentieth century must have been like for the people who made their homes where the park now stands.
The barn at the old Snead Farm is still in good shape. Most of the other structures are gone, only foundations left. Below: There is a view from the fire road before you follow the final fork to the farm.
Christine Says…
The walk to Snead Farm is really easy and perfect for families. Much of the trail is level and follows a fire road. There are a couple of route options, too. If you start from the visitor’s center, you’ll walk .8 miles on the Dickey Ridge trail before reaching Snead Farm Road. This ends up making a three-mile route, and is the route we followed. You can also start from Skyline Drive, directly on the Snead Farm road. This cuts the route to a mere 1.4 mile out-and-back. Just be sure to follow the correct forks in the road, or you’ll find yourself on a walk to nowhere (like we did… more about that later). Whatever route you choose, the going is easy and relatively level.
As far as I know, Snead Farm has the only remaining barn left standing in the park. In fact, it’s one of the few non-park structures of any kind left standing within the boundaries. The doors are barred closed, so you can’t go inside – but you can peek through windows and gaps in the doors to see the old hayloft up top and animal stalls on the lower level.
Behind a tangle of vines, you can still climb down into the root cellar located behind the barn. The cellar is deep and lined with sturdy shelves, which undoubtedly held stores of food for the farm. The main house’s foundation and several sets of stairs still stand slightly uphill from the barn. The boxwoods that stood on either side of the front door are still there. They have grown tall and wild! The cistern is still there as well. The farm was occupied until the early 1950’s, so the site doesn’t feel as old as some other places in the park, like Pocosin Mission.
Adam Says…
Our hike to Snead Farm ended up being longer than we were expecting. We were using our Falcon Guide Shenandoah National Park book as a guideline and there was misleading information in the book. I’ll try to set things straight with our own directions. From the Dickey Ridge Visitor Center, cross Skyline Drive and walk to the flagpole. Take a right at the plaque with hike information. In .2 miles, you will come to the intersection with the Dickey Ridge Trail. Take a right here and proceed for about .3 miles until you reach a fire road (Snead Farm Road). Take a left on the fire road. In another .2 miles, you will reach a fork on the trail. Stay to the left. In another short distance, you will come to another fork where you will see a concrete post. Go to the right, heading uphill. You will continue this trail for about .5 miles until you reach Snead Farm. You will begin to see the barn through the trees.
We did misinterpret the information in the book since it told us to take a left at the last fork. Since we were going a different way than the book, we ended up second-guessing ourselves. When we thought we had gone far enough, we decided to turn around and take a different fork. When the other fork came to a dead-end at a utility building, we realized we had been going the right way. We went back the way we came, took the correct fork, and made our way to the farm. We ended up adding only an extra mile to our hike, but after doing a couple of other hikes that day, we weren’t in the mood for more miles.
The Snead Farm Fire Road is pleasant walking. Below: The old root cellar is still standing; Another view of the barn.
Christine and I marveled at how well-maintained the barn looks. Since it was abandoned in the 50s, it is clear that the park service has kept up with maintaining the barn and even painting it. I wonder if this will be a permanent part of the hike or if the park service will one day let this building fall prey to the elements and the woods.
Overall, this hike was a decent leg-stretcher and a good family hike.
Trail Notes
Distance – 3 miles
Elevation Change – 300 feet
Difficulty – 1.5 An easy walk down a mostly level trail.
Trail Conditions –3.5. Half of the trail followed the Dickey Ridge trail which was well-maintained and the rest is on fire roads.
Views – 1.5 Some views are seen from the final fork to get to Snead Farm.
Waterfalls/streams –0. Non-existent.
Wildlife –2. You may run into some of the usual park animals like deer and birds.
Ease to Navigate – 2.5. The turns did us wrong, so we’re marking it down.
Solitude – 2.5. This is a popular hike due to the proximity to the Northern entrance to Shenandoah National Park and the short distance.
Directions to trailhead: Follow Skyline Drive to the Dickey Ridge Visitors Center (around mile marker 4.6) Park at the visitors center. The trail begins on the east side of the drive, across from the center.
The hike to Lands Run Falls is a fairly easy 1.6 mile walk down an old park road. The waterfall is not terribly large or impressive, but it’s definitely worth a look if you’re in the mood for a short leg-stretcher.
Adam sits alongside Lands Run Falls. The falls were still a little on the low side despite five inches of recent rain.
Christine Says…
We planned to do a long hike on Saturday, but Adam was having knee trouble. Instead, we waited until Sunday and decided to try doing a few short, gentle hikes in the north district of Shenandoah National Park. It’s been several years since I ventured as far north in the park as Lands Run Falls, so it was a nice change of pace.
The walk to the waterfall stays on a wide gravel road the entire time, so the footing is easy and there is absolutely no place you can possibly take a wrong turn. The only place you might go wrong is by hiking across the top of the waterfall and missing it completely. The falls aren’t marked and they’re really not visible from the trail. You’ll know you’ve reached the falls when you pass over a small stream and culvert. You can also follow the sounds of falling water!
To get a good look at the falls, you’ll need to follow a worn path through the woods down into the ravine. It’s a fairly well-worn path, and the rocks in the ravine sort of form big steps. Be careful on the rocks immediately around the waterfall. They’re very slick and covered with moss and algae.
The last time I visited Lands Run Falls it was winter and there had been quite a bit more rain.
If you hit Lands Run Falls when there has been lots of rain, you’ll be treated to a pretty waterfall with three small, but distinct drops. The first drop of about 20 feet is the most accessible and the most photogenic. The other two drops are mostly obscured by blow-downs and underbrush. If the weather has been dry, Lands Run Falls probably is not worth your time. It frequently dries up completely in the summer.
In Henry Heatwole’s well-known Guide to Shenandoah National Park and Skyline Drive, he stated “This [Lands Run Falls] is an unrewarding experience for most people… This is for the very few hikers who are willing to go to a lot of trouble to find solitude beside a pool on a mountain stream.”
I wouldn’t characterize Lands Run Falls quite so grimly. I mean, it’s not spectacular – but it is definitely worth seeing if the water flow has been nice.
Adam Says…
We started off with this as our first of three short hikes for the day. I was battling some knee issues and Christine thought we should turn around because I was limping the first few steps. I felt I could make it though and luckily my knee felt better on the trip back up from the falls.
You descend 310 feet during this walk down the fire road. While it doesn’t seem quite as noticeable on the way down, you will feel the elevation change on the way back up. Most people should be able to do this hike, but you may need to take your time if the steepness gets to you.
Once you reach the area of the falls, to get the views that we did, you do need to climb down a steep section off the trail that can be slippery. I was able to do it on a bad knee, but you do have to watch your feet carefully. The fire road continues further for another 1.4 miles past the falls, but that only leads to a park boundary and there is nothing of interest to see.
The day was quite brisk with temperatures in the upper 40s. I initially wished that I had brought a fleece along, but once the blood got pumping I was fine in my T-shirt and shorts. The leaves were just starting to turn color – I think we’re still two weeks before peak season on Skyline Drive and higher elevations.
The Lands Run Fire Road descends about 300 vertical feet over .6 of a mile to the falls.
The trail was a nice quick view to a waterfall. I believe it is a somewhat popular trail, but that is largely due to the number of people that are driving down from Northern Virginia and are looking for a close waterfall hike. The falls themselves are pretty but they are not as impressive as many others in the park.
Trail Notes
Distance – 1.6 miles out and back
Elevation Change – Around 300 feet
Difficulty – 2. Relatively easy, but definitely uphill on the return trip
Trail Conditions – 4.5 The trail is a well-maintained fire road
Views – 0. The trail stays in the woods and does not offer any panoramic views
Waterfalls/streams –3. Lands Run Falls is small but pretty. It does dry up when there hasn’t been much rain
Wildlife – 2. You’ll likely see the usual park specimens along this trail – birds, squirrels and deer
Ease to Navigate – 4. The fire road doesn’t have any turns. Be careful not to miss the falls – you walk over a small stream and the waterfall cascades below the trail.
Solitude – 3. We saw a couple groups, but for a beautiful fall day, the traffic was light.
Directions to trailhead: Follow Skyline Drive to mile marker 9.2. Park in the lot on the west side of the drive. The hike starts at the south end of the lot.
Powell Gap is a fantastic short hike to a beautiful view of the eastern valley. Even if you’re not a regular hiker, this walk can be done by nearly anyone. The rock ledge on the ridge provides better views than many of the scenic pull-outs along Skyline Drive.
Adam Enjoys the View of Powell Gap. Below: Parking for this hike is right along the road. There is not a lot or pull-off.
Christine Says…
For the final leg in our mini-hike trio, we chose the short walk up to a rocky ledge overlooking Powell Gap. The hike follows the Appalachian Trail the entire way – which is only a brief half mile. The trail goes rather steeply uphill the entire way. And although it’s short, our Falcon Guide still rates this trail as “moderately strenuous”. I would agree with that assessment if this hike was longer, but due to the shortness, I think this trail would be quite easy for anyone to do.
The overlook along the ridge-line comes atop a beautiful, little rocky ledge. Views face eastward, and include a wonderful look at the rolling mountains and the valley below. If you look to the north, you can even see a little snip of Skyline Drive winding its way through the forest below.
The viewpoint is accessed via the Appalachian Trail.
We spent a good twenty minutes on the rock ledge. Adam covered his face with his cap and took a brief nap. He exclaimed “That was the most comfortable rock I’ve ever laid on!” when he woke up. Apparently, it was smooth and the shape cradled his back perfectly. While he dozed, I enjoyed the nice summer breeze and watched butterflies fluttering about in the trees right below the overlook.
I could have happily stayed longer, but we were both hungry and wanted to squeeze in a picnic lunch on the beautiful summer day. We ended up having our picnic back in Harrisonburg – at Lake Shenandoah. Even at high noon, it never got hotter than 81. It was such a perfect day!
Trail Notes
Distance – 1 mile out and back
Elevation Change – 300 feet
Difficulty – 2. Although the trail is a bit steep, the route is so short that the hike qualifies as easy.
Trail Conditions – 3. The trail is typical of this section of the AT – well graded, but some rocks and uneven footing.
Views – 3.5. A very nice view of the mountains and the eastern valley.
Waterfalls/streams – 0. None.
Wildlife – 2. We didn’t see anything, but in the park it is always possible to see deer, bears and other wildlife.
Ease to Navigate – 5. There is only one trail in the area, so it’s nearly impossible to get lost as long as you head south on the Appalachian Trail
Solitude– 4. This section of the AT is not heavily traveled. We did come across two section hikers.
Directions to trailhead:
At Mile 69.9 on Skyline Drive. Park on the eastern side of the road along the meadow. The trail begins just near the Powell Gap sign on the eastern side of Skyline Drive.
Simmons Gap is a very easy walk from the ranger station down to the park’s eastern border. It follows an old route used by the mountain people that inhabited the area.
The Simmons Gap fire road extends to the park boundary. Below: We saw a bear less than a tenth of a mile from the Simmons Gap parking area; Apple trees probably attract lots of wildlife; Bear scat was everywhere along the Simmons Gap trail.
Christine Says…
Truthfully, we probably wouldn’t have bothered with this hike if it weren’t so close in proximity to the other two we selected for the day. Our Falcon Guide said it was nothing special, but it was one of the few hikes left in the park that we haven’t done at least once. (There are a few long 10-16 miles hikes still on the to-do list, but we’ll likely do those as backpacking trips)
The walk down Simmons Gap was about what I expected – a quiet walk down a shady path through the woods. There wasn’t much scenery – no views and no waterfalls. The stream running along the trail was nearly dry despite the decent rain we’ve had lately.
As we walked, we kept our eyes peeled for bears. We had seen a bear less than a tenth of a mile from where we parked our car. Also, the fire road was practically paved with bear scat. Besides the ridge of Knob Mountain, I don’t think I’ve ever seen so much bear poop in one place. Unfortunately, all we saw was the poop… no bears!
Wildflowers along the Simmons Gap fire road. Below: The trail follows along, and eventually crosses a small stream.
There are many hints of a bygone era along the trail – old stone walls, crumbling foundations and the odd apple tree tucked into the forest. The spot where the fire road meets the park boundary is obviously used as a dump by people who are too rude and lazy to take their garbage to a proper facility. The streambed at the end of the trail was littered with everything from a broken baby stroller, to a beaten plastic Shrek suitcase to a box full of empty 2-liter bottles of Dr. Pepper. It was disgusting. I wish I knew what people were thinking when they did stuff like this. How could anyone back their car up to a beautiful mountain stream, and just empty their trunk-load of discarded property?
Despite the disappointment of seeing the litter, we still had a nice walk down the path. Although, I don’t think I’d recommend this hike to anyone.
Trail Notes
Distance –1.6 miles out and back
Elevation Change – About 200 feet
Difficulty –1. Easy walking with very little elevation change.
Trail Conditions – 4.5. This fire road is smooth and easy to walk on.
Views –0. You’ll be in the woods the whole time.
Waterfalls/streams – 1. The small stream is pretty and is often lined by stone walls, but it may be dry most of the summer.
Wildlife – 3. There’s a good likelihood of seeing bears in this area.
Ease to Navigate – 5. There is no place to go wrong. Follow the fire road straight out and back.
Solitude– 4.5. Because there isn’t much to see in this area, not many people come this way.
Directions to trailhead:
At mile 73.2 on Skyline Drive you will see a small parking lot on the western side of the road (directly opposite of the sign for the Simmons Gap Ranger Station). Cross Skyline Drive, walking on the paved road to the ranger station. You will see a chain guarding a fire road. Cross the chain and start the trail down the fire road.
The Knob Mountain – Jeremy’s Run Loop takes hikers along a 12.4 mile route through one of Shenandoah’s most popular backcountry camping areas. This hike could be done as a long dayhike, but the campsites in the area are too inviting to pass up.
The Knob Mountain – Jeremy’s Run Loop offers beautiful stream scenery. Below: Mountain vistas can be seen along the descent on the Knob Mountain Trail; Blue Blazes mark the way across streams on the Jeremy’s Run Trail; Adam negotiates one of the many stream crossings.
Adam Says…
Since the weather looked like it was going to be a cooler, we decided to take off and go on an overnight backpacking trip. Our first overnight trip was the Hazel Mountain-Catlett Mountain trail which we did with a group from the PATC. This trip was our first non-group outing, so we felt it would be a good chance to put into practice what we learned from our Backpacking 101 course.
To do this trail as a loop, leave from the Elkwallow picnic grounds. You will see the entrance to the trail next to the pit toilet, which provides a last chance to “take care of business” before embarking on the hike. You will begin the trail on a short spur trail to the white-blazed Appalachian Trail. Turn left on the AT. In .2 miles, you will reach the junction with the blue-blazed Jeremy’s Run Trail. Continue straight on the Jeremy’s Run Trail. Around 1.2 miles, you will reach the junction with the Knob Mountain Connector Trail. Take a right at the post to join this trail. As soon as you cross Jeremy’s Run with a little rock-hopping, you will begin this steep connector trail. There are lots of switchbacks and this is definitely the steepest part of the entire trip. Around 1.7 miles, you will reach a junction with the yellow-blazed Knob Mountain Trail. Take a left at the trail junction and continue to follow this slowly ascending ridge trail. We would probably name this portion of the loop the Bear Scat Boulevard, because there was a ton of bear evidence in the area. You will see a few views through the trees, but nothing remarkable from the trail. At mile 3.9 you will reach the summit of Knob Mountain, marked by a concrete post. After the summit, you will begin your steep descent down the mountain. This is broken up by several switchbacks. The trail does open up at times to give you views of mountains along the way, including Strickler Knob and the Three Sisters. At 6.8 miles, you will cross Jeremy’s Run and reach the junction with the blue-blazed Jeremy’s Run Trail. Since we were fairly exhausted from our trip, we picked a campsite near the junction of the trail, which gave us great access to water. From the junction, you just continue on the Jeremy’s Run Trail until you reach the parking lot, crossing over Jeremy’s Run fourteen times. In some areas, it was necessary to rock hop across, but most of the time the traversing was quite easy. I imagine during heavy rain seasons, this would be more of a challenge.
The overnight trip started with a brief stop to fill out paperwork for our backcountry permit. Below: Adam makes his way down the Jeremy’s Run Trail; Snacks on the Knob Mountain summit; A view through the trees from the Knob Mountain Trail.
Jeremy’s Run truly provided a great opportunity for camping in the backcountry. We saw several previously-used campsite areas, so we decided to use our Leave No Trace principles and use an existing campsite rather than creating our own. The campsite was short walking distance to a reliable water source. After starting our trip around 9:30AM, we arrived at camp around 1:00PM. We were very hungry, so Christine worked on getting some lunch together and I began working on getting our tent set. The ground was very hard and rocky, so it took an effort to find a good place to get stakes into the ground. After lunch, we finished getting our sleeping pads/bags ready, hung our bear-bag rope, and prepared our kitchen area. We got some water to use for the trip at the nearby stream and I dug a few preemptive catholes. With every thing set, we decided to relax a little in our tents to stretch out our backs. I like to bring a book along the trip so we took turns reading aloud a few chapters from A Walk for Sunshine by Jeff Alt, an entertaining read about hiking the Appalachian Trail. We took a short nap and then played a few hands of the Monopoly card game we also brought. We then broke in our new JetBoil and prepared a great dinner. After cleaning up dishes, we went down to a place along Jeremy’s Run and stretched out on a large rock. We watched several brook trout jump out of the water, catching mosquitoes that were lightly dancing on top of the water. We retired to our tents to the sweet chorus of whippoorwills and the “who cooks for you” hoots of nearby barred owls.
On the hike down from the summit of Knob Mountain, hikers get a few decent views of adjacent Neighbor Mountain. Below: A scenic spot on Jeremy’s Run; Our campsite.
There were so many things I enjoyed about our trip. We saw tons of wildlife – three black bears, a wild turkey, scarlet tanagers in glorious color, and heard lots of birds at night. The temperature was perfect and the bugs were not out as much as we expected. The trip also helped affirm our ability to handle a backpacking trip by ourselves. I think we really learned a lot of great skills in the last few months to help us feel well-prepared. I was a little more apprehensive wondering if we could handle the 12+ mile hike with 35 pounds on my back, since our previous trip was about 8 miles total with a little less weight each. The hike was more strenuous the first day, but we were able to complete the hike without much trouble. I think we’re both looking forward to going on another backpacking trip, but we are now getting into the hot summer months. Hopefully, we’ll be able to find a cooler weekend in the near future.
Christine Says…
When Mother Nature gives you the gift of a sunny, dry, 70-degree day in the midst of a long string of 90+ degree scorchers, you must take advantage of that gift! We chose to make the most of the pleasant weather and go on an overnight backpacking trip. One of the leaders on our last trip recommended Jeremy’s Run as one of his favorite places in the park. As dayhikers (until recently), the Jeremy’s Run hike had always been a little out of reach. At 12.4 miles with well over 2,500 feet of elevation gain, it was always more than we were willing to tackle on a day hike. It seemed like a perfect candidate for this little weekend getaway.
After filling out all the requisite paperwork, we set out from the Elkwallow Picnic Area along the Appalachian Trail. Right away, I was struck by how much heavier my pack was compared to our last trip. On that trip, we had seven people to split the weight of group gear. But this time, we had to carry our own stove, fuel, collapsible bucket, water filter, food and rope. I also chose to carry my old dSLR camera, a couple card games, extra batteries, a fleece and my iPod. In the end, my pack weighed in about nine pound heavier than our last outing.
I brought my iPod along this time for a couple reasons 1) I wanted to be able to listen to my “workout mix” when climbing a couple of the big hills on the route and 2) my iPod is loaded with audio books, which I thought would be pleasant to listen to after sunset in the tent. The first big hill we hit was on the Knob Mountain Cut-Off Trail. It was really steep, so I put in my earbuds and started chugging up the hill. Listening to mindless pop music with a beat – anything from Tupac to Lady Gaga to Gnarls Barkley – makes climbing hills so much less painful. I had worked up a pretty good rhythm, listening to the early 90’s party song, “Rump Shaker”, when I rounded a curve a spotted two black bears about 50 yards up the hill. I’m not sure if they were a mom and a yearling or two adults. We looked at them, they looked at us, then they quickly decided to leave the area. I didn’t have time to free myself from my trekking poles and iPod cord to get a photo, but it was still a great treat to see the bears. Backpacking seems to involve an inordinate number of straps and buckles. Sometimes, it makes me feel like a horse pulling a cart.
After camp was set up, Christine spent some time relaxing on the rocks in Jeremy’s Run. Below: Adam collects water in a collapsible bucket to use for cooking later; Crocs and Socks – they might not be high fashion, but they’re functional; Playing Monopoly at camp.
After the cut-off trail met the Knob Mountain Trail, the tough climbing was over for the day. I listened to my iPod a bit more, but eventually put it away in favor of listening to the birds and the breeze in the trees. We took a snack break on the top of Knob Mountain. There weren’t any views at the summit – just shade and a ton of poison ivy. It felt really good to throw the pack off for a while and have a good stretch. I could really feel the heavier pack weight bruising my hip bones.
The downhill walk lasted a little over 3 miles. We soon arrived at the stream, where the Knob Mountain Trail converges with both the Neighbor Mountain and Jeremy’s Run Trails. We crossed the stream a couple times and decided it was high time to find a campsite. We were both completely knackered after walking about 7 miles with our packs. I honestly don’t know how thru-hikers cover 20-30 miles a day with even heavier packs. I’m convinced I wouldn’t last a week!
We found a beautiful place for camp under the shade of pines and hardwoods. It was clearly a place others have camped before. Stones were arranged like seats in a semi-circle in one of the clearings. It was also about 30 yards from a gorgeous spot along Jeremy’s Run – so we had great access to water.
We designated separate sleeping and kitchen areas right away. Adam pitched the tent while I fixed lunch. I made Buffalo Chicken Wraps – which were delicious. We found a place for our bear hang and dug a couple catholes for future use. With camp all set up, we settled into our tent for a nap.
Post-nap, we collected water for cooking in our collapsible bucket. On our water run, we also took some time to stretch out and lounge on one of enormous boulders in the middle of the stream. The sky above was so blue and it was very soothing to watch the trees swaying above in the breeze. I actually tried out my Crocs again, and found them more comfortable, albeit considerably dorkier, with socks. I may keep them as my camp shoes after all.
We filtered water for our dessert and boiled water for our entree. Below: We had Pad Thai for dinner; Dark Chocolate Cheesecake for dessert.
Around 5:30, we started getting things together for dinner. Because this trip was rather impromptu, we brought pre-packaged dehydrated meals instead of taking the time to make homemade food. But it was still delicious. The Backpacker’s Pantry Pad Thai was filling and tasty. It had a yummy, spicy peanut sauce with noodles and vegetables. For dessert, we ended up having Dark Chocolate Cheesecake (instead of Tiramisu, as originally planned). It was really tasty, too! I was stuffed from dinner, so we decided to take a short walk down to a deep pool I had seen along the trail a way back. We sat on a rock and just enjoyed the quiet of the evening.
It got dark quickly down in the hollow, so we retired to our tent a little before nine. I listened to a book on my iPod and Adam read. I started to doze off well before 10:00. All through the night, I could hear a couple barred owls hooting, over and over and over again. Pretty soon, a whippoorwill joined in and sang through almost the entire night. I haven’t heard a whippoorwill since I was a child, so it delighted me to hear the song in the night again. I slept pretty soundly, until the roar of a train whistle woke me up around 2:00 in the morning. I could hear the wheels on the track so clearly; it seemed like the train was rolling through camp. I guess some distant sounds really carry on the quiet night air. When I awoke, I found I was drenched with sweat in my sleeping bag. It was in the mid-50’s outside, so the down bag was a bit too warm. However, if I slept outside my bag, I got cold quickly. I want to get a blanket and sheet for my sleeping pad to make summer camping more comfortable. Despite being hot or cold, I eventually fell back to sleep and stayed so until 6:30 a.m.
I got up before Adam and got the bear bag down, so I could start breakfast. We ended up leaving the bacon home because we didn’t want to carry a pan. Instead we had oatmeal, boxes of apple juice and hot chocolate. It was a satisfying breakfast on the cool morning.
We saw three bears, including one on the Appalachian Trail. Below: Another scenic pool on Jeremy’s Run; We encountered this loose dog on the trail (one of many). He apparently lives on the border of the park and runs the trail often.; Rocks in the stream bed were covered with moss.
We broke camp down quickly and were back on the trail around 8:00. The second day of hiking was substantially shorter and easier than the first day. With about 5.5 miles to cover, we knew we’d be back at the car by mid-morning.
The trail climbs ever so gradually along Jeremy’s Run. We passed lots of fantastic campsites along the stream. It’s no wonder this area is so popular with backpackers! We crossed the stream 14 times over the course of the morning. Because of all the dry weather we’ve had lately, none of the crossings were challenging at all. Most of them were bone dry, and the ones with water were still easily rock-hopped.
We took a snack break where the Jeremy’s Run trail crosses the Knob Mountain Cut-Off. From this point, the trail follows the same route as we’d used hiking out the day before. The grade becomes steeper for the last mile and eventually meets back up with the Appalachian Trail. For this section, I put my iPod back on again to help endure the uphill. “Rump Shaker” came up in the shuffle again, and after the first few moments, I spotted another bear. There must be something about that song that conjures bears! I did manage to get a few distant photos of this bear before he disappeared deeper into the woods.
About ten minutes later, we were back at our car and on our way. We stopped by the Elkwallow wayside, where I rinsed my face and used a flushing toilet! Plumbing is so exciting after being without it. On our way home, we stopped at McDonald’s for lunch. Coke and salty French fries taste absolutely amazing after a long hike. As luck would have it, their credit card machine was broken and they gave us our lunch for free! It was a fitting bonus for a perfect trip.
Trail Notes
Distance – 12.4 miles
Elevation Change – 2600 ft
Difficulty – 3. If you were going to do this in one day without stopping, I would up the difficulty slightly due to the length.
Trail Conditions – 3.5. The trail was very well-maintained. We saw evidence that the Knob Mountain trail had been cut back, but I can imagine in late spring, much of the trail could have some overgrown areas. The ground was well-traveled and there were only a few rocky spots around the streams.
Views – 1.5. The best chance of views are on the descent from the Knob Mountain summit down to Jeremy’s Run. After leaves fall, this may be slightly better.
Waterfalls/streams –3.5. You do get lots of chances to cross Jeremy’s Run. There was only a small fall near the base. If you want to photograph streams, you should have plenty of opportunities. You’ll also have a reliable water source.
Wildlife – 4. We saw black bears, a turkey, and scarlet tanagers; we heard whippoorwills and barred owls at night.
Ease to Navigate – 4. The trails are well-marked and just stick to the signs on the cement posts.
Solitude –3. This is a popular spot for backpacking and trail running. However, we felt that we were able to find our own peace in the woods. We also came across a dog that belongs to a nearby family that evidently roams the trails frequently, so we had a companion during part of the hike up from Jeremy’s Run.
Directions to trailhead:
Located in the northern section of Shenandoah National Park. Park at the Elkwallow Gap picnic grounds around mile 24.3 of Skyline Drive. The Jeremy’s Run trail begins next to the pit toilet at the parking lot.
Trimble Mountain is a lovely, wooded trail through the North River Ranger District of George Washington National Forest. The hike begins near Todd Lake. It climbs the mountain, follows the ridge across two summits and then descends back to the start point.
A View of Trimble Mountain from the Todd Lake Dam. Below: Todd Lake has a nice campground with flush toilets and hot showers. The lake is open to swimmers.
Christine Says…
Well, this entry should have been part four in the Backpacking 101 series, but sadly my sprained ankle forced us to bail out on the trip. The weight of a pack on my sore ankle is still too painful. Fortunately, I was cleared to do some light day-hiking again. So, on Saturday morning, Adam and I headed out to George Washington National Forest.
Trimble Mountain fit the bill for a light and easy hike. The four-mile trail isn’t too rocky and follows a gentle grade both up and down the mountain. We parked along the road near Todd Lake. Before hitting the trail, we climbed up the backside of the dam and enjoyed the lake view. The top of the dam also provides a great look at Trimble Mountain. The sky was absolutely gorgeous – a real photographer’s dream. It was the prettiest I’ve ever seen Todd Lake look.
Shortly thereafter, we were on our way up the Trimble Mountain trail. Within a tenth of a mile, we reached a “Y” in the trail. We took the left branch, following Hiking Upward‘s advice that it was the gentler, more gradual grade. For about a mile and a quarter, we climbed steadily upward. It was never tough climbing, but it was consistent. The trail was really narrow and carved into the mountainside. A lot of places, one foot was always laterally uphill from the other, and there was barely room for placement of my trekking poles. It was also an unusually warm day for early May, so the bugs were out in full force.
Trimble Mountain actually has two summits with a saddle between. Once you gain the ridge, the terrain consists of both uphill and downhill hiking. There really aren’t any views to speak of at the summit. Every now and then, we could see glimpses of the mountains through the trees, but there was never a sweeping, panoramic view along this hike.
There were so many different kinds of wildflowers growing along the trail.
The remainder of the hike went by quickly and was all downhill. I stopped many times along the way to photograph the abundant wildflowers on the forest floor. I also spotted a few little tree frogs. They were so tiny and fast that I had a hard time getting photos. They were the only wildlife we saw on the trail.
By the time we got back to the car, my ankle was quite sore again. The downhill walking really seems to strain it. I hope that little by little it will feel better and become stronger. Hopefully when it’s healed, we can make up that backpacking trip.
This little frog was about the size of a fingernail.
Adam Says…
We had been to the Todd Lake area before of George Washington National Forest, but this was our first time hiking Trimble Mountain. Todd Lake receives a lot of campers and local visitors that want to enjoy swimming and basking. The Trimble Mountain trail that is nearby doesn’t seem to get a lot of traffic. We had the entire hike to ourselves on a beautiful day outside. The bugs helped us realize that the warm weather is here. One thing that is different about hiking national forest trails is that there isn’t a lot of maintenance to the trails. There were a couple of trees spread across the trail and the trail was becoming a little more overgrown in parts. We had heard that there were good views on this trail, but we were disappointed to find that most of the views are obstructed. The only views you will see is in break in the trees. The winter would probably lead to more views of the mountainside, but after the leaves fall this will look a lot more dull. We enjoyed getting out to hike and the wildflower variety was definitely a highlight of the trail.
One of the few openings in the trees that provided a view. Below: Trees blocked most of the view; the trail is marked with double yellow blazes.
There is one geocache on the trail and a few at the nearby Todd Lake area. The first you can find along this hiking trail. The other trail would involve hiking along the Todd Lake Trail which you can reach from the opposite side of the road from the Trimble Mountain trail. The Todd Lake Trail is a little less than a mile and takes you around the entire Todd Lake area. Since the day that we did the hike was the 10th Anniversary of geocaching, I felt I needed to do a couple of these to celebrate the hobby.
Difficulty – 2 This climb on this hike is about two miles, but is very moderate.
Trail Conditions – 3. The trail is narrow and little bit overgrown.
Views –1. There are some nice glimpses of the mountains through the trees, but nothing remarkable. Views might be nicer in the winter when trees are bare.
Waterfalls/streams –1. In times of heavy rain, you’ll find several small streams along the trail. Most of the year, these streams are dry.
Wildlife – 1. The national forest is used by hunters, so animals tend to stay hidden. We saw quite a few frogs and toads along the trail.
Ease to Navigate – 5. The trail is well-marked and easy to follow.
Solitude – 4. We didn’t see a soul.
Directions to trailhead: From Bridgewater, Virginia head south on Rte. 42 for about three miles, following signs to Natural Chimneys regional park. Take a right on 613 and in less than one mile, take a left on state route 747. Take a right .75 miles after Natural Chimneys to the intersection with 731. Take a right heading north. In about a mile, take a left on to State Route 730/North River Road. This comes to an end and take a right on to state route 718. In another mile, you will take a left on to Forest Road 95, entering George Washington National Forest (you will see signs directing you to Todd Lake). The trailhead is about 3.5 miles on the left. You can park on the side of the road right near a trailer dump station. The trailhead is on the opposite side. (There is a trail on the same side of the dump station that leads to the top of Todd Lake if you are interested.)
Kaylor Knob is a fairly easy 3.5 mile ridge hike offering nice (but slightly obstructed) views. The summit is the highest point on Second Mountain.
Adam Says…
For those that regularly follow our blog, you may know that Christine sprained her ankle badly during our hike up Buzzard Rock. While she was healing, we participated in a Backpacking 101 course through PATC. The workshop concludes with an overnight backpacking trip scheduled for the first weekend in May. We decided to test out the ankle with some extra weight to see if going on the backpacking trip would even be possible. So, we got our gear together and decided to do a short hike to Kaylor Knob after work last Friday.
While you can approach this summit from Cub Run, we decided to try the shorter approach, taking off from the overlook at Massanutten Resort. The hike starts across the road from the parking lot at the top of the overlook. We have hiked this trail several times to the first overlook where a geocache is hidden, but this was the first time that we took the hike to the summit.
Since the last time we did this hike, someone has improved the trail markings. You simply follow the blue-blazed trail along the way (some points also have blue signs marked with a “K.K.” and the mileage). At around .5 miles, you will come to a junction with another trail that is marked with pink blazes. Just stay to the right and continue on the blue-blazed trail. At .75 miles, you will come to a small rock outcropping that has a nice view to the west.
If you continue up the hill past this outcropping, you will continue to walk along the ridge. You will see views to the west and east through the trees that will open up at different spots. At 1.75 miles, you will come to the summit, which is marked with a larger outcropping and nice views toward Shenandoah National Park. After taking some time to enjoy the views head back the way you came.
Adam tries out the backpack.
I do think the views to the east are better than the views to the west on this hike. If you wanted to see a nice sunrise, you should get up early to make it to the summit by sunrise.
This is a great short hike to do if you’re visiting the Massanutten area.
Christine Says…
Adam and I have a backpacking trip coming up, so I needed to get out there and give the ankle a good test drive. Our original plan was to hike somewhere in Shenandoah on Saturday and then spend the night camping in our backyard. However, the weather took a turn for the worse, and we ended up just squeezing in a quick hike to Kaylor Knob on Friday evening. (we also skipped the tent in the backyard and slept in our nice, plush bed instead.)
I managed to load about 25 pounds of gear into our backpack for the “dress rehearsal”. My ankle felt completely fine for the entire hike – stable and painless. The pack was easy to carry and comfortable. It did make the hills a little tougher, but I still felt really good. I know our packs for the trip will be a little heavier, but this was still a decent test.
The Kaylor Knob hike is not particularly remarkable. It’s pretty and peaceful and has two nice viewpoints along the way. There are definitely more impressive trails in our area, but this one is a five minute drive from the house, so it was perfect for a quick after-work hike.
Note: If you have a couple days in the area, be sure to check out the Massanutten Ridge Trail!
Trail Notes
Distance – 3.5 miles out-and-back (Check out the stats from Map My Hike)*
Elevation Change – about 450 feet
Difficulty –1.5 Most people should be able to do this.
Trail Conditions – 3. While the trail is used often, it contains lots of pointy rocks.
Waterfalls/streams – 0. Non-existent.
Views – 2.5. Pretty, but not terribly open or panoramic.
Wildlife –1.5 There isn’t much room for wildlife on the top of this ridge. Expect to see birds of prey soaring in view as well as many of the local birds in the thickets.
Ease to Navigate –4.5. If you stay on the blue-blazes, you’ll be fine.
Solitude –3. You may see some people due to its popularity with vacationers, but you should still have mostly solitude.
Directions to trailhead: From Harrisonburg, head east on US 33 for about 10 miles. Turn left at the Exxon on the left and head on SR 644, Resort Drive. Follow this road and take a left on Massanutten Drive. You will reach a guard house. Let the guard know that you are here to hike and they will give you a guest pass. After about 3 miles, take a right on Del Webb Drive. Follow Del Webb Drive for about two miles until you begin to drive up to the ridge, where there is a parking lot on the left. After you park here, cross the road. At the end of the guard rail you will begin the Kaylor Knob trail.


 Wookie Says…


