The Priest

The Priest is a wonderful segment hike along the Appalachian Trail in the George Washington National Forest’s Glenwood & Pedlar Ranger District.  The northbound trail access may be a little tough for some people to reach (4WD vehicles are strongly recommended), but if you can get there, you’ll be treated to magnificent views of the Tye River Valley.

Adam enjoys the view from The Priest

Adam Says…

This was hike number two for us on a three-hike-day.  This was our first trip up The Priest, and it was well-worth the bumpy drive to get to the trail.   See the directions to trailhead (below) for some special precautions to take when approaching the trailhead.  On route 826, we decided to go a little further than  Crabtree Meadows, but didn’t make it all the way up by car to the AT junction.  We ended up parking at a campsite and hiking up the fire road for .3 miles.  Many people will want to park at Crabtree Meadows, but that will add one mile to the overall distance.  Route 826 can be quite steep. In fact, some sections of the road are much steeper than anything you’ll see on the actual trail.  We saw a Jeep brigade coming down the steepest section of road, but they looked like seasoned off-roaders.

Route 826 gets progressively rougher.
Route 826 gets progressively rougher. Pictured below: A group of off-roaders make their way down the road.

When you reach the junction (you’ll see painted rocks indicating north/south) of the Appalachian trail, head north (left).  You will come across the Priest Wilderness sign and trail map. When I was telling someone earlier about doing this trail today, they were wondering about the origin of the name “The Priest”.  The true origin is unknown, but there are a few myths.  The first is that it was named after the DuPriest family that lived in the area.  The second is that a minister in the area gave some of these nearby mountains religious names.  The Cardinal and The Friar are both close to The Priest.

Adam enjoys reading the journal at the AT shelter.
Adam enjoys reading the journal at the AT shelter.  Pictured Below: Some of the entries are funny, some divulge a little bit too much information.

journal_3

We found that the trail was a steady incline, but nothing too strenuous.  There was supposed to be a side trail to The Little Priest at .7 miles, but we didn’t see it (but we weren’t looking too hard).  At .9 miles, you will see a blue-blazed spur trail to an Appalachian Trail shelter.  We definitely recommend taking the extra .2 mile round trip to visit the shelter.  These shelters are a great place for all of the AT hikers to get together and have a roof over their head for a night.  At most of the shelters, you can find a journal in which the hikers will write about their day or plans, leave notes for other hikers, etc.  Since this hike is The Priest, the theme of this logbook was to make a confession.  It was a lot of fun to read through the journal entries.  These confessions ranged from eating two Poptarts, to taking drugs, to not paying for supplies.  If you happen to be hiking the trail in June when most of the AT thru-hikers are passing through, consider bringing along some treats to share.  It’s a form of “trail magic” and is always appreciated.  (read the guidelines – there are some tips for dispensing good magic on the Appalachian Trail Conservancy Site)  We did see a few thru-hikers on the trail today, but we hadn’t thought ahead to bring anything.

Around 1.3 miles, you will see some overhanging rocks to the north that lead to some marvelous views.  Take some time to enjoy the views.  The summit is only .1 mile further, but there are no views at the summit.  We really enjoyed this hike and hope to do this one again as well as the nearby Spy Rock.

Christine Says…

The Priest was probably my favorite of the three hikes we did on this particular day. Discovering a new hike is always a real treat, especially when it turns out to be as nice as this one.

There are actually two different ways to access the summit of The Priest. The southbound ascent is longer and much tougher – it follows the AT along a series of forty switchbacks with just over 3000 feet of elevation gain. It might be the hike with the most elevation gain in all of Virginia. One hiker remarked in the journal that the southbound climb “made him realize that he’s not the man he thought he was.” I guess that’s one way of saying that the hike was a long, tough haul!

We chose the northbound ascent primarily based on our limited time. The hike was listed in our book as strenuous, but I did not find it to be tough at all. The uphill grade was constant, but gentle. Adam and I were easily able to carry on conversation without any huffing and puffing uphill.

The terrain on this hike was so pretty! Along the first part of the trail, forest floor was blanketed with lush ferns. Every now and then, we could catch glimpses through the trees of the valley below. The summit of The Priest is 4,063 feet, so we were pretty high up (by Virginia standards, anyhow).

This appeared to be a popular campsite.

When we finally gained the ridge, there was a perfect (and obviously popular) campsite. Encircling the area was a collection of huge boulders arranged in an almost Zen-like natural sculpture. Amidst the boulders, there was a fire pit and a large smooth, open place to set up tents. If I were to spend a night along the trail, this would be my ideal kind of campsite.

Shortly after the campsite, the trail split. One arm headed down to the shelter and the other continued along the AT up to the summit of The Priest. This section of trail was lined with mountain laurels and wild azaleas in full bloom. Several places along the trail were covered with a carpet of pink and white flower petals that had been blown from the bushes. It was almost dreamlike to walk through all the flowers. In the tree tops, we heard the constant sweet sound of warblers singing. We even caught a few glimpses of the birds. The ridge is fairly level, so this walking was very easy and pleasant.

Wild Azalea flowers carpeted the forest floor.
Wild Azalea flowers carpeted the forest floor. Pictured below: Many of the azaleas and mountain laurels were still in full bloom.

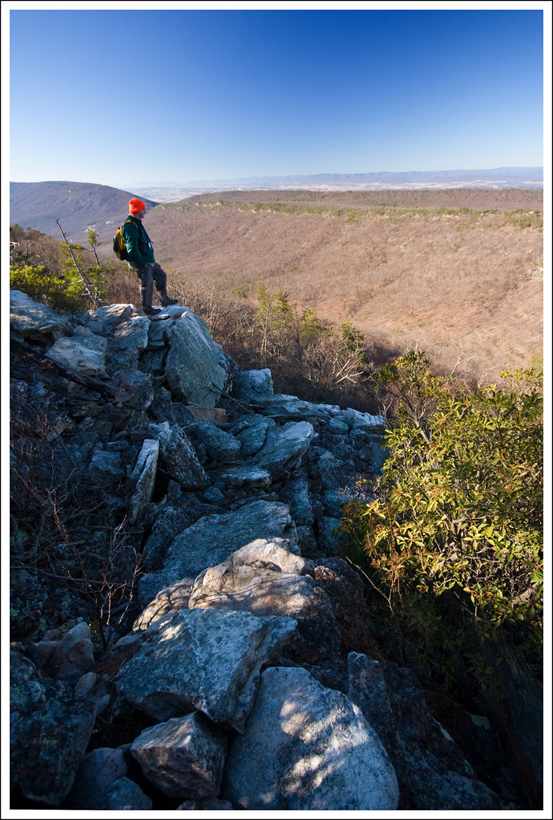
I had read that the summit of The Priest was a lovely shady place, but didn’t offer much in the way of panoramic views. So, it was much to my surprise and delight to find a worn path through the woods that led to an amazing outcropping of rocks with spectacular views of the entire valley below. Even though it was close to high noon, I loved photographing this spot along the trail. The sky conditions were a photographer’s dream – cerulean blue punctuated with both swishes and puffs of white cloud.

The summit was spectacular.

Adam and I sat on this spot for a good, long while. We shared a chocolate donut and some water, watched the hawks soar below and took in the valley view. Afterwards, we made the short walk to the actual summit. There was a fat toad sitting right along the trail at the summit. I like to think of him as the official summit marker.

This toad was our summit marker.

The hike back down to the car was fun – all downhill – just the way I like it!

Trail Notes

  • Distance – 2.8 miles out-and-back. We also recommend adding the .2 mile trail down to the AT shelter. If you park at Crabtree Meadows, add a mile on to the trail’s total length.
  • Elevation Change – 1,000 feet
  • Difficulty – 2. While the trail does have a moderate elevation change, the uphill is not too tough.  If you have to hike up the fire road from Crabtree Meadows to get to the trailhead, that will be much tougher than anything along the AT.
  • Trail Conditions – 4. Like most of the AT in Virginia, this section is nicely maintained.
  • Views – 4. Gorgeous views of about 150 degrees of views out into the Tye River Valley
  • Waterfalls/streams – 0. None, but there is a small spring-fed water source near the shelter.
  • Wildlife – 1.5. We didn’t see much, but this is wilderness area.  There are lots of nice birds for any ornithologists.  We saw a cerulean warbler, which has such a gorgeous song.
  • Ease to Navigate – 4.5. Just stay on the AT.
  • Solitude –4. Since it is difficult to get to, you may run across some backpackers or AT thru-hikers, but not many others.

Directions to trailhead: The best access to this trail is via VA-826.  If you are approaching from I-81, take exit 205 towards Steeles Tavern.  Take a left on to Rte. 11 and then a quick right on to VA-56 heading east.  Follow this past the Blue Ridge Parkway (near BRP Mile Marker 30) and then take a right shortly after the Fish Hatchery on to VA-826.  There is a sign at the entrance that you need to have four-wheel drive to travel on this road.  It is a bumpy gravel road where you have to cross several small streams.  Once you reach Crabtree Meadows, it is .5 mile before you can reach the AT trailhead to start The Priest trail.  Many cars should be able to get up to Crabtree Meadows, but the last .5 mile should be taken cautiously and done only if you have a confident driver and appropriate vehicle.

Crabtree Falls

Crabtree Falls is probably Virginia’s best-known waterfall hike. The hike is located a short distance from the Blue Ridge Parkway. The trail climbs alongside the falls and ends at an overlook of the Tye River Valley.

This is the first large cascade you'll encounter on the hike.
This is the first large cascade you’ll encounter on the hike.

Christine Says…

Crabtree Falls, located in George Washington National Forest’s Glenwood & Pedlar Ranger Districts, is one of the classic “must-hike” Virginia trails. When the area is experiencing good amount of rainfall, the 1,200 foot series of falls can be truly impressive.

Adam and I left our house at 5:45 a.m. on the morning of this hike. I wanted to get to the area before the sun started shining into the gorge. Sunny days usually mean crappy waterfall photos. On the morning of our hike, the area was forecast to have quite a bit of fog. I was really excited and had visions of the falls – cascading through the mist, lined with lush, blooming mountain laurel. Unfortunately, it was not to be. When we arrived, the fog was gone, the sun was already high in the sky and the laurel had mostly gone to seed. Nonetheless, I was still able to find a few shady spots along the way to take photographs.

The beautiful arched bridge over the Tye River.

The trailhead is located at the upper parking lot of the Crabtree Falls area. There is a $3.00 fee to use this area. Even though the trail starts from the upper lot, don’t miss walking down to the lower lot to take a walk across the beautiful laminated wooden arch bridge that crosses the Tye River. It was delivered to the area in a single piece and has graced the spot since 1978. Crossing the bridge used to be part of the hike, but improvements to the area expanded parking, added restrooms and shortened the trail.

As you start the hike, don’t neglect reading the bulletin board at the trailhead. It provides many cautionary tales concerning the waterfall’s deadly terrain.  As of June 2015, 29 people have fallen to their deaths at Crabtree Falls – most of them teenagers and young adults. The rocks surrounding the stream are coated with transparent algae. It doesn’t look wet or slippery, but it’s honestly as slick as grease in some spots. The forest service is always warning hikers to stay off waterfalls – but they really mean it at Crabtree.

Adam climbs the steps along the Crabtree Trail.

The first impressive cascade is at the very bottom of the trail and is accessible along a level, paved walkway. The trail to the summit starts on the right side of the paved path, and climbs quickly upward. The trail makes use of steps, railings, wooden walkways and switchbacks to traverse the steep terrain. Some of the switchbacks meander quite a distance from Crabtree Stream, but the sound of rushing water is ever present in the woods. You never move so far from the stream that you can not hear the sound of the waterfall. It’s such a soothing sound. There are five major cascades (and many smaller ones) that make up Crabtree Falls.

The trail is mostly well-graded and maintained. There are a few rocky sections, and some of the rocks may be loose or slippery. On the day we hiked, the trail was really muddy from all the recent rain, but it was still easily passable. I think most of the pretty sections of the falls are within the first three-quarters of the hike. The big, dome-shaped cascade at the top is impressive to see, but it just doesn’t photograph well. At the Tye Valley overlook at the top, you can’t see the falls below you at all. If you hadn’t just walked along the waterfall on your hike, you might not even believe it’s there. The view from the top is just so-so – mostly just tree-covered mountainsides. It pales in comparison to the waterfall views. Most hikers choose to turn around at this point, but you also have the option to continue the hike along the stream, ending up at Crabtree Meadows.

There are discrepancies about the length of this hike. On the internet, I’ve seen it listed everywhere from 2.2 to 4 miles. The on-site plaque at the base of the falls says the hike is two miles to the top, for a total 4 mile out-and-back. Our Blue Ridge Parkway hiking guide lists the hike at 3.4 miles, out-and-back. It seems like the happy medium distance, so we’ll go with that measure.

Adam Says…

The hike along Crabtree Falls is one of the best waterfall hikes, since you hike along the falls for most of the way.  I haven’t experienced any other hike in Virginia that allows you to walk along such an impressive series of falls.

Another beautiful section of falls along the trail.

This was our second trip to Crabtree Falls.  We were hoping to go in the late spring or early summer for views of mountain laurel along the stream.  It looks like in this area, we just missed the peak by about two weeks or the laurel didn’t bloom as well this year.  When you reach the top of the falls after a 1.7 mile hike, there is a stone platform at the top that provides you with nice views of the Blue Ridge Mountains.

The view from the top.

Near the entrance to the paved trail you will see a small family cemetery.  These are actually distant relatives of mine.  My great grandmother was a Fitzgerald and owned the farm next to the McCormick Farm.  My mother used to visit that farm often when she was little.  If you are interested in history, the McCormick Farm is open to visitors and has lots of exhibits showing the early farming techniques.  Cyrus McCormick was the inventor of the mechanical reaper which revolutionized farming.

This is a great hike that a lot of families do before picnicking at one of the tables near the lot entrance.  I know we will visit this location time and again.

Trail Notes

  • Distance 3.4miles out-and-back.
  • Elevation Change – 1000 feet
  • Difficulty – 3. This is a fairly steep trail with plenty of switchbacks.  However, most people will stop along the way to enjoy the falls, so it breaks up the pace.
  • Trail Conditions – 3. There are lots of pointy rocks along part of the trail, but there are some sections that are very nice.  The view to the lower falls is even paved for wheelchair access.
  • Views – 2. At the top of the falls, you get a decent view of the Tye River Valley
  • Waterfalls/streams – 4.5. This is one of the best waterfalls in the Central Virginia area.
  • Wildlife – .5. You probably won’t see anything here other than people.
  • Ease to Navigate – 4.5. Just stay on the trail.
  • Solitude –1. This is an extremely popular hike, so you will surely see people along the way.

Directions to trailhead: If you are approaching from I-81, take exit 205 towards Steeles Tavern.  Take a left on to Rte. 11 and then a quick right on to VA-56 heading east.  Follow this past the Blue Ridge Parkway (near BRP Mile Marker 30).  After a few more miles, you will see the signs for the parking area of Crabtree Falls on your right.  The parking lot loops around and you will see the trailhead and map near the restroom facilities.

Sugarloaf – Keyser Run – Hogback Mountain Loop

The Sugarloaf-Keyser Run-Hogback Mountain Loop is a lovely 4.9 mile hike through classic Virginia forest.  It passes by several nice panoramic viewpoints and makes use of the Appalachian Trail, a couple SNP trails and a fire road.

Mom on the Little Hogback Summit

Christine says…

We hiked this trail with my parents to celebrate a combination of (belated) Mother’s Day and (early) Father’s Day.  My parents are fit, active, outdoorsy people, so we knew they would enjoy a day of wildlife watching, hiking and picnicking in Shenandoah.

My Wonderful Mom & Dad

We picked the Sugarloaf-Keyser Run-Hogback Mountain Loop because it sounded like the perfect length and difficulty for the whole group.  For some reason, my mom had a hard time remembering the name of the hike, and kept referring to it as “Hogland.”  I chuckle every time I think of a hiking trail being called Hogland; it sounds like the name of a porcine-themed amusement park.

It definitely turned out to be a suitable hike for the whole group.  The first 3.5 miles were really easy going. The AT and Sugarloaf segments were both especially pretty. The section along the Keyser Run Fire Road was boring, as fire roads always are.  My mom and I agreed that fire roads are always a little dull compared to “real” trails. We saw a couple hikers coming out of the Little Devil’s Stairs area on Keyser Run Road.  They looked exhausted and sweat-drenched.  The day turned out to be a lot warmer than had been forecast.

The view from the summit of Hogback Mountain (the highest point on the trail) was a little underwhelming for me.  The valley vista was lovely, but it was hazy and the view was ruined by power lines and an obstructive radio tower.  The views from Little Hogback are definitely nicer, even though the vantage point isn’t as lofty in elevation. The saddle between Little Hogback and Hogback also has one especially beautiful view spot.

The saddle between Little Hogback and Hogback is very pretty

The whole hike only took us a couple hours to complete, even with water and snack breaks along the way.  Afterwards, we shared a delicious picnic lunch at Pinnacles and headed home tired and stuffed full of chocolate chip cookies and fried chicken.  It was a really fun day.

Adam says…

Since there are a lot of trails and options in this area, here are the trail directions we used.  After crossing Skyline Drive from the parking lot and proceeding .3 miles, you will come to a concrete post.  Take a right and follow the blue blazes down the Sugarloaf Trail.  Hike for 1.1 miles until you come to the next marker.  Take a left onto the Pole Bridge Link Trail.  Continue for .5 miles and then take a left on to the Keyser Run fire road.  Follow this for 1.1 miles, crossing Skyline Drive.  When you reach the AT junction, take a left heading south on the AT.  Keep on the south AT, going up Little Hogback and then Hogback Mountain.  You will cross Skyline Drive one more time on your descent.  Follow the south AT until you reach the parking lot.

The stream crossings were shallow and easy

This hike had some very pretty spots on the trail.  The fern-covered forest floor near the beginning of the trail and again near Hogback Mountain was really quite gorgeous.  I felt this trail was very easy and most people could handle it.  The only challenging portion was the brief half-mile set of switchbacks climbing up to the Hogback Summit.  Last year, a ranger told us this was the best hike in Shenandoah National Park.  I would disagree, but it was still an enjoyable hike and our first time on this particular route.

One of the prettiest section of trail was the Appalachian Trail crossing Hogback Mountain
One of the prettiest sections of trail was the Appalachian Trail crossing Hogback Mountain

We ran into our AT thru-hiker for a third time!  When we stopped to talk to him, I told him, “I promise we’re not stalking you.”  He laughed and asked “Don’t you guys ever go home?”  Quite funny that we’ve seen him so many times in a park that encompasses 196,000 acres!

Trail Notes

  • Distance – 4.9 mile loop.
  • Elevation Change – 700 ft.  Most of this is during the climb up to Hogback Mountain.
  • Difficulty – 1.5.  For most of the trail, the trail is level or slightly downhill.  There is a steep set of switchbacks to the summit of Hogback Mountain.
  • Trail Conditions – 4. The AT is well-maintained.  You also travel on the Keyser Run fire road for a little over a mile.
  • Views – 3.  The view from the summit of Little Hogback was the nicest unobstructed view.
  • Waterfalls/streams  – 1.  A couple of very small stream crossings, but not photo-worthy.
  • Wildlife – 2. Some signs of bears in the area, but you’re more likely to see some deer along the way.
  • Ease to Navigate – 4.   There are a couple turns, but the directions are well-marked on cement posts.
  • Solitude4.  Likely to see AT hikers mostly during June, but we didn’t really see many others.

Directions to trailhead:

Park just south of the Hogback Overlook, in the parking lot located at mile marker 21 on Skyline Drive.  At the south end of the lot, you will find the AT marker.  You will cross the drive here, go slightly uphill, and then start the descent.

Mill Prong – Rapidan Camp Trail

The hike to the Rapidan Camp (also known as Camp Hoover) is probably one of our very favorite walks in all of Shenandoah National Park.  We had such a great time there today.  It was one of those really perfect mornings along the trail.

The Brown House (as opposed to the White House) is where President Hoover stayed.
The Brown House (as opposed to the White House) is where President Hoover stayed when he wanted to escape the heat, stress and formality of Washington, D.C.  Below are photos of (left to right): The main entry to Brown House has steps that lead down to the Rapidan River; the house has a large patio overlooking the river – it was a popular place to relax in Hoover’s day; the Mill Prong was running beautifully today.

Brown House historical Mill Prong

Adam Says…

This is probably my favorite hike in Shenandoah National Park.  The reason I would say this is due to the combination of the history and scenery.

The hike isn’t too difficult, but there are three sets of rock-hopping that you’ll need to do over the Mill Prong.  Due to the recent storms, we actually had to wade across the the third stream crossing since the rocks were mostly submerged and we didn’t want to risk dropping Christine’s camera gear into the water.

The Rapidan Camp was built for Herbert Hoover during his term of office to serve as the first Presidential retreat.  Hoover was an avid outdoorsman and fisherman.  Shenandoah National Park was being built around the same time.  In order to hopefully get the park approved, they encouraged Hoover to build his retreat here.  Marines were brought in to build the camp, which included the construction of thirteen buildings and electrical/phone lines.  Interestingly enough, they heavily stocked the Rapidan River with lots of trout before Hoover arrived, so he would have lots of successful fishing trips.  When Hoover left office he donated his camp (which he paid for out of personal funds) to the government.  Hoover’s initial plan was to have the Camp serve as the permanent presidential retreat.  Due to Franklin D. Roosevelt’s wheelchair-confinement and his strong dislike of Hoover, he decided to establish a new retreat in the Catoctin Mountains of Maryland which he called Shangri-La (it was renamed by Eisenhower as Camp David).  It is interesting to think about what it would be like if the presidential retreat stayed at Camp Rapidan and how that could have impacted the park.

There does seem to be some good trout-fishing in the areas nearby, but it is all catch-and-release.  Of course, it’s not stocked like it was for Hoover.

If you aren’t able to see inside the Brown Cabin (see Christine’s info below), you can still walk around the grounds and read about the history of the area.  I would highly recommend bringing a lunch or snack. The back porch is a great place to eat and reflect on the history of this time.

Big Rock Falls is located along the trail right before you cross the river.
Big Rock Falls is located along the trail right before you cross the river. Below are photos of (left to right): the trail is lined with lush ferns; Adam wades across the stream; a pretty spot along the Mill Prong.

Ferns Deep Water mill prong_2

Christine Says…

We’ve hiked to the Rapidan Camp many times, but today was my favorite trip down the trail ever.  It was just one of those magical mornings where everything felt especially beautiful and perfect.

We got an early start, so the only people we came across on the way down were Boy Scouts hiking back out after a weekend of camping.  As we passed them, I had to wonder how they fared last night.  We had some fierce thunderstorms that rolled through around 3:00 a.m.  I was thrilled to see how flush with water the Mill Prong and the Rapidan River were.  Even the small waterfall, Big Rock Falls, looked impressive this morning.  When a crucial rock hop proved unavailable due to the high water, I enjoyed wading barefoot across the stream.  I thought the water would be cold, but it was actually pleasant and refreshing.

Probably the best part of the hike was our tour of the Rapidan Camp.  The volunteer ranger was just opening up when we arrived and gave us a private look at the President Hoover’s cabin, also known as “The Brown House”.  Although the cabin looks rustic on the outside, the inside is quite refined and cozy.  The floor is beautifully smooth wood, there are two bathrooms, two bedrooms, two huge stone fireplaces, hand woven rugs and a lovely study/office that overlooks the headwaters of the Rapidan River.  Until 1996, the Brown House was available to high-ranking politicians and V.I.P.s.  Al Gore was actually the last person to “rent” the Rapidan Camp for personal use. (Sandra Day O’Connor and Jimmy Carter have also been guests of the Rapidan Camp.)

The cabin is open for tours most days, May through October.  Volunteers have Tuesday and Wednesday off, so if you want to see inside, hike it on another day.  Each volunteer ranger actually gets to live at the camp for their three-week tour of duty.  The volunteer stays in the nearby Creel Cabin, which is one of the only three original buildings left standing.  The volunteers maintain the property and give tours to visitors.  The camp is also accessible on a ranger-guided program.  So, even folks who can’t (or don’t want to) walk can still see the site.

There is a fantastic exhibit set up in the “Prime Minister’s Cabin”.  It has many old photos and detailed information about the engineering feats required to build the camp.  Be sure to look at the large version of the letter pictured below.  It shows a lot of the planning that went into picking the site.

President and Mrs. Hoover
President and Mrs. Hoover enjoy the deck of the Brown House. Below are photos of (left to right): a letter from William Carson explaining preparatory steps to get the camp ready for Hoover; horses crossing the river; another historical photo of the Hoovers.

letter horse crossing historical_2

Trail Notes

  • Distance – 4 miles
  • Elevation Change – 750 feet
  • Difficulty – 2. The elevation change is gradual which makes it a fairly easy hike.
  • Trail Conditions – 4. The trail is in great condition, with few rocks or roots sticking up.  The rock-hopping could be a little challenge to anyone not stable on their feet.
  • Views – 1. Only views of the streams and the camp area.
  • Waterfalls/streams – 4. If it’s good enough for a former President, it should be good enough for you. 🙂
  • Wildlife – 1. Probably not as likely to see bigger animals due to popularity of the trail.  
  • Ease to Navigate – 4. Only a few turns to get to the camp.
  • Solitude – 2. You will likely see others here, but you should be able to find your own spot to enjoy the scenery and history.

Directions to trailhead: The hike starts at mile marker 53 on Skyline Drive.  Park in the Milam Gap lot, then cross the drive.  The trail picks up on the other side of the crosswalk.  You’ll quickly come up to a park post and take a left to start the trail.

Canyon Rim Trail – West Virginia

Our guide book described this moderate five-mile hike as having exceptional scenery and a couple stream crossings.

The rhododendron along this trail are jungle-thick
The rhododendron thickets along this trail are jungle-dense

Christine Says…

The trail description in our hiking guide, Day & Overnight Hikes in West Virginia’s Monongahela, made this hike sound like a must-do with lots of solitude and great views of the Blackwater Canyon.  It did warn that the overlooks were on hard-to-find spur trails, but we didn’t give that a second thought.  We tend to have a good sense of direction and aren’t afraid to do a little bushwhacking.

The trail was about what I expected… a narrow path winding its way through dense thickets of rhododendron.  The growth was so thick that the forest felt stifling.  The air was damp, heavy and still.  The footing for the first mile was often muddy and wet as the trail descended.  There were many pink lady slippers growing along the trail.  Other than one short initial descent, the trail was easy and mostly level.

Pink Lady Slipper
Pink Lady Slipper

The part of this hike that was unexpected were the lackluster views.  The fist overlook was pretty easy to find.  It cut a short distance through the rhododendron to a big pile of boulders.  The vegetation was so thick at this viewpoint, that you really couldn’t see down into the canyon very well.  Unfortunately, we never found the second viewpoint despite looking carefully on a couple passes.  We’re guessing that the spur path was completely overtaken by new growth.  I really think the views of the canyon from Lindy Point in Blackwater Falls State Park are as nice as anything in the area.

After failing to find the second overlook, we trekked back to the car feeling a little let down by the hike.  Maybe if we had found the second overlook,  I would have felt more than “meh” about the hike.

Adam Says…

I agree with Christine in that I was underwhelmed.  We could see the canyon along the way, but never found a good way to get to it.  Christine did find one overlook, but she didn’t feel that it was photo-worthy.

We did see more lady slippers on this trail than on any trail we have ever found anywhere.  If you’re into those, this is a good trail to check out.

We made our way to Big Run.  We were also trying to find the Canyon Rim Waterfall that was listed in a book, but we didn’t find it or a way to get down the water to view possible places for falls.

Trail Notes

  • Distance – 5 miles
  • Elevation Change – 600 feet
  • Difficulty – 2.  Other than a few short, steep climbs, the trail is mostly level.
  • Trail Conditions – 2.   The trail can be very muddy and wet and is often overgrown by the dense thickets of rhododendron.  There are several small streams to cross.  In low water times, these may be dry.
  • Views – 1.  On the day we hiked, we saw one unremarkable view of the Blackwater Canyon.  The path to the second viewpoint was completely obscured by new growth and we were unable to find it.
  • Waterfalls/streams -2.  A few small, pretty streams.
  • Wildlife – 2.  We saw evidence of recent bear activity, but no actual bears.
  • Ease to Navigate – 2.   The main trail is easy to follow and is blazed yellow.  The spur trails to the viewpoints were extremely difficult to find.
  • Solitude4.  We didn’t see anyone on the hike at all.  There was a family camping along the Forest Road near the terminus of the trail and we saw/heard them.

Directions to trailhead:

From WV Rt. 219, turn onto Forest Service Road 18. After .4 of a mile this will turn into Forest Service Road 717. Follow 717 for about 1.5 miles. You will see a sign for the Canyon Rim trail on the right and a pull-off for parking on the left. The Forest Service Roads are gravel and are quite rough.

Rose River Loop

The Rose River Loop is one of Shenandoah National Park’s most beautiful hikes for streams and waterfalls.  Over the course of 3.7 miles, you’ll hike along the Rose River, the Hog Camp Branch, and finally up the Rose River fire road.

A new log is resting on the crest of the falls
Two large fallen trees obscure Rose River falls.

Adam Says…

This hike is one of our most-repeated hikes in Shenandoah National Park.  It has some great views of running water throughout the trail. This isn’t the most secluded trail since it connects to Dark Hollow Falls.  However, you should normally only come across a few other people on this trail.  There are some good places to do some trout-fishing along the river.  The man pictured a few photos down had caught a 8.5 inch trout the day before at the same spot.

The hike starts off at the parking area just north of the Fishers Gap Overlook.  Cross the road and follow the Skyland-Big Meadows Horse Trail for .5 mile.  There is a steady downhill grade, but it’s not too steep. At .5 miles, you’ll reach the junction of the Horse Trail and the Rose River Trail.  Go right and follow the Rose River Trail, continuing downhill.  Once you reach the bottom of the trail in about a mile, you’ll hear the water. The trail continues alongside the stream for a ways.  You will reach Rose River falls at 1.3 miles.  They are impressive, but more beauty awaits along the trail.  For fans of long-exposure photography, this is a paradise.

The trail will pass an old copper mine at 1.8 miles.  Some people like to explore the old mine, but we don’t think there is anything worth seeing there.

For the next mile, the trail closely follows the stream.  It is very rocky and can be icy or muddy depending on the weather.  There are tons of small waterfalls, slides, and plunge pools to explore.

At 2.7 miles, you will reach the footbridge at the bottom of Dark Hollow Falls.  Turn right, cross the  bridge, and follow the Rose River Fire Road uphill.  At 3.3 miles, you will pass the Cave Cemetery on the right.  At 3.7 miles, you will arrive back at Skyline Drive and your vehicle.

You can see from some of Christine’s pictures that there is really a lot of nice water to see on this trail.  I highly recommend doing this if you have a day or two in the park.

Some graves date back to the Civil War.
Some graves (not this one) in the Cave Family Cemetery date back to the Civil War.

As I usually like to comment, there is a geocache located here.  For those that are unaware, physical geocaches are not allowed in National Parks.  However, there is a small cemetery located off of the fire road that is considered private land and not owned by the Park Service.  The cemetery was used by the people who used to live in the mountain hollows before the government took their land for the park in the early 1900’s.  The Cave family gave permission for a geocache to be placed here called Viking Treasure Cave. ETA:  This cache has since been removed from the park (September 2010)

Christine Says…

When we started down the Rose River trail, I couldn’t help but skeptically watch the blue sky peeking between openings in the trees above.  The local weatherman had forecast a cloudy morning, but as we hiked along the sun began sending down rays and making a dappled pattern across the forest floor.  It was lovely to look at, but was definitely not the kind of light I was hoping to have for the stream and waterfall photos I wanted take.  You see, the Rose River Loop is one of the very best hikes in Shenandoah for folks who enjoy photographing running water.  It’s also the place where my brother proposed to his now wife.  They were engaged on a bitter cold New Year’s Eve camping trip somewhere along the Rose River.

The Rose River
The Rose River has many beautiful small, unnamed falls.  I’ve named this one “Slip and Slide Falls” because the bushwhack down to the base is so steep.

Even though the light made photography a challenge today, I found several spots to shoot along the Rose River.  We had to bushwhack off the trail a couple times, and all I could think about were ticks.  I don’t think I’ve recovered from our walk down the Dry Run Falls fire road yet.

One bushwhack in particular was especially steep, slick and muddy.  As luck would have it, it also offered the prettiest of all the little cascades along the walk.   When I looked down the ravine, for some reason my inner girly-girl came out.  I announced to Adam that I wasn’t going down there no matter what.  He said “Yes, you are!” and took my camera away and starting climbing down without me.  I was left with no choice but to follow.  I got really muddy and touched a gross centipede-like creature.  I’ll never like bugs!

We stopped at Rose River Falls for a few shots.  For the past few years, there has been a huge fallen tree lying across the waterfall.  It’s still there, but now there is a new downed tree stuck at the crest of the waterfall.   Both trees are way too big to move, and will likely be there for years to come.

We paused at a couple other places along the Hog Camp Branch for photos, but there was another photographer who was consistently about ten minutes ahead of us on the hike.  Each time we got to a spot I planned on photographing, he was already there.  He looked pretty serious getting his shots.  At one spot, he even donned chest high waders and water shoes so that he could get to the middle of the stream for an ideal composition.   I skipped a lot of my favorite photo spots along the Hog Camp because I always feel a bit rude stepping into somebody’s shooting space.

I had my tripod all set up when the fisherman jumped into my scene
Speaking of stepping into someone’s shooting space… I had my tripod all set up when this fisherman dropped into my scene.  Oh well 🙂

We finished the loop hike on the Rose River fire road.  The last mile on the road is always my least favorite part of the hike.  The fire road is easy walking, but yawn… it’s a bit on the boring side. Despite the dull last leg, the Rose River loop is a must-do hike for anyone visiting Shenandoah.

I'm so lucky that Adam routinely offers to carry all my photography gear.
I’m so lucky that Adam routinely offers to carry all my photography gear.

Trail Notes

  • Distance – 3.7 miles loop trail
    (Check out the stats from Map My Hike)*
  • Elevation Change – Around 900 feet
  • Difficulty – 2. Some downhill and uphill, but it’s not too bad.
  • Trail Conditions – 3.5. There are some areas along the river that are more like a 2, but there are some areas that where it is more like a 5.  Footing is tricky around the climb up after the red bridge.
  • Views – 0. Just waterfall and stream views.
  • Waterfalls/streams – 4.5. Some of the most continuous views of water that allow for some great water photography.
  • Wildlife – 1. Some birds and chipmunks, but not much else here.
  • Ease to Navigate – 5. Trail is well-marked and there aren’t any spurs until you get back to the fire road.
  • Solitude – 3. Not the best on solitude, but you won’t run into a ton of people.

Download a trail map

Directions to trailhead: The trail is located on Skyline Drive.  Park at the Fisher’s Gap Overlook (at mile marker 49.4 miles), cross the road and pick up the trail.  The Rose River Loop starts to the left of the fire road.  You will see a cement marker.

Strickler Knob – via Scothorn Gap

The Strickler Knob hike is a beautiful, 5.5 mile hike in the Lee Ranger District of George Washington National Forest.  It offers fabulous views of the Page Valley and a short, but fun, rock scramble.

View from Strickler
The view of New Market Gap from Strickler Knob is amazing! Below: Park at Scothorn Gap; Adam crossing Passage Creek; Trail markers.

Park Here Crossing Passage Creek Trail Sign

Adam says…

This is a great hike that is still not very well known.  There are some great views at the top and a mini rock scramble that is good preparation for anyone who wants a little practice before tackling Old Rag.  I wouldn’t recommend this hike for small children or dogs due to the rock scramble.

The hike can be a little tricky to navigate, so I have provided some clear directions for following the trail.

After parking at Scothorn Gap, you’ll immediately wade or rock hop across Passage Creek.  The hike starts off on a fire road.  The way starts to get fairly steep at .4 miles, but levels off again at .65 miles. At .8 miles, the hike gets steep again, but levels at .95 miles. This is the hardest part of the hike, so once that is done, the elevation changes are small. At 1.07 miles, you will see a nice campsite for anyone that wants to stay overnight. At this point, you will see an arrow pointing to the right, where you will pick up the trail again. The trail continues SSE from the campsite and you will be leaving the fire road for a hike through the woods. At 1.3 miles, you will come to a junction sign. Head straight on to the orange-blazed Massanutten trail.

At 1.94 miles you will come to the junction with the Strickler Knob trail to the right. This trail was built and opened in 2006 by some anonymous trailblazers. The blazes for this trail are marked as pink on rocks and typically red or purple rectangles on trees. This trail is fairly rocky, so be careful not to turn your ankles. Around 2.5 miles, you will see gorgeous views of the Shenandoah River and the Blue Ridge Mountains to the east. To the west, you will see more of the Shenandoah valley and the Appalachian Mountains. At 2.67 miles, you will reach a rock scramble for about one tenth of a mile until you reach the summit. This is a great spot to have 360 degree views of the area around you. Tied to a tree, you will also see a logbook that someone placed for people to journal about their hike.  It’s definitely a good read to those that are interested.

For those that are interested, I also placed a geocache up there.  The direct link for the geocache can be found at:

Rock Formation
The hike to Strickler Knob has lots of interesting rock formations to scramble over! Below: One of the more interesting formations; Adam walks the mountain’s spine; Scrambling up the pinkish-purple blazed Strickler Trail; More rock formations.

Rock Formation Spine Walk Scrambling Rock Formation

Christine says…

We hiked the Strickler Knob trail on the recommendation of a friend of mine from Flickr.  He said it was a fun hike with excellent views.  He wasn’t kidding!

We walked the trail on a bitter, windy winter day shortly before the forest road closed for the season.  The section of road that leads to the trailhead is periodically closed in the winter to prevent damage to the road surface.  (You can always check the status of roads and trails in the George Washington National Forest on their website) The hike was fairly easy and passed through the beautiful woods of Massanutten Mountain.  The Strickler Knob trail branches off the main trail and follows a rocky ridgeline over to the knob.  I love scrambling on rocks, so the last portion of the trail was my favorite part.

When we reached the knob, the view was amazing.  We got there mid-day, so it wasn’t a great time for photography.  I’d like to hike it again in the afternoon sometime.  I think the late day light would be prettier on the rocks and over the valley below.

Trail Journal
There is a log book at the summit of Strickler Knob.  Below:  Adam takes in the view; Geocaching

Strickler View Geocache

While Adam hid his geocache, I spent some time reading the trail journal at the summit.  It was entertaining, and I even came across the name of an old co-worker in the book.    I also remember it being super windy at the summit.  It was so bad, my bag of trailmix blew over and (sadly) sent chocolate covered peanuts spilling all over the rocks.  I hate it when I lose chocolate like that.  I’m sure some stupid crow enjoyed it though.

Trail Notes

  • Distance – 5.5 miles round-trip
  • Elevation Change – 1,600 feet
  • Difficulty – 3.  There is some moderate climbing along the route.  The scramble might be tough/scary for some.
  • Trail Conditions – 3.   Most of the trail is nicely graded and well maintained.  But once you turn onto the Strickler Knob trail it’s rocky and requires some scrambling.
  • Views – 4.  Once you reach the top you have some great views.
  • Waterfalls/streams – 1.  Just a small stream to cross at the beginning.
  • Wildlife – 2.  Hunters like this area, so there must be wildlife (although we didn’t see any.) During hunting season, make sure you’re wearing bright colors and making noise.  A co-worker who was running up here also got attacked by a wild goat here.
  • Ease to Navigate – 3.   The blazes can be a little tricky to follow on the pink blazed Strickler Knob trail.  Otherwise, the trail is pretty straightforward.
  • Solitude – 2.  Since 2009, this trail has become increasingly popular.  We revised the solitude rating from 4.5 down to 2 in 2014.

Directions to trailhead:

Reach the trailhead by turning on to Crisman Hollow Road (FD 274) off of 211 near Luray. Continue on this road for a few miles and park at the Scothorn Gap trail parking.

Once you have parked follow Orange Blazes on Scothorn Gap trail.  Follow trail directions above.