MacRae Peak – Grandfather Mountain (NC)

North Carolina Hikes

This hike follows the Grandfather Trail across series of ladders and cables to the summit of MacRae Peak.  After climbing MacRae peak, we continued a little way along the trail before turning back right after Attic Window Peak. It’s a truly amazing hike with phenomenal views.

View the full photo album from this hike on Flickr

Top of MacRae Peak
Christine and Adam enjoy the view atop MacRae Peak. Below: Adam checks out the sign at the beginning of the Swinging Bridge Trail; A view of the bridge from the trail; the valley from the bridge.

Start of Bridge Trail Swinging Bridge View from the Swinging Bridge

Adam Says…

Hiking up Grandfather Mountain is nothing short of an adventure and one that I will not forget.  This will challenge you as much mentally as it will physically as you have to decide how far you can go.   Choosing to navigate up ladders on the side of a mountainside with nothing to save you from a nasty fall makes this hike one not for the faint of heart.  I have a fear of heights, but especially when it comes to trusting in man-made things that tested me a few times on this hike.  But  Christine and I kept saying, “I can’t believe we just did that” when we passed through these obstacles and the adrenaline kept us going.

We drove into Grandfather Mountain through the main entrance off 221.  If you are planning on doing any hiking on Grandfather Mountain, I would recommend starting as early as possible.  Starting later than when the park opens could lead to an extremely long line of cars waiting to enter on a weekend or pretty summer/fall day.  There is an admissions fee to get into the park ($18/adult with discounts for seniors and children at press time).  Another reason to start early is this hike does take a while.  While it is only a relatively short distance, you will want to take time to enjoy the numerous views and you will need to take time going up the ladders.  With a lot of people on the trail, there could be a bottleneck through some of these passes.  The park closes before nightfall and they do have rangers hiking along the trail to make sure that people get off the mountain in time.  If you don’t get back to your car by nightfall, they post they will send out a search.

Adam Crosses the Swinging Bridge
Adam crosses the Swinging Bridge. Below: A look back at the Top Shop from the beginning of the Grandfather Trail; Adam looks at MacRae Peak

Looking Back at the Bridge Complex Adam Looks at MacRae

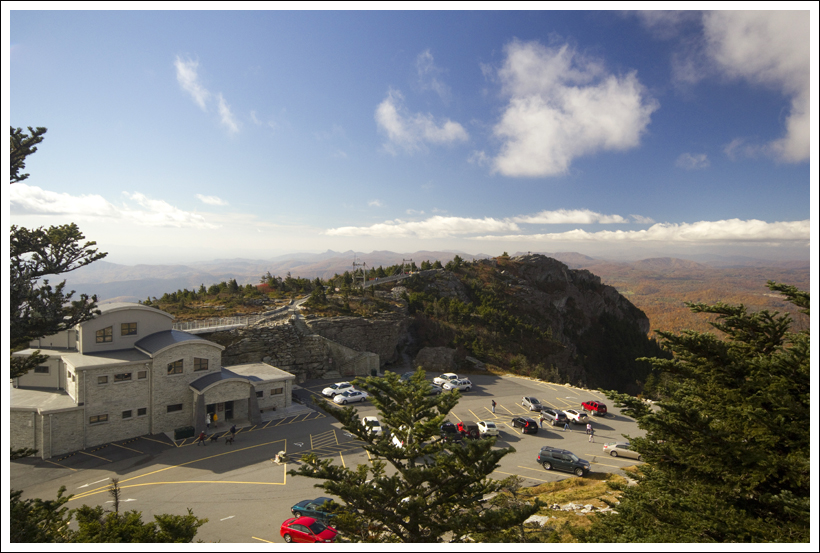
At the entrance to the park, the ranger warned us that the winds were between over 30 mph at the top.  We made our way up the drive and stopped by Split Rock, a picnic spot and witnessed the drop in temperatures and wind firsthand.  We then made our way to the Nature Museum and wildlife habitat.  We walked around briefly and picked up a hiking trail map from the Nature Museum cashier.  We continued our drive along the curvy road up until we reached a parking lot attendant.  Since we were hiking, he instructed us to park in the lower lot to begin our hike.

From the parking lot, we took the Bridge Trail, a non-blazed trail that includes switchbacks through a hardwood forest.  After a short distance, we started hearing a mechanical, whistling sound.  This was the sound of wind whipping through the Mile High Swinging Bridge that lay above us.  At .4 miles, we reached the Mile High Swinging Bridge and visitor center.  The wind was blowing so hard up here.  I felt that I didn’t have warm enough clothes, so we went inside the visitor center to buy a hat and gloves to replace the ones I’d forgotten back at our hotel.  The wind was blowing much harder than 30-40mph.  I would guess that it was closer to 60mph.  My pants sounded like flags beaten by high winds and it was hard to even take a step ahead of you.  From the visitor center, we went up the stairs to reach the bridge.  Christine was eager to go across, but I had a lot of trepidation.  The bridge was “singing” more than “swinging”, but I was wondering if it was safe to cross.  Christine made her way across and per an earlier agreement,  if I was going to make her hike up Grandfather Mountain, I had to hold my end of the bargain and  walk across this 228 foot bridge.  Being 6 feet tall, the side railings barely reached my hips and I was worried that a strong enough wind would have blown me off.  The bridge has its name because the elevation here is 5280 feet above sea level making it a mile high.  The bridge actually only spans two rock formations that has an 80 foot drop, but it is still unnerving.  After making it across the bridge and back, we continued the hike.

Climbing Up the Grandfather Trail
Most of the way was steep and rocky.

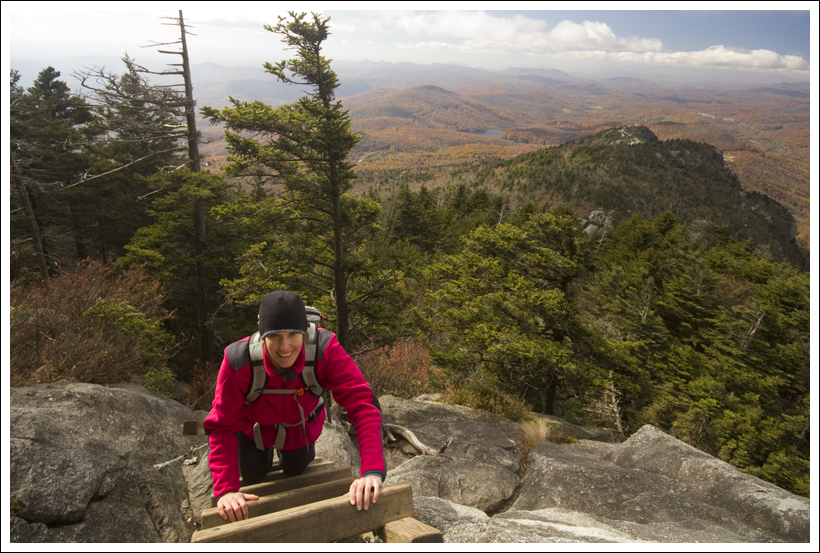
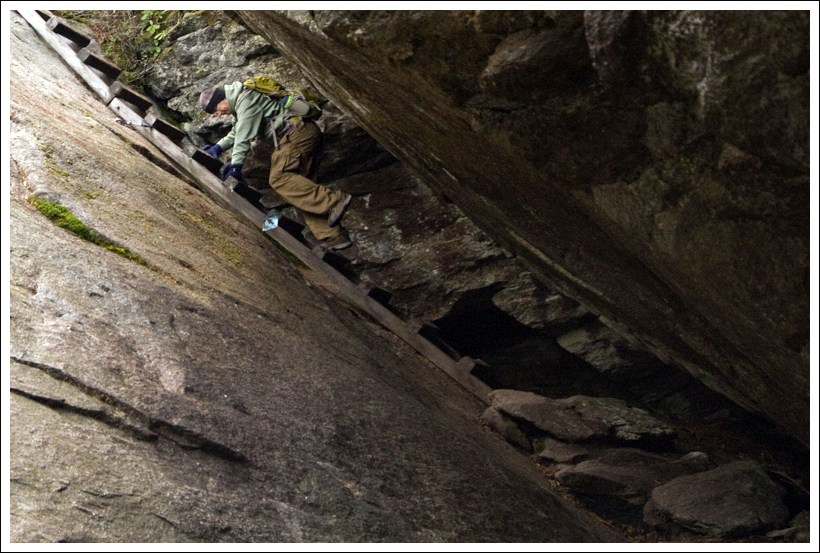
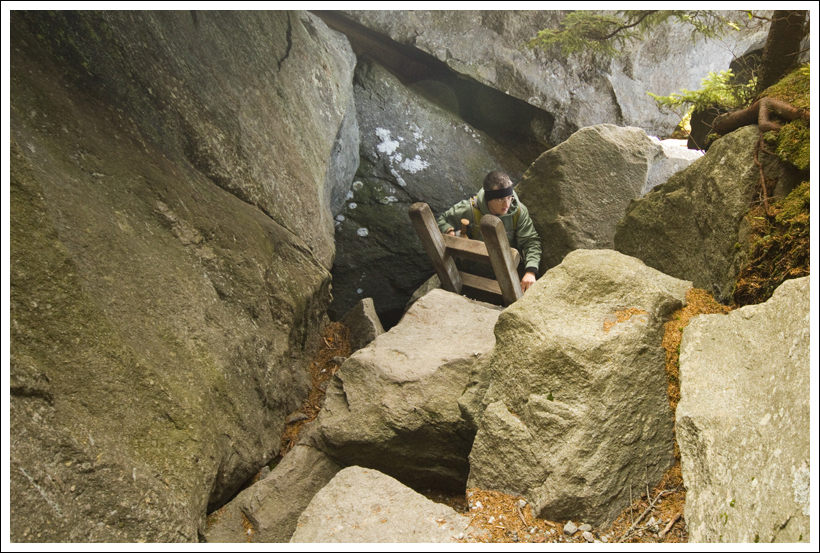
Christine was having a difficult time making her way across the parking lot to the trailhead.  I would see her take one step forward and the wind blew her two steps to the side.  We made it to the other side and debated on if we could do this hike with such high winds.  I convinced Christine to go a little further, hoping that the brush would slow the wind and after a short distance we didn’t feel the affect of the wind.  We began the hike up using the Grandfather Trail, a blue diamond-blazed trail.  At .8 miles (including the hike from the parking lot), we reached a junction with the Grandfather Extension trail.  We kept going forward on the Grandfather Trail and at .9 miles, we reached Grandfather Gap, an open area that gives you great views.  Continuing on at 1.4 miles, we reached a junction with the Underwood Trail.  We stayed again on the Grandfather Trail and in a short distance the first ladder appeared.  This was a long ladder (the first of nine total) that helped you navigate through a tight gorge between two rocks, but was not that scary.  Shortly after this ladder, the real fun started where we had to do some rock scrambling, sometimes with the assistance of cables before coming up to a series of ladders.  These ladders were definitely more frightening as you had to often climb up one ladder and then take a step to the left and climb up another ladder.   We saw several people that got to the ladders and then wisely turned around as they didn’t think they can handle it.   Knowing your limitations is definitely important.  These ladders eventually led up to to one area that you were climbing up ladders on the side of the mountain with an insane drop to the side.  We made it up this final ladder and took a moment to reflect on what we did and take in the views from the side of the mountain.  We continued on the trail for a short distance and at  1.4 miles we reached a ladder on the side of the rock leading to the summit of MacRae Peak at 5845 feet.  You climb up this 20 foot ladder and then grab a cable at the top of the ladder to pull yourself up the rock.  You can find the benchmark for the peak at the top of the rock, giving you 360 degree views all around you, including the bridge to the southwest.

Christine Climbs a Ladder
Christine climbs a ladder on the Grandfather Trail. Below: One ladder went between two giant slabs of rock; Adam pulls himself up a sheer rock face; More ladders along steep, cliffside terrain.

Climbing Between Slabs Cable Pull Ladder Climb

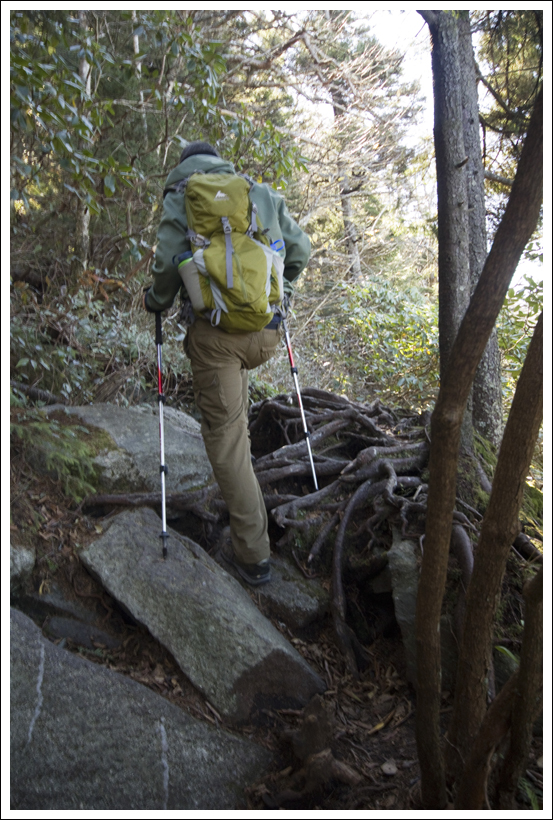
We climbed back down the ladder and then continued on the Grandfather Trail to the next peak.  At 1.5 miles, we reached another junction with the Underwood trail.  Continuing on the Grandfather Trail, we went up to The Chute, a rock scramble that leads to the top of Attic Window Peak.  The scramble wasn’t too tough, but did require you to climb up on all fours at some points.  We reached the top at 1.7 miles and passed the overnight Attic Window campsite.  Continuing on the trail, we reached a junction with the Indian House Cave, a short but steep side trail that leads to a cave wall that was a shelter to Native Americans back in the day as artifacts were found here when it was first discovered.  We continued back on the Grandfather Trail and the trail here begins to be more of a ridge walk.  We took some time to find some nice spots to take in the views, eat some snacks, and then made our way back.  At the junction with the Underwood Trail at 2.2 miles, we ended up taking this Yellow Diamond blazed trail to avoid the ladders on the return.  This was a steep and rocky trail back without much to see and there is still one large ladder to climb down on the way, but it feels safer than the ones leading to MacRae Peak.  At 2.7 miles, we reached the opposite end of the Underwood Trail, rejoining the Grandfather Trail, by taking a right.  At 2.9 miles, we reached the junction with the Grandfather Extension trail and then took this Red Diamond blazed trail downhill through some switchbacks for .6 miles (with some more views along the way) until we reached our car at 3.5. miles.

Many people just drive to the upper parking lot to experience the Mile High Swinging Bridge and then return.  It is definitely a highlight of Grandfather Mountain, but we were so glad that we hiked past this feature.  The bridge used to be a wooden suspension bridge (erected in 1952) and used to sway more in the wind, but the side rails and floorboards were replaced with steel in 1999.

Adam Enjoying the View Near the Top of MacRae
Adam enjoys the view near the top of MacRae.  Below: The Blue Ridge Parkway winds its way through forest below Grandfather Mountain; the last ladder to the top of MacRae; Beautiful rugged scenery on Grandfather Mountain.

View From MacRae summit ladder Landscape on Grandfather Mountain

Grandfather Mountain was originally named Tanawha Mountain by the Cherokee, meaning “glorious hawk or eagle”.  It was named Grandfather Mountain by pioneers as one view of the mountain does look like an old man’s face staring up into the sky.  Daniel Boone once hunted in this area and John Muir after climbing Grandfather Mountain in 1898 proclaimed that the air during his climb had healed him of a bronchial cough.

Overall, I will say this has been one of my favorite and most memorable hikes that I have ever done.  The views are absolutely gorgeous around you, as you can see for miles around on a clear day.  Once you reached a viewpoint, you thought that it couldn’t get any better; but then you would take a few more steps and be even more impressed.  We definitely plan on returning to tackle the hike all the way to Calloway Peak, the tallest peak at 5946 feet.

Christine Says…

It’s kind of ironic that John Muir proclaimed that Grandfather Mountain’s air cured him of bronchitis. I was sick as a dog when I hiked this trail, and the air did not have any magical curative properties for me!  In fact, I think it may have helped precipitate my garden-variety bronchitis into a full-blown, month-long battle with pneumonia.

Some readers might wonder why I didn’t do the sensible thing and actually rest while I was sick.  I wish I had been smarter, but we had planned this trip several months earlier and were there to celebrate our 15th wedding anniversary.  There was no way I was going to miss it.  So… stupidly, I pushed myself mercilessly so that I could see and do all the things we had planned.  I had a great time on the trip, and especially this hike – but I definitely paid a high price for all that fun.

More Ladders Near the Chute
Adam approaches the rock scramble known as The Chute.  Below: The Chute

The Chute

Illness aside, this hike is probably near the top of my list of all-time favorite hikes.  The scenery was breathtaking.  Every boulder I rounded, every opening I stepped into; I practically gasped with disbelief at how truly beautiful nature can be.  The ladders and cables were a perfect balance of scary and fun. I felt challenged and rewarded in equal measures.

Our adventure started off in the hiker parking area on Grandfather Mountain.  The trail from the parking lot to the bridge was short and easy.  Almost immediately, we could hear the harmonic hum of the wind whipping through the bridge.  Evidently, the ‘singing bridge’ is a more accurate moniker than ‘swinging bridge’.  We spent a little time at the ‘Top Shop’.  We both crossed the bridge.  I was very proud of Adam for crossing.  He does not like heights and the bridge was not a happy place for him!

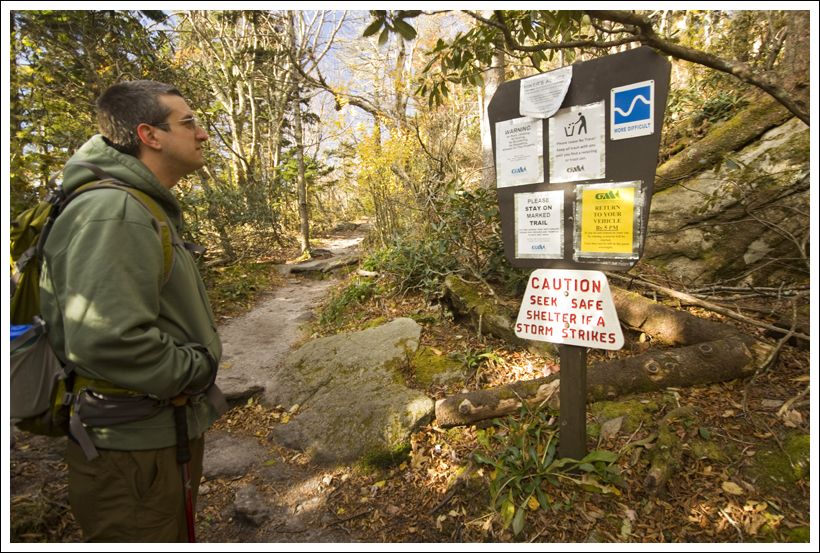
The bridge didn’t scare me at all, but the wind’s strength did!  The main trail system on Grandfather Mountain starts directly above the parking area.  The sign marking the trailhead is loaded with many, many warnings and cautionary tales.  On the way over the the trailhead, the wind literally blew me off my feet!  I rolled like a tumbleweed across the parking area – pretty remarkable for a full-grown, adult woman!  It was the strongest wind I’ve ever encountered — even topping the weather we experienced on Mt. Washington.  I told Adam that I thought it was stupid to hike in such strong wind, but he encouraged me to hike a little along the trail, in hopes that the trees and other obstacles would shelter us from the wind. Thankfully, he was right and the wind wasn’t bad for most of the hike.  

All of the ladders and cables were sturdy and securely fixed to the rock, so I never felt like I was in any real danger.  They greatly aided us in traversing some very steep terrain.  When you look at MacRae peak from a distance, it looks so steep and practically unscalable.  When you finally climb the last ladder to the highest point of the peak, you truly feel on top of the world!  We shared the peak with a group of Boy Scouts and a group of Amish men.  Quite an interesting mix of folks!

Beautiful views from Attic Window Peak
Beautiful views from Attic Window Peak.  Below: Tent site on Attic Window Peak; More gorgeous vistas

Tent Site More Views on Grandfather Mountain

After leaving MacRae, we continued along the Grandfather Trail in the direction of Calloway peak.  The trail took us through a fun and challenging rock scramble called ‘The Chute’.  Near there, we met one of the Grandfather Mountain rangers.  He was out hiking the trail to sweep for hikers in trouble and for people who might be cutting time short to make it back to the parking area by 5:00.

After the Chute, we passed the Attic Window Peak backcountry tent site.  After that, we walked a short way along an open, razorback ridge or rock.  We had more spectacular views looking toward Banner Elk and in the direction of Calloway Peak.  Along this ridge, we stopped for a snack.  While I was eating my Luna bar, I measured up the distance to Calloway peak.  I wasn’t feeling any better.  I was cold, stuffy, achy and exhausted.  As much as I wanted to reach Calloway peak, I wanted some soup and a hot bath even more.  I apologetically told Adam that I couldn’t go any further.  I could tell he was disappointed, but he willingly turned back.

Cliffside View
Adam enjoys cliffside views. Below:  Fall foliage from Grandfather Mountain; Our last ladder down the Underwood Trail, Fall Foliage; Rocky and rooty footing on the Underwood Trail.

Fall Color Final Ladder Grandfather Extension
Underwood Trail Adam Climbs Down the Underwood Trail

On the return, we took the Underwood Trail.  It was quite steep and rocky, but only required one downward ladder climb.  Eventually, we reached the junction of the Grandfather Trail and the Grandfather Extension.  The extension led us back down to the hiker parking area without having to cross the Swinging Bridge parking lot again.  That little section of trail had one pretty view from a bridge and lots of fall color.  We got back to the car and made our way back down the mountain.  I could not believe the line of cars waiting to get into Grandfather Mountain.  It stretched for several miles!  Insane!  I guess it’s a good idea to get an early start when you visit Grandfather.  All in all, it was a super day and a great hike.  I can’t wait to go back sometime when I’m not sick!

Trail Notes

  • Distance – about 3.5 miles
  • Elevation Change – about 1600 feet
  • Difficulty – 4.5.  The ladders and cables make this a tough hike.  The climbs over the mountains make this hike take a lot longer than you would normally on this distance.
  • Trail Conditions – 4.  The trail was in good condition.  Ladders and cables were sturdy and secure, but rainy/icy/snowy weather will make the rock climbing treacherous.  If you have a fear of heights, ladders or precipitous edges, this hike might not be for you.
  • Views5.  AMAZING!
  • Waterfalls/streams – 0. There are no streams on this hike.
  • Wildlife – 0. This area is heavily traveled, so it’s unlikely you’ll see wildlife.
  • Ease to Navigate –4. The junctions at all the trails are well-marked.  We got a little turned around through one of the rock scrambles.
  • Solitude – 1.5.  Expect to see lots of people on this trail unless you go at an off time.  But we never felt too crowded where we couldn’t enjoy things by ourselves.

Directions to trailhead:  The entrance to Grandfather Mountain is located on US 221, two miles north of Linville, North Carolina, and one mile south of the Blue Ridge Parkway at milepost 305.  Signs for the entrance are well-marked and an entrance station is right off the road with large gates.  Travel up the road by car until you reach the parking lot designated for hiking trails.  The trailhead for the Bridge Trail is on the left side of the parking lot as you are driving up. Coordinates for the hiker parking area are 36.096145, -81.831802.

Beacon Heights (NC)

North Carolina Hikes

The walk to Beacon Heights is just another short, easy leg-stretcher we did on our fall trip down the Blue Ridge Parkway.  Beacon Heights has the bonus of offering two separate, but equally spectacular, vistas at the summit.

Beacon Heights View
Adam takes in spectacular foliage from the view atop Beacon Heights.

Rolling Mountain Scenery Beacon Heights Trail Sign Beacon Heights Boulder

Adam Says…

The Beacon Heights trail, like the Rough Ridge trail nearby is a trail that gives you great views for minimal effort.  This trail has two different expansive viewpoints at the top.

We started off our hike by parking in the parking lot at mile 305.2 on the Blue Ridge Parkway.   Across the parkway, you can see Grandfather Mountain looming overhead.  Behind the parking lot is another parallel road, SR 1513.  We crossed that and found the trailhead easily.  The trail goes up and comes to a junction shortly.  Take a right at this junction to follow the Mountains-to-Sea/Beacon Heights trail.  At .2 miles, you reach another junction as the Mountains-to-Sea trail and the Beacon Heights trail splits.  Take a left on the Beacon Heights trail.  At .3 miles, you reach a junction where the trail splits where their is a stone bench.  Each junction leads to views from Beacon Heights.  The path to the left leads to an outcropping that provides great views to the north and west.  The path to the right leads to another outcropping with views mostly to the east.  Either spot provides plenty of room to spread out and take in the scenery.  Head back the way you came for about a .7 mile round trip.

Due to the shortness of the hike, you should expect a lot of people at the top.  I’ve heard this trail referred to as a “leg stretcher” and that is an accurate description.  It is not too difficult, so there isn’t much of a need to get geared up for an intense hiking experience.  My favorite of the two viewpoints was at the junction to the left of the bench, since it did provide views of Grandfather Mountain from the top.   With a cell tower visible on the other junction, it takes a little away from the view for me.

Beacon Heights View
The view on the right side of the bench.

Christine Says…

This was the last mini-hike of three we did in one day near the Linn Cove Viaduct.  It was a great way to finish the day, and a good way to work off some of the English Pub fare we enjoyed for lunch.  The walk was short and followed a gentle uphill grade.

The two views at the top were beautiful, and the fall color was simply spectacular!  If we had planned our day a little more thoroughly (and if I hadn’t been so sick), I would have liked to park near Beacon Heights and then follow the Tanawha Trail from Beacon Heights all the way over to the Rough Ridge area.  It would have been a great out-and-back with lots of scenery and view pay-offs.

After Beacon Heights, we briefly discussed tacking on another short hike up to Table Rock, but in the end I was just too worn out to go any further.  Adam and I agreed at the end of the day that we must make a return trip to the area to make up for all the stuff we missed seeing on this trip.

Trail Notes

  • Distance – About .7 miles
  • Elevation Change –  120 ft
  • Difficulty – 1. This is a fairly easy hike.  It’s slightly uphill, but almost anyone should be able to make it up.
  • Trail Conditions – 3.5.  The trail is in great condition, but rain could leave a few areas slick.
  • Views4.5.  Just docked it half a point for the cell tower visibility.
  • Waterfalls/streams – 0. There are no streams on this hike.
  • Wildlife – 0. This area is heavily traveled, so it’s unlikely you’ll see wildlife.
  • Ease to Navigate –4. Follow the signs to Beacon Heights and you won’t have a problem.
  • Solitude –1.  We saw quite a few people on this hike.

Directions to trailhead: Follow the Blue Ridge Parkway to mile marker 305.2  Park in the parking lot or along the road.  Behind the parking lot is another parallel road to cross and you will see the trailhead on the other side.

Rough Ridge (NC)


North Carolina Hikes

Rough Ridge is a short hike that leads to wonderful views of Grandfather Mountain, the Linn Cove Viaduct and the valley below.

Christine Enjoying the Rough Ridge View
Rough Ridge is a great place to enjoy an autumn view. Below: A glimpse of the Blue Ridge Parkway below Rough Ridge; A series of boardwalks protects fragile ecology;  Christine’s hair shows the windy conditions.

A View of the Blue Ridge Parkway from Rough Ridge  Rough Ridge Boardwalks WIndy Rough Ridge

Christine Says…

After we finished our short hike around the Linn Cove Viaduct, we drove a short distance north on the Blue Ridge Parkway to hike Rough Ridge.  This short hike is one of the Parkway’s most popular – understandably, because the views are truly breathtaking.  The trail starts with a small series of log stairs that climb steeply into the woods.  Shortly after the steps, there is a small footbridge over a chasm.  Perhaps in wetter conditions, a small stream might flow under the bridge.  When we visited it was dry.

The trail climbs uphill for about .3 mile, across muddy and rocky trail, until it reaches a series of boardwalks.  The wooden pathways are intended to keep hikers off the fragile terrain.  This part of the parkway is home to numerous rare species, and careless footsteps can do all sorts of damage.  From the rocks beside the boardwalk, hikers are treated to a wonderful panoramic view of the scenery.  The viaduct is almost always visible off in the distance.

After leaving the boardwalks, the trail continues a little more steeply uphill.  There are more rocks to climb and more mud to traverse.  At the top, you’ll reach a giant, sheer-faced boulder with a line of affixed cable.  Use the cable to pull yourself to the top of the boulder.  You’ll be treated to another amazing view. The impressive face of Grandfather Mountain looms above and pristine nature spreads out below.  It’s nothing short of spectacular.

We stayed atop the boulder for a very short while – just enough time to take in the view and snap a few photos.  The wind was so strong, it could almost blow a person of their feet!  The hike down went very quickly, and simply retraced our steps.

After this short hike, we headed into the little town of Blowing Rock for lunch.  What an adorable town!  If you visit the area, don’t miss a visit to the nearby town.

Adam Enjoys Rough Ridge
Adam enjoys the rocky outcroppings on Rough Ridge.  Below:  Adam climbing the trail; We made it to the top; Christine crossing one of the footbridges;  Log steps descending the trail.

Climbing the Rough Ridge Trail At the Top of Rough Ridge Bridge on Rough Ridge
Log Stairs Climbing Down Rough Ridge

Adam Says…

Rough Ridge was one of the hikes we were most excited to do on this trip.  When we were at the Linn Cove Viaduct, we were hoping that the Rough Ridge hike would give us great views of the viaduct and we were not disappointed.

The trail starts from the parking lot by going up a few log steps.  At the top, you reach a junction of the Tanawha Trail.  Take the trail to the left and follow uphill until you reach the boardwalk at .3 miles.  Interestingly enough, while they tell you to stay on the trail, they have left an opening to climb out onto a large flat rock.  Just be careful if you have any children, since the edge has a large dropoff.  From this viewpoint, you can see the Linn Cove Viaduct which looks quite straight from this perspective as you are looking at it straight on.  After the boardwalk, the trail continues to climb and then takes a sharp turn leading up to another rock formation that daring people could climb onto.  Continuing on, at .6 miles, you reach a junction with the Tanawha Trail again and see the trail blocked off to protect vegetation.  There are a few different rocks to get great views, with the best being from the rock Christine mentioned above with a cable to hold to guide yourself up.  There are some great spots here to have a quick snack and enjoy the views all around you.  From the summit, you can see Grandfather Mountain rising above the Linn Cove Viaduct (which you can see snake from the summit) and views down into the Linville Gorge.  On a clear day, you should be able to see for miles

One of the more popular rock climbing spots in the South lies below Rough Ridge in an area known as Ship Rock.  If you are a skilled rock climber, I could see this being a way to do some climbing on the rocks before taking this trail to hike to the top.

This is definitely an easy hike for most people that has a huge payoff for minimal effort.  If you are traveling along the Blue Ridge Parkway, I would make this a must-do hike along the way for a short 1-1.5 hour break.

Trail Notes

  • Distance – About 1.2 miles
  • Elevation Change –  480 ft
  • Difficulty – 2. This is a fairly easy hike.  It’s mostly uphill, but never steep.  The final viewpoint at the top requires a short, rope-assisted climb to a boulder top.
  • Trail Conditions – 3.  The trail is good condition, but it can be muddy and slick.
  • Views5.  AMAZING!
  • Waterfalls/streams – 0. There are no streams on this hike.
  • Wildlife – 0. This area is heavily traveled, so it’s unlikely you’ll see wildlife.
  • Ease to Navigate –4. This trail is an easy to follow out-and-back.
  • Solitude –1.  We saw quite a few people on this hike.

Directions to trailhead: Follow the Blue Ridge Parkway to mile marker 302.8  Park at the Rough Ridge overlook.

Linn Cove Viaduct (NC)

North Carolina Hikes

The Linn Cove Viaduct is one of the Blue Ridge Parkway’s most recognizable features.  A short (less than one mile!) loop hike lets you see the viaduct from all angles, while enjoying a lovely walk through the woods.

Linn Cove Viaduct
The Linn Coves Viaduct hugs the side of Grandfather Mountain. Below: Adam walks beneath the viaduct; Tanawha trail blazes; Markers along the trail.

Walking Under the Viaduct Tanawha Trail Marker Tanawha Trail

Christine Says…

We recently spent a few days in western North Carolina along the Blue Ridge Parkway.  What a spectacular area!  On our first full day, we did a trio of short, ‘leg-stretcher’ hikes in the vicinity of Linn Cove – the Viaduct Trail, Rough Ridge and Beacon Heights.  In retrospect, we think we should have covered all three of these hikes as one long out-and-back (or shuttle) along the Tanawha Trail, but you live and learn when you visit a new place.

Our first mini-hike of the day was a short loop that passed underneath and then alongside the famous Linn Cove Viaduct.  The viaduct is a feature I had been wanting photograph for years, and to be able to visit at the peak of fall color was a real treat. The serpentine curve of the viaduct hugging the shoulder of Grandfather Mountain is a classic scene – probably one of the Parkway’s most iconic.

Our hike started out from the Linn Cove Visitor Center.  The paved trail begins at the far end of the parking area.  For almost a quarter mile, the trail passes underneath the viaduct.  Cars rumble across the span overhead, while underneath walkers can marvel at the engineering it took to put the viaduct in place.  At the end of the paved section, a set of stairs climbs up a hillside and the trail begins to run through the woods, parallel to the viaduct.  If you continue uphill, you’ll find yourself on the Tanawha trail.  A trail lower on the hillside follows the road more closely and crosses a couple small bridges.  It really doesn’t matter which trail you follow, both will lead to the same place – a great vista just above the viaduct.

The trail to the vista is just a small, well-worn footpath through the woods.  Be careful you don’t miss it!  If you continue on, you’ll be following the Tanawha Trail for quite a while.  The best clue that you’ve reached the side trail is that you’ll be able to see the north-end of the viaduct through the woods.  Follow the trail until it reaches a jumble of rocks just off the side of the road.  Climb the rocks, and you’ll be able to enjoy a beautiful view of the viaduct curving off around the side of the mountain, with the rolling valley beyond.  It’s GORGEOUS, especially in early morning light!

After you’ve enjoyed the view, take the footpath up to the main trail and return the way you came.

Walking Through the Woods Alongside the Viaduct
The trail went through the woods, roughly running parallel to the viaduct. Below: The trail passed some interesting boulders; This tree’s roots really have to reach toward the ground; A paved section of path underneath the viaduct.

Boulders Near the Linn Cove Viaduct Interesting Tree on the Viaduct Trail Paved Trail

Adam Says…

Normally, if I were to hear someone suggest that I take a short hike with the highlight being a view of a paved road, I would think they don’t know what a nice hike is.  However, I would be wrong in this case.  It is impressive to think about how this feature was built and the bend in the road leads to some gorgeous views off the side.  And when you hit this on a beautiful fall day, you have quite a scene.

I would recommend a trip inside the visitor center to learn more about the construction of this feature.  I was impressed to learn that the viaduct was created with the purpose of not impacting the surrounding environment.  Many times when roads are being constructed, they will cut into the mountain to build the road.  The Linn Cove Viaduct was actually built by putting seven foundations below and then having 153 segments lowered down onto seven piers.  This kept construction vehicles from having to build a temporary road to haul heavy construction vehicles and equipment on to the mountain, minimizing the stress on the nearby environment.   For more information on how this feat was accomplished by the Figg & Muller Engineering Group, check out the NPCA’s website for details.

On our way down to North Carolina, we had extreme heavy fog and light drizzle.  Visibility was at times only allowing us to see about 20 feet in front of the car.  We had driven over the viaduct and didn’t even really know what we were missing.  Pedestrians aren’t allowed on to the viaduct.  To get the classic photo you see above, there was a side trail once you reach the other side of the viaduct that leads to a boulder for the birds-eye view.

This was a great start for a few days of hiking along this area of the Blue Ridge Parkway.  The foliage near the peak of fall color made us excited to take in as many autumn views as we could.

Trail Notes

  • Distance – About one mile
  • Elevation Change –  negligible
  • Difficulty – 1. This is an easy hike, part of it is even accessible and follows a paved path.
  • Trail Conditions – 4.  The trail is in excellent condition.
  • Views4.  The best views are from the small, rocky outcropping just above the road.  You’ll also get some glimpses of the valley through the trees.
  • Waterfalls/streams – 1. There is one small waterfall cascading under the viaduct.  You’ll pass over it on one of the small footbridges.
  • Wildlife – 0. This area is well-populated by people, so it’s unlikely you’ll see wildlife.
  • Ease to Navigate –3. We aren’t really sure what part of the hike was the Tanawha trail and what part was the interpretive trail for the Viaduct, but it really didn’t matter since the area is so small and close to the road.
  • Solitude –1.  While we saw almost nobody on our visit, I think it was the exception.  This area is typically very popular and heavily trafficked.  When we passed the same area later in the day, it was swarming with people.

Directions to trailhead: Follow the Blue Ridge Parkway to mile marker 304.  Park at the Linn Cove Visitor Center.

Andrews Bald and Clingmans Dome (TN)

Special: Smokies Edition

Introductory Guide to Visiting Great Smoky Mountains National Park

The 4.8 mile Andrews Bald and Clingmans Dome hike leads to a grassy bald and offers 360-degree views from an observation tower on the tallest mountain in the Great Smoky Mountains National Park.

Andrew's Bald
The view was nice from Andrew’s Bald, but the weather changed fast. Below: Adam checks out the trail marker at the beginning of the hike; Rhododendron were not yet blooming, but the buds were evident; The view from the Clingman’s Dome Observatory before the hike.

Start of Hike Rhododendron About to Open View From Clingmans Dome

Adam Says…

One of the things that we wanted to accomplish on our trip to the Smokies was a hike to one of the many balds in the park.  After a long day of hiking the day before to Charlies Bunion and The Jumpoff, we decided on a shorter hike to a bald, but we also wanted to include a visit to the famous viewpoint, Clingmans Dome.

We started off early in the morning and it looked like decent weather.  On our way down Clingmans Dome Road, we saw that clouds were beginning to roll in.  When we arrived in the parking lot, there wasn’t a lot of nearby views as clouds were beginning to roll in.  During the early part of this week, I kept thinking of the Mark Twain quote about New England – “If you don’t like the weather in New England, wait a minute.”  I felt the same about the Smoky Mountains.  The clouds rolled away during our trip to Charlies Bunion, so I was hoping the same would hold true at Clingmans Dome.

We made a quick trip to the top of Clingmans Dome first and the views were completely covered in clouds.  There were a couple of Appalachian Trail thru-hikers that were actually camped overnight at the top of the dome.  We were surprised to see hikers that had just started a few weeks ago, compared to March or April when most will get started.  I wondered if they would make it to the northern terminus of Mount Katahdin in Maine before it closed off due to winter snow.  The weather looked like it may change, so we headed down to decide if we should attempt the hike to Andrews Bald.

We talked to a few park rangers about what they thought the weather would do based on their experience up here and if we should expect rain.  They said that it was expected to clear up later in the morning, but we would probably have some storms in the afternoon.  We gathered our gear and decided to hit the trails.

Boardwalks on the Forney Ridge Trail
Potentially muddy areas on the Forney Ridge trail were traversed by boardwalks. Below: Adam hikes down the Forney Ridge Trail.  Extensive work has been done on this trail in recent years; Trail marker on Andrews Bald; Another view of the mountains from the bald.

The Forest Was Deep and Green Forney Ridge Trail Andrews Bald View

The trail to Andrews Bald starts from the large Clingmans Dome parking lot.  As you’re walking past the bathrooms and towards the paved trail to Clingmans Dome, you will see a sign to the left marking a few trails.  You head down a few stairs and start the hike to Andrews Bald.   The trail starts off as a steep downhill.  At .2 miles, you reach the junction with the Forney Ridge Trail.  Bear left continue your descent on the Forney Ridge Trail.  The trail is quite rocky in the beginning and can be slick if there has been recent rain, but the trail is well-constructed through this area.  At 1.1 miles, the trail reaches another junction with the Forney Creek Trail, branching off to the right.  Just stay on the Forney Ridge Trail and follow the sign towards Andrews Bald.  The trail begins to be through dense forest and there are a series of strategically-placed, wooden planks that help provide footing on a sometimes-muddy trail.   At 1.8 miles, the forest opens up and you reach the Andrews Bald area.  Enjoy the views and then head back the way you came.

When you reach the first junction at 3.4 miles with the trail back to the parking lot, just stay straight on the Forney Ridge Trail.  You will immediately begin to see the difference in how the trail is maintained as this is a steady uphill through some loose rocky areas.  The trail continues to climb for another half mile; at 3.9 miles, you reach the junction with the Appalachian Trail.  Take a right on the white-blazed AT heading North.  You will be walking along the ridge which will open up views on both sides almost instantly.  At 4.2 miles, you will come out to the paved trail for Clingmans Dome.  Head to the left and climb up the winding path of the observation tower at Clingmans Dome.  Once reaching the top, wind back down but take the paved path down which leads past a gift shop and then to the parking lot which should bring your trip total to 4.8 miles.

When we reached the top of the tower the second time, the clouds were covering most of the area again.  We were able to get a few views, but I can only imagine how beautiful this could be on a clear day.  This is the highest point in the Smokies (and also the entire state of Tennessee), reaching 6643 feet.  Since this area is home to the Cherokee, this mountain is known to this Native American tribe as Kuwahii, meaning “Mulberry Place” and is considered sacred.  Cherokee legend believes this mountaintop to be a place where the bears danced before hibernation.  The clouds that often lie in the valleys between the mountains were seen as lakes where sick bears would go to heal themselves.

The trip to Clingmans Dome is a must when you visit the park.  You can do this as a short but steep .5 mile walk up the paved path to Clingmans Dome, but I’m glad we did a hike that made you feel like you earned the views.  While this hike did meet our goal to visit one of the balds, I’ve heard that Andrews Bald pales in comparison to Gregory Bald or Silers Bald.  On our next trip, we definitely plan to visit one of those.

Christine on Andrews Bald
Christine watches storm clouds roll in. Below: After leaving the bald, the trail goes back into the forest; This area branches off into many other trails.

Stepping Out of the Woods Onto the Bald Trail Signs Along Forney Ridge

Christine Says…

We got up on Monday morning, still undecided about what hike we wanted to do that day.  We knew we wanted to see one of the Smokies’ famous balds, we just weren’t sure which one would fit best into our plans for the week.  We also knew we wanted to visit the observatory atop Clingmans Dome, so we narrowed it down to two balds – Silers or Andrews.

Andrews was a significantly shorter hike – 3.6 miles (4.8 with the Clingmans Dome add-on) compared to 10.  But, Silers was larger and had a more interesting ridge hike with most of the hike staying about 6,000 ft.  In the end, the weather made the decision for us.  When we arrived at Clingmans Dome – the starting point for both hikes – the clouds were thick and dark. In the end, we decided to go for the shorter hike to Andrews Bald.  Balds and high ridges are not where you want to be stuck when a thunderstorm rolls through!

View from the Appalachian Trail
A nice view from the Appalachian Trail near Clingmans Dome. Below: Adam makes his way up to meet the AT; The ridge leading to Clingmans Dome is very rocky.

Hike Up to Meet the AT Along the Ridge Trail to Clingmans Dome

The hike to the bald was mostly downhill.  It followed an elaborately constructed trail of stone slabs, timber-blocked steps, water bars, and plank board walks.  It passed through dense, mossy forests – thick with rhododendrons, ferns and fir trees.  Again, it was so breathtakingly beautiful and different from hiking in Virginia.  As we walked, the sun made an effort to burn through the clouds and fog.

The trail passed a couple junctions to other trails, but to reach Andrews Bald, we just stayed on the Forney Ridge trail.  Eventually, the trail passed through a thick tunnel of rhododendron and opened out onto the bald.

Andrews Bald is not very large.  It consists of a small grassy/shrubby field, peppered with rhododendron, azalea and other low-lying plants.  When we visited, the rhododendrons were just about to open.  There were lots of bright pink buds on the branches, but no open flowers.  I bet the scene will be even prettier in early to mid June when everything is flowering.

The view from the bald was lovely and expansive – though the sky was quite hazy.  We sat for a few minutes and had a quick snack.  While we relaxed, we noticed darker clouds were rolling in again, so we decided to make our way back.

The return trip retraced our steps most of the way.  However, about .1 miles from the Clingman’s Dome parking area, we decided to skip the spur trail to the car and continue uphill along Forney Ridge to its junction with the Appalachian Trail.  This half mile segment was steep and rocky and passed through a stand of huge dead fir trees.

Walkway to the Observatory
The walkway to the Clingmans Dome Observatory. Below: Another view from the observatory; The tower looks like a spaceship;  The summit is covered with many dead fir trees destroyed by an insect called the wooly adelgid;  The walkway down to the parking area was covered with fog; A view opened up from the parking lot.

Another View from Clingmans Dome The Observatory Dead Fir Trees
Foggy Walkway View from the Clingmans Dome Parking Area

Once we gained the ridge, we took a right and headed north for .3 miles along the Appalachian Trail.  There were a couple nice views along the way and even a glimpse of the parking area through the trees.

The trail came out close to the base of the observatory.  We made a second climb up the tower to see if the view was any clearer.  It wasn’t – in fact; within a few moments a giant bank of fog rolled in and covered the view completely.  We ate some lunch on the bench in the tower and did a little people watching.  Eavesdropping on conversation, I was amazed to hear so many people had never heard of the Appalachian Trail. They were stunned, upon reading the plaque at the summit, that there was an actual walking trail from Georgia to Maine.

After we finished eating, we walked the half-mile paved trail back down to the parking area.  Several people stopped us to ask if we were thru-hikers or if we were ‘headed to Maine.’  I guess trekking poles and wicking shirts  make us look very serious about the outdoors. We politely replied that we were mere dayhikers, but it would have been funny to tell people that we expect to be in Maine by mid-August.  Technically…  that is true – only we’ll be arriving by car for a week-long vacation in Acadia.  🙂

After wrapping up our hike, we drove into Cherokee and visited the Museum of the Cherokee Indian and the Qualla Arts & Crafts Mutual.  Both places were beautiful, fascinating and informative.  And, by the time we came out of the museum, it was thundering, lightning and pouring down rain.  We definitely made the right choice, but next time we’ll visit Silers Bald!

Trail Notes

  • Distance4.8 miles
  • Elevation Change – about 1200 feet
  • Difficulty – 3.  The trail from Andrews Bald to the AT is mostly uphill with a few steep sections.
  • Trail Conditions –3.5.  The upper part of the Forney Ridge Trail has loose rock, but the trail is generally well-maintained.  The hike down from Clingmans Dome is paved, but steep.
  • Views– 5. Expansive views from Andrews Bald and 360-degree views from Clingmans Dome.  On a very clear day, you could see for 100 miles in all directions.
  • Streams/Waterfalls – 0. Non-existent.
  • Wildlife – 1.5 Other than birds and maybe an occasional squirrel, I wouldn’t expect a lot of wildlife here due to the popularity of the trail.
  • Ease to Navigate – 4. Signs at junctions are well-labeled and stand out, but make sure you stay on the correct trail.
  • Solitude –1. The hike to Andrews Bald is one of the most-traveled trails in the park, and expect crowds at Clingmans Dome most days.

Directions to trailhead:  From December 1st through March 31st (and some other days based on weather), the road to Clingmans Dome is closed.  From Newfound Gap Road/441 take the Clingmans Dome road (south of the Newfound Gap parking area).  The road continues for seven miles until it reaches the large parking area.  Past the bathrooms and to the left of the paved path up to the gift shop and Clingmans Dome, take the marked trail down the steps that leads to Andrews Bald.

Charlies Bunion and The Jumpoff (TN/NC)

Special: Smokies Edition

Introductory Guide to Visiting Great Smoky Mountains National Park

This 9.5 mile hike, mostly along the Appalachian Trail, starts out from Newfound Gap. The route offers several places to take in magnificent vistas of the Smoky Mountains.

Adam on Charlie's Bunion
Adam enjoys the view from Charlies Bunion. Below: The trail starts out from Newfound Gap. The area has the Rockefeller Memorial (pictured), plenty of parking and restrooms; Christine at the start of the hike; The forests in the Smokies are so dense and green.

Newfound Gap Christine at the Trail's Start Everything Was So Green

Christine Says…

We knew this hike was one of the most popular in the Smokies, so we got off to an early start – breakfast at the hotel, in the car by 7:15 and on the trail around 8:00.  We were one of the first cars in the Newfound Gap parking lot, which is always very busy.

We headed north along the Appalachian Trail.  Immediately, we began to marvel at how different the Smokies are from Shenandoah.  I’ll admit, I sort of expected this park to be similar to Shenandoah – kind of like an older sister – bigger and taller, but still similar in looks and personality.  But, the trail was strikingly different – more evergreens, wetter, mossier, greener, more rugged – I might even say ‘more alive’.

I’d heard and read plenty about the extensive biodiversity of the Smokies before, but wasn’t really prepared by how awestruck the park would make me feel. This park has dramatically more plant and animal species than almost any other place on earth. During the last ice age, plants and animals were pushed into the Southern Appalachians as glaciers advanced. When the glaciers retreated, species were left behind – almost stranded in the Smokies.

The trail climbed gradually uphill over the first couple miles, climbing over rocks and roots and mud.  Little rivulets of water were running down the mountainside all over the place and filling the woods with the sound of dripping and trickling.  Every now and then, we got a view of mountains in the distance.  Everything was still partly cloaked with fog and clouds, but it was evident that the sun was making a full effort to burn through.

Hiking Up the Appalachian Trail
Christine makes her way up the trail. Below: One of the first nice views came at the junction of the AT and the Sweat Heifer Creek trail;  Trail junctions were well-marked; There were plenty of wildflowers along the trail.  We even spotted a few fading trillium, but they were all pretty tattered and not photo-worthy.

View From the Trail Junction With Sweat Heifer Creek Trail Wildflowers in the Smokies

At the junction of the AT and the Sweat Heifer Creek Trail (isn’t that a funny name?), we diverted a short distance off the AT to take in the view.  Almost immediately after turning onto Sweat Heifer, there is a bench and a marvelous open view of the mountains.  After a few minutes, we proceeded along the trail which had become more level as it followed a ridgeline.  We saw a couple trillium still in bloom – one bright purple and one white, but most were far past their peak.

Eventually we reached the junction with the Boulevard trail.  This is the spot where you can take a detour to another viewpoint – the Jumpoff.  We decided to press on toward Charlies Bunion, in hopes of having the spot to ourselves a while before the crowds materialized. About .3 of a mile past the junction, we reached the Icewater Shelter.  It was still full of weekend backpackers, some making breakfast and some still in their sleeping bags.  We didn’t want to disturb them, so after a brief hello, we moved on.  Shortly after leaving the shelter, we stepped over Icewater Spring, which is the water source for this area.  The piped spring seemed to be running nicely.

The trail climbed steeply downward over slick, wet trail.  The forest around us was extremely dense evergreen.  It was quite beautiful and different!  As we made our way along, thick, cottony fog started to roll in.  We passed one hiker marching south – tripod in hand and a disgusted look on his face.  I can only gather that he went to Charlies Bunion for the view and saw nothing.  The next hiker we encountered pretty much confirmed the sky conditions.  We asked how the view looked and he said ‘No view – unless you like fog, but it looks pretty cool blowing up the sides of the mountains.’

I felt a little disappointed about the prospect of missing out on the view, but we stayed optimistic and hoped that the fog would burn off within the next fifteen minutes.  When we first spotted Charlies Bunion from a distance, the fog was swirling around and covering the rocky outcropping almost completely.  But, by the time we reached the bunion, conditions were clearly improving.

What a spectacular place!  The mountains are so craggy and ragged and sharp around the bunion.  The rocks were covered with sand myrtle and a few rhododendron were about to bloom.  The fog was whipping by, rolling up the sides of the mountains in giant waves.  Every now and then, a thin spot would give us a glimpse of distant mountains and not even a hint of civilization.  We sat on the rocks, enjoying the solitude.  We were absolutely thrilled to enjoy this special place without the company of other park visitors.  As the minutes passed, the view became more and more clear.   It was everything I imagined the Smokies would be!

Christine Checks Out the View from the Bunion
Christine checks out the view from the Bunion.  Below:  Adam walks through the cool, dense evergreen forest as we cover the last mile toward Charlies Bunion; Some sections of trail were covered with this smooth, slate-like rock; Many high, rocky places in the Smokies (including Charlies Bunion) are covered with sand myrtle.

Evergreen Trees Slate Trail Sand Myrtle

Shortly before we were ready to head back, another couple from Michigan joined us at the rock.  We chatted a while and took photos for one another.  We decided to head on out and let them enjoy a bit of solitude, too.

On the hike back, we planned on eating lunch at the Icewater Shelter, but found it still loaded with people – and not very friendly ones at that.  So we pressed on, with plans to eat lunch at our next stop – a viewpoint called ‘The Jumpoff.’

The side trip to the Jumpoff required about an extra ¾ mile of hiking along the Boulevard Trail and a small side spur trail.  The climb up to this view was our toughest climbing of the day.  It was steep and very slippery and root-covered.  Once we got to the view, it was quite evident why the spot garnered the name ‘jump off’.  It has an extremely precipitous drop from the edge!  We ate lunch on the rocks and enjoyed the view.

On the hike back down to the junction, we passed a huge hiking party and were thankful that we had once again dodged sharing a nice viewpoint with crowds.

The rest of the hike back down went quickly and was mostly downhill.  We saw dozens and dozens of backpackers and dayhikers making their way up the trail. When we got back to the parking lot, it was full of people taking in the view from Newfound Gap.  Most of them will probably never set foot on the trail, and maybe with so many people already out there… that’s just fine!

Adam Says…

This was a great first hike in the Smokies for us.  We had driven up to Newfound Gap the previous day and saw a ton of cars.  We knew it would be a great idea to start off on this trail as early as possible.  The view from Newfound Gap is absolutely gorgeous, but you’re in for a treat if you continue on to Charlies Bunion and The Jumpoff.

When you park in the large lot, you will see a terraced memorial for Laura Spelman Rockefeller, the wife of John D. Rockefeller.  It is amazing the impact that Rockefeller family’s philanthropy has had on our national parks.  In addition to the Great Smoky Mountain National Park, the Rockefeller family’s donations have given land and money to help establish Acadia, Grand Teton, Yosemite, and Shenandoah national parks.

The origin of the rock outcropping being called Charlies Bunion is amusing.  A mountain guide named Charlie Conner had a large bunion on his foot and Horace Kephart named it in honor of him and his foot affliction stating “That sticks out like Charlie’s bunion”.  Horace Kephart was one of the people that helped get the Great Smoky National Park established and plotted the Appalachian Trail path through the Smokies.

This rock outcropping was created through a combination of logging, fire, and flooding.  This area was heavily logged in the early 20th century, leaving behind lots of dried debris.  A large forest fire came through this area known as The Sawteeth in 1925, destroying much of the vegetation and sterilizing the soil.  A torrential cloudburst in 1929 washed away the soil and left this as a rocky outcropping.

View Through the Smoke
A view through the ‘smoke’ at Charlies Bunion. Below: The quickly changing clouds and fog opened up new views depending on how the wind blew; The Icewater Shelter.

Another View from the Bunion Another Bunion View The Icewater Shelter

For trail directions, the hike started with an uphill climb just right of the memorial (there is also a small bathroom to the right of the trail) on the white-blazed Appalachian Trail.  At 1.7 miles, you will reach the junction with the Sweat Heifer Creek Trail.  Continue straight on the AT.  At 2.7 miles, you will reach another junction with the Boulevard Trail to the left.  You will use this trail to get to The Jumpoff, but we continued straight on the AT.  At mile 3.0, we reached the Icewater Spring cabin, which serves as an overnight cabin for any backpackers.  On the trail shortly after the shelter, you will see a pipe that serves as a water source if you need water, but you should treat any water before drinking.  The trail then begins to go downhill steeply at this point as you make your way to Charlies Bunion.  You will reach Charlies Bunion at mile 4.4.  After visiting the Bunion, go back the way that you came.  At mile 6.1, you will reach the junction with the Boulevard Trail again.  Take a right on this trail and after a very short distance, you will see a wooden sign that points up to The Jumpoff.  This trail was definitely the most strenuous of the entire hike.  The trail is about .4 miles to reach the end at 6.5 miles.  Take a minute to enjoy the view and then head back down the way you came to rejoin the Boulevard Trail and take a right at the junction to rejoin the Appalachian Trail.  You should reach the parking lot at 9.5 miles.

The Appalachian Trail is relatively smooth up to the junction with the Boulevard Trail, but gets rougher, rockier and more slippery as you descend down to Charlies Bunion.   The trail up The Jumpoff is the toughest climbing of the day – quite steep and treacherous, so it will take a while to reach the viewpoint.

View from the Jump Off
The view from the Jumpoff was pretty impressive! Below: To reach the Jumpoff, follow a short spur from the Boulevard Trail; Adam gets ready to eat lunch with a view; By the time we passed back by early spots on the trail, the view had cleared up significantly.

The Jump Off Junction Lunch on the Jump Off View at the End

When Christine and I were hiking up past the junction with the Sweat Heifer Creek Trail, the strangest thing happened.  We both felt that we had a drumming noise inside our heads that was beating rapidly for a few seconds.  I said to Christine, “That was weird” and she asked what I felt.  It turns out that she had the same sensation happen at the exact same spot.  I’m not sure if it was an adjustment to the altitude, a pulse increase, or an alien scanning us, but it was quite odd.

The highlight of this hike is definitely the views.  From the Bunion, you can see steep, mountain peaks all around.  We were so glad that we stayed around a while to be able to watch the “smoke” rise up and blow over the Smokies.  We really felt like we were up in the clouds as the wind blew the fog around quickly.  We stayed around at this viewpoint for longer than we normally stay because it was so entertaining to get different glimpses of the mountains.  The Jumpoff trail gives you similar views, but you can also see Charlies Bunyon from afar.  The Jumpoff did seem a lot more treacherous.  The soil is eroding off this viewpoint and you just think if you take a wrong step you could plummet.  When we were leaving the area, a large group of older adults were on their way to The Jumpoff.  There is not a lot of room at the viewpoint, which made us both wonder how they were going to be able to take the views in.  We found someone’s driver’s license at the top of this point and we were just hoping that he has survived.  We took it to mail it off to him, but we did check the news to see if anyone was missing.

Trail Notes

  • Distance 9.5 miles if you go to The Jumpoff, 8.2 miles if you just do Charlies Bunion
  • Elevation Change – about 1600 feet for the complete hike
  • Difficulty – 3.  There are several moderate climbs on this hike.  The only truly steep climbing is the short spur trail to The Jumpoff
  • Trail Conditions – 3.  The trail is in good condition, but you can expect to hike over lots of mud, loose rocks and roots. It’s just the way the Smokies are made.
  • Views – 5.  Spectacular!
  • Streams/Waterfalls – 0.  There are no streams or waterfalls along this trail, as it follows mostly ridgeline.
  • Wildlife – 1.  Lots of juncos darting underfoot from low-lying plants.  We didn’t see anything else, but the  Icewater Shelter was closed during fall 2011 for an aggressive bear, so there is undoubtedly other wildlife in the area.
  • Ease to Navigate – 4.  Trails are well-marked and blazed.  There are several turns, but it would be tough to get lost on this trail.
  • Solitude – 2.  This trail is one of the top five most popular hikes in the Smokies.  Hike early if you want to avoid crowds.

Directions to trailhead:  Take 441 through Great Smoky National Park to reach the large Newfound Gap parking lot.  Park in the lot and head towards the memorial.  The trail starts off just to the right of the memorial.