Halfmoon Mountain Loop

This 10-mile loop could easily be a day hike, but we chose to do it as a short overnight backpacking trip. The route has some fairly nice vistas and there are a couple campsites near the summit.

View the Full Album of Photos From This Hike

Halfmoon Mountain Summit
Adam takes in the view from Halfmoon Mountain. Below: The trail started from the Bucktail Trail parking area – pass the locked forest service gate to begin; We hiked the loop counterclockwise – starting on the pinkish-purple blazed Bucktail Cutoff Trail; Walking along the Bucktail Cutoff.

Halfmoon Mountain Halfmoon Mountain Halfmoon Mountain

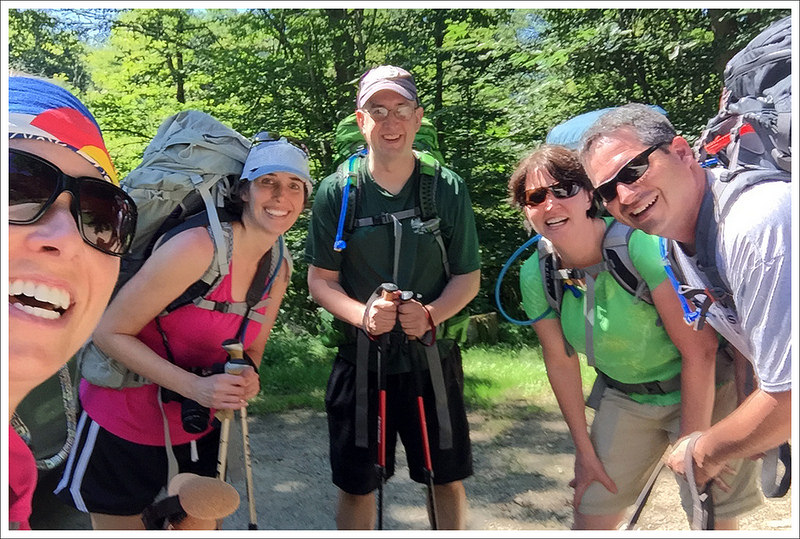
Adam Says: Day One  (4.7 miles)

This past year was not a good year for our backpacking hobby. The rain seemed endless and the amount of exceedingly heavy rain did a lot of damage to trails. We also got a new puppy in March. He needed a lot of training and we weren’t quite ready to trust him to someone else for long periods of time.

We did manage to get out for this one trip in August 2018. Halfmoon Mountain had been a trail we had looked at doing for many years.  We heard there were great views and a sweet campsite with a view at the top. One thing that hurts this as a backpacking loop is the nearest water source to the top is about 1-1.5 miles away from the camp areas, so you have to haul what water you need to the top.

Campsite
There is a nice campsite at the junction of the Halfmoon Mountain Trail and the Bucktail Cutoff Trail. Below: After the campsite, we followed the yellow-blazed Halfmoon Mountain Trail; The trail was steep and had some obstructed views; Junction of the Halfmoon Mountain Trail and the Halfmoon Lookout Trail.

Halfmoon Mountain Trail Halfmoon Mountain Trail Halfmoon Mountain Trail

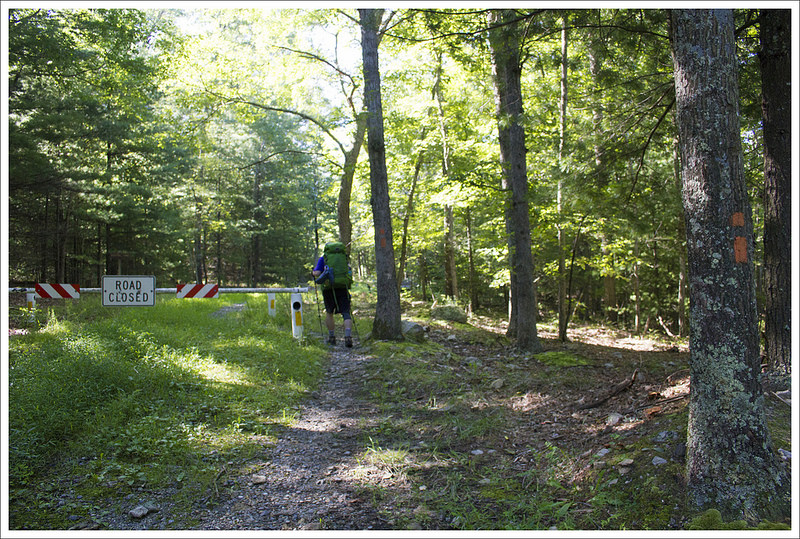
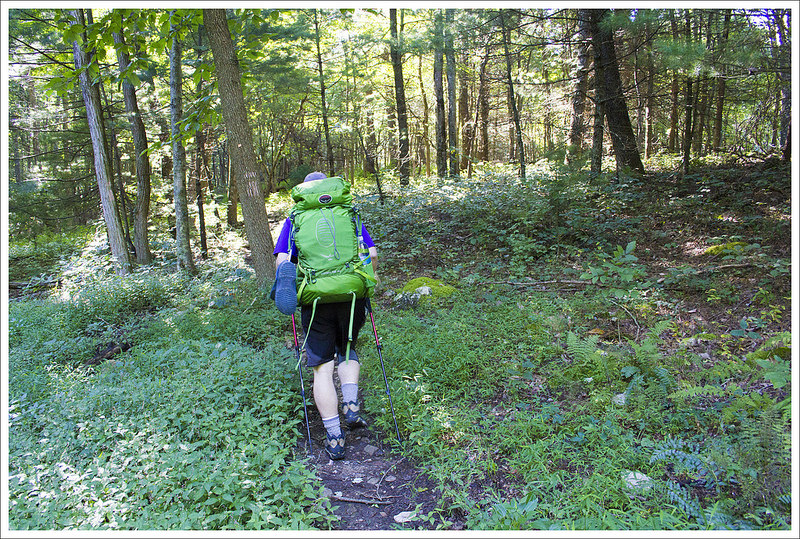
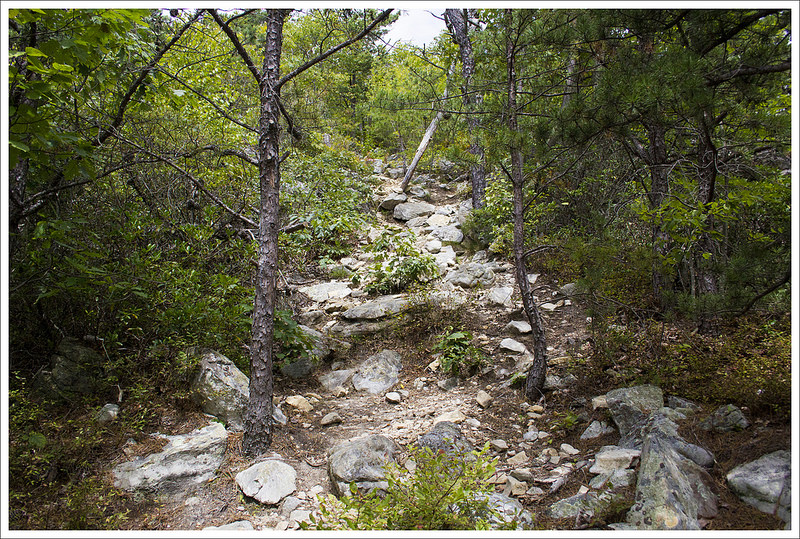
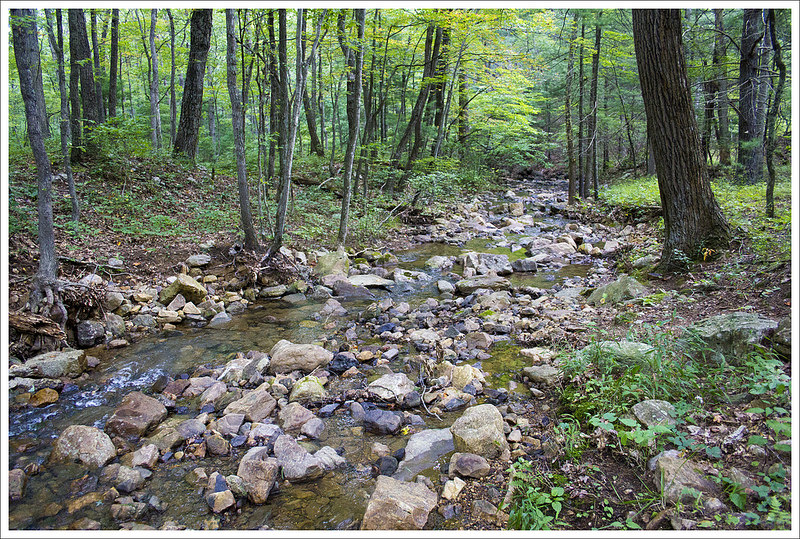
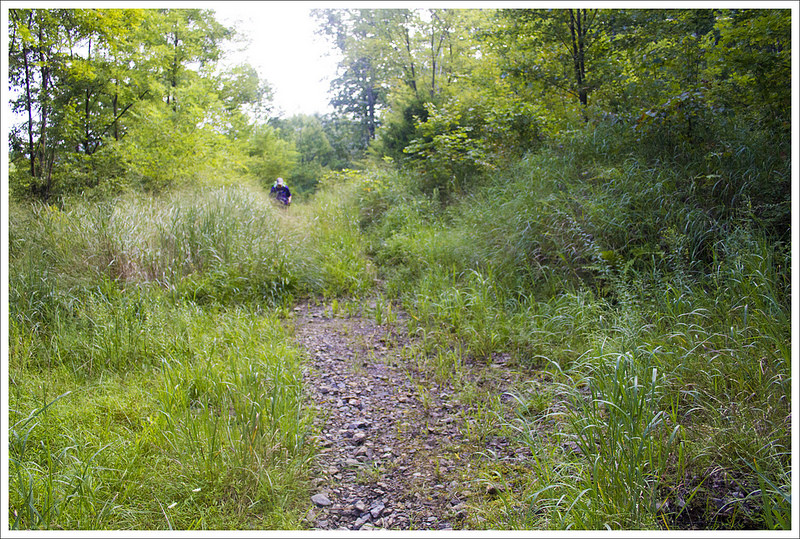
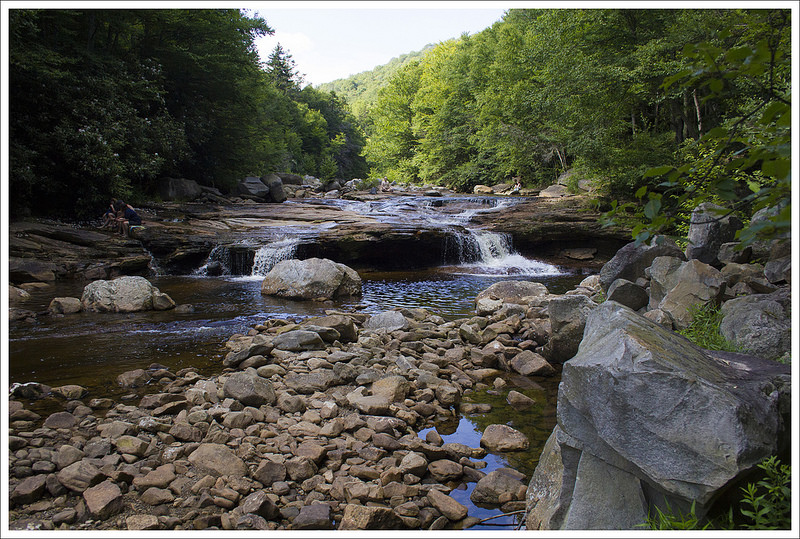
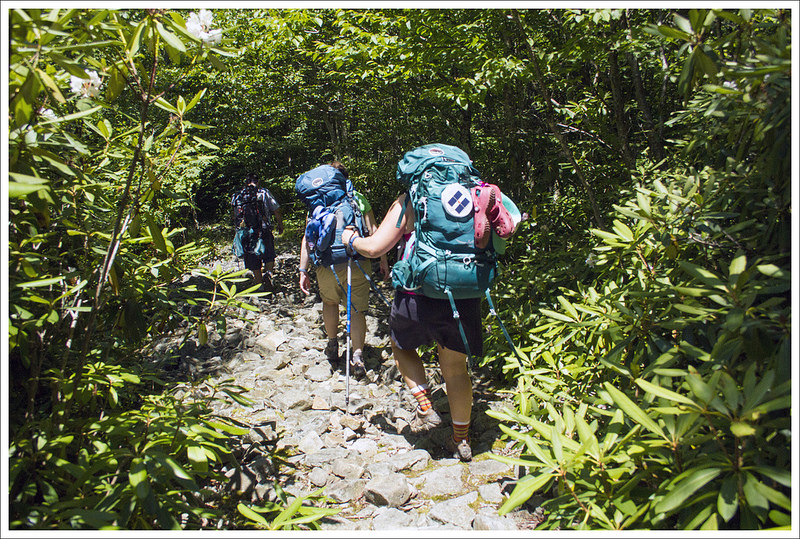
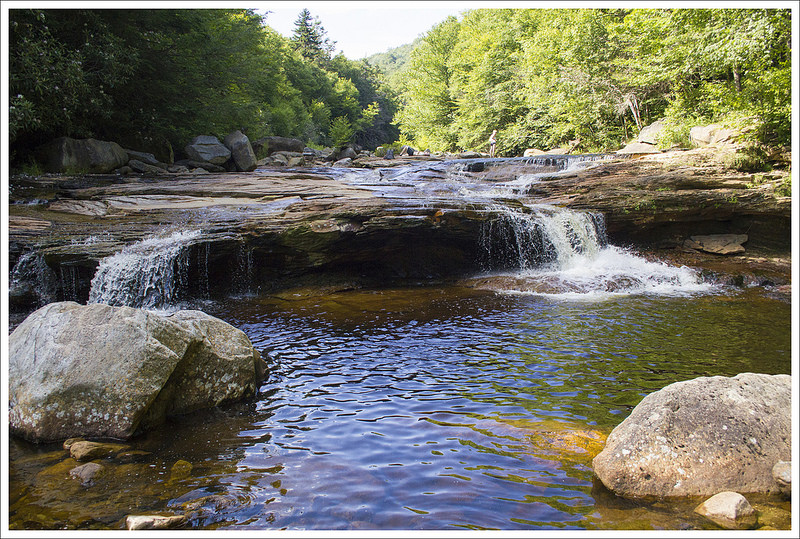
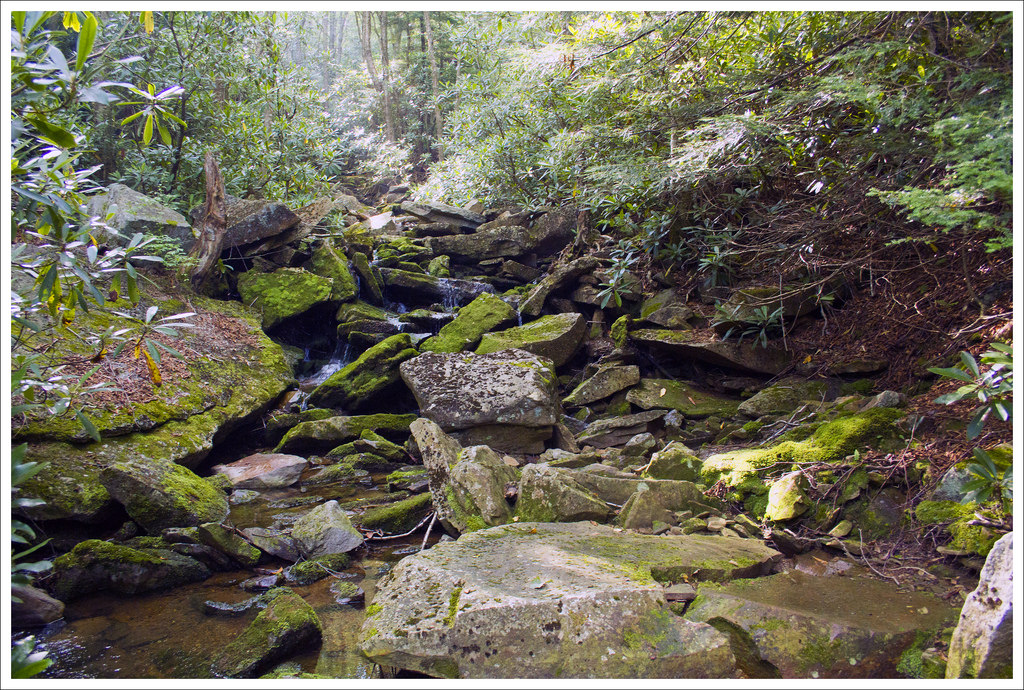
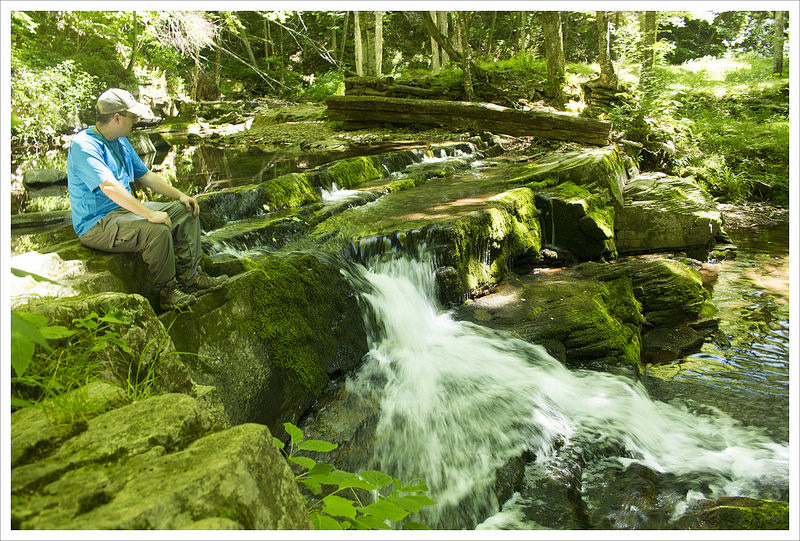
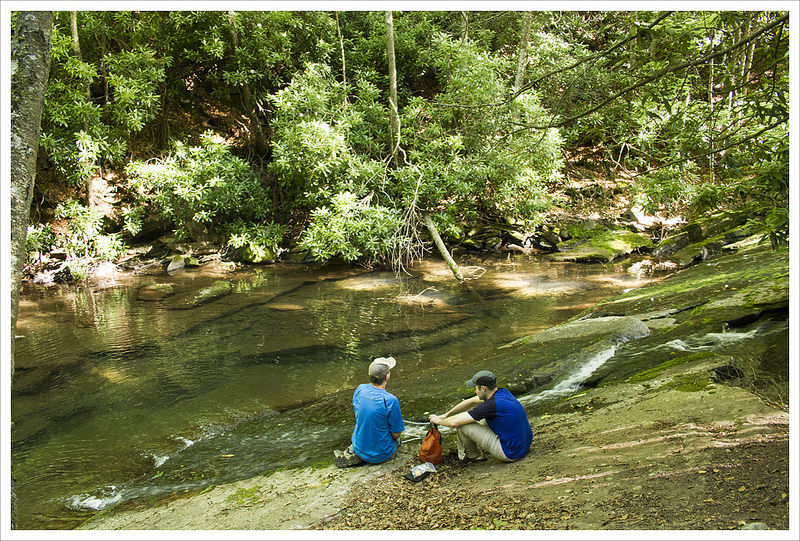
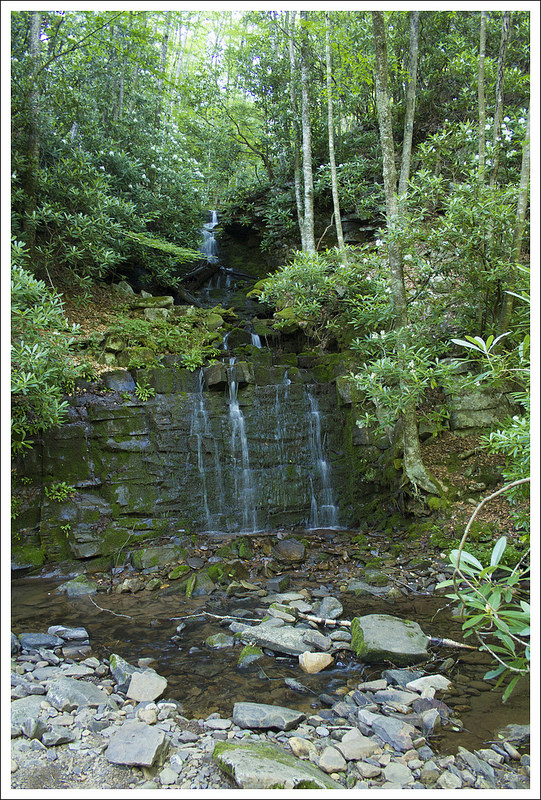
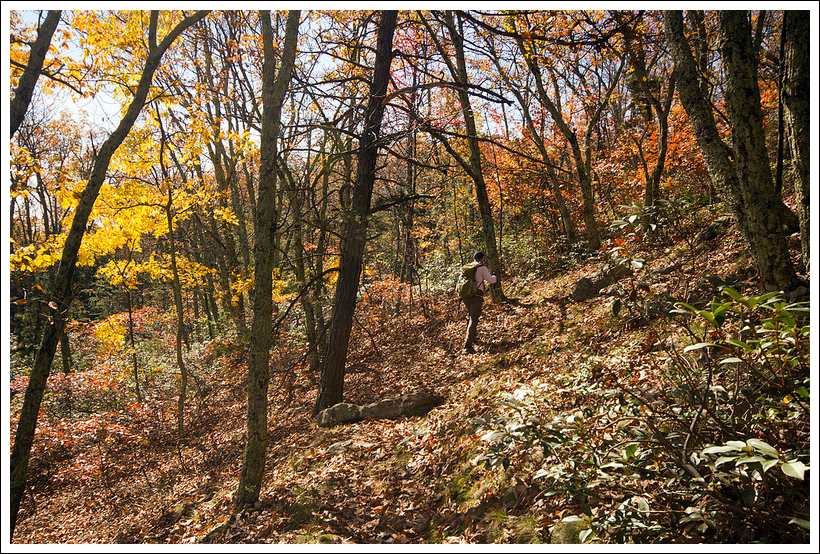
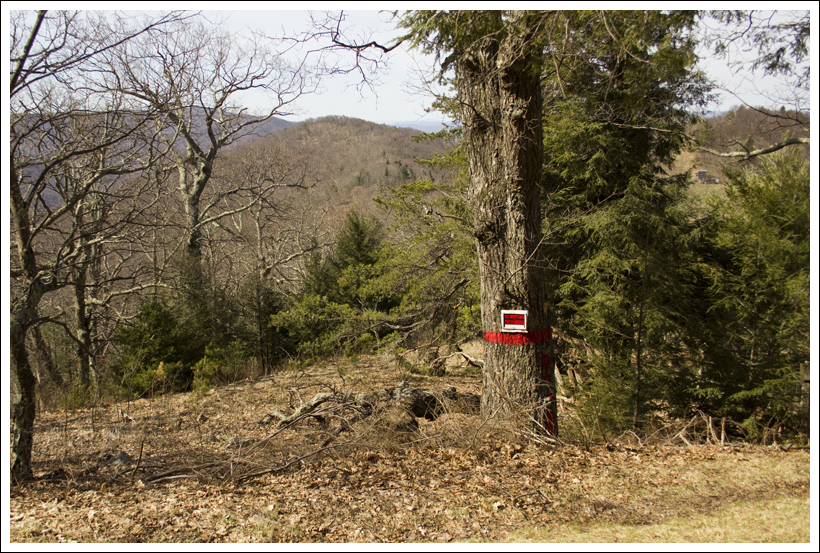
We started the trip by parking along Trout Run Road (see GPS coordinates below).  We started off on the Bucktail Trail and shortly walked through a gate blocking off the fire road.  After a short distance, we came to a junction where the Bucktail Connector Trail branched off to the right while the Bucktail Trail takes a left (this is your return trip for the loop). We took the right Bucktail Connector Trail which has pinkish-purple blazes to follow this loop counter-clockwise.  The trail began to climb up through forested terrain.  Overall, this trail was well-maintained as it is a visible, narrow footpath cutting through the forest.  There isn’t a ton to say about this section since there wasn’t a lot to see other than forest around you.  The trail climbs for about the first 1.25 miles before descending slightly for about .5 miles and then there is another up and down until you reach another junction at 2.5 miles. There is a very nice campsite along the stream near this junction.

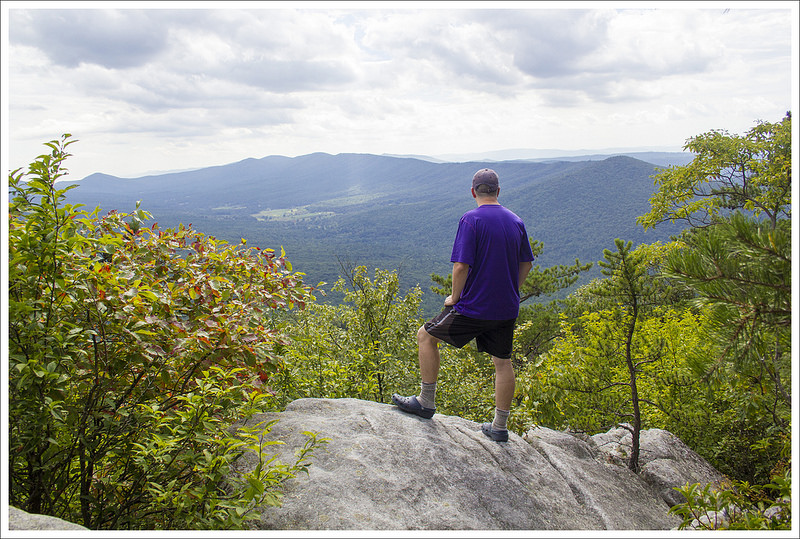
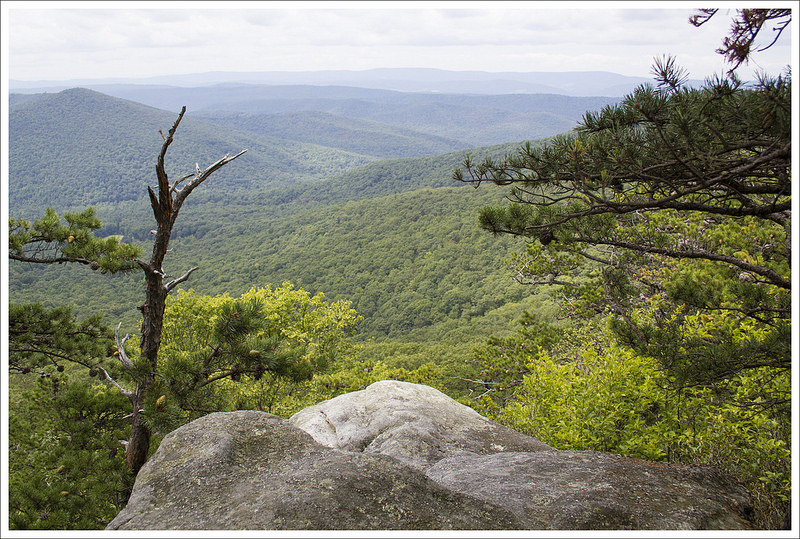
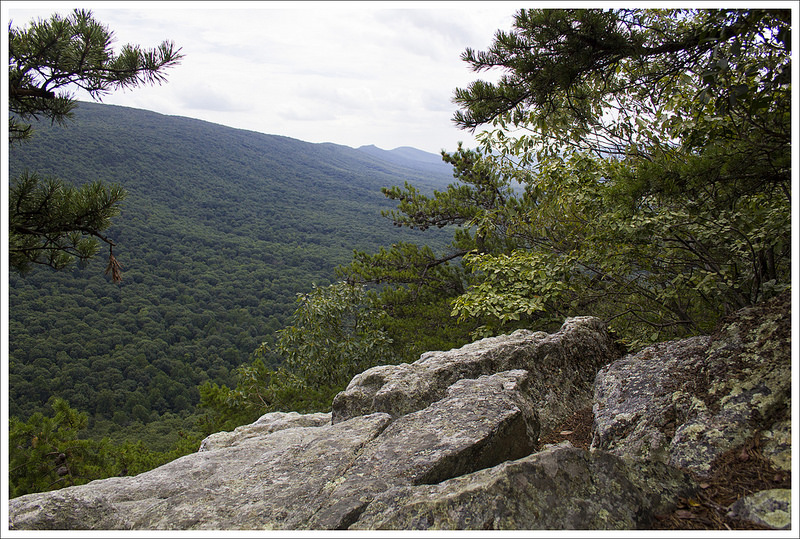
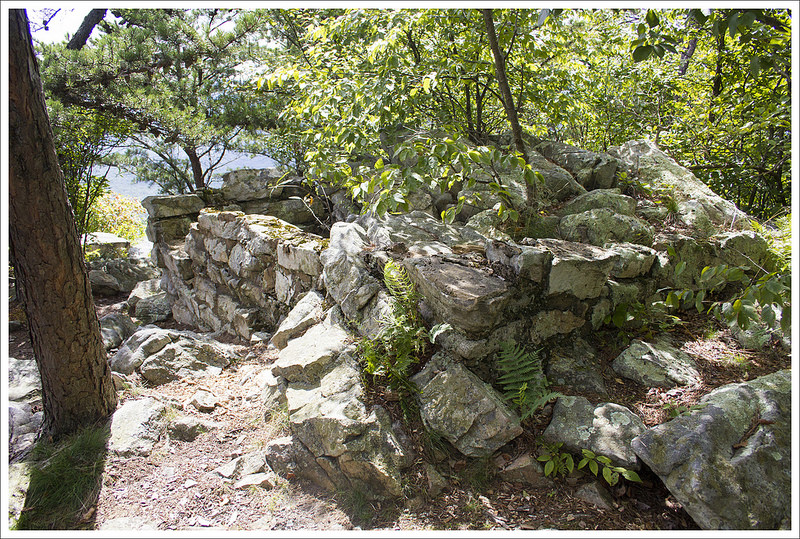
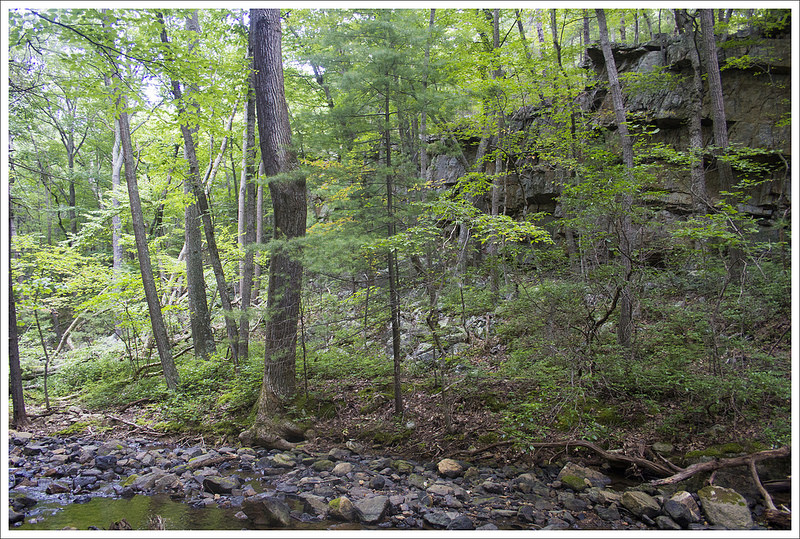
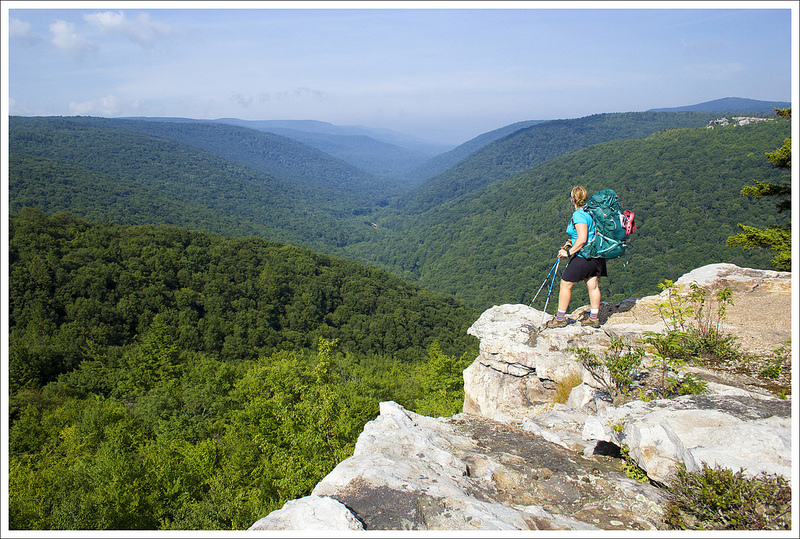
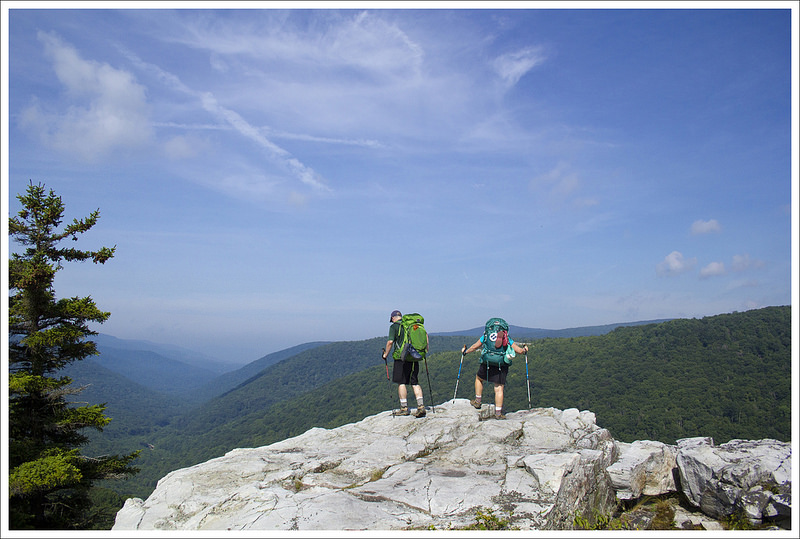
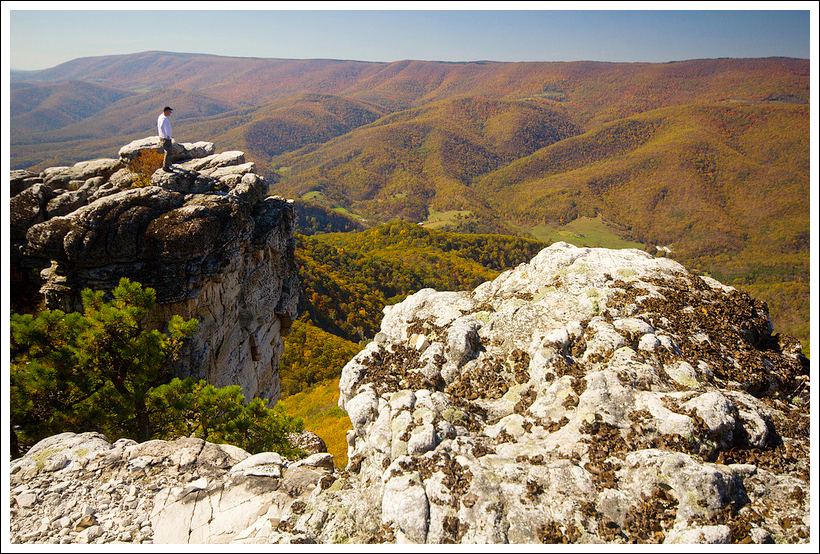
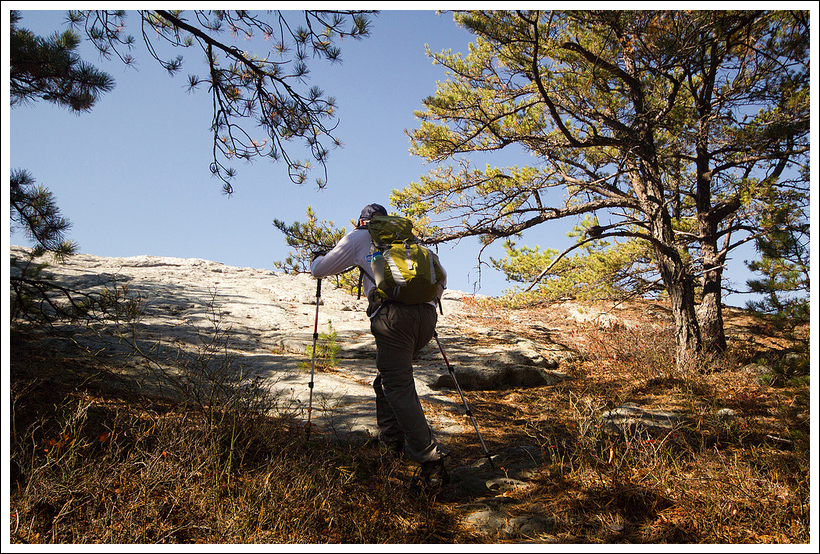
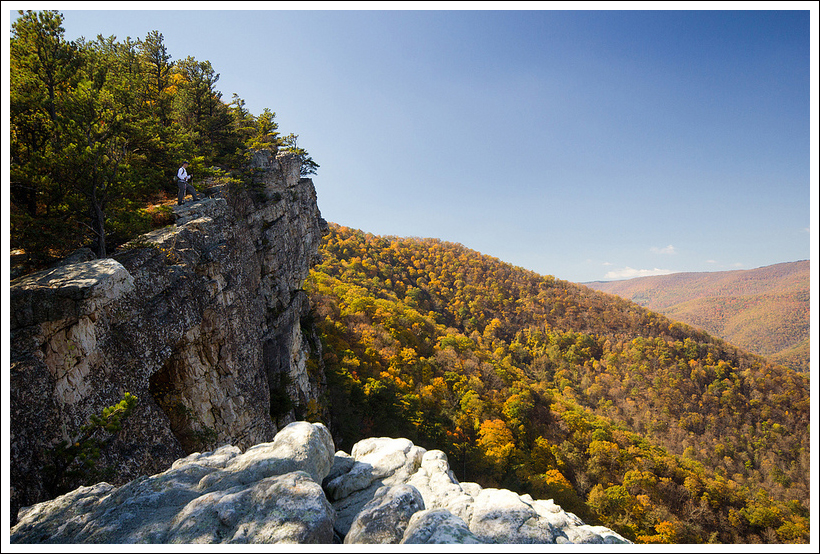
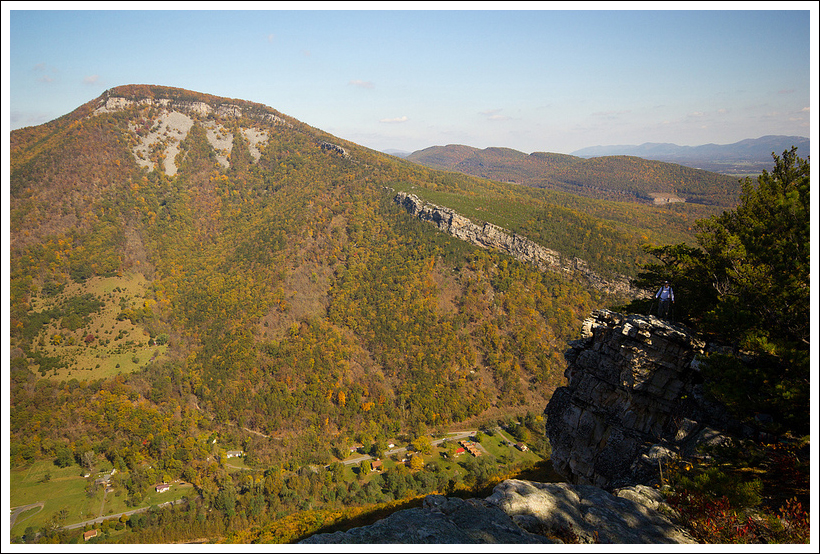
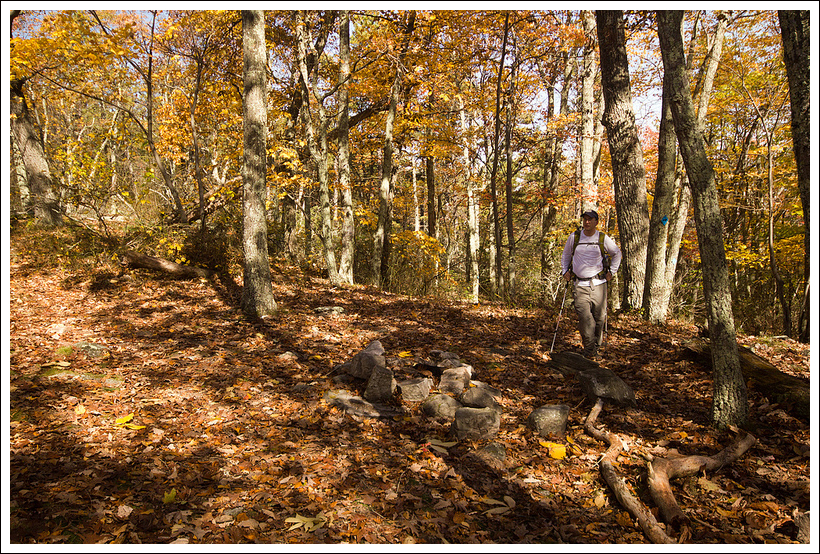
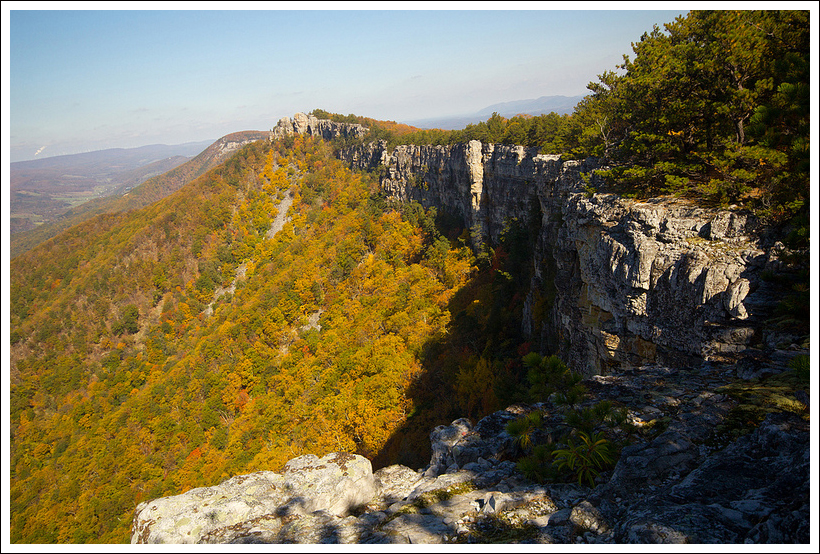
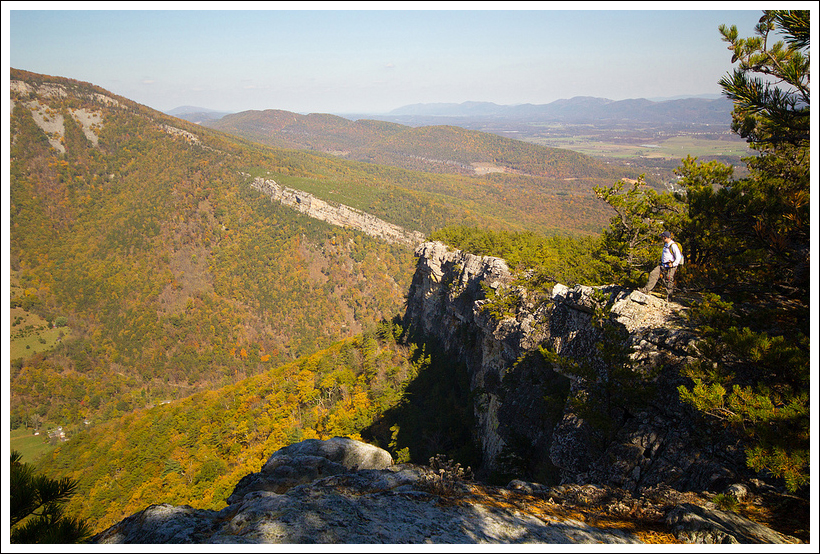
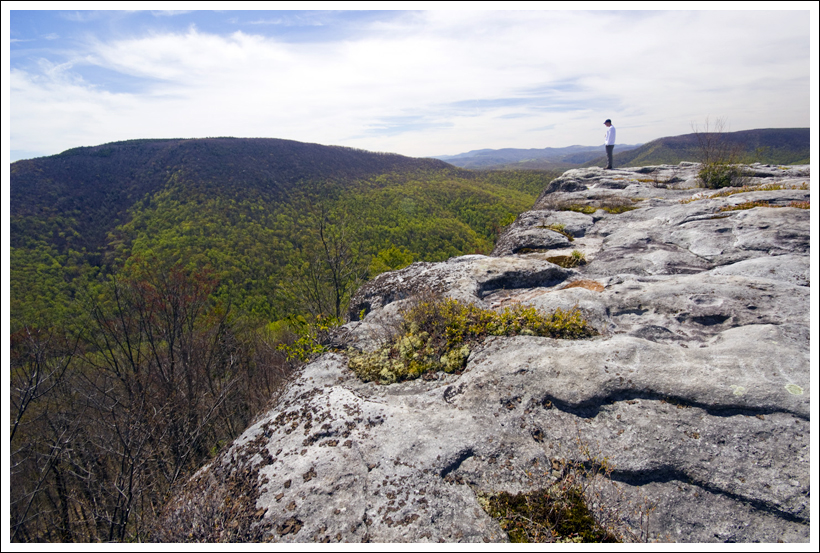
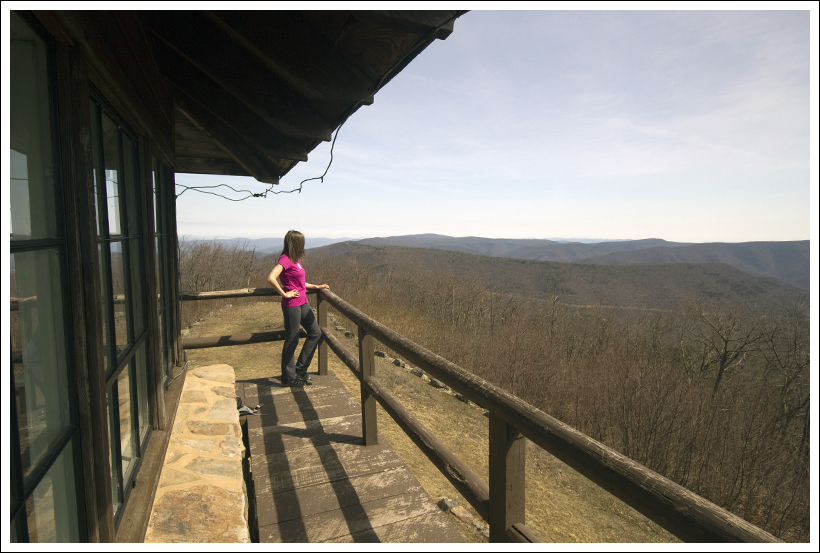
At the junction take a left on to the Halfmoon Trail (going right would take you to the Halfmoon parking area – where many hikers originate on a shorter out-and-back route to the summit).  From here, the trail gets steeper and at the 3.5 mile mark, you reach the junction with the Halfmoon Lookout Trail, which takes off from the left.  Take that left on to the Halfmoon Lookout Trail to reach the summit after another .8 miles.  On our way up to the Halfmoon Lookout, we noticed a small footpath that branched off to the left which led to a larger camp area where we ultimately camped for the night.  The last tenth of a mile is a steep rock scramble to the top.  With crumbling rock underfoot, you really have to watch your step.  At the top, there are two great viewpoints. The first you come across on the lefthand side of the trail and there is room for a few people at the top. There are remains of an old firetower at this lookout spot.

To visit second viewpoint, you descend through a campsite in a saddle and then over another rock scramble to to the view.  This view spot will typically only work for about two people. It’s tight quarters.

First Views
One of the viewpoints from summit of Halfmoon Mountain. Below: The Halfmoon Lookout Trail is pretty flat until the last bit before the summit; The last hundred yards to the summit is a minor rock scramble (it’s steeper than it looks in the photos); Somebody chopped down numerous living trees at the summit to make the saddle campsite larger (jerks!); We thought about camping in the saddle at the summit, but didn’t like the tightness of the campsite.

Halfmoon Mountain Trail Halfmoon Mountain Trail
Tree Damage Summit Site

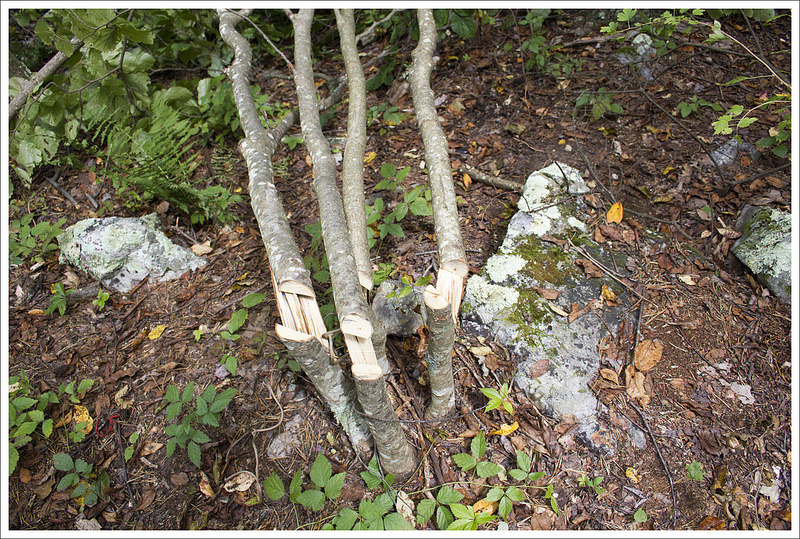
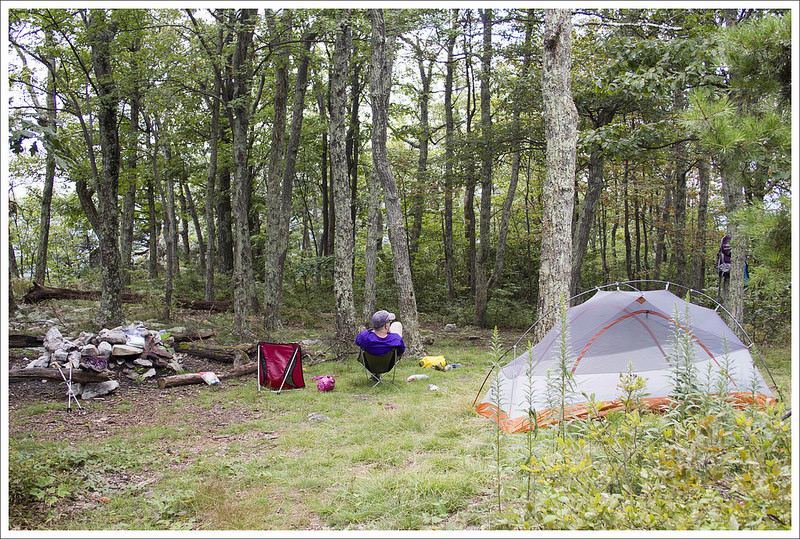
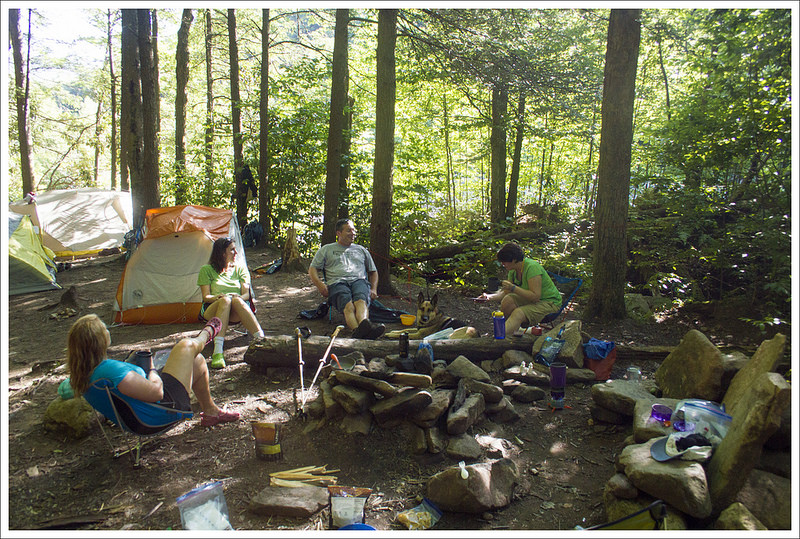
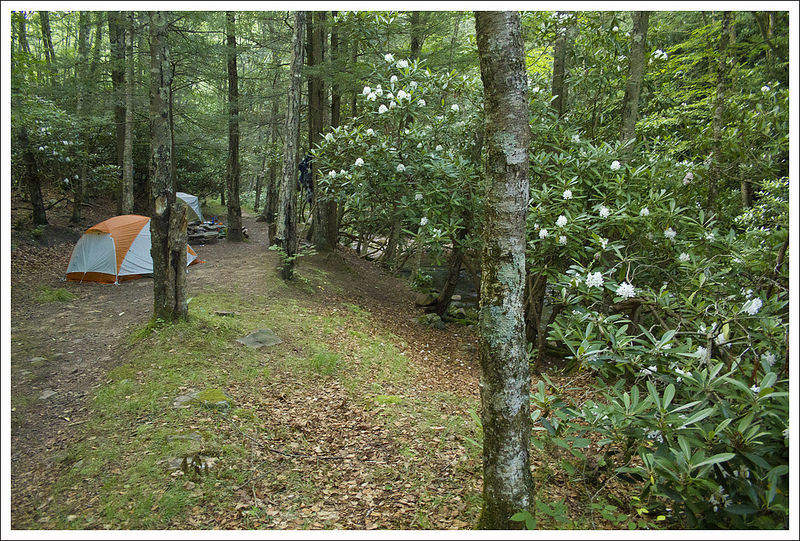
We initially were going to camp at the top – we heard it was a great campsite. Some jerks had chopped down some live trees to build the frame of a lean-to (so much for Leave No Trace principles) on the campsite. We deconstructed the lean-to and tried to clear out the area a bit, but felt the campsite would have been a bit tight and we would have had people walking through our campsite all day to get to the second viewpoint.  We decided to enjoy the views up here and then make our way back down.  Investigating that side trail, we found a great spot to set up camp. Even better, the campsite below the saddle had its own little viewpoint for us to enjoy.  We found a nice grassy spot to set up our tent on some flat ground.  The bugs were a little hard to deal with at camp, but we made the best of it.  We were later joined by another couple that shared our camping area.

Sunset on Halfmoon
We had a beautiful sunset on Halfmoon Mountain. Below: We chose this spacious, grassy site right below the summit; Our campsite had its own little viewpoint; There are remains of an old fire tower at the summit; Another camping part hung a hammock on the summit for sunset.

Our Campsite View at camp
 Hammock

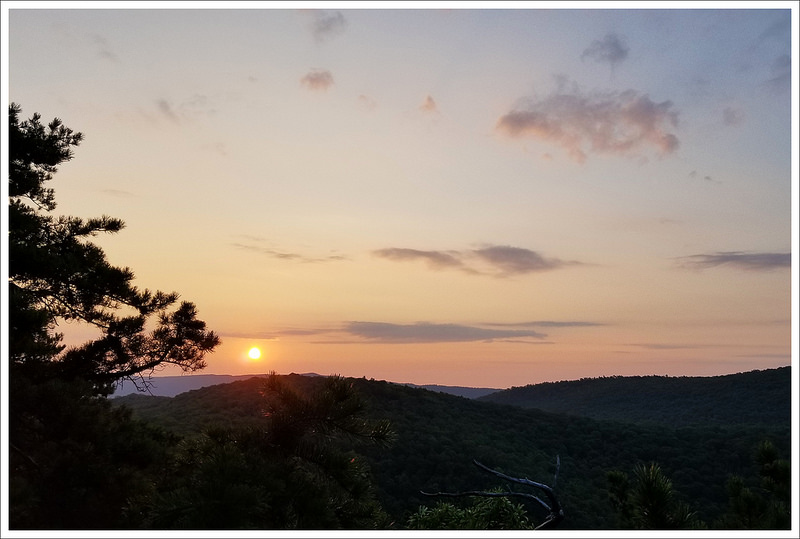
After we set up camp, we made our way back to the top to enjoy some late afternoon/sunset views.  At the second view, another couple had set up a hammock somewhat precariously over the edge – a nice spot, but it did obstruct the views for anyone else. We had a nice dinner back at our campsite and settled down for the evening enjoying the sounds of the forest.

Christine Says: Day Two (5.3 miles)

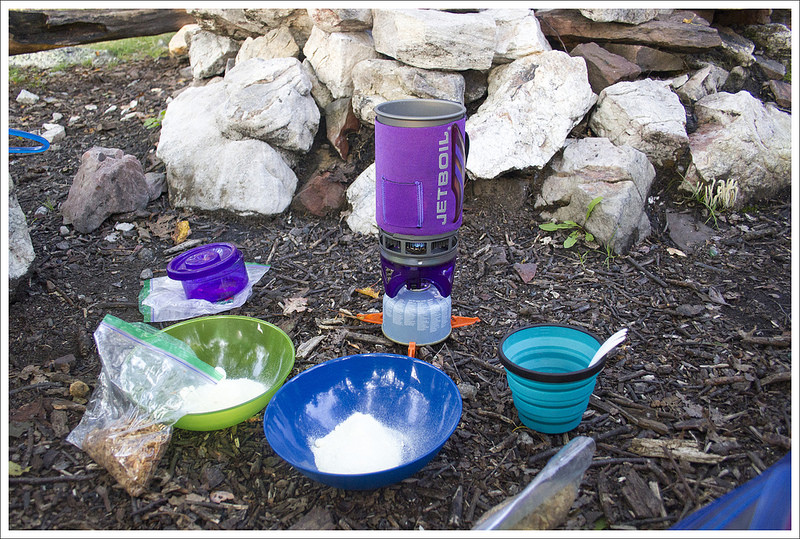
I woke up early on the second day, so I could watch the sunrise. There were a couple decent places to catch the sun coming up – the small outcropping at our campsite and a spot about halfway up the scramble to the summit of Halfmoon. Both vistas were a bit obstructed, but I was still able to capture some pretty morning color in the sky. The day was already warming, so we ate breakfast and packed up quickly.

Halfmoon Sunrise
Sunrise on Halfmoon Mountain. Below:  Our camp kitchen; Leaving camp in the morning along the German Wilson Trail; The German Wilson Trail is exceedingly rocky and steep in places.

Bucktail Trail Bucktail Trail

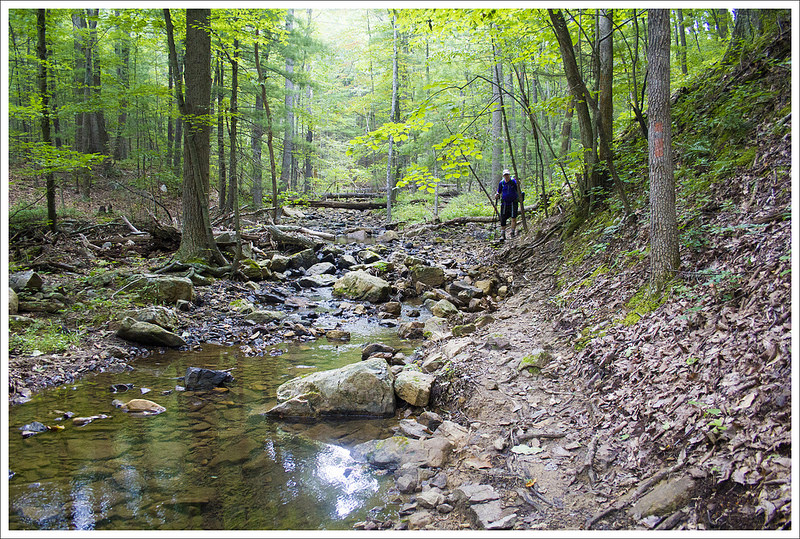
We made our way back down the Halfmoon Lookout Trail for several tenths of a mile to its junction with the German Wilson Trail. I don’t know what color I’d call the blazes on German Wilson Trail – purplish? fuchsia? magenta?  Something like that, I suppose. The German Wilson Trail descended very steeply over loose, rocky terrain. It wasn’t fun and I was very glad we had decided to hike the loop counter-clockwise and didn’t have to ascend this tough section of trail with full packs. The trail drops steadily for about a mile before coming to a grassy area with a shallow stream.

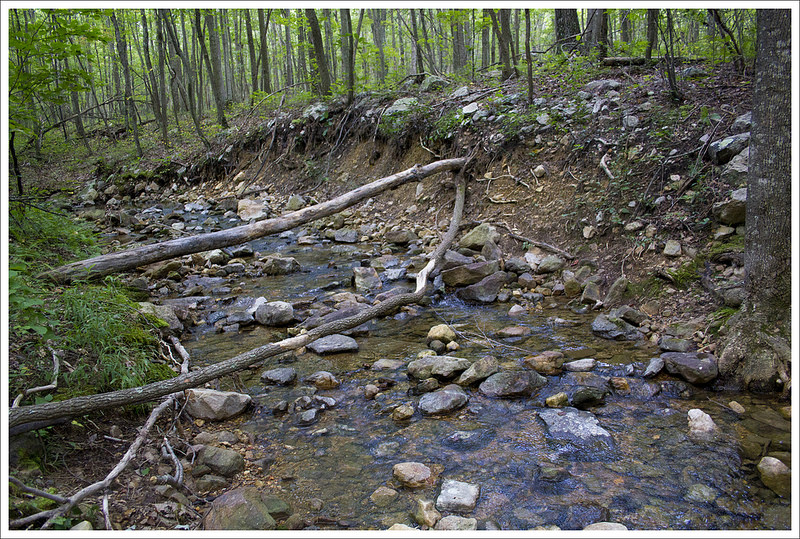
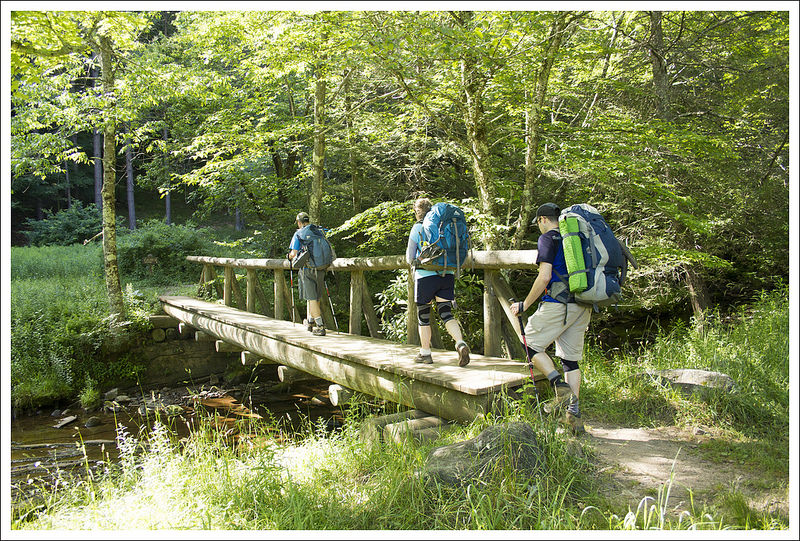
Look for a forest service gate to the left.  You should see the orange blazes of the Bucktail Trail.  The trail that continues toward the right is the Old Mine Trail – do not take this trail. Follow the Bucktail Trail, crossing the stream multiple times over the next .8 mile. When we hiked in August 2018, this section of the trail was in terrible shape. Big sections were washed out and we had to navigate by following sparse orange blazes.  Lots of sections of footbed were completely disappeared by debris and erosion. Hopefully some trail maintenance has been done over the last eight months.

Stream Crossings
There were many stream crossings on Day 2. Below: Arriving at the junction of the German Wilson Trail with the Old Mine Trail and the Bucktail Trail; Following the Bucktail Trail; There were numerous stream crossings on the Bucktail Trail.

 Bucktail
 Stream Crossing

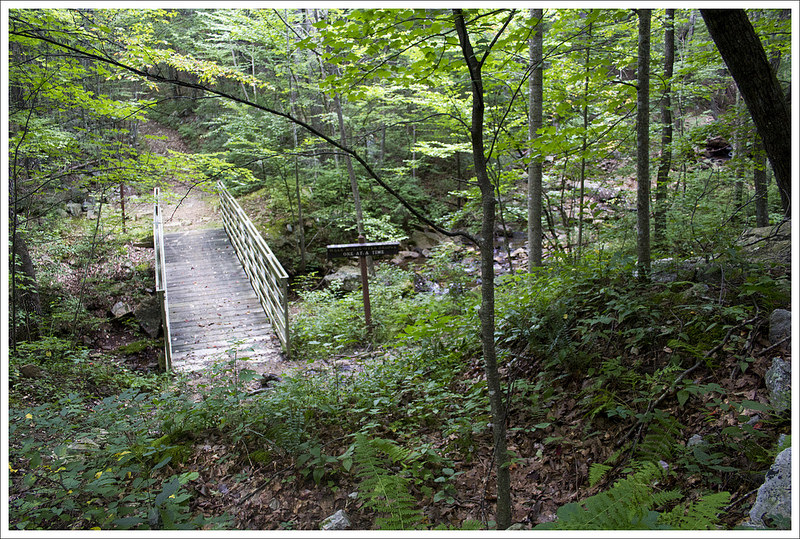
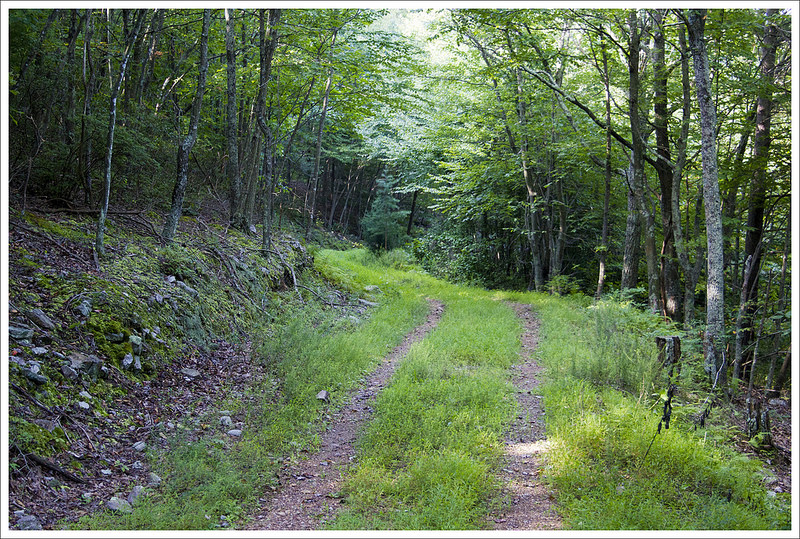
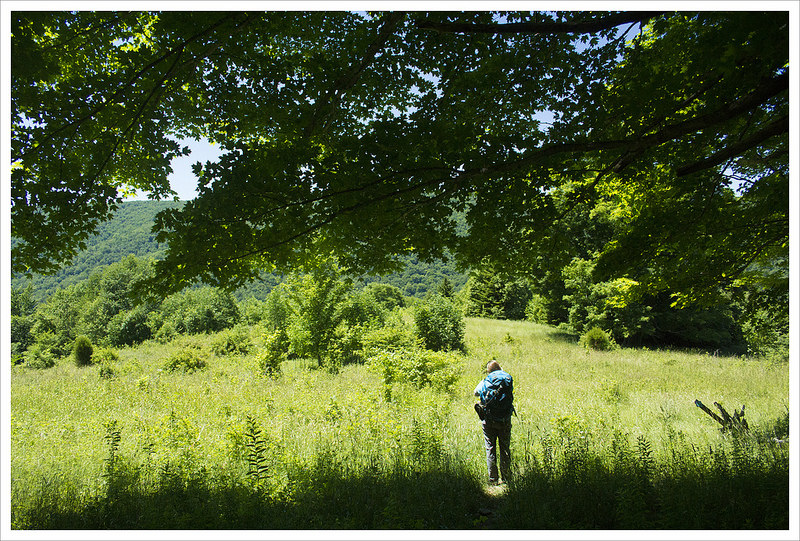
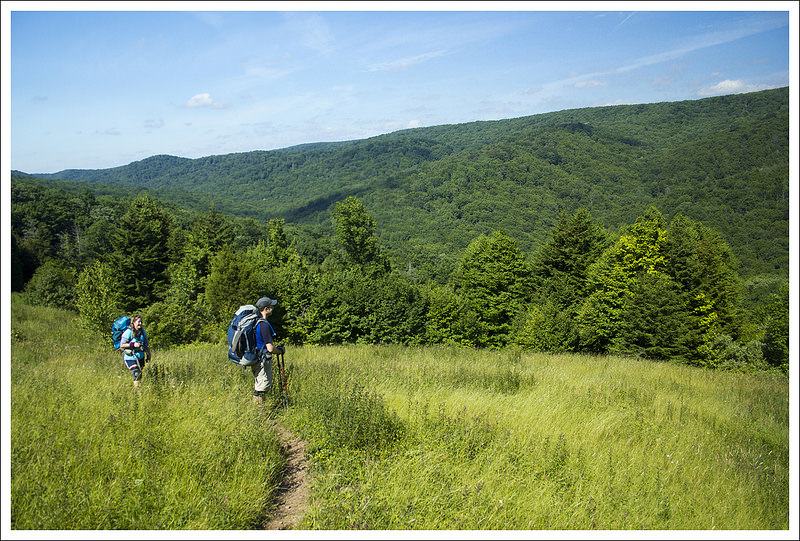
At 2.2 miles, you’ll come to a junction with the Cacapon Trail. That trail follows a small footbridge over the stream on the right.  Stay to the left and continue following the orange blazed Bucktail Trail. At this point, the trail becomes wide and grassy. It also begins to ascend again. This climb wasn’t difficult, but the grass was pretty overgrown and there was a lot of direct sun/heat. I also saw a ton of poison ivy mixing in with the grass. The climb felt worse than the numbers make it look.

Erosion Along the Trail
The trail was eroded and hard to follow in places. Below: Cliffs along the Bucktail Trail; This bridge takes you onto the Cacapon Trail; More scenes along the Bucktail Trail.  Much of the Bucktail Trail was a grassy, overgrown road.

Cliffs Bridge Near Cacapon Trail Overgrown
 Bucktail Bucktail

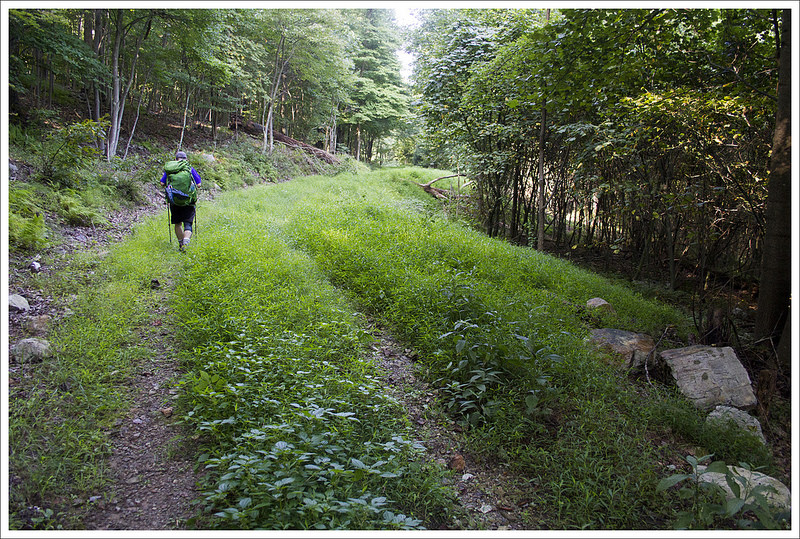
The last three miles on the Bucktail Trail were pretty dull. It was basically a trudge along a grassy roadbed back to the parking area. All in all, this hike didn’t really live up to my expectations. It was nice to get out after such a long backpacking drought, but this trail definitely is not destined to become a favorite. If I were to hike it again, I think I’d park at the Halfmoon Mountain parking area and just do this as a seven mile, out-and-back dayhike.

We got back to the car by late morning, so we decided to get some lunch and a cold beer before heading home.

Trail Notes

  • Distance – 10 miles
  • Elevation Change – Day One: 1545 feet, Day Two: 477 feet
  • Difficulty –  3.  This was a fairly easy backpacking route.  The first day has about a mile of serious climbing, but the rest is very gradual. The second day has a steep, rocky mile of downhill, followed by a bunch of stream crossings, and then a moderate climb along a forest road before gently descending back to the parking area.
  • Trail Conditions – 3.  The trail was in decent condition for national forest. The first day along the Bucktail Cutoff and Halfmoon Mountain Trail was excellent.  The second day had rougher trail conditions: the steep descent when you first turn onto the German Wilson trail had lots of loose softball to football sized rocks and was a bit challenging to walk on, there was a trail washout near the final stream crossing on the Bucktail Trail, and the road portion of the Bucktail Trail had loads of tall grass and poison ivy.
  • Views  3.  There are several vistas at and near the summit of Halfmoon Mountain, however they are all small and partially obstructed.
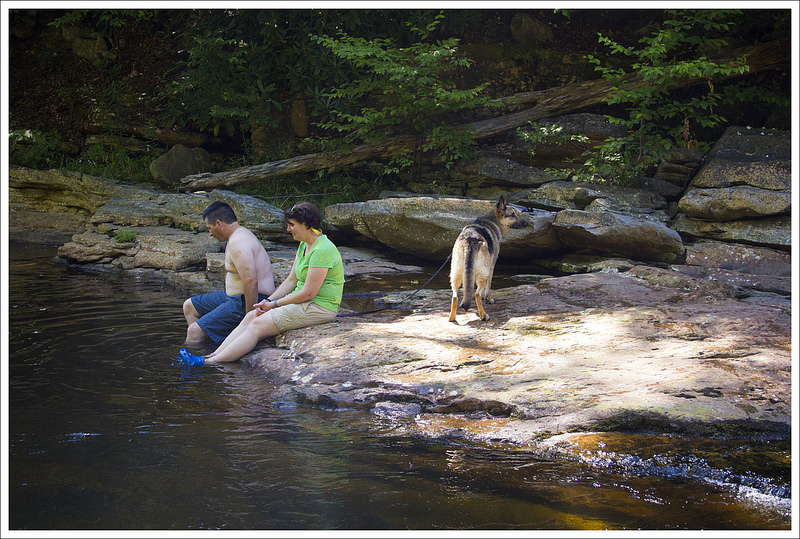
  • Streams/Waterfalls – 3.  There are nice streams on both day one and two, but the closest water source to the summit campsites is about 1 – 1.5 miles downtrail.  In drier times, I expect campers might have to walk up to 2.5 miles down from the summit for water.
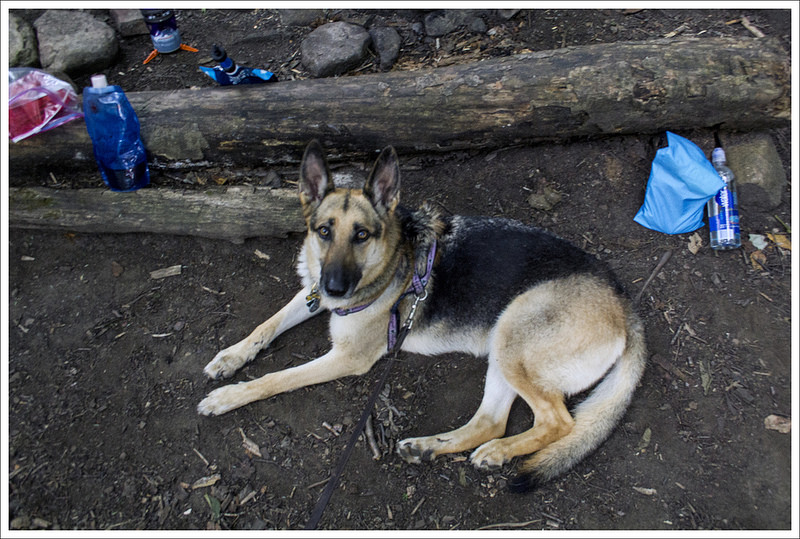
  • Wildlife – 3.  We saw several deer and had a whippoorwill at camp.
  • Ease to Navigate – 2.5.  The trail has spotty blazing and intermittent trail signs.  Blazes are not equally distributed for hikers headed in both directions, sometimes we had to look back to check for blazes to make sure we were on the same trail.  There are some trail washouts on the Bucktail Trail that make navigating the stream crossings a little tricky.  Also, many blazes are faded and painted in inconsistent colors (for example – the orange Bucktail Trail blazes were often closer to red).
  • Solitude – 2.  There is one small campsite and one large campsite near the summit. We had to share the large campsite with another hiking party.  There was also a steady stream of dayhikers visiting this peak.  

Maps

Download a full size map for DAY ONE.
Download a full size elevation profile for DAY ONE.
Download a full size map for DAY TWO.
Download a full size elevation profile for DAY TWO.

Directions to trailhead: Parking coordinates are 39.01431, -78.66388.  The parking area is at the top of a gravel loop right off Trout Run Rd.  The sign along the road will be for the Bucktail Trail.  Do not park at the lot labeled Halfmoon Trail – that is the 7-mile out-and-back route, rather than the loop outlined here.

Dolly Sods – Rohrbaugh Plains to Red Creek (WV)

This 10 mile (round-trip) hike takes you past some of Dolly Sods most beautiful scenery.  The dense rhododendron thickets, unblazed trails, and rugged terrain will have you feeling like you’re truly in the wild.  Camping along Red Creek is popular and can be crowded with weekend backpackers, but it’s still one of West Virginia’s most spectacular places.

View the Full Album of Photos From This Hike

Beautiful Red Creek
Beautiful Red Creek was our destination for this short overnighter. Below: Our excellent hiking crew (Maia the dog not included in the photo!);  Making our way onto the Rohrbaugh Plains Trail; The trail is only lightly maintained so you have to climb blowdowns and navigate without the help of blazes.

Our Hiking Crew Start of the Rohrbaugh Plains Trai Rohrbaugh Plains Trail

Day One…

Back in early June, we were at happy hour with our friends Christy and Brian.  Over beers, we cooked up a vague plan for a weekend backpacking trip in late July.  In the weeks to come, we added our mutual friend, Kris, into the mix and settled on a route.  The plan was to take two cars, and do a trans-navigation of Dolly Sods starting at the picnic area and ending at Bear Rocks.  It was about a 16 mile route with tons of camping options along Red Creek.

As it turned out, a heat wave settled over the mid-Atlantic that weekend.  It was the hottest, most humid weekend of the summer.  We still thought we could make the full 16 miles, so we met at Bear Rocks and shuttled in our car to the start point at the Dolly Sods Picnic area.  On the ride, we learned that you really can fit five adults, five big backpacks, and one German Shepherd in a Subaru Forester. It was like a clown car!

We parked at a small pullout near the picnic area, and picked up the Rohrbaugh Plains Trail on the opposite side of the road.  The trail meandered through dense rhododendron forest.  A lot of the rhododendron was Rosebay near the peak of its bloom.  So pretty! The air was thick, still, and heavy with humidity. It felt like walking through the jungle.  At one point, Kris said, “I feel like we might see monkeys!’

Meadows on the Rohrbaugh Trail
Walking through meadows. Below: Maia enjoys a shady pool under the rhododendrons; Walking across Rohrbaugh Cliffs; A nice spot for lunch!

Maia Enjoys a Shady Pool Arriving at Rohrbaugh Cliffs Lunch Stop

The trails in Dolly Sods are well-traveled but very lightly maintained.  There are no blazes.  The only wayfinding signs are at trail junctions.  There are lots of rocks, blowdowns, and mud pits to navigate. Even though the area is complete wilderness, the high traffic through the area keeps the trails apparent and fairly easy to follow.

We walked the Rohrbaugh Plains trail for about 2.5 miles before reaching the spectacular viewpoint off Rohrbaugh Cliffs.  The area is near and dear to my heart because it was one of the first places I ever camped in the backcountry. The cliffs offer great views across the valley to the Lions Head (another popular rocky outcropping in Dolly Sods) and down into the Red Creek basin.  Just past the cliffs, there is a patch of open forest with space for many tents.  It’s still one of the most beautiful campsites I’ve ever had the pleasure of staying at.

We decided to take a lunch break at the cliffs.  At first, the breeze across the open terrain felt nice.  Maybe the heat wasn’t so bad?  But after a few minutes of sitting in the direct sun, we were all pretty hot.  I could feel my shoulders starting to burn.  After lunch, we packed up and continued another .6 mile down the Rohrbaugh Plains Trail.  At 3.1 miles, we passed the junction with the Wildlife Trail.  We stayed to the left, continuing on the Rohrbaugh Plains trail.

We passed a small (mostly dry) waterfall and crossed over some extremely rocky footing. At 3.5 miles the Rohrbaugh Trail meets the Fisher Spring Run Trail.  We followed the Fisher Spring Trail to the left, beginning to descend for 1.2 miles.  At first the descent is smooth a gradual, but it becomes steeper and follows a couple switchbacks down to a rocky crossing of Fisher Spring Run.

Setting Up Camp
We set up camp at a large site along Red Creek. Below: Most of the trails in Dolly Sods are rocky; Crossing Fisher Springs Run before arriving at camp; Our campsite had a private swimming hole nearby.

Rocky Trail Crossing Fisher Spring Run Our Private Swimming Hole

After the crossing , the trail follows the stream on high ground.  There are several nice campsites at the bottom of extremely steep spur trails.  A few sections of this trail are quite eroded, leaving the trail narrow and precipitous.  Take your time and watch your footing, especially if you’re carrying a heavy pack.

At 4.7 miles the Fisher Spring Run Trail ends at the Red Creek Trail.  We took a right, following the trail down toward Red Creek.  In about three tenths of a mile, we passed the first of many stellar campsites.  At the very first one, I thought to myself, “That’s a really sweet campsite.  I wouldn’t mind sleeping here!’

Our group decided to take a break and discuss camping plans and how much of the route we wanted to cover on day one of our trip.  We all agreed that we were pretty hot, the campsite was ideal, and Red Creek looked really inviting.  We figured on day two, we could either hike 11 miles or hike out the way we came in and make our trip a short 10-mile out-and-back.

Adam and I explored several more campsites along the stream before agreeing that the very first site was the prettiest and most private.  There was easily space for four tents.  The ground was flat and clear.  We had easy access to water.  We even had a large fire pit with a stone couch someone had constructed. We all unpacked and set up camp. Maia, our friends’ German Shepherd, supervised the operations.  She was on her first backpacking trip ever, and she took to it like a pro!

Red Creek
Red Creek is a beautiful place to camp and swim.  Below:  Fun in the water and fun at camp!

Swimming in Red Creek Swimming in Red Creek Swimming in Red Creek
Swimming in Red Creek Enjoying Red Creek red creek 18

It was only around 2:30, so most of us spent the entire afternoon swimming and playing in Red Creek. The water was so cold and refreshing. The small rapids and waterfalls felt like hydrotherapy for our hot, tired muscles. Adam opted to restock everyone’s water and read a book at camp, but even he enjoyed splashing in the cold water near camp.

Around 5:00 we decided to get dinner started.  Everyone brought their own dinner, but Christy and Brian brought a shared dessert – Rocky Road pudding.  Kris contributed a two-bottle capacity bag of wine to the feast.  After dinner we played cards and sat around our campfire.  Even at 9:00 p.m., it was still 75 degrees.  That’s unusually warm for Dolly Sods at night!

Around 10:00 we let the fire die down, and everyone started retreating to their tents.  Adam and I opted to leave the rain fly off in hopes that it would keep us cooler.  Honestly, it didn’t really cool off until sometime around 3:00 a.m.  It was a steamy night and I was very glad to have left my sleeping bag home in favor of a light summer quilt.  I enjoyed falling asleep to the sound of the running stream.  Any time I woke up during the night, I took a moment to marvel at the brilliance and magnitude of the stars in the sky.  It’s such a gift to be able to visit places like this and have good friends to share the experience. I felt so fortunate that night in my tent.

Day Two…

The next morning we awoke at daybreak.  We thought Maia would have woken up the group, but she was a perfect camp companion and let us get up when we wanted.  We enjoyed some of Christine’s homemade granola with Nido and then made our way back to the car.  With a warm night and temperatures climbing quickly in the morning, we decided to get an early start to get back to our cars before the temperatures peaked in the afternoon.  It is always uncomfortable when you feel like you never had a chance to cool down, so everyone felt hot within a few minutes back on the trail.

Camp Dog
Maia did great on her first backpacking trip. Below: Hiking back out the way we came in!

Hiking Out Hot and Humid More Rocks to Cross

We climbed back up the steep Red Creek Trail and Fisher Spring Run trail very slowly as we were all quickly drenched with sweat.  We got back to the junction with the Rohrbaugh Trail in about 1.5 miles and we knew our toughest work was behind us.  In another .4 miles, we reached the junction with the Wildlife Trail and took a right to make our way to the Rohrbaugh Cliffs again.  We paused for a snack and some more pictures from Rohrbaugh Cliffs, which is probably my favorite spot in Dolly Sods.  Looking over the creek and seeing nothing but mountains around you is a scene that begs you to pause and appreciate nature.

Rohrbaugh Cliffs
Taking in the view from Rohrbaugh Cliffs. Below: The small waterfall along the Rohrbaugh Trail was running very low; Climbing on the rocks of Rohrbaugh Cliffs; Back to the Forest Road.

Small Waterfall Rohrbaugh Cliffs The End

With the strong sun beating down, we decided to press on and continue our journey back to the car.  We made our way back fairly quickly, passing by a group of about 10 women that were enjoying the weekend as well.  We got back to our car just a bit before lunch and carpooled Christy, Brian, and Maia back to their car.  We had a great adventure together and we were really glad to share this amazing piece of wilderness.  We parted ways with Christy and Brian, and Christine, Kris, and I headed to Lost River Brewing Company in Wardensville, WV for some celebratory beers and food.  It was a great trip, but we vowed to return when it isn’t the hottest weekend of the year to do the traverse across Dolly Sods like we originally planned.

If you are looking for a hike or overnight trip that combines majestic views, creeks with a waterfall and swimming possibilities, and great overnight camping, this may be a perfect one to experience.

Trail Notes

  • Distance – 10 miles
    (Check out the stats from Map My Hike [Day One] [Day Two])*
  • Elevation Change –  1480 feet
  • Difficulty – 3.  The elevation gain/loss is moderate, but the rugged nature of the footing adds difficulty to this route.
  • Trail Conditions –  2.  Trails are unblazed.  Be prepared for mud, blowdowns, and lots of rocks.
  • Views – 5.  The view from Rohrbaugh Cliffs is pretty spectacular!
  • Waterfalls/streams – 5.  You will want to spend all day enjoying the beautiful rapids and waterfalls along Red Creek.  This is some of the best stream swimming in West Virginia.
  • Wildlife – 2.  We saw a white tail doe with two fawns on the drive in, but generally the woods were quiet and we didn’t feel like there was much wildlife in the camping area.
  • Ease to Navigate – 2.  There are no blazes, but junctions were marked, and the trail was generally easy to follow.  Navigation gets trickier near Red Creek where you depend on cairns to mark stream crossings.
  • Solitude – 3.  This is tough to call!  We saw almost nobody on the trail when we were hiking, but there were many people camped along Red Creek.

MapMyHike is not necessarily accurate, as the GPS signal fades in and out – but it still provides some fun and interesting information.

Download a trail map (PDF)

Directions to trailhead:  GPS Coordinates for Parking are 38.962019, -79.355024. From Seneca Rocks, go North on WV 28 for 12 miles.  Take a left on Jordan Run Road.  Go one mile up Jordan Run Road and take a left on to Forest Road 19.  In 6 miles, Forest Road 19 comes to a T on to Forest Road 75.  Take a right, heading north on Forest Road 75.  Drive for about eight miles until you reach the Dolly Sods Picnic Area. The Rohrbaugh Plains Trailhead will be across the road from the picnic area.

Spruce Knob – Seneca Creek (WV)

This 16.5 mile overnight backpacking trip has cooler temperatures in the summer, beautiful streams and waterfalls, high mountain meadows, abundant berry bushes, and even an old plane wreck to explore. It’s a great change of pace from hiking the Appalachian Trail.

View the Full Album of Photos From This Hike

Hiking Along the Huckleberry Trail
The high meadows along this hike were beautiful! Below: Backpacks in the car; Everyone checks out the information at the trailhead; Suzanne picks ripe blueberries along the Huckleberry Trail; The Huckleberry Trail passes through several small meadows; Spruce-shaded areas on the Huckleberry Trail; Signage along the way.

Backpacks in the Car Getting Started Blueberry Picking
Views from the Huckleberry Trail Spruce Trees in the Sun Trail Sign

Day One…

Initially, we  planned on doing very little hiking in July this year.  Our goal was to stay out of the heat and to rest up a bit so we wouldn’t overdo things before we tackle our trip to New Hampshire later this summer.  But the weather was too nice and we had lots of invitations to go hiking.  Over the 4th of July weekend, our friends Anthony and Suzanne suggested we go on a backpacking trip together.  We always enjoy hiking with them, so plans were made to hike in the Spruce Knob area.  This was actually the second 4th of July weekend we’ve spent on the trail with Anthony and Suzanne.  A couple years ago, we did a trip to Dolly Sods.

Our friends came down and spent the night before the trip at our house. We divided up some group gear and then packed the car and headed out fairly early to start our trip.  We arrived at the trailhead mid-morning.  We saw the short trail to the Spruce Knob summit fire tower, but we decided to visit that at the end of the loop the next day to feel like we had truly earned it.  Spruce Knob is the highest peak in West Virginia.

The printed maps we have found of this area are fairly outdated and online maps also don’t have the trails completely accurate.  The best map I have found of the entire area has been from Mid-Atlantic Hikes and it may be helpful to bring that along since there are lots of trail options here.

Descending to Junction
Adam descends to our junction with the Lumberjack Trail. Below:  Anthony makes his way along the Lumberjack Trail.  The trail has a reputation of being sloppy/muddy, but it wasn’t too bad when we visited; Someone moved a piece of the plane from the wreck site up to the trail – probably to mark the spot; Even after 4+ decades on the mountainside, the plane wreck is still mostly intact.

Walking the Lumberjack Trail Plane Window Fuselage
Mud Nettles First Large Meadow

We started off our first day of the hike on the Huckleberry Trail (TR533).  The trail starts off with a little bit of crushed gravel on the trail, but that goes away in a short distance.  This first section of the trail was fairly flat or downhill and alternates from going from dense Spruce forests to more open fields. There are numerous dry campsites along the trail. In the fields, we found tons of blueberries that were just starting to ripen.  We stopped along the way for a few handfuls before pressing on.  At 3.4 miles, you will reach a campsite and a sign that points to the trail going right.  Follow this trail and in another short distance, you’ll come to another sign pointing you to go left as the trail winds around a dense forest area.  You’ll soon reach another sign that shows that the Lumberjack Trail is .4 miles away.  The last .4 miles of the Huckleberry trail drops rather steeply to the large trail junction at 4.7 miles.  Take a right at this junction to join the Lumberjack Trail (TR534).

The Lumberjack Trail is a relatively flat trail.  We were warned that it can be very muddy and wet, but we found that even after some recent heavy rains there were only a few 20-foot sections that had mud to slog through.  Most of the trail had rocks or logs placed that saved us from having to get our shoes wet or muddy.  Around mile 5.8, we saw a plane door hung on a tree and a short, yet steep trail that led down to plane wreckage (a Piper PA-23 that crashed here in 1973 with two casualties).  Be respectful if you decide to visit this site.  We stayed on the Lumberjack Trail until it came to a junction with the High Meadows Trail at mile 6.7.  Take a left to join the High Meadows Trail (TR564).

The High Meadows Trail was the most overgrown trail we came across.  There were times that it felt like we were bushwhacking.  There are stinging nettles everywhere along the trail and grass was up to our knees in some portions.  The High Meadows Trail also has alternating landscapes; you will go from dense forests to large open meadows several times.  Keep an eye out for blue blazes on posts or trees as you navigate through these high grass areas.  The trail descended through these gorgeous meadows and it is not surprising that we were thinking of the Sound of Music when we were walking through these fields surrounded by mountains.

High Meadows
The high meadows on this hike were so beautiful!  Below: Adam admires the high meadows; Grass in the meadows was tall;  There were several meadows separated by short sections of shade;  Most of the shady spots were densely overgrown with berry brambles; Black-eyed susans; Adam crosses out of the final meadow.

Adam in Meadow Meadow Walking Shade Between Meadows
Overgrown Susans Leaving the Meadows

Eventually, you will enter into the woods again and cross a small creek.  At 8.6 miles, you will reach another trail junction. Take a right here and you will descend even more as you make your way through a scenic forest landscape.  You will soon hear water flowing from Seneca Creek below you.  The trail crosses the creek and comes to a junction with the Seneca Creek Trail at 9.1 miles.   At this point, you will cross Seneca Creek to reach the trail on the other side.  The water was flowing to make a nice small waterfall.  Before we crossed, we ventured just a short distance (about 75 yards) to the right down the Seneca Creek Trail and came across one of the most beautiful waterfalls/swimming holes I’ve seen – Seneca Falls.  We dropped our bags on the trail and scrambled down to reach the base of the falls.  There was a large cavernous rock overhang to the right of the falls.  In the water, we could see brook trout swimming around, occasionally breaching the water to catch flies that were dancing along the water surface.  Once we climbed back up from the basin, another group came down to the falls jumped into the swimming hole at the base of the falls.  From the screams when they jumped in, we could tell the water was extremely cold.  We made our way back to our original junction and then determined the best place to cross the creek was at the very top of the small waterfall.  We all made it across safely.

Christine hit a wall with her energy level, so we stopped a few minutes to eat a snack on the opposite side of the creek at a nice campsite.  Knowing we still had a distance to go, we pressed on further.  The Seneca Creek Trail went to the side of Seneca Creek for the entire way.  We crossed the creek in a couple of places.  Around mile 10.4, we began to see a ton of campsites.  We were surprised to see that there were so many people that were camped here overnight.  When we kept passing people on the trail, we felt that we would have our picks of campsites, but we didn’t realize how many people come here a different way (mostly from the lower Spruce Knob parking lot and taking the Seneca Creek Trail to these campsites).  Anthony and Suzanne hurried ahead, while I waited a while for Christine to try and regain her strength.

Seneca Falls
Seneca Falls is an impressive waterfall with an emerald green plunge pool. Below: Leaving the high meadows for Seneca Creek; A small waterfall above Seneca Falls; A side view of the falls; The trickiest of the stream crossings; Pretty wildflower; Lovely Seneca Creek.

Start of the Seneca Creek Trail Small Waterfall Seneca Falls
Crossing Wildflower Seneca Creek

We caught back up with our friends soon and they had claimed a gorgeous campsite (even though it was hard to imagine a bad one here) at 10.6 miles that was near a waterfall that plunged into the creek.  While there were lots of larger groups out here, we found a nice, secluded campsite that had a nice waterslide that created a babbling brook sound throughout the night.  We set up camp and started to make some dinner.  I always enjoy bringing a card game with us when we do an overnight backpack and this time I brought the game Hike.  It was pretty brainless fun and plays similar to Uno with specialty cards that create twists in the game.  It was starting to get dark, so we created a small, but nice fire in the pit.  Once the sun set and the fire died out, we retired to our tents.  It may have been the sound of the brook, but I probably slept the best I have ever slept backpacking that night.  What a great first day!

Campfire
The evening concluded with dinner, card games and a great campfire. Below: There were abundant rosebay rhododendron all along the stream; Our campsite had nice, flat space enough for 2-3 tents; We also had a pretty waterfall and pool for our water source.

Rosebay Camp Filtering

Day Two…

As usual on backpacking trips, we both woke up right around first light. We spent a little while longer in our sleeping bags, chatting and stretching.  It was a chilly morning, so we weren’t quite ready to climb out into the cold.

Eventually we emerged from our tent to start the day.  I put on gloves and a light jacket and  headed downstream to take a few photos of the big waterfall at the next campsite over.  The folks camping there had packed up and departed very early.  Adam went to get the bear bags down while I took photos.

Campsite Falls
One lucky group gets to camp on a site right across from this pretty waterfall.  Below: Our campsite in the morning; You can see smoke from other campsites downriver; Crossing the footbridge across Seneca Creek before our big uphill climb.

Campsite in the Morning Downriver Footbridge

We got everything out for breakfast and started taking down our tent, rolling up sleeping pads and stuffing our sleeping bags back into compression sacks.  I decided that I was going to eat a huge breakfast, so I wouldn’t bonk again on our second day of hiking.  Adam didn’t go into much detail in his day one post, but right around mile ten of our hike the day before, I hit a wall – HARD! It was right after we visited Seneca Falls and crossed the stream.  I sat on the ground and told everyone that I was feeling really lightheaded and sick.  I didn’t feel hungry.  I had been drinking water all day.  Regardless, my legs just felt like jelly and I just didn’t want to walk another single step.  Adam, Suzanne and Anthony all told me that they thought I needed to eat.  Turns out they were right – I had been hiking for ten miles with a 25 lb. pack on under 700 calories.  I guess I just didn’t realize how little I had eaten until I did the calorie math.  My appetite always goes away when I’m doing strenuous activities.  Usually, it doesn’t cause problems and I just eat when I get to camp.  I guess this time I just expended all my short term energy before we finished for the day.  I need to do a better job forcing myself to eat enough.

Alright… off that tangent and back to breakfast!  As promised, I ate a large breakfast – oatmeal, cheese, a honeybun and coffee.   It was about 600 calories of food and much more in line with my energy needs for a tough uphill and 6 miles of hiking.  Everyone had eaten and packed up camp by around 9:45 and we were on our way again.

Final Meadow
Adam climbs steeply uphill across our final large meadow of the hike.  Below: Anthony and Suzanne take a look back toward Seneca Creek;  We had spectacular skies; Making progress back to our start point.

One Last Look Toward the Creek Beautiful Skies Trail Sign

We had a short distance left to walk along Seneca Creek.  Within about a quarter mile, we reached a small wooden footbridge across the stream.  We crossed and continued uphill on the Seneca Creek Trail.  The steepest climbing was across a beautiful, expansive meadow.  We got great views of the valley and our last glimpse into the Seneca Creek watershed.  The high meadows on this hike are truly majestic and are definitely one of the trip’s highlights.

After crossing out of the meadow, we continued uphill through the woods back to the four-way junction of Seneca Creek/Lumberjack/Huckleberry.  Staying straight took us back onto the Huckleberry Trail.  From there, we retraced our steps from the day before.  It was a little slower going and felt longer on the second pass.  It was all uphill and everyone was a little tired.  It’s always funny how different the same four miles can feel under different circumstances.

Adam on the Huckleberry Trail
Hiking the Huckleberry Trail reminded us of hiking in New England.  Below: More lovely views from the Huckleberry Trail;  The trail was often paved with rock; A well-appointed campsite on the Huckleberry Trail; Ripe berries; A view from the talus slope.

Huckleberry Views Laurels Campsite
Ripe Berries Talus

We enjoyed the sunny, unseasonably cool July weather.  We stopped and picked many blueberries along the walk back.  I also took a little side trail from one of the meadows and found a talus slope with nice views across the mountains.

We got back to the car around noon.  We threw our packs into the back of the car and took the short, flat walk to check out views from the observation tower atop Spruce Knob.  It’s just a short quarter mile walk and well-worth the extra time and steps.  We spent some time enjoying the lofty views and cool breezes.  Anthony, Adam and Suzanne decided to walk to one more nearby viewpoint on the Whispering Spruce Trail.  It was just a tenth of a mile down the trail and provided even more spectacular views.  I headed back to the car to eat some more candy and switch my trail shoes for flip flops.

Tower Views
Anthony and Adam take in views from the observation tower on Spruce Knob.  Below: Views from the tower; The hiking crew; Views from the Whispering Spruce Trail; The tower.

Views Hikers Whispering Spruce
Observation Tower

After a few minutes, everyone was back at the car and we were on our way back to Harrisonburg for a celebratory meal and beer.  We all decided that Jack Brown’s was the best spot for lunch.  They have fantastic gourmet burgers and a great beer list.  It’s a perfect post-hike indulgence.

We couldn’t have asked for better weather, scenery, or company for this 4th of July weekend backpacking trip.  After lunch, we bid farewell to Anthony and Suzanne.  They’re such great hiking buddies and we always feel lucky when we get to hit the trail together.

Trail Notes

  • Distance – 16.5 miles [Day One] [Day Two]
  • Elevation Change – About 2300 ft.
  • Difficulty –  4.  The distance makes it fairly tough and the second day has a lot of uphill on the trail. 
  • Trail Conditions – 3.  Most of the trail was well-maintained.  The High Meadows Trail was quite overgrown.  There are some rocky, loose sections on this trail too, which can be a little rough on the feet.
  • Views – 5.  The best views are from the Spruce Knob trail near the fire tower.  The fire tower has wonderful views, but once you take the .5 mile trail around the fire tower, you will have gorgeous, breathtaking views from the highest point in West Virginia.  The views along the main backpacking trip were mostly during the High Meadows Trail.  There are gorgeous mountain views and no sign of civilization. 
  • Wildlife – 3.  There were lots of birds to be found on the High Meadows Trail.  We did have a deer visit us several times at camp. 
  • Ease to Navigate – 2.  The Huckleberry Trail and High Meadows Trail could use more signage.  I would suggest printing out our step-by-step desciption and bringing the midatlantichikes map to help guide your way. 
  • Solitude – 2.  This is a popular spot for people to do overnight camping.   Expect to see lots at the campsites, but you will have more solitude until you get to Seneca Creek. 

Download a Trail Map (PDF)

Directions to trailhead:  Directions vary so greatly depending on the direction you’re coming from.  Please refer to the trailhead marked on the map below to determine your best route.

North Fork Mountain to Chimney Top (WV)

This 6-mile hike is a bit challenging – tough climbing and a little hard to follow – but payoffs at the end make the effort well worth your while.  The views are spectacular – some of the best in the mid-Atlantic!

View the Full Album of Photos From This Hike

Amazing views from Chimney Top!
Amazing views from Chimney Top! Below: Adam checks out the trail information board; The spine of the mountain offers many magnificent views, if you’re willing to do a little climbing.

Trail Sign Scaling the Spine

Adam Says…

Our first experience hiking on North Fork Mountain was on my birthday in 2012 (birthday hikes are a tradition for us!) We decided tackle a little piece of the the trail from the base of the mountain to the well-known outcropping of Chimney Top.  This August day ended up being one of the hottest days of the year.  While hiking up the backside of this mountain, there was absolutely no breeze so the air was stifling.  We were quickly questioning why we chose this one, but we had to press on for tradition’s sake.  We reached the ridgeline and walked along for a while.  We eventually came across a few rocks that seemed to denote a path up.  We semi-bushwhacked up this trail and came to a rock column and climbed up to the top to enjoy the views.  We thought this may have been Chimney Top.  When we got back home and did more research, we realized we hadn’t found the true Chimney Top, so we vowed to return – and we did… on our sixteenth wedding anniversary in fall 2013.

First Outcropping
The first outcropping offers stunning views. Below: The view in the other direction from the first outcropping,

Views from Ridge

It was a perfect October day with the leaves just a shade past peak.  One of the difficulties about this trail is there are no solid online resources for maps and even using our mapping software (alltrails.com), the full trail doesn’t appear on any kind of topo maps.  We used our MapMyHike app on our phones to try and get accurate readings and I traced that outline on a topo map through alltrails.com to try and get a good resource if you want to attempt this hike.

We arrived at the small parking area and made our way up the trail.  The trail meanders for the first two miles through the woods with some slow switchbacks to help you gain elevation.  The thick canopy is high above you, but you will notice you will rarely feel much wind on this side of the mountain.  Around 1.5 miles, you make a steeper ascent up the mountain and reach the top of the ridgeline around 2.0 miles.  Once you reach the top, you can see down below to the North Fork of the South Branch of the Potomac River and WV-28/55 on the other side.  Both times we have been, you can see dots of people fishing in the river.  Across the way, you will see ridges of mountains with Canaan Valley hidden behind them.  Looking along the ridgeline, you’ll see sheer cliffs of rock, making this quite a remarkable scene.  From this ridgeline, we continued along the path.  The trail stays on the ridgeline allowing for several opportunities to check out the views for the next .5 mile.  Around 2.5 miles, the trail has been rerouted away from the ridgeline and you descend the mountain.  The signs say that it was to protect the nesting/hatching peregrine falcons, who have nested on the cliff faces. The signs are at least five years old, and October is not nesting season, so we’re not sure if the signs are still valid.

Fall Color
Fall color was pretty nice!  Below: The trail is often rocky and rough; Adam walks along the increasingly hidden trail.

Rocky Spine Tough Trail to Follow

The trail continues through this terrain for another .5 miles and then starts to gain elevation again.  At 3.0 miles, we came to a well-established campsite and could see the ridgeline just above it.  I walked over to the ridge, but the views were fairly obstructed.  I then saw a smaller campsite to the right of the trail.  Going to that campsite, I walked a short distance behind it on a small trail towards the ridgeline to discover the elusive Chimney Top.  The photos we will place should lead you to the proper campsite that leads to the correct trail.  We ate some lunch from the top of the cliffs near Chimney Top  Exploring a little around this area, you are able to see a most-impressive cliff face (where I’m assuming is the section protected for peregrine falcons).

After we ate our lunches and took in the scenery, I decided I wanted to try to climb up Chimney Top.  I had to find some good footholds, but I was able to get up without too much trouble, but please be careful if you try to do the same.  There are many sheer drops from here, so I wouldn’t advise any unsupervised children to be given free reign on this hike.  Head back the way you came to make this a 6 mile out-and-back.

I do believe that the scenery from this spot is one of the most dramatic and beautiful views you will get in Virginia and West Virginia.  The trail was called the best trail in West Virginia by Outside magazine in 1996 and I can see why.  Some people like to backpack the entire 34 miles of North Fork Mountain.  Since you are at the top of the ridgeline for this hike, there isn’t a reliable water source to be found so you would need to pack in a lot of water for this backpacking trip.  I would strongly recommend trying this hike on a beautiful spring or fall day.

Christine Says…

I’ll admit – I’m the reason it’s taken over three months to get this hike posted.   A foot injury, a lingering cold, and the unusually frigid temperatures have sent me into a state of lassitude.  I haven’t felt particularly motivated to hike or write.  I’m sure I’ll snap out of it completely sooner or later.  But today, I decided to give myself a little push and get this post live!

Fall foliage and amazing views.
Fall foliage and amazing views. Below: Adam checks out one of the campsites; A nice view of the cliff face along the mountainside.

Campsite The Cliff Wall

We were really excited to try this hike again.  Our trip on Adam’s birthday had been rewarding even though we missed out on the main view.  We started the morning with a big breakfast at Bright Morning Inn (Pumpkin Pancakes with Walnuts and Maple Butter Sauce!).   It’s one of our favorite places to eat in Canaan Valley/Davis – everything is always excellent there!

After parking, we started climbing the mountain, following the familiar ground we had covered the previous summer.  We spent a little time exploring the first of several impressive rock outcroppings on this hike.  While there, we took some time to chat with the only other two people we saw on the trail – a couple from Pennsylvania.  They were recent empty-nesters and were returning to backpacking for the first time in 20+ years.  They still had all their gear from the late 80’s/early 90’s – external frame packs, old fashioned sleeping pads, and I think I may have seen something cast iron!  It looked like a heavy load!

After leaving the first view, we pushed along the trail, passing the spur trail to our lunch spot from the 2012 attempt.  This spot is marked by a rock cairn and the worn footpath is well established.

I thought this rock formation near chimney rock looked like a tortoise.
I thought this rock formation near Chimney Top looked like a tortoise. Below: More views; Adam checking out another rock outcropping along the way.

More Views Another Outcropping

The route follows a series of rolling hills after passing the spur trail.  I thought the trail was pretty hard to follow along this section.  It’s a reroute, and vestiges of the old trail are still apparent.  It may have been because the trail was under so many leaves, but I still think the reroute isn’t fully established.  As we continued along, I asked Adam how much further we should go.  According to old information, we had hiked far enough to be well past Chimney Top. As it turns out, the reroute is just longer and follows a wide arc around the preserved cliff face.

Eventually, we reached a spot with numerous campsites.  That’s usually a good indicator that you’re near something desirable to hikers/campers.  In this case, spotting the campsites let us find yet another unmarked trail that led out to the spectacular view from Chimney Top.

We spent quite a while up there, enjoying the fall foliage and awesome views, eating our lunch and taking photos.  The hike back went very quickly… mostly downhill and along a route that felt a little more familiar.

Trail Notes

  • Distance – 6.0 miles
    (Check out the stats from Map My Hike)*
  • Elevation Change – 1725 ft.
  • Difficulty –  3.5.  The trail has some decent climbing on it.  Both times we’ve hiked it, there wasn’t any wind until the top, so the temperatures can be stifling. 
  • Trail Conditions – 1.5.  Trails are largely unmarked with reroutes not always clear.  Finding the actual viewpoint of Chimney Top can be a little challenging.  Watch out for loose rock on the ridgelines in case you go to check out any views.
  • Views – 5.  Absolutely stunning views and great ridgeline walking. 
  • Streams/Waterfalls – 1.  From way above, you’ll see North Fork Gap.  There isn’t a water source on this trail.
  • Wildlife – 1.  We barely saw squirrels, but you may have some views of preying birds.  Watch out for timber rattlesnakes on the rocky ridgeline.
  • Ease to Navigate – 2.5.   There is basically one trail to follow here, but it can be tricky finding Chimney Top.
  • Solitude – 4.5.  Typically, you’ll only see a few people on this trail.  Most will go to the first overlook and stop.

Download a Trail Map (PDF)

Directions to trailhead:  From Seneca Rocks, WV head northeast on WV-28N/WV-55E for 15.2 miles.  Take a right on to County Route 28/11/Smoke Hole Road.  You immediately cross a bridge where you may see people fishing in the stream.  In about .4 miles, there is a small parking lot on the right-hand side.  You’ll see the brown board which denotes the start of the trailhead.

MapMyHike is not necessarily accurate, as the GPS signal fades in and out – but it still provides some fun and interesting information.

Murphy-Chambers Farm – Harpers Ferry

This 2.2 mile route is more of a historic stroll than a true hike, but it’s definitely worth doing if you’re in Harpers Ferry and don’t have time for more significant hikes, like Weaverton Cliff, Loudon Heights or Maryland Heights.

Cannons on Murphy Farm
This short hike has a lot of interesting history. Below:  Meeting Jennifer Pharr Davis, Brew Davis and baby Charley; Berries on the trail; The beginning of the route.

ATC Talk Berries Trailhead

Adam Says…

We took a trip to Harpers Ferry, WV primarily to meet Jennifer Pharr-Davis, the current record-holder with the fastest time to hike the Appalachian Trail.  She was giving a talk at the Appalachian Trail Conservancy to promote her new book, Called Again,  and talk about her experiences hiking the Appalachian Trail.  The center holds archives of all the thru-hikers that have made it to this halfway point and while we waited for her talk to begin, we browsed around the center and looked through the photo archives to find some of our friends that had thru-hiked in years past.  We found Jennifer’s talk to be truly inspirational and she took several questions about her experience.

After leaving the center, we decided to take advantage of being in the area and headed to Harpers Ferry National Historic Park.  We drove up to the Visitor Center.  At the gate, there was a line of cars and one car was taking a long time to get through.  While I wasn’t feeling particularly patient either, the car in front of us was shouting for the car ahead to move along.  When this car finally got to the gate, they yelled at the park ranger for being too thorough with the other people’s questions.  They ended up just turning around since they were too mad to enjoy the park.  We felt so bad that the park ranger had to take this abuse.  We paid our $10 entry fee and parked near the Visitor Center.  We talked to the staff there and asked for an idea for a quick hike.  The staff member recommended this hike to us, since she said this had some of the nicest views of the Shenandoah River.  We filled up our water bottles and began our hike.

River View
A view of the river. Below; Stairs climb into the woods at the beginning of the hike; First views; Cannon

Steps View from Trail Cannon

The temperature was scorching this day and we hit the trail in the peak of the afternoon heat.  We both talked about how much we hate the heat of the summer.  Give me fall or spring hiking days any time over humid, hot summer days.

The trail starts from behind the restrooms of the Visitors Center and across the main road.  As soon as you cross the cross the road, the trail bears a sharp left, skirting the tree line.  The trail then goes deeper into the woods and begins a descent including a sharp switchback.  At about .25 miles, the trail crosses a bridge over the small creek and then begins a short climb uphill.  Once you reach the top, the trail opens up to houses on the right and a large field on the left.  We took a sharp left, which hugged the tree line down a path that was cut into the tall grass.  The shade of the trees gave us a little protection from the sun beating down, but it wasn’t quite enough.  At .5 miles, the trail approaches the back of the Murphy-Chambers House.  We decided to continue on and see the house on the return trip.  We continued along the trail and at .9 miles, we reached the John Brown Fort foundation.  John Brown was such an interesting character in American history and I remember writing a paper in college about his activist behavior.   A short distance from the foundation, the trail dips into the woods for the view of the Shenandoah River.  You get a nice view of the river and we weren’t surprised to see large rafts floating down the river.  We continued from this point to take a right at the next junction (rather than continuing on to the earthworks) to head back to the Murphy-Chambers House.  The trail follows a rather straight path and there wasn’t any shade to be found from the sun at this point.  At 1.2 miles, we reached an area of cannons and learned about how Confederate General A.P. Hill maneuvered his troops to a fortified position on this hill.

From here we continued on the trail which led to a gate keeping an unpaved road from going any further.  There is a parking lot here and a path to the right leads to the Murphy-Chambers House.  The Union took over this farm in 1862, ousting the Chambers Family.  While he tried to claim restitution for his property, there is no evidence that he was ever paid.  In 1869, Alexander Murphy re-established the farm.

We continued along the trail on the unpaved road until we reached the junction again that led back into the woods at 1.5 miles.  We followed the trail back to the Visitor Center and our car.  While the day was incredibly hot, it was nice to get out and stretch our legs and learn a little about the history that shaped this area.

Christine Says…

If the weather had been cooler or if we’d had more time, we would have opted to take one of the longer hike options in the area.  But after spending Saturday visiting Charlottesville-area wineries (Horton and Barboursville), touring James Madison’s Montpelier and enjoying a huge dinner at the Barbeque Exchange, we got a very late start on Sunday morning.  So late, in fact, that we were worried about making it to Jennifer Pharr Davis’ talk in time.  The original plan had been to have a leisurely lunch in downtown Harpers Ferry and then make our way to the ATC.  As it turned out, we ended up wolfing down Subway in Charles Town and making it to the talk just in time.

Murphy Farm
The Murphy-Chambers Farm; Adam checks out route options, John Brown historical site; Rafters

Checking the Map John Brown Historical Site Rafters

Jennifer’s talk was everything I hoped it would be and more!  I will never be a tenth of the athlete that she is, but she inspires me to get out there and challenge myself.  She loves the Appalachian Trail, and despite all the amazing places she has hiked, the AT is still her favorite.  Some people might think that setting a speed record on the trail would preclude appreciating or enjoying the beauty and the experience of nature.

But after hearing her speak and reading Called Again, I believe she found new levels of beauty, love, and personal fulfillment.  People hike the trail for a variety of reasons – to see scenery and wildlife, to engage in self-discovery, to challenge oneself physically or to form/deepen personal relationships.  Jennifer may have flown across the trail in a mere 46 days, but she still had all the experiences you would expect a person to have along the way.   I really enjoyed Jennifer’s first book Becoming Odyssa, but Called Again was even more rewarding.  I also added Brew Davis’ book (Jennifer’s husband) to my reading queue.  I expect his side of the story to be equally fascinating!

Fawn
We spotted a cute fawn. Below:  The return arm of the loop; Adam at the ATC.

Path ATC Adam

OK… now on to the hike!  Adam has already done such a thorough job describing the route and points of interest, that I really don’t have much to add.  I will echo his sentiments about the heat.  I felt like I was going to melt into a pool of sweat on the trail.  The day we were there was the beginning of one of the only really hot weeks we’ve had this summer. It was probably in the low nineties, but it was humid, windless and sunny, so the heat index was 101.  I really don’t like to hike when it’s above the mid 80s, so this wasn’t a particularly fun hiking day.  Even if there had been more time to explore the area, I don’t think I would have wanted to do a longer hike in this heat.

Nevertheless, I enjoyed the views of the river and the historical attractions.  If it had been cooler, I would have taken more time to read informational placards.  My favorite part of the hike was spotting a fawn grazing in the field.  From a distance, I saw a brown hump in the grass.  I asked Adam, ‘Is that an animal of some kind?’.  He thought it was a rock and headed over to read about the cannon on display.  I tiptoed along with my camera and found that the ‘rock’ was actually an adorable spotted fawn.  We made eye contact for a brief moment before he flashed his white tail and bounded off into the trees.

We made our way quickly back to the car where I chugged more water and blasted the air conditioning.  The outdoor temp thermometer on our car said 107.  I know that was mostly from leaving the car sitting in the sun… but still!  This short hike in the heat added even more to the anticipation about our upcoming ten day trip north!  Our next five posts are going to be out-of-staters!  We’ll be taking you to the rugged, exciting, spectacular high peaks of New Hampshire!

Trail Notes

  • Distance2.2 miles
  • Elevation Change – negligble
  • Difficulty –  1.  The trail was not very difficult and only had a little bit of elevation change on the hike.
  • Trail Conditions – 4.  The trail is well-established and didn’t have very difficult footing.  Most of the trail is on grass or gravel.
  • Views – 1.5.  The views of the Shenandoah River were somewhat obstructed with trees around. 
  • Streams/Waterfalls – 2.  You do get one heightened view of the Shenandoah River from this point.
  • Wildlife – 2.  I believe we were fairly lucky to see a fawn on the trail.  I would expect to see field birds here for any bird-watchers.
  • Ease to Navigate – 4.  The trails mostly inter-connect here, so you shouldn’t get lost.
  • Solitude – 4.  My guess is that most people that visit the Visitor Center do not hike up to this area, but you may see some people at the Murphy-Chambers House. 

Directions to trailhead:  From Charles Town, WV head north for about 4.5 miles.  Turn right on Shoreline Drive (about .8 miles past Millville Road).  The entrance fee station is just ahead and the large parking area is to the right.  Walk up to the Visitor Center and the trail is across the road behind the bathrooms.

Table Rock (WV)

The drive to the trailhead is probably tougher than the actual hike, but this 2.4 mile out-and-back in the Canaan Backcountry has spectacular views and is well worth the bumpy ride to get to the trail’s start!

Christine on Table Rock
Table Rock has great views of the valley. Below: When the weather has been wet, there are several muddy sections to cross (it was quite dry when we visited); Later this summer, the rocks will be covered with blueberries.

Muddy Crossing Blueberry Blooms

Adam Says…

This hike was definitely one of those pleasant surprises you find once in a while.  We have been going to Canaan Valley for years (my wife has been going since she was a kid) and we never knew about this great place for hiking that was just a short distance from where we always stay.  I’ve driven by the Canaan Loop Road and thought to myself, “I wonder where that road goes.”  If I had known earlier that it led to this area of hiking, we would have tried this out a long time ago.

We had picked up the Day & Overnight Hikes: West Virginia’s Monongahela National Forest book a couple of years ago and have done a few of the hikes before.  This one led us right to the Canaan Loop Road for this great out-and-back hike.  When we started on the road, we passed by a few houses on the gravel, pothole-laden road and then quickly came upon a school bus parked in the middle of the road, blocking any traffic.  I thought this was odd (and possibly a little like the start to a horror movie), but I didn’t see anyone inside.  I walked up and saw a man about halfway down the bus that was straightening some things up.  I asked if he was moving and he darted up front, started the bus, and gunned it down the road.  We followed the bus for a while, but it was quickly leaving us in the dust kicked up from the gravel road.  After a few miles, we came upon the bus again as it was parking for a scouting group that looked like they were packing up after a large picnic.  We continued past the group on a very bumpy and narrow road that has some precarious edges that you just pray that another car doesn’t come the other way.  We only came across one other vehicle on the road, but I would warn you to be cautious as you make your way along the road and drive slowly.

Thick Rhododendron
The rhododendron along this trail was thick and jungle-like. There were lots of buds, so it should be a pretty bloom this year! Below: Trails are not typically well-marked in the Canaan backcountry; Adam walks through open forest; Crossing another muddy section.

Trailhead Sign Open Forest Mucky

After driving for exactly 10 miles on the Canaan Loop Road, we came to the parking area to the left for Table Rock.  We started down the trail.  The trail is technically blue-blazed, but you will likely only see a few of these blazes on the trees.  The trail is fairly obvious, but I can imagine after the leaves first fall, it could be a little tough to find your way.  The trail starts almost in a jungle of rhododendron, but that quickly opens up to an open forest of larger beech, maple, and birch trees.  The trail stays relatively flat the entire way and there are a few areas of mucky ground or pools.  Rocks and logs have been placed over in some of these to help you traverse, but in some areas after a good rain, you will likely need to get your shoes wet.  After about 1.1 miles, you come across a campsite.  Just ahead is Table Rock.

The outcropping has phenomenal views.  The rocks have crevasses that can be quite deep, so watch where you are stepping and be careful around the edges since there are huge drops below.  Since this place isn’t visited often except by locals, this will be a great off-the-beaten path hike that you can likely enjoy the views all by yourself.  The spruce-covered mountain across the gorge is Green Mountain.   Since this trail is flat, almost anyone could enjoy this hike.

It was quite breezy at the top and I had to hold my hat a few times as the wind picked up.  You can tell that this area does get a lot of wind that funnels quickly through the gorge.  We look forward to coming back to this area sometime soon and visit some of the other trails that crisscross around the Canaan Loop Road.

Christine Says…

Normally when we visit the Canaan Valley area, it’s all about hiking and nature and waterfalls!  This visit was all about… cleaning.  Adam and I agreed to take care of the annual spring cleaning of my parents’ rental property in the area.  In the three days we were there, we scrubbed, scoured, swept and probably did more than 20 loads of laundry.  It wasn’t a fun trip, but we did manage to get out for one short, nearby hike.

I have no idea how the trails off the Canaan Loop Road escaped our notice.  I guess when you’re close to Dolly Sods, Seneca Rocks, and Spruce Knob, other trails fall a bit by the wayside.  But, I’m really glad we took the time to drive the ten bumpy miles to this trailhead.

Greening Up
I love watching green creep up the mountainsides each spring. Below: Lovely trillium, A couple views of Table Rock.

Trillium Table Rock Table Rock

The hike to Table Rock was short, but had a spectacular payoff in terms of views and solitude.  The path led through gorgeous forest, alternating between dense stands of rhododendron and open, mossy forest.  The whole route is flat and easy, so in about 20-30 minutes, you’re already at the overlook.  The rocky shelf stands over a magnificent, undeveloped valley.  When we visited in mid-spring, the emergence of leaves created the effect of green creeping up the mountainsides.  So beautiful!  There were tons of blooming blueberry bushes in the area, too. It would be nice to visit in August and pick berries!

I also enjoyed the Painted Trillium along the trail.  Most of the trillium I see along the trails in Shenandoah is plain white or pink, so seeing a different variety was a nice change of pace.  We were there a little too early to see the rhododendron bloom, but most of the plants were abundant with buds.  It should be really pretty when they finally open!

Trail Notes

  • Distance – 2.4 miles
    (Check out the stats from MapMyHike)*
  • Elevation Change –  195 ft
  • Difficulty – 1. This trail is very flat, so just about anyone could enjoy it.
  • Trail Conditions – 3.5.  The trail isn’t that well-used, but it was still a worn path.  You may have to do a little rock-hopping to make it across some of the larger puddles.
  • Views4. Breathtaking views are clear from this point.  We enjoy not being able to see houses from great viewpoints and you shouldn’t see many signs of civilization from this outcropping.
  • Waterfalls/streams – 0. Non-existent.
  • Wildlife – 2. Other than a few birds, we didn’t see anything on the trail. 
  • Ease to Navigate – 3. There is only one trail on this hike, so there shouldn’t be any confusion.  The only reason to downgrade this is because it is not blazed often at all and in the fall it could be a little challenging to follow the path.
  • Solitude – 5.  We didn’t see anyone on a beautiful weekend day in the afternoon. 

Directions to trailhead:

From Davis, WV, head south on WV 32.  In 3.2 miles, turn right on to Canaan Loop Road (Forest Service Road 13).  Follow the road for exactly 10 miles.  The parking area is on the left and there is a wooden sign that shows the beginning of the trailhead.

* MapMyHike is not necessarily accurate, as the GPS signal fades in and out – but it still provides some fun and interesting information.

High Knob & Hoover Ridge

This 5.75 mile hike takes you to an old fire tower sitting atop a high peak on the border of West Virginia and Virginia.  After visiting the tower, you can either head back to the parking area (which would cut the distance and make this a 3 mile total round-trip hike), or continue to explore the Shenandoah Mountain trail with a walk over to Hoover Ridge.

SPECIAL NOTES:  Please be conscientious and respectful when hiking in this area. Hiking trails near High Knob are adjacent to private land. Please honor posted ‘no trespassing’ signs and stay on official forest service trails.  Please do not tamper with posted private land signage.

High Knob Fire Tower
The High Knob Fire Tower provides panoramic views into both Virginia and West Virginia. Below: Adam looks at trail information in the kiosk in the parking area; The Shenandoah Mountain Trail is often lined with dense mountain laurel; Trail junction – one way climbs up the fire tower, another continues on the Shenandoah Mountain trail, and the third descends to the Brandywine Recreation area.

Parking Areas for High Knob Trail Dense Mountain Laurel Along High Knob Trail Trail Junction on Shenandoah Mountain Trail

View a 30 second video of the panoramic view from the High Knob fire tower.

Christine Says…

First of all, I’m not sure whether to call this a Virginia hike or a West Virginia hike.  While you park in West Virginia, the Shenandoah Mountain trail meanders right along the states’ borderline.  I believe the High Knob fire tower sits on the Virginia side of the line, but views look out into both states.  This is definitely a hike worth doing!

Our first attempt to hike High Knob was on April 7th, 2013.  That hike started off well enough, but within the first half mile the trail turned into a veritable luge track.  It was a smooth, slick, well-polished chute of ice!  Had we planned more extensively, we would have packed Yaktrax, but after a week of warm, sunny weather, we simply didn’t expect to see so much ice!  We watched a couple on the trail ahead of us falling down, over and over and over again.  The girl literally fell ten times in about two minutes.  She couldn’t make a single step of forward progress.  Adam and I looked at each other and said ‘Nah… we’ll come back and do this some other time.”

Mountain Laurel is Getting Ready to Blook
Fetterbush is blooming!  Below: Trails are marked with a double yellow blaze; Occasionally views opened up through the trees.

Yellow Blazes on Shenandoah Mountain Trail Views Along the Shenandoah Mountain Trail

The very next weekend, we headed back and ended up with much better hiking conditions.  The trail to High Knob is pretty basic – it follows the Shenandoah Mountain trail until a junction with a spur trail that leads directly to the tower.  The way is well marked with double yellow blazes and has nice footing.  The path passes through dense stands of mountain laurel.  From the number of flower buds on the laurel, it looks like it’s going to be a spectacular bloom this year!

About .8 mile into the hike, we reached the junction – hikers can turn uphill and take the spur trail to the fire tower, continue on the Shenandoah Mountain trail, or head downhill to the Brandywine Recreation Area.  We decided to visit the fire tower first, mainly because it was early and we wanted to avoid Sunday afternoon hiking crowds.  The spur to the High Knob tower is probably the steepest climbing of the entire hike.  While the section is steep, it’s also fairly short.  At the top of the climb, the trail comes out on a fire road that leads pretty much the rest of the way up to the tower. We were surprised how heavily the area was marked with ‘Private Land – No Trespassing’ warnings.  There were dozens of signs and trees spray-painted red.  I’m guessing the public land abuts private land that is heavily used for hunting, and the landowners are trying to protect hikers/bikers from getting shot.  Regardless, the area is very thoroughly and clearly marked – you shall not pass!

As we arrived at the fire tower, we passed a foursome of hikers headed down.  We had the tower all to ourselves for about twenty minutes.  We enjoyed the views in every direction!  I especially enjoyed looking down on Switzer Lake.  It brought back lots of memories from my days as a college student at JMU.  On warm spring days, my sorority would load up in cars and make the drive to Switzer for an afternoon of swimming (and perhaps some beverage consumption).  Swimming is no longer allowed in the lake (maybe it was never allowed?), as it’s used as a public water source.  Even though you can’t swim in the lake, it’s still a great place for scenery and birding.  A friend of mine has even seen bald eagles at Switzer!

Steep Climb on High Knob Spur Trail
Adam makes the steep climb between the Shenandoah Mountain trail and the fire road that leads to the High Knob Fire Tower. Below: Private land in the area is very thoroughly and clearly marked. A bird’s eye view of the private land from the fire tower.  I think those might be hunting camps/blinds.

Marked Private Land View of Private Land Approaching the Fire Tower

After enjoying the views and eating a snack, we climbed back down to the junction.  It was around 11:15 a.m. and we were torn – do we continue to explore Shenandoah Mountain or do we call it a day and get a nice lunch in Harrisonburg?  We didn’t have a coin, so Adam flipped his pass-case – card side up, we hike on – card side down, we go home.  The pass-case dictated a longer hike.

We followed the Shenandoah Mountain trail over to Hoover Ridge.  If I were to make a recommendation, I would tell people to skip this part of the hike.  In the end, the views weren’t worth the climb. The trail is narrow – too narrow to ever be level.  You hike most of the way with your uphill foot much higher than your downhill foot.  It’s also covered with tons of loose stone and slate that shifts under every step.  On the early spring day we hiked, the trail was still under a foot of dry leaves.  The footing was treacherous.  I was so glad for my trekking poles.

There are several steep climbs on the way to Hoover Ridge.  Once the trail meets the ridge walking along is pretty pleasant. The terrain is open and grassy and there are obstructed views of mountains in every direction.  You can even catch a glimpse of the fire tower off in the distance.  On Hoover Ridge, we decided we’d hiked enough for the day and turned back to make our return to the parking area.

Since it was mostly downhill, the walk went quickly.  We were back at our car by 1:15 and back in Harrisonburg for lunch a half hour later.  It was a great day to be out hiking after such a cold and snowy March!  We’ll definitely make a return hike to the fire tower… Hoover Ridge, not so much.

Adam Says…

As Christine mentioned, this was a second attempt at High Knob, since it was too ice-covered to walk up previously.  We hate having to bail on a hike, but we want to feel that it is something we can accomplish and still enjoy.  We’re glad that we waited for the snow to melt to enjoy this trek up to the fire tower.  Our friends at Hiking Upward covered this hike from the Brandywine Recreation Area, but this is a shorter way to accomplish the hike up to the top.  If you’ve purchased National Geographic’s Staunton/Shenandoah Mountain Trails Illustrated Map 791, you will see High Knob Fire Tower on the cover.

Christine Enjoys the Fire Tower View
Views from the fire tower look out in every direction. Below: You can see Switzer Lake from the fire tower; More views; Adam enjoys a snack (Trader Joe’s Monkey Business trail mix) on the fire tower.

Switzer Lake Views from the High Knob Fire Tower Enjoying a Snack on the Fire Tower

From the parking lot on 33, we took off down the stone steps.  The parking lot and surrounding areas has a lot of trash thrown around, so if you can, bring a trashbag and help to carry out some of the litter.  Once you join the Shenandoah Mountain trail at the bottom of the stone steps, the trail will be clear of litter.  The trail starts off fairly level and then gradually ascends up the mountain.  In .85 miles, you do reach a large junction that includes the spur trail to the High Knob Tower.  Take this spur trail up the mountain.  At about 1.1 miles, you will reach a forest road.  Take a right on the road (taking a left will put you on private land) and continue to follow the signs to the High Knob Tower.  Continue your ascent up the fire road until you reach the High Knob Tower at 1.4 miles.

We retraced our steps until we returned back to the junction of the Shenandoah Mountain Trail and High Knob Trail at 2.0 miles.  At this point, we took a left to get back on the Shenandoah Mountain trail.  This part of the trail was not well-maintained and we were constantly worried about turning our ankles on loose rocks that were hidden underneath the leaf-covered trail, crossing over tree blowdowns, or catching ourselves from falling off the narrow trail with our trekking poles.  The trail in most places along this section felt more like a narrow animal path than an actual trail.  The rough trail and the steepness in some sections really made us question how far we were going and if it was worth it. We made our way a little further uphill but we weren’t fighting rough terrain the whole way.  We reached the crest of Hoover Ridge at 3.5 miles, which gave us some obstructed views of the areas to the south.  After taking a few minutes to explore the open fields and campsites on Hoover Ridge, we made our way back.

Shenandoah Mountain Trail Cairn
One of the few tricky spots on the Shenandoah Mountain trail. The cairn indicates that hikers should take the lower trail, and not follow the trail partially blocked by branches. Below: Sign on Hoover Ridge

Signage on Hoover Ridge 


As Christine stated, I would agree that I probably wouldn’t add on Hoover Ridge to this hike unless you would like to get some extra hiking accomplished.  However, this was also the area that we saw the best wildlife.  We saw a deer in the distance take off when we were spotted and a grouse jumped out of some brush when we were walking by that caused us both to nearly jump out of our hiking shoes.

The hike up to High Knob is one that I think would be a perfect hike if your goal was to see great views from all directions. On a clear day, you should be able to see several layers of mountain ranges.  I’m sure the foliage scenery in the fall is breathtaking.  I can see this being a great hike to take some out-of-town visitors to show the splendor of the rolling Virginia and West Virginia mountains.

Trail Notes

  • Distance – About 5.75 miles
  • Elevation Change –  1168 ft
  • Difficulty – 3.5. This is a moderate hike in terms of elevation change.  On the day we hiked, the Shenandoah Mountain trail was still covered with deep, slick leaves and quite a few fallen trees.  These challenges increased the difficulty level somewhat.
  • Trail Conditions – 3.  The trail to High Knob is in great shape, but the Shenandoah Mountain trail is narrow and rocky.
  • Views5.  Views from the High Knob fire tower are spectacular and panoramic.  Views from Hoover Ridge are obstructed.
  • Waterfalls/streams – 0. There are no streams on this hike.
  • Wildlife – 2. We saw a deer and a grouse, but I think hunters scare off most wildlife in this area.
  • Ease to Navigate –3. Trails are generally well-marked/blazed, but there are a few mildly confusing spots on the walk to Hoover Ridge. There were a few worn paths in the woods that looked like old trails or animal paths.  As long as you still to the most well-worn pathway, you should be fine. Take care to observe posted signs for private land.
  • Solitude –2.  You will likely see quite a few people on the walk to the fire tower, but few along the way to Hoover Ridge.

Directions to trailhead:

Head on 33 West from Harrisonburg, VA.  In about 10 miles, you will enter into George Washington National Forest.  In 12 more miles, you will reach the parking lot on the left right after you see the “Welcome to West Virginia” sign.  A large kiosk with a map of the area gives some general information and you will see a break in the girders that will lead down to start your hike.

* MapMyHike is not necessarily accurate, as the GPS signal fades in and out – but it still provides some fun and interesting information.

Snowshoeing: Bald Knob from White Grass (WV)

If you’re looking for a great place to enjoy snowshoeing or cross-country skiing in the mid-Atlantic, don’t miss a visit to White Grass!  Their extensive network of trails offer something for every skill level.  Their terrain is beautifully groomed and the people who run the resort are so friendly and helpful.

If you don’t own snowshoes/cross-country skis, White Grass has them available to rent!

Christine at Summit of Bald Knob
Christine enjoys the view from Bald Knob. Below:  The morning started off cloudy; Learning about winter trees with the naturalist; Lots of old cross country skis.

Morning Sun Naturalist Shack and Skis

Adam Says…

It has been over a year since we went snowshoeing.  Our area of Virginia was robbed of any meaningful snow for the past two years, so we decided to cross the border to West Virginia to catch the elusive snow.  Christine’s parents had bought us each a pair of Tubbs Frontier snowshoes for Christmas over a year ago, but it wasn’t until now that we were able to break them in.  We were both very pleased with how they felt on our feet.  They felt lighter than many I had tried before and were a little more sleek than some others I had tried.  This enabled me to not feel too fatigued using them and I also didn’t feel like I had to walk like a cowboy in fear they would cross over and cause me to trip.

We had heard great things about White Grass from other friends of ours that had been there for cross-country skiing.  White Grass maintains a great website where they will post weather conditions, snowfall, pictures, and trail maps.  Check it out to get the best up-to-date information.  They will typically be open December-early March to access their 40km of trails.

When we first arrived at White Grass, we checked in at the lodge.  They informed us they were having a naturalist from the Canaan Valley Wildlife Refuge take a group out in about five minutes for a free snowshoe trail talk.  We grabbed our shoes and met up with him.  We were part of a small group of about 7 (including two little children).  The goal of the walk was to teach us about the different trees that can be found in Canaan Valley, how to identify them, and threats to their future.  We spent about an hour walking. The naturalist did a great job of teaching us many things about trees that I didn’t know before.  After the walk, we decided to make make our way over to Hellbender Burritos for two Gendarme burrito bowls to power us up for our big snowshoe trip in the afternoon.

Spring Orchard Trail
We started out along the Springer Orchard Trail. Below: Trail junction; Warming huts along the trail; Adam snowshoes along groomed trails.

Trail Junction  Warming Hut  Adam Snowshoeing

We returned to White Grass and paid our $20 trail use fee.  We asked the woman in the shop for some trail suggestions, and she kindly mapped out a route that would take us to the top of Bald Knob.  The trails criss-cross often and the maps, posted at each junction, a little confusing.  We found ourselves asking other skiers and snowshoers where they had been to help us navigate through the labyrinth of junctions.  We left the lodge and started on the Springer Orchard Trail, on the opposite side of the large Weiss Knob Slope that heads directly down the mountain.  We stayed on this trail for about .35 miles, passing the Plum Orchard trail, until we reached the Highland View trail.  We took a left on this trail and continued upward, crossing past several other confusing junctions.  We stayed on the Highland View Trail for about .35 miles, until we made it up to its end at the Sawmill Flats shelter at .8 miles.  The shelter was a small warming hut.  There were a few ammo boxes that included snacks and there were some containers of bird seed that you could throw out to chickadees.  From this point we made our way following the signs for the Double Trouble trail.  We reached the junction at 1.0 miles, took a right, and headed up the Double Trouble trail.  At 1.3 miles, we reached the Weiss Knob Ascent trail, took another right and made our way to the Roundtop shelter.

The shelter here was also filled with snacks and bird seed.  The birds here were more accustomed to people and would actually eat the seed out of your hand if you wait patiently.  We were also told that someone had left a Gatorade bottle of moonshine at the shelter.  I picked it up and saw some stuff floating in the bottle and decided to pass.  I find it is a good rule of thumb to at least know the person that has made the moonshine for you.  There’s no need to go blind without anyone to blame. 🙂

Christine and Adam at Roundtop Hut
Christine and Adam at Roundtop Hut. Below: Adam feeds a chickadee; Deeper snow as we climb upward; Snow draped on evergreens.

Adam Feeding a Chickadee Deeper Snow Snow on Spruce

We continued from this point following the signs to Bald Knob.  You will cross a Boundary trail and then make a right on the Bald Knob Trail to wind up the mountain.  The trail then takes a sharp right and a junction where you can continue to hike up the Bald Knob Trail.   We reached the summit at around 2.1 miles.  The scenery was breathtaking and you could see skiers on the Canaan Valley Ski slopes and mountains off in the distance covered in snow.  The wind is strong here at the top, so we didn’t stay incredibly long, but made our way back down.  We returned down the Bald Knob Trail to the Roundtop shelter and back down the Double Trouble trail.  However, instead of heading back to the Sawmill Flats shelter, we followed Double Trouble until it led us to the Lift Shack, crossing over the Weiss Knob slope.  Right behind the Lift Shack, we then took the Barton’s Bend Trail until we reached the Falls Overlook trail.   We took a left on the Falls Overlook Trail and then a left on the Three Mile Trail until it brought us back to the White Grass lodge.  Our return trip was around 2 miles, taking our snowshoe hike to be around 4.2 miles.

I had three big highlights on this trail.  Feeding birds out of my hand, the peaceful scenery through the spruce on the Bald Knob trail leading to great views, and looking back and seeing my wife smile.  I told her that her face was going to be sore from all the smiling she was doing.  We really had a wonderful time at White Grass and we can’t wait to return.  We will probably take the Three Mile Trail all the way up to the Roundtop Shelter next time.

Christine Says…

I love some parts of winter – the snow (too bad there can’t be snow without cold), the potential for workplace closures, and most of all snowshoeing!  For Christmas of 2011, my parents bought us snowshoes.  And well… many of you will remember winter of 2011-12 as ‘the winter that never happened’ in Virginia.  The only measureable snow we had was in October.  The rest of the season passed – mostly warm and sunny – leaving our snowshoes to gather dust in the garage.  This winter hasn’t been much better, but thankfully we live just a couple hours from Canaan Valley.  Even though the areas lies less than 90 miles away as the crow flies, they have vastly different weather.  It’s almost like a small chunk of Canada dropped into a bowl located in the mid-Atlantic.

Christine and a Chickadee
Christine feeds a chickadee.

Bald Knob Trail Roundtop Hut Christine on Snowshoes

We got up early on a Sunday morning and drove over to White Grass – one of the only big Nordic centers in our region. The entire drive, we saw nothing but bare grass and muddy fields.  I’ll admit that I was a little worried that we were driving over for nothing.  But as we grew closer, bare fields gave way to a dusting of snow and then smooth, billowing drifts.  On the final drive up to White Grass, the road was not even cleared.  As we pulled in to the parking area, an exuberant, bearded man gesticulated dramatically, guiding us to a parking spot. Every employee of the resort that we talked to during the day was super friendly and full of information happily shared about the area.

We headed into the lodge to get information and pay our trail use fees.  The lodge is warm, cluttered and cozy, lacking the slick, commercial feel of most ski operations.  Even though it wasn’t yet 10:00 a.m., it was packed with people chatting and enjoying hot beverages.  The woman at the cash register told us we had arrived just in time to go on a free snowshoe walk with a naturalist.  We had about five minutes to gear up and meet the group.  She told us to run on ahead and to pay our trail fee later on.  We ran back to the car, grabbed our snowshoes/poles, put on our layers, got the camera gear packed up and made it back just in time for the walk.  The walk was more talking than active snowshoeing, but I enjoyed learning more about the areas fragile ecosystem.

The snowshoe walk finished up a little after 11:00, so we decided to drive into Davis for an early lunch before our longer snowshoe trek.  At lunch, we learned something interesting – you can’t buy a beer in West Virginia on Sunday until 1:00 p.m.  The restaurant was pretty crowded, and I don’t think I saw a single table not try to order a beer. I guess everyone was visiting from out of town and didn’t know the law.

Christine Snowshoeing
Christine snowshoes uphill.  Below: Approaching Bald Knob, Bald Knob View, Enjoying the Summit

Approaching Bald Knob Bald Knob View Adam and Christine

After lunch, we headed back to Whitegrass.  With our trail feed paid and our route mapped out, we headed up the trail.  When I heard that we were walking up to the summit of Bald Knob, I was a little hesitant at first.   Hiking up to the summit of Bald Knob didn’t necessarily conjure pleasant feelings; rather I remembered the last time I attempted to climb that peak.  It was probably about 15 years ago when I was not a regular hiker and generally quite out of shape.  Adam and I had hiked Bald Knob from the Canaan Valley Ski Resort side.  We made it to the top, but it involved tears and suffering on my part.  I remember the trail being unbearably steep and thought it was going to kill me.

However, this time, I found the terrain easy, pleasant and totally manageable – even on snowshoes!   One of the nice things about White Grass is that the trail grooming takes some of the exertion out of snowshoeing.  When you snowshoe on fresh, unpacked powder, the shoes do keep you aloft on the snow — but only to a degree.  In fresh powder, you sink down and a certain level of ‘slogging’ is required.  At White Grass, most of the trails are packed and machine-groomed.  There are usually a pair of cross-country ski tracks worn into the snow, and then smooth packed trail alongside.  As snowshoers, we’re careful to stay off of the ski tracks, as the blades on the bottom of shoes can easily chew up the established tracks.

Walking the trail system at White Grass was so fun!  As Adam mentioned, I smiled the entire way!   I loved chatting with other people we met along the way.  I was enthralled by the gorgeous, snow-draped scenery.  I had a blast hand-feeding the chickadees at the warming up.  I have a slight phobia of flying things (bad experience with a bat and several moths over the years), so at first I looked away and closed my eyes as the chickadees fluttered down.  But after a few landings, I opened my eyes and watched the birds perch.  When they land, they are weightless; the only thing you feel is a slight pinch from their gripping feet.  One chickadee sat on my hand long enough to eat several seeds.  So fun!

When we made it to the summit of Bald Knob, I stood in awe of the beautiful, snowy valley laid out before me. The wind was whipping and clouds were moving in, so we didn’t stay long.  The walk down went by so quickly — all downhill.  We were back at the main lodge within an hour.

Expansive View
Even though Whitegrass is popular and heavily used, you never feel like it’s crowded. Below: Adam checks out the old, abandoned ski lift apparatus; Adam says hello to a friendly Whitegrass dog.

Old Lift Building Whitegrass Dog

I’m hoping that we’ll get another chance to visit White Grass one more time this season.  If we do get to go again, I definitely want to plan a meal at the White Grass Cafe.  The food people were eating in the lodge looked amazing!  We would have eaten there, but we already had plans to eat at another local favorite – Sirianni’s.  We love their pizza and can’t visit the area without going there to eat.

If we make a return trip, I’ll also be sure to take a few photos of the actual facilities – the lodge, the cafe, etc.  In the rush to meet the naturalist on time and my eagerness to spend as much time as possible on the trail, I neglected to take any photos of the facilities.  They are really cute, so I feel bad that I forgot.

Trail Notes

  • Distance – 4.2 miles.  This is approximate.  It was hard to gauge mileage when the trails crossed each other so frequently and were labeled on the maps in kilometers.
  • Elevation Change –  973 feet
  • Difficulty – 2. The trail did go uphill most of the way up, but the grade was only seriously steep in a few spots.
  • Trail Conditions – 4.  The trail was in excellent shape.  They spend a lot of time grooming the trails, so it was fine to have both snowshoeing and cross-country skiing on the same trails. 
  • Views4.  The views from Bald Knob are some of the best you’ll see of Canaan Valley.
  • Waterfalls/streams – 1. Only a few streams that you pass on the trail.
  • Wildlife – 2. Red squirrels, Chickadees, and pileated woodpeckers were spotted.
  • Ease to Navigate –1.5. You have to pay very close attention to the trails and maps at the junctions to keep your bearings.
  • Solitude –2.  The trails in this area are heavily trafficked, so expect to see others.  We still felt that we had plenty of room for ourselves though as people are spread across all the distance of trails.

Directions to trailhead:  The best directions can be found here  From Route 32 at Canaan Valley, take Freeland Road.  Follow the signs to White Grass.

Blackbird Knob – Dolly Sods (WV)

This 5.8 mile out-and-back hike along the Blackbird Knob trail gives you a sampling of many of the beauties offered by the Dolly Sods Wilderness area. While you don’t get any high-up, panoramic vistas, you still get amazing views across the high plateau.

Adam and Wookie in Dolly Sods
Dolly Sods is spectacular in the Fall. Below: Trailhead along the forest road; Off to a chilly start! The morning was breezy and in the 30s; Dolly Sods is famous for turning crimson in the fall.

Forest Road Off to a Chilly Start Berry Bushes Turn Crimson

Adam Says…

Fall is here!  At least it has arrived in Dolly Sods.  For those that haven’t been to visit out this wilderness area on the eastern side of West Virginia, you will be impressed by the terrain.  I have read many times that the terrain and climate up here is more similar to Canada than the surrounding areas of West Virginia and Virginia.  You will quickly notice that the vegetation is just different here – you’ll see spruce and conifers in one direction and blueberry bushes and boggy areas in another.

After hyper-extending my knee on our last backpacking trip, I was thinking another trip the next weekend would be a little too much of a re-injury risk.  But, we wanted to do something fun since it was Christine’s birthday, so I suggested that we spend the weekend in Canaan Valley to enjoy some of the early fall color.  The last weekend of September is usually the Leaf Peepers Festival in Canaan Valley, but we were hoping for some fall color the week before and we weren’t disappointed.

Wilderness Wookie Enjoys Dolly Sods
Wookie rests on a warm rock in the sun. Below: Christine checks out a trail marker.  There are very few signs and no blazes in Dolly Sods; Fall color is starting to pop; Walking past a colorful maple.

Trail Sign Fall is Starting Walking Past the Maples

I feel it is necessary to put out a few warnings about Dolly Sods.  First, the trails are not well-marked.  They typically will have some trails marked at intersections, but there are no blazes on the trails and if you wander off on something that looks like a trail, you could become lost.  Second, the road to get to and through Dolly Sods is very rough.  You won’t see many Toyota Prius-like cars on this road.  We approached it from Canaan Valley and there are some scary roads to drive up.  You are on a road barely able to fit two cars with a large drop-off on the side.  We were almost hit by some locals barreling down a blind curve on the road and they only missed hitting us by a couple of inches.  The road through Dolly Sods is also extremely rough and filled with potholes.  We’ve gotten a flat tire up here before and hope to never experience that again.  You’ll need to drive very slowly and steer away from any potholes or sharp rocks sticking up.  Four-wheel drive is not completely necessary, but it may give you ease of mind.  Third, good maps are hard to find.  As I mentioned on our Rohrbaugh Plains post, probably the best maps are available online.  If you are looking for printed maps, we’ve bought quadrant maps of the Dolly Sods area from the nearby Seneca Rocks Discovery Center, but I’ve found some flaws with these marking trails properly (the quad for Blackbird Knob showed the knob on the wrong side of the trail).  The online maps area also from 2006 and the quads are mostly from 1995.

For the hike to Blackbird Knob, we parked on the eastern side of the road just north of the Red Creek Campground area.  You should see the large trailhead sign on the western side of the road just past the campground area.  You quickly cross a boardwalk over a boggy area and then you will pass a large open area of pine forest to the right.  In .3 miles, you will come to a grey sign that shows the trail goes to the left deeper into the woods.  You may not see a trail to the left, but follow the sign and you will begin to see cairns that will lead you back to where the trail is more apparent.  At .5 miles, the trail opens up to a larger field with nice views around you.  The trail begins to descend at this point, but you will still see some views as you are walking through an open field.  At mile 1.1, you reach Alder Run, which requires a small rock-hop to get across.  You will then go slightly uphill through the forest again, but it will soon open up to more views.  The trail then goes back into the woods and you will arrive at Red Creek at 1.6 miles.  You will need to do more substantial rock-hopping to get across, but we didn’t have any trouble.  The trail goes steeply uphill at this point.  At 1.8 miles, the trail again opens up to spectacular views.  You will shortly come across a junction with the Upper Red Creek Trail at 1.9 miles.  Stay straight on the trail and you’ll duck back into forest.  At 2.1 miles, you’ll reach another junction with the Red Creek Trail, which leads back to the campground.  Stay straight again and it will finally open up to spectacular views.  You are then making your way along the circumference of Blackbird Knob.  Gorgeous fields with ridge views to the left give you many options to take in the sites.  There are boulders on the hillside that seem to be placed by nature as auditorium seats to enjoy this area of wilderness.  We continued along the trail until about 2.9 miles, when the trail was going to continue back into the woods.  We turned back and returned the way we came.

Berry Bushes
Color everywhere! Below: Fall foliage scenery along the Blackbird Knob Trail. Below: Enjoying the fall color.

Dolly Sods is Spectacular in the Fall Fall Color in Dolly Sods Maple

Time for a few confessions.  We had packed our bags fairly quickly to head out for our hike.  I forgot to pack the lunch that we were going to eat on the hike.  All that I brought with us was a small bag of nut-heavy trail mix.  Christine has a mild nut allergy, so we were a little concerned about food.  I remembered that I left some Combos in the car, so we were saved with that.  But, I need to learn to be a little better prepared when going into this area.  As I mentioned before, maps of Dolly Sods are hard to find and trails are not marked very well.  We were surprised how many people just came out here and were hiking without maps.  We ran into a few guys that were unsure of where they were going.  I showed them where we were on our map and they said they would just go on ahead and hope they can catch a trail that will eventually loop them back to where they were.  Not the smartest strategy.

We really enjoyed our trip to Dolly Sods to explore this area.  Since we hadn’t received much fall color yet in Virginia, it felt like we had a private advanced screening of the color that we’ll experience here in a few weeks.

Christine Says…

Dolly Sods is somewhat of a phoenix that has risen from the ashes.  Its rugged beauty is actually a mask that belies years of abuse and damage.  Until 1930, Dolly Sods was heavily logged.  Entire mountainsides were stripped bare of their pristine, old-growth forest.  The largest tree ever harvested in West Virginia came from this area – a magnificent white oak – about 1000 years old and nearly as big as a Giant Sequoia.  Once the hillsides were barren, woodchips, fallen pine needles and small trees dried in the sun and became perfect fodder for catastrophic fires.  Flames consumed more than 24,000 acres, scorching the earth down to bare rock.  After the logging industry closed up, the government purchased the land.  In the 1940s, Dolly Sods was used as a training range for the military.  As recently as 2006, a significant amount of unexploded ordnance was still being found along trails.

Red Creek
Red Creek gets its red color from tannins.  Below: Adam and Wookie cross; Fall color and a rocky stream bed; Trail marker in Dolly Sods.

Stream Crossing Fall Along the Creek Trail Sign

Despite all the damage the land has endured, it is still one of the most breathtaking places in the entire mid-Atlantic.  I don’t think it’s hyperbole to say that there is nothing else like it.  We were lucky enough to visit this fall on one of those perfect, technicolor, early fall days.  The sunshine was sparkling, the sky was crystal clear and deep blue.  Already, maples were turning to flame-color and entire hillsides of fern were glowing and golden.  While Dolly Sods is rugged as a whole, the Blackbird Knob Trail is gentle and without much change in elevation.  Because it was an easy hike, we decided to bring Wookie along.  He was so excited to finally be on a hike!

We started out along a clear path through the woods, but at the first trail sign, we became a little confused.  The obvious, worn path led in the opposite direction of the directional marker on the trail sign.  We sat and pondered for a moment.  We consulted a map.  We didn’t see any sign at all of a trail leading in the arrow’s direction, so we assumed a prankster had turned the sign.  We took the trail a short way uphill before it dead-ended in a thicket of laurels.  We backtracked and followed the arrow’s direction.  For a short while, we were just walking through the woods, but eventually we spotted the cairn and then finally we were back on worn trail.  This is very typical of Dolly Sods!

The first open view came shortly after our brief detour.  From a pile of rocks, we could see all across the high plateau.  Distant hillsides were already covered with red foliage.  The open meadows were covered with crimson berry bushes and tall, tawny grass.  We all stopped to enjoy the perfect fall day –  I snapped photos and Wookie stretched out on a warm rock.  After a brief stop, we continued along.  A few minutes later, we passed a pair of backpackers.  Then we passed three more.  Then we passed five more.  Passing backpackers became pretty much the ‘norm’ for the rest of the hike.  All in all, I’m sure we saw thirty or more people out for the weekend. Typically,  I think of Dolly Sods as being rather remote and isolated.  On this particular weekend, it was not the case.  People were everywhere!

Ferns and Fall Color
It was a technicolor day in Dolly Sods.  Below: Adam hikes across the open terrain; Fall color all along the hillside; Christine enjoys the fall color.

Hiking Along Fall Color in Dolly Sods Christine Enjoying the View

Throughout the hike, the trail passed in and out of trees and open spaces.  We crossed Alder Creek and Red Creek.  Both were running, but on the low side.  I’ve heard that streams are often uncrossable in Dolly Sods in the spring.  It’s hard to imagine that when you see them running so meagerly in the early fall.  Red Creek was especially lovely.  Tannins give the water a rich, reddish color.  I suppose the name ‘Red Creek’ is very well-suited for this body of water!

When we reached the end-point of the hike, we stopped for a snack.  As Adam mentioned, he forgot our lunches.  So, he ate peanuts and cashews, while I picked all of the remaining M&Ms out of the trail mix.  It was enough to tide me over for the walk back to the car.  Honestly, it was such an easy hike that it really didn’t require that much energy.  It also left me nice and hungry for an early dinner at Hellbender Burritos.  For a tiny town, Davis, WV has two very good restaurants (the other is Sirianni’s Pizza Cafe).  At Hellbender, I got my favorite Gendarme burrito.  It’s basically a steak and cheese in a bowl – medium rare chunks of steak, smothered with grilled onions and peppers and then doused with queso.  Yum! And even better (or worse… depends on how I look at it), I discovered Harpoon Pumpkin Cider.  I’m a very picky beer person, but I really like most hard cider, and this seasonal pumpkin cider might be the best thing I’ve ever had to drink!  Sadly, it’s very, very hard to find in our area.  Even the local beverage shop can’t special order it and it’s nowhere to be found in stores.

Wookie Says...Wookie Says…

Sometimes the tail says it all.  What I mean by that is that on this hike for most of the way, my tail stayed nice and curled.  When I get tired, it tends to start drooping like a flag slowly being brought down the pole.  But I really enjoyed myself in Dolly Sods Wilderness.  This was my first trip out there.  Christine and Adam often call me, “Wilderness Wookie”, but this was the first time I have been in true designated wilderness area.

Wookie Crossing Red Creek
Wookie crosses the stream. Below: Adam and Wookie hike on the return leg of the out-and-back; Adam enjoys fall color; Don’t miss a visit to Bear Rocks when you’re in Dolly Sods.

Wookie and Adam Hike Hillside of Color in Dolly Sods Don't Miss a Visit to Bear Rock

My highlights of the trip were when first reached the open field around .5 miles.  I spread out on a nice rock, sniffed the brisk, fall air and enjoyed the views.  I also really enjoyed eating a few cashews from the base of Blackbird Knob.  Christine poured a little rock in a natural bowl in the rock and Adam gave me some nuts to help me re-energize for the return trip.

My lowlights of the trip were crossing Red Creek and the initial boardwalk.  The boardwalk made me a little uncomfortable since there were spaces where my paws could have slipped through.  Crossing Red Creek was a little more troublesome.  I really don’t like getting my feet wet.  But, I took a wrong step and got my front paws wet.  I jumped back away from the water and then made a successful second pass.  My tail immediately went down to let Adam and Christine know that I didn’t like getting wet.  I don’t mind mud as much and my feet did get quite muddy along the trail.  But by the time that we got back to the car, most of the mud had come off.

Going almost six miles is a little taxing for a pug.  For some reason, I don’t see a lot of other hiking pugs out there.  When we got to the car, I immediately fell asleep and was snoring loudly by the time that we got moving.  Of course, when we got back home I had to strut my stuff and tell my brothers, Yoda and Mojo, that I went on a great hike.  I’m glad it’s finally getting a little cooler again so I can get back on the trails.  Wilderness Wookie is ready to do some more fall hiking!

Trail Notes

  • Distance – 5.8 miles.
    (Check out the stats from MapMyHike)*
  • Elevation Change –  440 feet
  • Difficulty – 1.5. The trail is not that steep at all, so most people should be able to handle it.
  • Trail Conditions – 3.  The trail was in decent condition and was not overly rocky or muddy today.  I do think mud could be a problem after larger rainfalls though. 
  • Views3.  While you don’t get views from a big overlook, the scenery along the way is quite gorgeous.  Open fields and views of mountain ridges in the distance give you a lot to see.
  • Waterfalls/streams – 4. Red Creek gives you a reliable water source and picturesque stream views.  There are plenty of backcountry campsites near the stream if you are planning an overnight backpack trip.
  • Wildlife – 3. While we didn’t see any large wildlife on this trip, the area has plenty of wildlife.
  • Ease to Navigate –2.5. As we’ve mentioned, trails are not blazed and only some junctions are marked with signage. 
  • Solitude –2.  We saw over 30 people on the trail.  Most of these were backpacking groups.  If you go on a nice weekend from Spring-Fall, expect to see others.

Directions to trailhead: From Seneca Rocks, go North on WV 28 for 12 miles.  Take a left on Jordan Run Road.  Go one mile up Jordan Run Road and take a left on to Forest Road 19.  In 6 miles, Forest Road 19 comes to a T on to Forest Road 75.  Take a right, heading north on the gravel Forest Road 75.  Drive for five miles until you pass the Red Creek Campground parking on the left.  Park on the opposite side of the road where the grey trailhead marker is located.

* MapMyHike is not necessarily accurate, as the GPS signal fades in and out – but it still provides some fun and interesting information.

A Birthday on North Fork Mountain

We initially intended Adam’s birthday hike on North Fork Mountain (West Virginia) to be the subject of a standard blog post. However, once we finished the hike, reviewed a couple maps and discussed the post, we decided that we’re going to hike it again in the next month or so with a different (and better!) route in mind.  To tide everyone over for the time being, please enjoy a couple photos of the views along the hike.  Trust us… these are just the tip of the iceberg when it comes to scenery!

Adam Enjoys the View
Adam enjoys his birthday view!
Tuscorora Cliff
Tuscarora quartzite makes up the cliffs along the crest of North Fork Mountain.