Trail Notes

Kaylor Knob

Kaylor Knob is a fairly easy 3.5 mile ridge hike offering nice (but slightly obstructed) views.  The summit is the highest point on Second Mountain.

Adam Says…

For those that regularly follow our blog, you may know that Christine sprained her ankle badly during our hike up Buzzard Rock.  While she was healing, we participated in a Backpacking 101 course through PATC. The workshop concludes with an overnight backpacking trip scheduled for the first weekend in May.  We decided to test out the ankle with some extra weight to see if going on the backpacking trip would even be possible.  So, we got our gear together and decided to do a short hike to Kaylor Knob after work last Friday.

While you can approach this summit from Cub Run, we decided to try the shorter approach,  taking off from the overlook at Massanutten Resort.  The hike starts across the road from the parking lot at the top of the overlook.  We have hiked this trail several times to the first overlook where a geocache is hidden, but this was the first time that we took the hike to the summit. 

Since the last time we did this hike, someone has improved the trail markings.  You simply follow the blue-blazed trail along the way (some points also have blue signs marked with a “K.K.” and the mileage).  At around .5 miles, you will come to a junction with another trail that is marked with pink blazes.  Just stay to the right and continue on the blue-blazed trail.  At .75 miles, you will come to a small rock outcropping that has a nice view to the west. 

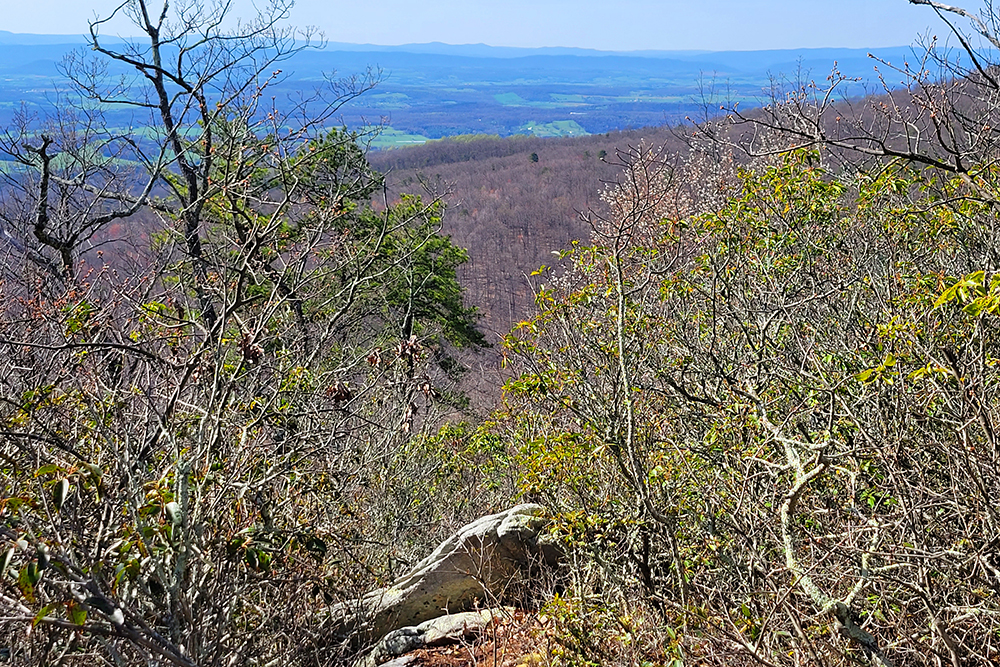
If you continue up the hill past this outcropping, you will continue to walk along the ridge.  You will see views to the west and east through the trees that will open up at different spots.  At 1.75 miles, you will come to the summit, which is marked with a larger outcropping and nice views toward Shenandoah National Park. After taking some time to enjoy the views head back the way you came.

Adam tries out the backpack.

I do think the views to the east are better than the views to the west on this hike.  If you wanted to see a nice sunrise, you should get up early to make it to the summit by sunrise. 

This is a great short hike to do if you’re visiting the Massanutten area.

Christine Says…

Adam and I have a backpacking trip coming up, so I needed to get out there and give the ankle a good test drive.  Our original plan was to hike somewhere in Shenandoah on Saturday and then spend the night camping in our backyard.  However, the weather took a turn for the worse, and we ended up just squeezing in a quick hike to Kaylor Knob on Friday evening. (we also skipped the tent in the backyard  and slept in our nice, plush bed instead.)

I managed to load about 25 pounds of gear into our backpack for the “dress rehearsal”.  My ankle felt completely fine for the entire hike – stable and painless.  The pack was easy to carry and comfortable.  It did make the hills a little tougher, but I still felt really good.  I know our packs for the trip will be a little heavier, but this was still a decent test.

The Kaylor Knob hike is not particularly remarkable.  It’s pretty and peaceful and has two nice viewpoints along the way.  There are definitely more impressive trails in our area, but this one is a five minute drive from the house, so it was perfect for a quick after-work hike.

Note: If you have a couple days in the area, be sure to check out the Massanutten Ridge Trail!

Trail Notes

  • Distance – 3.5 miles out-and-back
    (Check out the stats from Map My Hike)*
  • Elevation Change – about 450 feet
  • Difficulty –1.5 Most people should be able to do this.
  • Trail Conditions – 3. While the trail is used often, it contains lots of pointy rocks.
  • Waterfalls/streams – 0. Non-existent.
  • Views – 2.5. Pretty, but not terribly open or panoramic.
  • Wildlife –1.5 There isn’t much room for wildlife on the top of this ridge.  Expect to see birds of prey soaring in view as well as many of the local birds in the thickets.
  • Ease to Navigate –4.5. If you stay on the blue-blazes, you’ll be fine.
  • Solitude –3. You may see some people due to its popularity with vacationers, but you should still have mostly solitude.

Download a trail map (PDF)

Directions to trailhead: From Harrisonburg, head east on US 33 for about 10 miles. Turn left at the Exxon on the left and head on SR 644, Resort Drive.  Follow this road and take a left on Massanutten Drive.  You will reach a guard house.  Let the guard know that you are here to hike and they will give you a guest pass.  After about 3 miles, take a right on Del Webb Drive. Follow Del Webb Drive for about two miles until you begin to drive up to the ridge, where there is a parking lot on the left.  After you park here, cross the road.  At the end of the guard rail you will begin the Kaylor Knob trail.

Part 3: Backpacking 101 with the PATC

Christine Says…

I can’t think of any other class where it would be acceptable for an instructor to say “Now imagine me with my pants pulled down.”  But Backpacking 101 is quite different from other classes.

Prince William Forest Park
Prince William Forest Park was the location for Backpacking 101’s weekend-long field class.

The third day of instruction also took place at Prince William Forest Park.  Adam and I showed up for class freshly showered, warm and well-rested.  We were among the few students who opted out of the group camping experience.  We would have liked to camp, but my parents live too close to the park to not pay them a visit for the weekend.  It was probably good that we had a place to go escape the pollen.  It was the worst pollen I’d ever seen – you could see it raining down from the sky and everyone’s shoes and pant-legs were coated with a thick, yellow dust.

The morning started off with an explanation of the different brands and styles of tents used for backpacking.  We walked around the group campsite, looking at about ten different models owned by class participants.  I really liked a particular REI tent and also one from Sierra Designs.  We’ll likely be purchasing a three-person tent so we have room to keep little gear inside.  I was amazed by the miniscule size of most two-person tents.  They left me wondering… what two people?… Lilliputians, leprechauns, pygmies?

Camp was set up with a variety of tents.

Tents We liked this tent

After tents, we had a thorough discussion of water filtration/purification methods.  I found this to be the most fascinating part of the day.  Access to clean, safe water is probably one of the things I find most worrisome about backpacking.  We saw demonstrations of a Katadyn Filter system, iodine tablets, AquaMira and talked about boiling.  A couple of the instructors seemed to favor SteriPen systems, but we didn’t see a demo of one in action.   I think the pump filter system looked like the fastest and easiest of the methods, but I think I might use some AquaMira or Micropur as a second layer of protection for my personal drinking water.  I figure that an extra layer of prevention is a good idea, especially when the consequence could be explosive diarrhea.

After water, we moved on to campsite selection.   This included discussion of where to pitch tents, set up the “kitchen”, where to place your bear hang and how to designate a bathroom area.  This session provided the perfect segue to the other part of backpacking that I sort of dread… catholes.  In short, I simply do not want to poop in the woods.  I am a princess about these things … but I suppose I have to get over it because poop happens.  I think most of you will have figured out that the opening quote for this blog posted was pulled directly from the cathole session.  I won’t go into all the gory details, but I will share one prophetic term and leave the rest to your imagination – “Poop Soup”.  Beyond that, I am not going there.  As one person in the class put it “I don’t think I’ll be able to look any of you in the eyes again after this trip.”  I guess nobody really likes pooping in the woods.

The last sessions of the day covered personal hygiene, flora and fauna (poison ivy, ticks, bears and snakes) and Leave No Trace principles. At the conclusion of the class session, the class broke into outing groups.  We had the option of easier or moderate – with easier groups covering about four miles a day and the moderate groups covering six miles a day. We chose the easier group because at this point, I’m still not sure if my sprained ankle will be healed in time.

The class split just about in half between the moderate and easier groups.  Adam is one of only three males in the easier group.  I’m dragging him down to my level.  🙂

Honestly, we’re both THRILLED to be in the easier group, because we get to go to Dolly Sods for our outing.  Our group leaders (Dave, Jen and Dave) chose Dolly Sods because it’s an easier place to accommodate a large backpacking group than Shenandoah National Park.  There are eleven people in our group.  We’ll hike and have meals together, but split into two groups for camping. We love the people in our group.  Everyone seems to be nice and so many group members have a great sense of humor.

Now everyone needs to stay tuned for the actual post from the outing (coming sometime in May.)  I will say that we’re really excited about the trip.  The PATC Backpacking 101 Workshop gave us exactly the information we were looking for.  I feel like we’re kicking off our backpacking experience the right way, and that’s given me a lot of confidence and hope that I actually can do this.

Part 2: Backpacking 101 with the PATC

Adam Says…

I must admit that had some anxiety about the Backpacking 101 course through Potomac Appalachian Trail Club.  I was a little worried about the status of Christine’s ankle sprain, the dynamics of the group, and wondering if people would be a little too “hard-core” about backpacking in general.

TREC Center
Most of the classroom sessions took place in the Turkey Run Education Center (T.R.E.C.)

I think all the worry was quickly alleviated once we started the weekend course.  Christine and I are both so happy that we signed up.

The first session of the day started with Trip Planning.  We brainstormed ideas on what you need to think about to plan a good backpacking trip.  I felt our group came up with great ideas and covered all of the necessities.  One group seemed more like the “party group” because they were concerned with who was bringing the frisbee, harmonica, and alcohol.  I don’t think most serious backpackers would want to lug the extra weight or dehydrate themselves with a bottle of whiskey.

Backpackers
These backpackers did a good job planning.

We then had a “Bio-Break”.  I remember when I saw this on the agenda initially, I was wondering what this could be.  It turns out to mean just a bathroom break.  Christine and I have started using this and I think we’ll teach this phrase to our dogs.   They also know “Go outside” and “Drain your lizard”, so what’s one new phrase for them to learn?

The next session taught us about clothing.   We learned about layering and the purpose for each layer of clothing.  This should help minimize what needs to be packed and ensures that our clothing is keeping our bodies at the right temperature and keeping us dry.  All of the students in class learned the mantra of “No Cotton”, since it gets wet easily and takes a long time to dry.

Next, we learned some basic skills in map reading, which I found to be quite easy.  I think most of the class was fairly confident with map reading, but it was great to work on map skills as small groups.  We also learned some basics on reading a compass.  I typically use my hand-held GPS, but it was good to have a refresher.   Our instructor suggested that we take a compass for when we leave the trail/camp for the bathroom.  We found a spot to approach and then followed the compass to get us there and back.

We took a short lunch break and then learned about the Ten Essentials that everyone needed to have available in their packs.

The instructors demonstrated different types of backpacks and talked about the pros and cons of internal frame packs, external frame packs, and frameless packs.  We split into groups based on height and learned about the different packs the instructors had.  We tried on various packs, discussed how to adjust for your individual needs, and then looked at how each of them were packed.  I personally liked the Gregory brand packs best, because I feel they worked a little better with my back and they gave some breathing room between my back which tends to sweat.   I ordered a Gregory Z65 and I’m excited to try it out.

The next session involved discussing sleeping bags and pads.  It seems that most backpackers go with a mummy-style bag.  They tend to be a little lighter, but they are not for the claustrophobic.  I know Christine will definitely want something different since she likes to not feel confined when she is sleeping.  I can usually fall asleep easily anywhere, so I’m not as concerned.   The instructor also showed us some different styles of sleeping pads (foam and self-inflating).   Again, I’m not as concerned about the type I get, but Christine will probably want a self-inflating pad, like what is offered from Therm-a-Rest.

Stove Demon
We saw a demo of a variety of stoves. Below: We liked the JetBoil.

We loved the JetBoil

Many of the people in our class decided to stay in Prince William Forest Park for the night.  We were staying with family nearby, so we didn’t brave the cold with the others.  Those staying overnight were given time to pitch their tents before dark.  This was a great opportunity for us to look around initially at some of the different tent options there are.  We did an instructor-led tour of the different tent options the next morning.

The end of the first full day involved a demonstration of stoves, cooking, and clean up.  We looked at a variety of stoves and talked about the benefits of each.  Our favorite that we will likely purchase is an integrated stove system made by JetBoil.  We felt that based on what we will likely do in the future, this will serve our needs well.  A co-worker is loaning me one this weekend to try out and learn more about.   The instructors then did a skit, acting out a “good backpacking trip” vs. a “bad backpacking trip”.  It was quite funny and showed the importance of planning ahead, delegating duties, and what to pack.  We then started on preparing dinner.   We split into four groups, with each group preparing a different meal.  This gave us all some experience with using a camp stove and understanding how things could be prepared in advance to save weight and time.  We had plenty to eat between all of the groups and we were able to sample a few of the other meals.  The one we cooked was rice-based, but flavored with cheese and dehydrated hamburger.  I think it was my favorite.

We all enjoyed a great camp dinner
Cheesy Rice and Beef.

After everyone had enough to eat, we worked on cleaning the pots.  Cleanup is a necessity and does have to be done after each cooked meal.  We learned different techniques of Leave No Trace ethics to ensure that cleanup was done in a way that leaves little to no impact on the environment.

I really felt liked I learned a ton of information in this first day of class and we were looking forward to another full day.  I felt the PATC did a wonderful job of explaining all the different types of gear and how to prepare for a backpacking trip.  After the next day of sessions, I feel well-prepared and excited to go on our first trip.

Part 1: Backpacking 101 with the PATC

Christine Says…

(instead of doing both a Christine Says and an Adam Says section for this series, we’ll be taking turns with writing.  We’ll be back to team blogging when we hit the trails again)

Anyone who has read the About section of our website already knows that we’re not backcountry campers/backpackers.  Although I grew up camping with my family, we were always strictly “frontcountry.”  We had a pop-up camper and spent a lot of vacations in developed campgrounds with electricity, playgrounds and hot showers.  Adam definitely has more experience roughing it than I do.  He did a lot of primitive camping in high school and college.

PATC Headquarters
The first session of Backpacking 101 was held at the Potomac Appalachian Trail Club’s headquarters in Vienna, Virginia.

My only backpacking experience came when I was ten years old and attending summer camp with the National Wildlife Federation (Ranger Rick Wildlife Camp).  We did a couple one-night backpack trips in the woods of western North Carolina.  I don’t remember anything from those trips other than the poison ivy.  Our hippie camp counselor encouraged us to walk barefoot through the forest to “be one with nature.”  That was one of the worst ideas ever.

The last time I camped in any way, shape or form was in the mid 90’s.  Adam and I had just started dating, and decided to go camping on one of our first trips together.  The weather was supposed to be nice, but we ended up having freak storms with torrential downpour.  Our tent leaked, we couldn’t get a fire going, Adam got hypothermia – basically everything went wrong.  We ended up bailing out and sleeping in the car.  The next day, we broke camp and moved back into the great indoors. I’ve never looked back, because honestly… I love a soft mattress, a hot bath and access to a microwave.

Recently, I’ve decided to give sleeping outdoors another chance.  I’ve been on so many hikes with places that I’ve stopped and thought “Wow – I’d love to wake up right here and see the sunrise!”  So, when we got a Potomac Appalachian Trail Club (PATC) newsletter, we were intrigued by a workshop called Backpacking 101.  It’s an adult class for backpacking newbies.  I’m hoping that their expert instructors will be able to show us how to backpack and camp in a way that makes it safe, fun and comfortable.

Last Monday, we had our first class meeting to go over course expectations, physical conditioning and how to choose boots.  The class has 28 participants – all very diverse in age, gender, experience and fitness level.  We’ll be spending the next two class sessions doing field learning – everything from how to purify water to how to load your backpack properly to how to choose a campsite.  The class will conclude with a weekend-long backpack trip to put everything we learn into practice.   At this point, my ankle sprain is still too painful to hike. I’m really hoping it will be healed enough by May for the weekend trip.  Keep your fingers crossed for me!

We’ll be blogging about each of the sessions… so stay tuned!  Maybe we’ll become backpackers yet!

Buzzard Rock

This 4 mile out-and-back hike takes you to a ridge walk with views of Fort Valley below.

Adam on Buzzard Rock
From Buzzard Rock, you get a great view of Passage Creek and Fort Valley below. Below: The view below from this vantage point; Scrabbly pines are the predominant tree at the summit

View of Fort Valley

Adam Says…

This was the first time that we had done this hike.  The hike seems to be very popular for people from nearby Front Royal, Winchester and Northern Virginia.  It is not too difficult of a hike, which makes it a great hikes for families and newbie hikers.

You start the trail from the parking lot and you’ll follow the double white blazes for the entire trip.  You begin walking through a piney area that will smell nice if the area has been warmed up in the spring/summer sun.  The trail has some hills to go up and down and a few small streams to cross.  Around 1.0 miles, you will arrive at a frequently-used campsite.  Just cross the campsite and continue up the trail for about another .75 miles until you reach the first overlook.  You will continue up the hill to reach the ridgeline.  Continue to hike across the ridge to take in the views from different angles.  Once you feel that you have seen all that you would like, you can return the way you came.

Trail Sign
The trail is well-marked and connects to other local GWNF trails. Below: Lots of stuff along the trail is in bloom now; the rocks at the top are covered in lichen.

Blossoms Flowering Trees Lichen

For any of those people that are interested in geocaching, you can grab three easy ones along the trail.  All of them are normal-sized containers and have some things to trade.  One of these was placed by our inspiration for a lot of hikes, Hiking Upward.

Unfortunately, this trip was marred for us since my wife sprained her ankle very badly at the top of the ridge.  She somehow managed to hike back down under her own power despite my offerings to carry her down – quite a trooper!  We definitely will do this hike another time.

Christine Says…

Buzzard Rock was a beautiful hike for a beautiful spring day.   The summit offers a great scenic payoff with minimal effort.  The elevation gain of 650 feet is very gradual with the exception of one very short, steep climb to the ridgeline.

The early part of the hike passes close to civilization, so the sound of cars and glimpses of houses are always in sight.  However, within a half a mile, the trail leads away from everything and passes through a pretty stretch of open woods with very little undergrowth.  In early spring, the forest floor is covered with tiny wildflowers peeking out from under the brown leaves. The view from the trail eventually opens up and provides a nice view of the Front Royal Fish Hatchery and the surrounding valley below.

The view of the valley below is beautiful! Below: The Front Royal Fish Hatchery; A view of the Buzzard Rock “spine”

From this point on the trail is extremely uneven and rocky – big slabs of stone, angle up out of the ground like jagged teeth… more about that later.  The view from the top is not as dramatic as other Virginia hikes, mostly because you can’t see many distant layers of ridges.  What you do see is a deep, narrow valley below with Fort Valley Road and Passage Creek winding their way through.  Because of all the recent rain, we could hear creek’s roar even hundreds of feet above.

We enjoyed the view, had some trail mix and then headed back down the mountain.  I stopped along to way to photograph some flowering trees.  When I turned to rejoin Adam, I moved a bit too hastily and carelessly.  The toe of my boot got caught between two of the “jagged teeth” on the ridge.  My toe stopped dead, but my ankle kept moving.  It completely rolled to the side, resulting in a bad Grade 2 ankle sprain.

I was extremely glad to get back to parking lot so I could stop walking on my injured ankle. Below: My bruised and deformed ankle.

My ankle immediately started to bruise and swell, but I had no choice but to hike myself out.  Adam found a makeshift walking stick in the woods, and that helped offset weight on my injured foot.  Nonetheless, it was a long two miles back down to the car. I’ll be off the trails for several weeks to come while my ankle heals and rehabs.  I’m hoping it won’t take as long as the doctor predicted.  I hate to waste three (or more) weeks of this fantastic spring hiking weather.

Wookie Says...Wookie Says…

This was a great first hike of the year for me!  It wasn’t very steep, and I love to scramble on rocks.  What I liked less were all the small stream crossings on this trail.  I hate to get my paws wet and muddy, but that’s exactly what I ended up doing on this hike.  I actually acted quite brave, and on the return trip I crossed all the streams with confidence.  Maybe I’ll be a water loving dog yet!

Wookie on the Trail
Wookie had a great time on the hike.

I really enjoyed the breezy overlook atop Buzzard Rock.  I liked sniffing the air and feeling the sun on my back.  I even got to enjoy a few graham crackers from my masters’ trail mix.  I also got some water from my portable dog dish.

It was a great day, but I have a feeling I’m getting a bath when I get home.

Trail Notes

  • Distance – 4 miles – out-and-back
  • Elevation Change –around 650 feet
  • Difficulty – 2 This trail isn’t too steep and most people should be able to make it up to the top.
  • Trail Conditions – 3. The trail is in decent shape.  There are some muddy spots and a lot of jagged rocks on the ridge.
  • Views –3.5. There are great views along the entire ridge.  We would have liked it better if we couldn’t see a road below.
  • Waterfalls/streams –1. There are a few rock-hops across some streams, but nothing photo-worthy.
  • Wildlife – 1. This is a better bird-watching trip than a trip for spotting any mammals.  We were glad we saw a buzzard at the top since it is their rock.
  • Ease to Navigate – 4.5. The trail is well-marked with a white double blaze.
  • Solitude – 2 . This is a popular trail for local families and also rock climbers.

Directions to trailhead: From I-66, take 340 South Exit. Take a right on 55 – Strasburg Road. Take a left onto 678 – Fort Valley Road. Take a left onto Mountain Rd., Route 619, towards fish hatchery. Parking lot is on the right-hand side. If you are arriving from the south, go up 340 (following directions for Front Royal Airport) until you reach 619-Rivermont Drive. After a few miles, Rivermont Drive becomes Mountain Rd (At sharp right bend ~1/2 mile past Fire Dept.). Parking lot is on the left-hand side just past Massanutten Farms Rd. If you reach the fish hatchery or Fort Valley Road you have gone too far.

Mount Pleasant

This 5.4 mile loop hike takes you to the beautiful double summit of Mount Pleasant, across Pompey Mountain and then back down to your car.

NOTE (2/26/17): A recent hiker reported that the fall forest fire in this area did severe damage to this trail system.  He reports that many of the blazes have been destroyed and the trail is hard to follow.

Adam enjoys the vista from the west summit of Mount Pleasant. Below:  Moss was still the only greenery along the trail.  Leaves are still a few weeks away;  The sign at the trailhead marks the loop at 5.2 miles.  Our GPS marked it at 5.75, so we’ll split the difference in mileage for this blog post.

Trailhead Sign

Christine Says…

When we hiked the Cole Mountain trail last fall, we made a mental note to return to the area sometime to do the Mount Pleasant hike.   We’re so glad we did.  The hike up Mount Pleasant provides gorgeous views from both its east and west summits.  We had a crystal clear day and could see for miles in every direction.

We started out on our hike a couple hours later than we normally do.  The delayed start turned out to be quite fortuitous.  As we drove down Wiggins Spring Rd toward the trailhead, we saw 15-20 cars parked near the AT crossing and Cole Mountain trail.  We assumed that they were a group camping and hiking on the Cole Mountain trail and were thankful not to sharing trail with such a large crowd.  A little further down the road, the Mount Pleasant parking lot was empty with the exception of one frost-covered car that had obviously been left there overnight.

We started down the trail.  It was icy and muddy, but pleasantly flat for the first mile.  After we crossed a small stream, the upward climb began in earnest.  It wasn’t terribly difficult or steep climbing, but it was constant for the rest of the way to the summit.  Much of the trail was wet/soupy and covered with a thick layer of leaves.  There were several places that the trail was tough to follow, but I imagine that once more hikers pass this way, the trail will become clear again.

These could be the poster children for the defiance of Leave No Trace principles.  This was just a portion of the group we encountered.

At around the 1.5 mile mark, we started hearing distant voices in the woods – lots of distant voices.  I looked at Adam and said “I don’t think all those people are on Cole Mountain after all.” At 1.9 miles we came to a trail junction being used as a rendezvous point for about 30 kids on a church youth group trip. I have never heard people being so loud in the woods.  One group of three boys thought it was hilarious to repeatedly scream “NINKOMPOOP” at the top of their lungs as they headed down the trail.

After we cut through the crowd, we took a right turn and followed the spur trail up to the mountain top.  On the way up, we passed about 20 more hikers from the same youth group.  As I mentioned earlier, it was lucky we started our hike late, or else we might have been sharing the beautiful mountaintop with 50 shrieking kids.  As it turned out, we had the view all to ourselves.

At the summit, there was a small sign with arrows pointing to the east summit and the west summit.  We headed west first.  The west summit is on a dramatic outcropping of rocks.  It provides an expansive, layered mountain vista, including a great look at the bald summit of Cole Mountain.  The east summit is also lovely, albeit a little less dramatic.  The view is mostly valley and farmland.

We stayed at both summits longer than we normally would.  We wanted to put some time and distance between ourselves and the youth group.  We took in the view, had a snack and a drink and took a few photos.

The hike back down from the summit brings you back to the trail junction, where instead of turning left to hike back down the way you came up, you continue straight on the Henry Lanum Loop Trail.  This trail will almost immediately begin to climb upward again – over the summit of Pompey Mountain.  There are no views from this mountain.  After reaching the peak of Pompey, there is a short, but steep downhill.    The trail from this point on is a mix of uphill and downhill walking until you’re eventually returned to your car.   On this loop, you definitely spend more time hiking uphill than you do hiking downhill.  If you want less climbing, I recommend hiking this as an out-and-back.  It won’t make the hike much shorter, but will significantly cut down on the climbing.

Adam Says…

The summit provides a beautiful view of distant mountains. Below: A telephoto shot of the Cole Mountain summit from the west side of Mt. Pleasant; The eastern summit is beautiful, albeit a bit less dramatic.

View of Cole Mountain The East Summit

The hike up Mount Pleasant is one of the better hikes for views in Virginia.  If you have a few days to spend in this area, I would also recommend doing this and the Cole/Cold Mountain hike.  This area has some gorgeous mountains around you and the reason for the town nearby to be named Buena Vista.   When you combine both views from the two overlooks at Mount Pleasant, you get nearly a full view of the area around you.

The hike was not too difficult.  I would recommend that if just want to see the views, complete this hike as an out-and-back hike.  When we did this hike as a loop, we added on the trip up Pompey Mountain, but there are not any scenic views or much of note on the way back.

One interesting note about this trail is that you may see some remnants of fallen American chestnut trees throughout your hike.  They once covered this area until a fungal blight wiped out their population.   It is interesting to think how different these views would have looked in a canopy of chestnuts.

To know which way to start the hike can be a little tricky.  There are lots of paths away from the parking lot, including two blue-blazed trails marking the Henry Lanum Trail.  You will start the hike at the blue-blazed trail that starts off very flat.  The other blue-blazed trail looks clearly uphill and is the path that you will return. We felt this trail was a little hard to follow at times and could have used a few more blue blazes painted.  There were times we were unsure if we were still on the correct trail.

The trail starts off relatively flat or going downhill for about the first 1.5 miles.  Around 1.3 miles, you see a wooden sign that reads “Trail”, but other than that it is fairly easy to follow.  Keep following the blue blazes and you will eventually need to cross a couple of areas that may include small streams.   We didn’t have any trouble hopping across and I’m guessing that most of the year, it is relatively dry.  After you cross the stream, the trail will lead to the climb up to the summit.  Around 2.0 miles you will reach a junction sign that shows the Mount Pleasant Summit Spur Trail to the right.  This summit trail continues for about .4 miles until you reach the saddle.  A sign at the junction here shows there are overlooks to the West and East.  The western summit takes about .1 mile to reach and you will need to climb up the rock outcropping for the great views.  The eastern summit is closer and doesn’t require any climbing, but we were both more impressed with the views from the western summit.  Once you take some time to soak in the views, go back the way you came to reach the junction sign for the Summit Spur Trail.   If you want to continue the loop back to your car, you will continue straight on the Henry Lanum Trail.  This leads you through the forest for some more uphill climbs over Pompey Mountain.    From the junction sign, it is about 1.9 miles back to your vehicle.

Luckily, we were able to avoid the crowds of screaming teenagers that clearly don’t understand Leave No Trace principles.   Once more of the leaves start spreading their leaves, the summit overlooks will give you absolutely amazing views.

Trail Notes

  • Distance – 5.4 miles – loop.
  • Elevation Change –1350 feet.
  • Difficulty – 3.5 This loop has long, moderate uphills and shorter, steeper downhills.  It’s one of those trails that makes you feel like you’re always walking uphill.
  • Trail Conditions – 3. The trail is in decent shape.  There was a lot of mud when we hiked.
  • Views –5. The east/west double summit of Mount Pleasant is magnificent
  • Waterfalls/streams –1. There is a small stream in the woods on the departing arm of the loop.
  • Wildlife – 0. Nothing, but doubtlessly the large church group scared any wildlife away.  We did see lots of juncos along the trail.
  • Ease to Navigate – 2.5. In several spots, the trail was hard to find under thick leaves and blowdowns.  Some blazes are starting to wear away and it might be easy to miss turns.  I think ease of navigation will improve as spring/summer approach and hikers wear the path down.
  • Solitude – 3 . For today, we had a 0 for solitude, but we just had a bit of poor timing.  Being the namesake hike for this area, you will likely run into some other people on the hike.

Directions to trailhead:
Follow I-81 to Buena Vista (exit 188A).  After passing through the town of Buena Vista, follow US60/Midland Trail for 9.5 miles.  Take a left on Coffeytown Rd.  Follow Coffeytown for just under two miles.  Take a right on Wiggins Spring Rd. Follow Wiggins Spring for 3 miles.  This road will turn to a rugged gravel road.  Follow the signs for the Mt. Pleasant trailhead.  There is a small parking lot at the trailhead.

Corbin Cabin – Nicholson Hollow

This 4.2 mile hike leads you to a PATC cabin as well as a cabin once owned by a family from the mountain.

The Corbin Cabin sits alongside the Hughes River in what used to be known as Freestate Hollow.

Adam Says…

It was great to finally get out and do some hiking after the harsh winter!  I think it had been since November since we were able to actually enjoy a hike.  After some debating on which trail would be “less muddy”, we decided to try this hike.  We were surprised that the ground was actually in good shape and not muddy like we were expecting. The hike’s main draw is the historical interest.  The Corbins and Nicholsons were two families that lived in this area since the end of the Revolutionary War until the park authorities made them leave.

You begin the trail from the cement post across from the parking lot.  You start the trail walking through an area of mountain laurel that will bloom nicely in the Spring.  The trail descends through an elevation loss of 1500 feet over 1.4 miles.  Around the first half of a mile, you will begin to see a stream off to your left.  At .9 miles, you will come across some of the remnants of the families that inhabited this hollow through views of a rock wall to your right.  Downhill to the left you will see ruins of John “Russ” Nicholson’s cabin.  At 1.4 miles, you will hear the rushing of the Hughes River and see the ruins of an old cabin to the right that belonged to John T. Nicholson.  You can walk over to this area and peek inside to see the small one-room dwelling.  There is lots of glass and rusty metal, so be careful if you inspect this area.  You will see the Corbin cabin across the river.  You will need to rock-hop across the river, which is usually not too difficult.  This time, the water was higher than normal and we only had to partially put our feet in the water to get across.

The Corbin cabin is available to rent from the Potomac Appalachian Trail Club.  There are access points here to connect to Old Rag.  We plan on trying that out in the future sometime for a weekend of living like mountain folk.

The Nicholson Cabin
The Nicholson Cabin is across the river from Corbin Cabin. It’s slowly sinking back into the forest.

After you cross the creek to the cabin, take a right to join the Nicholson Hollow Trail.  After a short distance, you will have to do a little more rock-hopping as it crosses Indian Run.  You will start your steep ascent back up to Skyline Drive and at 3.6 miles you will reach the road.  When you come to Skyline Drive, take a left, heading south for about 75 yards.  You will cross the road and join a short spur trail.  After less than .1 mile, you will come across an intersecting trail with a cement post.  This is the Appalachian Trail.  Take a right, heading North on the Appalachian trail, you will descend and ascend for another .6 miles until you reach the parking lot.

Christine Says…

While this hike doesn’t offer any waterfalls or sweeping views, it does provide one of the park’s best peeks into area history.  The trail begins steeply downhill for about a mile until you reach the bottom of the hollow.  It’s a big drainage area with many small streams that pour into the Hughes River.

I love seeing all the remnants of old homesteads tucked into the woods. The main homesite, which lies on both sides of the Hughes River is such a perfect and idyllic spot.  If I were to choose anywhere in the park to build a home, I think it would be right here.  I can understand why John Nicholson was so heartbroken to leave.  I love to imagine what it would be like to go to bed each night listening to the bubbling sounds of the river and see the sun rise each morning between the mountain folds visible from the front porch.

We had the homesite to ourselves for a little while.  Fifteen minutes later, a couple guys with fishing poles arrived and we were on our way.  The long arm of the loop starts from Corbin Cabin and climbs steadily uphill for about two miles.  Most of it is moderate uphill climbing, but one section that passes through a thicket of mountain laurel is quite steep.  The final .6 miles of the hike follows the Appalachian Trail.

On the AT, we encountered a lost beagle.  She leapt out of the woods at us, probably expecting to see her people.   She had a collar, an identification tag and the remnants of a broken/frayed leash.  As soon as she realized she didn’t know us, she darted back into the woods.

We love dogs, and there was no way we were going to leave the beagle behind.  We tried to corral her in, using low voices and lots of “Good dog!” calls.  However, she was obviously terrified of strangers and started howling pitifully.  Bit by bit, we were able to get closer and closer to her.  We were just about to catch her when heard voices shouting down the trail, and the dog sprinted away.  Thankfully, this time she was running toward the call of her owners.  They were all happily reunited.  It turns out the dog broke her leash four hours earlier when she chased something away from camp.

I guess even when they’re leashed, dogs can get into trouble in the park.  I’m always surprised how many dogs we see running free with hikers.  It’s both good practice and park policy to keep dogs leashed on park trails.

Since this was our first real hike of the season, we were both pretty tired at the end.  We’re definitely looking forward to hitting the trails more regularly now that the weather is turning warmer.

Trail Notes

  • Distance – 4.2 miles – loop.
  • Elevation Change –1500 feet.
  • Difficulty – 3.5 The hike descends and ascends fairly steeply.
  • Trail Conditions – 4. The trail is in good shape.  There were a few blown-down trees covering the trail due to the winter.  Leaves on the trail make for a slick surface when going downhill.
  • Views –0. You are deep in the woods for the entire hike.
  • Waterfalls/streams –2. Near the cabins, you have a nice opportunity to see the Hughes River.
  • Wildlife – 1. We didn’t see anything alive, but found remnants of deer that didn’t survive the winter.  Expect to possibly see bear in the area.  Heard pileated woodpeckers and saw juncos.
  • Ease to Navigate – 4. Trails are clearly marked.
  • Solitude – 3. This trail isn’t the most popular due to the steep terrain, so you should likely only encounter people around the cabin and river.

Directions to trailhead:
From Skyline Drive, park on the western side at mile marker 37.9. Cross the road.  The trailhead begins at the cement post across from the parking lot.

Snowshoeing in Canaan Valley (WV)

Snowshoeing is a fantastic way to get great exercise and enjoy winter scenery.  We’ve been lucky over the past two years.  Above-average snowfall has given us several opportunities to enjoy a winter sport that isn’t very common in our area.  Snowshoeing is a perfect recreational activity for anyone – it requires no special skills.  If you can walk, you can snowshoe.

Canaan Valley provided a beautiful winter wonderland for a day of snowshoeing.

Christine Says…

Last Saturday, we took a trip over to Canaan Valley for a day of snowshoeing.  I really can’t think of a better way to spend a winter’s day outdoors.   There is something so peaceful about walking atop the fresh snow surrounded by the hush of the winter woods.

We were extremely fortunate with timing on this trip.  The conditions couldn’t have been more perfect.  The Canaan area had about nine inches of fresh snow on Thursday into Friday (on top of the two+ feet of snow already on the ground).  When we arrived on Saturday morning, roads were completely clear but the new snow was still practically untouched.

Adam takes a look over the frozen Blackwater River.

After renting  gear from Canaan Valley Resort, we set out on the Blackwater River Trail as a warm-up.  The trail is a pretty ¾ mile loop that starts off near the golf course and skims alongside the river.   The snow was waist deep, soft and powdery, but the snow shoes kept us aloft and allowed us to only sink a few inches down into the snow.  Most of the trail was completely untouched other than a short section that still had faint cross-country ski tracks. To navigate, we had to rely on blazes since no trail was visible.

It’s amazing how much more physically demanding snowshoeing is than normal hiking.  You wouldn’t think a few inches of light, fluffy snow would cause so much resistance, but it does.  I love the workout I get on snowshoes!  By the end of the loop, my legs were already a little tired but we were just getting started.

After finishing our warm-up loop, we headed over to Canaan’s campground area to hike the circuit of trails created by Mill Run, Abe Run and Deer Run.  All-in-all, the trails cover about 2.5 or 3 miles.  Even though the distance was longer, these trails were much easier to walk.  Earlier cross-country skiers and snowshoers had already traversed these trails, so there was no virgin snow to trudge through.

The ice sparkled on the tree tops.

The area was spectacularly beautiful, draped with snow and ice that sparkled under the clear blue sky.  Every time I looked up, the crystallized tree branches looked like prisms, glittering in the sun.  We saw loads of whitetail deer in the woods.  They were all chest deep in the snow.  As they struggled to move forward, they all paused to stare at us with their wide, blinking eyes.  It was almost like they were saying “Hey, snowshoes  – no fair!”

It’s funny how different a trail can feel under a blanket of snow.  Both the areas we snowshoed are areas I’ve hiked countless times in spring/summer/fall.  The snow completely transforms the trails into something unfamiliar and beautiful.  It was really a great day.  I don’t think I stopped smiling for the three straight hours I was on snowshoes.

Adam Says…

A month ago, we ventured out to Canaan Valley to try and do some snowshoeing.  Christine was battling the flu and we had consecutive days of rain, so we decided to come back and try it again in February.  This was only our second time snowshoeing, but we know this is an activity we both enjoy.

We rented our snowshoes from the Canaan Valley lodge and then drove over to the golf course to begin the Blackwater River Trail.  We parked and started putting on our gear when another car drove up and parked behind us.  We brought snowpants, but opted against putting them on because we felt they may be too hot (regretfully, our jeans got quite wet).  The couple in the vehicle asked if you could cross-country ski this area, somehow missing the ski sign about 20 feet away.   They got into their gear quickly and seemed to want to race us to start.  The woman as she started said, “Could you please keep your snowshoes off our tracks if you get in front?”  This is a given rule of etiquette – snowshoers should leave ski tracks undisturbed whenever possible.  However, she was a little rude in her delivery.  The couple got a little ways in front of us, but then she fell over.  While her husband just stared at her offering no assistance, Christine and I helped her to her feet.  She thanked us, demonstrating just a tinge of guilt from her attitude at the beginning of the trail.  The snow was probably about 3 feet high on this trail and our snowshoes would sink down about 8-12 inches each step on the fresh powder.  This does make for some great exercise and I could definitely feel my heart pound on occasion.  When we got near the riverside with the beaver dams, just a few feet away I saw a bald eagle take off from a nearby tree.  This was such a treat to see such a majestic bird soaring in the peace of the snow-covered, mountainous valley.  We continued on the trail and again caught up to the couple on skis.  The woman had fallen again and her husband just told her, “Put one foot in front of the other”.  He eventually came downhill to her to try and help as we passed them and made our way back to the car.

Abe Run, Mill Run and Deer Run create a series of interconnected loop trails.

We made our way to the Deer Run/Abe Run/Mill Run trip by parking at the campground.  We did this trail the first time we tried out snowshoeing.  The snow was a little more packed down on this trail, which made for an easier traverse.  The trail crosses through many nice forests and the snow was still sticking heavily to the branches of the trees, providing a picturesque backdrop to a nice dose of exercise.  This series of trails is nice because there are many options to shorten the trip.  The Abe Run and Mill Run Trails are loops that spur off the Deer Run trails, so you can eliminate them if you are getting tired.  The Deer Run Trail is about 1.5 miles; Abe Run is .75 miles; and Mill Run is 1 mile.  You should pick up a map beforehand at the lodge.

When we were almost back to our car we saw another group of cross-country skiers and we knew they were getting ready to enjoy a beautiful trail through the woods.  We got back to our car and then headed to one of our all-time favorite pizza spots, Sirianni’s, in Davis, WV for a much-earned warm meal after a tough bit of exercise.

Trail Notes

  • Distance – Blackwater River Trail: ¾ mile – Deer Run/Abe Run/Mill Run: Varies 1-4 miles
  • Elevation Change – Negligible
  • Difficulty – 3.  The deep powdery snow provided a good workout.
  • Trail Conditions – 4.  The snow was perfect.
  • Views –0. No views, but gorgeous winter woodland scenery.
  • Waterfalls/streams – 0. There are some streams and rivers along the trails, but everything was frozen.
  • Wildlife – 4. Lots of deer and a bald eagle!
  • Ease to Navigate – 5. Very easy to follow.
  • Solitude – 4. The park is typically very quiet if you’re away from the ski slopes.

Special Note: Canaan Valley offers all day rentals of snowshoe equipment for $20/adult $18/child. (Blackwater Falls State Park and White Grass also offer trails and equipment rental)

Directions to trailhead:
Canaan Valley Resort is on Rt. 32 about halfway between Harman and Davis.  It’s really in the middle of nowhere.  At the junction of Rt. 33 and Rt. 55 in West Virginia, continue on Rt. 33.  In Harman, pick up Rt. 32 and follow signs to the park.

Adam’s 2009 Hiking Highlights

Since Christine did some of the best in different categories, I thought I would do what is typical of most year-end reviews and do a top nine of ’09 list.  Here are my favorite hikes of the year:

9. The Priest – We’ve heard amazing things about this hike and we weren’t disappointed.  You can truly contemplate and appreciate nature while taking in the scenery at the top.

This View of McAfee is an Appalachian Trail Icon

8. McAfee Knob – This was our first time doing this hike, but I know we’ll want to go back sometime.  The summit gives you some amazing panoramic views.

7. Hawksbill Summit Loop – We really enjoyed the ability to see the peregrine falcons and talk to one of the volunteers who has been monitoring their nest.

The Brown House (as opposed to the White House) is where President Hoover stayed.

6. Mill Prong – Rapidan Camp – We had a wonderful time doing this hike.  Wading across the stream and getting a private tour of President Hoover’s retreat cabin made this a memorable trip.

5. Mary’s Rock – Starting our trail from the Jewell Hollow Overlook this time led to a wonderful ridge hike that made it much more enjoyable than previous trips.

Gorham Mountain's mix of mountain and ocean scenery makes the hike an annual favorite.

4. Gorham Mountain – This hike we did in Acadia National Park.  It is probably one of our all-time favorites and one we do every time we visit Maine.  This time, we had a lot of fog move in right after we reached the summit, but it is one not to be missed.

3. Mount Morgan – Mount Percival Trail – This trail we did on our visit to the White Mountains of New Hampshire.  The hike included a lot of interesting hiking to include climbing a series of ladders and navigating a cave crawl-through on the way down.  Great views.  The only letdown was Christine got stung by some weird insect which caused her to not feel great on the way back.

The Cold Mountain Summit

2. Cole (Cold) Mountain – This was a pleasant surprise to us.  I had heard good things about the hike, but this blew away my expectations.  Great views as you walk along the summit.  It really helped that we had a great day for fall foliage.

1. Mount Rogers – While we thought this day was going to be covered in fog, it turned out to be a marvelous hike.  This hike is what gives Virginia Highlands its name – gorgeous views all along, varied terrain, and the bonus of wild ponies.

Christine’s 2009 Hiking Highlights

Well… the year in hiking ended with a fizzle rather than a bang.  December has been a complete bust for hitting the trails.  In addition to holiday obligations, we had three weekends of snow and/or rain that kept us largely indoors.  As I sit here on New Year’s Eve, I wanted to take a few moments to reflect upon my memories from hiking in 2009.

Toughest Hike

Cascades along the South River
The South River

Toughest Hike: It’s a toss-up for this honor; if you can call it an honor.  I think both South River Falls and the Doyles River-Jones Run hikes were surprisingly tough.  Neither trail was terribly long,  but they both had substantial, steep uphill climbing that was unmitigated by switchbacks.  If pressed, I’d grant the honor of toughest hike of 2009 to South River Falls.  The hike back up from the base of the falls is relentless uphill for a couple miles.

Biggest Letdown

Lewis Spring Falls

Biggest Letdown: I think the hike to Lewis Spring Falls was my biggest disappointment of the year.  The falls were much prettier when I visited a couple years ago.  Since 2007, several big trees have fallen across the waterfall and blocked the view.  The falls were also substantially smaller than I remembered.

Best Wildlife Encounter

We saw this adorable cub and his mother right as we finished the Mary’s Rock hike.

Best Wildlife Encounter: We had many excellent wildlife sightings on our hikes this year, but I’m giving top honors to the Mary’s Rock hike.  We spotted bears three times along the trail.  We also saw a few species of small mammals (squirrels, chipmunks and rabbits) and several big, impressive bucks.  Mt. Rogers and Hawksbill Mountain are runners up in the wildlife category.

Most Photogenic

Adam enjoys the view from The Priest

Most Photogenic: Hands down, I am giving this title to The Priest.  It was not a hike I expected to be photogenic, so taking photos I loved was a pleasant surprise.  At the summit, we had gorgeous skies – wispy clouds and high visibility.  The mountains were lush and green and the woods were full of spring blossoms.

Favorite Trail of the Year

This gorgeous gray was one of the many ponies we saw on Mt. Rogers.

Trail of the Year: Mt. Rogers!  I loved every minute of that hike.  Simply said, it was a perfect day and a perfect hike.  I’ll never forget climbing up to the summit in thick fog.  I can still picture the first wild ponies emerging from the mist.  I loved seeing the clouds burn off as we neared the summit.  It was a beautiful day that I’ll always remember.

If I had to pick a second favorite hike, that honor would go to our snowshoe trip on the Deer Run Trail in Canaan Valley (WV).  We did that hike last January, before we started Virginia Trail Guide. It was my first time on snowshoes and I loved every minute of it.

Whats On Deck for 2010

We’re hoping to do as much hiking in 2010 as we did in 2009.  With luck, we’ll have some decent weather and will be able to do some winter hiking in January and February.  And if we end up with lots of snow, hopefully we’ll get to share a post about showshoeing.

We’re also hoping to tackle a few longer hikes in Shenandoah National Park, like the Riprap Trail and Overall Run.

We’ve also been tossing around the idea of taking a backpacking trip along the Appalachian Trail in the spring.  I’ve never been much of a  backcountry camper, but I’m willing to give it another try.  I think I’d enjoy the challenge.