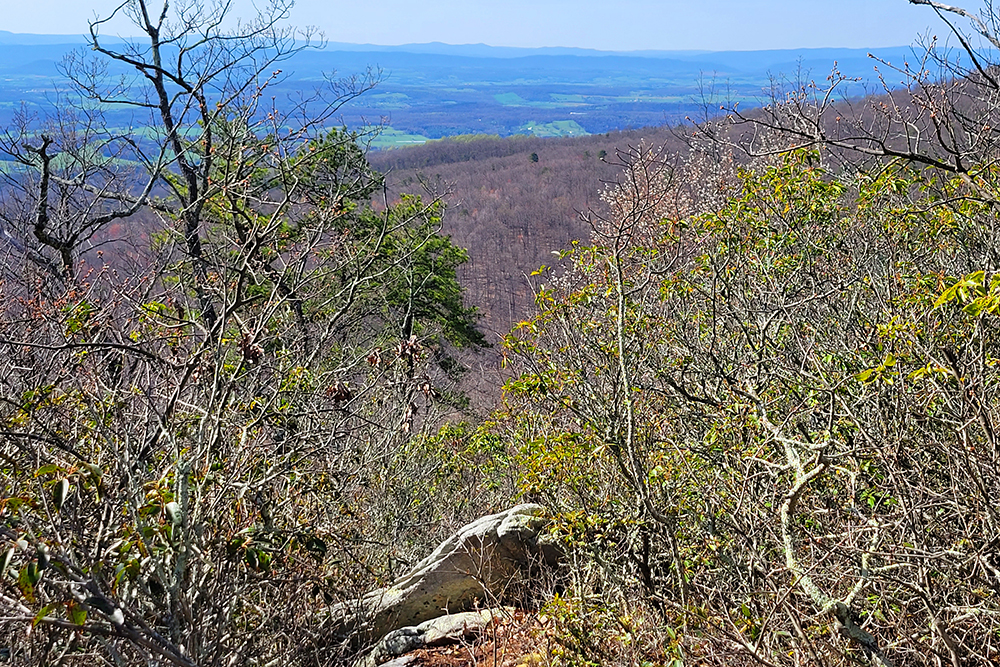
Kaylor Knob is a fairly easy 3.5 mile ridge hike offering nice (but slightly obstructed) views. The summit is the highest point on Second Mountain.
Adam Says…
For those that regularly follow our blog, you may know that Christine sprained her ankle badly during our hike up Buzzard Rock. While she was healing, we participated in a Backpacking 101 course through PATC. The workshop concludes with an overnight backpacking trip scheduled for the first weekend in May. We decided to test out the ankle with some extra weight to see if going on the backpacking trip would even be possible. So, we got our gear together and decided to do a short hike to Kaylor Knob after work last Friday.
While you can approach this summit from Cub Run, we decided to try the shorter approach, taking off from the overlook at Massanutten Resort. The hike starts across the road from the parking lot at the top of the overlook. We have hiked this trail several times to the first overlook where a geocache is hidden, but this was the first time that we took the hike to the summit.
Since the last time we did this hike, someone has improved the trail markings. You simply follow the blue-blazed trail along the way (some points also have blue signs marked with a “K.K.” and the mileage). At around .5 miles, you will come to a junction with another trail that is marked with pink blazes. Just stay to the right and continue on the blue-blazed trail. At .75 miles, you will come to a small rock outcropping that has a nice view to the west.
If you continue up the hill past this outcropping, you will continue to walk along the ridge. You will see views to the west and east through the trees that will open up at different spots. At 1.75 miles, you will come to the summit, which is marked with a larger outcropping and nice views toward Shenandoah National Park. After taking some time to enjoy the views head back the way you came.
Adam tries out the backpack.
I do think the views to the east are better than the views to the west on this hike. If you wanted to see a nice sunrise, you should get up early to make it to the summit by sunrise.
This is a great short hike to do if you’re visiting the Massanutten area.
Christine Says…
Adam and I have a backpacking trip coming up, so I needed to get out there and give the ankle a good test drive. Our original plan was to hike somewhere in Shenandoah on Saturday and then spend the night camping in our backyard. However, the weather took a turn for the worse, and we ended up just squeezing in a quick hike to Kaylor Knob on Friday evening. (we also skipped the tent in the backyard and slept in our nice, plush bed instead.)
I managed to load about 25 pounds of gear into our backpack for the “dress rehearsal”. My ankle felt completely fine for the entire hike – stable and painless. The pack was easy to carry and comfortable. It did make the hills a little tougher, but I still felt really good. I know our packs for the trip will be a little heavier, but this was still a decent test.
The Kaylor Knob hike is not particularly remarkable. It’s pretty and peaceful and has two nice viewpoints along the way. There are definitely more impressive trails in our area, but this one is a five minute drive from the house, so it was perfect for a quick after-work hike.
Note: If you have a couple days in the area, be sure to check out the Massanutten Ridge Trail!
Trail Notes
Distance – 3.5 miles out-and-back (Check out the stats from Map My Hike)*
Elevation Change – about 450 feet
Difficulty –1.5 Most people should be able to do this.
Trail Conditions – 3. While the trail is used often, it contains lots of pointy rocks.
Waterfalls/streams – 0. Non-existent.
Views – 2.5. Pretty, but not terribly open or panoramic.
Wildlife –1.5 There isn’t much room for wildlife on the top of this ridge. Expect to see birds of prey soaring in view as well as many of the local birds in the thickets.
Ease to Navigate –4.5. If you stay on the blue-blazes, you’ll be fine.
Solitude –3. You may see some people due to its popularity with vacationers, but you should still have mostly solitude.
Directions to trailhead: From Harrisonburg, head east on US 33 for about 10 miles. Turn left at the Exxon on the left and head on SR 644, Resort Drive. Follow this road and take a left on Massanutten Drive. You will reach a guard house. Let the guard know that you are here to hike and they will give you a guest pass. After about 3 miles, take a right on Del Webb Drive. Follow Del Webb Drive for about two miles until you begin to drive up to the ridge, where there is a parking lot on the left. After you park here, cross the road. At the end of the guard rail you will begin the Kaylor Knob trail.
This 4 mile out-and-back hike takes you to a ridge walk with views of Fort Valley below.
From Buzzard Rock, you get a great view of Passage Creek and Fort Valley below. Below: The view below from this vantage point; Scrabbly pines are the predominant tree at the summit
Adam Says…
This was the first time that we had done this hike. The hike seems to be very popular for people from nearby Front Royal, Winchester and Northern Virginia. It is not too difficult of a hike, which makes it a great hikes for families and newbie hikers.
You start the trail from the parking lot and you’ll follow the double white blazes for the entire trip. You begin walking through a piney area that will smell nice if the area has been warmed up in the spring/summer sun. The trail has some hills to go up and down and a few small streams to cross. Around 1.0 miles, you will arrive at a frequently-used campsite. Just cross the campsite and continue up the trail for about another .75 miles until you reach the first overlook. You will continue up the hill to reach the ridgeline. Continue to hike across the ridge to take in the views from different angles. Once you feel that you have seen all that you would like, you can return the way you came.
The trail is well-marked and connects to other local GWNF trails. Below: Lots of stuff along the trail is in bloom now; the rocks at the top are covered in lichen.
For any of those people that are interested in geocaching, you can grab three easy ones along the trail. All of them are normal-sized containers and have some things to trade. One of these was placed by our inspiration for a lot of hikes, Hiking Upward.
Unfortunately, this trip was marred for us since my wife sprained her ankle very badly at the top of the ridge. She somehow managed to hike back down under her own power despite my offerings to carry her down – quite a trooper! We definitely will do this hike another time.
Christine Says…
Buzzard Rock was a beautiful hike for a beautiful spring day. The summit offers a great scenic payoff with minimal effort. The elevation gain of 650 feet is very gradual with the exception of one very short, steep climb to the ridgeline.
The early part of the hike passes close to civilization, so the sound of cars and glimpses of houses are always in sight. However, within a half a mile, the trail leads away from everything and passes through a pretty stretch of open woods with very little undergrowth. In early spring, the forest floor is covered with tiny wildflowers peeking out from under the brown leaves. The view from the trail eventually opens up and provides a nice view of the Front Royal Fish Hatchery and the surrounding valley below.
The view of the valley below is beautiful! Below: The Front Royal Fish Hatchery; A view of the Buzzard Rock “spine”
From this point on the trail is extremely uneven and rocky – big slabs of stone, angle up out of the ground like jagged teeth… more about that later. The view from the top is not as dramatic as other Virginia hikes, mostly because you can’t see many distant layers of ridges. What you do see is a deep, narrow valley below with Fort Valley Road and Passage Creek winding their way through. Because of all the recent rain, we could hear creek’s roar even hundreds of feet above.
We enjoyed the view, had some trail mix and then headed back down the mountain. I stopped along to way to photograph some flowering trees. When I turned to rejoin Adam, I moved a bit too hastily and carelessly. The toe of my boot got caught between two of the “jagged teeth” on the ridge. My toe stopped dead, but my ankle kept moving. It completely rolled to the side, resulting in a bad Grade 2 ankle sprain.
I was extremely glad to get back to parking lot so I could stop walking on my injured ankle. Below: My bruised and deformed ankle.
My ankle immediately started to bruise and swell, but I had no choice but to hike myself out. Adam found a makeshift walking stick in the woods, and that helped offset weight on my injured foot. Nonetheless, it was a long two miles back down to the car. I’ll be off the trails for several weeks to come while my ankle heals and rehabs. I’m hoping it won’t take as long as the doctor predicted. I hate to waste three (or more) weeks of this fantastic spring hiking weather.
Wookie Says…
This was a great first hike of the year for me! It wasn’t very steep, and I love to scramble on rocks. What I liked less were all the small stream crossings on this trail. I hate to get my paws wet and muddy, but that’s exactly what I ended up doing on this hike. I actually acted quite brave, and on the return trip I crossed all the streams with confidence. Maybe I’ll be a water loving dog yet!
Wookie had a great time on the hike.
I really enjoyed the breezy overlook atop Buzzard Rock. I liked sniffing the air and feeling the sun on my back. I even got to enjoy a few graham crackers from my masters’ trail mix. I also got some water from my portable dog dish.
It was a great day, but I have a feeling I’m getting a bath when I get home.
Trail Notes
Distance – 4 miles – out-and-back
Elevation Change –around 650 feet
Difficulty – 2 This trail isn’t too steep and most people should be able to make it up to the top.
Trail Conditions – 3. The trail is in decent shape. There are some muddy spots and a lot of jagged rocks on the ridge.
Views –3.5. There are great views along the entire ridge. We would have liked it better if we couldn’t see a road below.
Waterfalls/streams –1. There are a few rock-hops across some streams, but nothing photo-worthy.
Wildlife – 1. This is a better bird-watching trip than a trip for spotting any mammals. We were glad we saw a buzzard at the top since it is their rock.
Ease to Navigate – 4.5. The trail is well-marked with a white double blaze.
Solitude – 2 . This is a popular trail for local families and also rock climbers.
Directions to trailhead: From I-66, take 340 South Exit. Take a right on 55 – Strasburg Road. Take a left onto 678 – Fort Valley Road. Take a left onto Mountain Rd., Route 619, towards fish hatchery. Parking lot is on the right-hand side. If you are arriving from the south, go up 340 (following directions for Front Royal Airport) until you reach 619-Rivermont Drive. After a few miles, Rivermont Drive becomes Mountain Rd (At sharp right bend ~1/2 mile past Fire Dept.). Parking lot is on the left-hand side just past Massanutten Farms Rd. If you reach the fish hatchery or Fort Valley Road you have gone too far.
The summit of Mount Rogers, Virginia’s highest peak, can be reached via a nine mile (total, out-and-back) hike starting from Grayson Highlands State Park. The hike follows the Appalachian Trail for most of the way and crosses into Jefferson National Forest.
Mount Rogers has beautiful and rugged terrain. The area is home to several herds of wild ponies.
Christine Says…
Mount Rogers has long been on my list of must-do hikes. The peak’s status as the state’s highest point was one draw, but personally, I wanted a chance to see the feral highland ponies that roam the area.
Our trip started under rather inauspicious conditions. We missed a turn on our way to the park, and ended up an hour out of the way. The weather had been forecast to be sunny, but the morning dawned with a thick, wet, windy cloud of bleakness blanketing the entire area. But when you have driven almost four hours to do a long-anticipated hike, you’re going to do it regardless of minor complications like gloominess and getting lost.
The trail starts out from Massie Gap in Grayson Highlands State Park.
We parked at Massie Gap in Grayson Highlands State Park. From there, we walked across a wide pasture, passed a sign warning of extremely erratic weather in the area and went through a horse gate. The trail climbed upward along a wide, gravel path.
We almost immediately saw our first small group of wild ponies, clustered under the trees on a hillside next to the trail. The fog was so thick; they looked like silhouettes in the mist. I quickly got my camera out and started snapping shots. The ponies were so small and rugged looking. Their coats were thick and their manes long and wavy. Some were solid colored and some were spotted. They also turned out to be incredibly inquisitive and gentle. While I was squatting down to take photos, a dark brown pony walked up to me and nuzzled her soft nose onto the back of my hand. I know she was looking for food, but I had nothing to offer. We lingered with the ponies for a while, and then moved on.
(note: The park rules prohibit feeding the ponies.)
The ponies are very friendly. They come right up to you, especially if they think you have food. Although it may look like Adam is feeding the pony, he’s actually just unzipping his backpack. Pictured Below: More ponies; State park rules!
We soon reached the junction with the Appalachian Trail, followed the white blazes and headed south. The fog was such a transformative element on the morning of our hike. Instead of the amazing mountain views we’d heard about, the thick mist made the scenery feel closer and more intimate. I told Adam several times that I didn’t feel like I was in Virginia at all. I felt like I was walking through some storybook version of the Scottish Highlands. It was so quiet and mysterious-feeling – no people, no tall trees rustling in the wind, no birds chirping. The terrain was open, studded with rocks and covered with scrubby low-lying brush.
The Wilburn Rock scramble was slippery, but fun.
The Appalachian Trail exits Grayson Highlands State Park at around the 1.5 mile mark. The trail becomes increasingly rugged and rocky at this point. There are a couple route options for the middle section of the trail. Hikers can continue along the AT, or choose to branch off on the Wilburn Ridge Trail for a short rock scramble (and nice views on a clear day). We chose to scramble. In retrospect, we probably should have stuck to the AT. The boulders on Wilburn Ridge were quite slippery. After we finished scrambling, we passed through a thick tunnel of rhododendron that spilled us back out into another open pasture area.
When we rejoined the AT, we started to see signs of the sun burning through the cloud layer. We soon reached a horse camp next to an enormous rock outcropping . When we climbed to the top of the rocks, we both gasped in awe at the view. The valley below us had been mostly cleared of clouds and fog, and a blanket of fall color spread out before us, as far as the eye could see. Only a few wisps of mist were left hanging on the ridges below. We sat on the rocks and took a break from walking. A couple backpackers passed below, and we overheard them talking about hearing coyotes howling in the night before. Instead of coyotes, we heard the distant squeal of ponies whinnying ahead on the trail.
We got our first clear view from atop a huge rocky outcropping. Pictured Below: fog and clouds lift off the colorful mountainside; the ferns along the trail were turning gold; one of the pony stallions we saw along the way.
After a short break atop the rocks, we continued along, passing through another thicket of rhododendron. The area was completely shaded and nearly ankle deep in mud. My trekking poles came in very handy traversing the sloppy footing. This section of the trail runs almost parallel to the Mount Rogers horse trail. There are many beautiful backcountry campgrounds nestled into the trees along this stretch. We saw about a dozen more wild ponies near the campsites, including a couple stallions.
This gorgeous gray was hanging out near the campsites. Pictured Below: More ponies – they are everywhere along the trail through Rhododendron Gap.
By this point in the hike, all the fog and clouds had blown off the mountain, giving us a great look at the gentle rolling terrain and spectacular open views. You can’t help but feel like you’re on top of the world walking along this ridge. The fall color was amazing! We stopped for lunch at the Thomas Knob Appalachian Trail hut. We shared the picnic table with several groups of day hikers and backpackers. We read the logbook, stretched a bit and then made our final push for the summit.
The spur to the summit departs the AT and heads into a dense, rainforest-like grove of spruce-fir trees. It was damp and green and draped with moss. It reminded Adam and I of the forests in the Pacific Northwest. The summit of Mt. Rogers is rather anticlimactic after passing by so many sweeping panoramic views and rocky pinnacles. The marker lays set in stone, tucked into a shady spot in the woods. There is no view to speak of, just a quiet little spot under the trees.
We only stayed at the summit for a few minutes, as there were quite a few people there. We hiked the return trip to Massie Gap fairly quickly, stopping briefly along the way to admire ponies and take in views that had been obscured by fog earlier in the day. The hike almost felt like a loop because the weather changed so dramatically between the hike up and the hike down. My final treat along the hike came less than a mile from the end, when a young foal came bounding out of the brush, nickering loudly for his mother. The foal was absolutely adorable. I wanted to pack him up and take him home with me! (Incidentally, the wild ponies are periodically rounded up and sold to keep the herd at a sustainable size. Although, I don’t think our property owners association would appreciate me bringing a miniature horse home, so I’ll just have to keep the pony ownership idea in the realm of fantasy for now.)
We had beautiful autumn views hiking back down Mount Rogers. Pictured Below: A foal is curious; View from the trail on our return.
We got back to our car, tired and happy. The entire hike took around six hours – even with lots of breaks and dawdling along the way. For its nine mile length, it’s a surprisingly easy hike.
I really can’t fully put into words how much I loved this hike. I went to sleep that night dreaming of wild ponies and gorgeous fall views. I know I’ll revisit Mt. Rogers often in my mind until I have a chance to hike it again.
Adam Says…
We had such a great hike up Mount Rogers! A co-worker that had previously hiked the mountain had described the scenery as God’s country and I couldn’t agree more. While walking across the highlands, you can’t help but feel reflective about the beauty before you. The land around you is vast and I guarantee you will be humbled by the nature.
The trail along the top of Mt. Rogers is surprisingly level.
Mount Rogers was originally named Balsam Mountain, but the name was changed to honor Virginia’s first state geologist and first president of MIT, William B. Rogers. With the peak being the highest in Virginia at 5,729 feet, this is quite an honor.
One thing that does make this a special hike is the ponies. Another co-worker of mine didn’t believe that there were wild ponies here (even with photographic evidence). The ponies were originally placed here by the park service in 1974, but are currently maintained by the Wilburn Ridge Pony Association. The ponies help protect the area from wildfires by eating grasses and underbrush. The Wilburn Ridge Pony Association takes care of their veterinary needs and provides supplements of salt and hay in winter months. There are close to 150 ponies, that are separated into three herds – some are in Grayson Highlands State Park, more are in the Scales area of Pine Mountain, and the most are near Rhododendron Gap on the Mount Rogers trail. The proceeds from the sale of the ponies at the end of September supports the vet and winter feed costs.
Adam points out the only sign of humans he can see for miles from Mt. Rogers. Picture Below: a pair of palominos; beautiful clouds and blue skies over the rocky vista.
The geology of Mount Rogers provides an interesting tale of how things were formed over the years. Geologists will be able to see evidence of gneiss, sandstone, rhyolite, and shale on their hike along the trail.
For people that like a little more direction for the route that we took, here are some points of interest along the way:
Cross the field at the Massie Gap parking lot and go through the gate to start the trail.
You will now be on the Rhododendron Trail for .8 mile until it intersects the Virginia Highlands Connector Trail. Take a left on this trail for just .2 miles.
When you reach the junction with the Appalachian trail, head south. You will shortly leave Grayson Highlands State Park and enter Mount Rogers National Recreation Area through a gate – continue straight on the AT at this point. After another .25 mile, you will have the option to stay straight on the Appalachian Trail or turn left and proceed on the Wilburn Ridge Trail. The distance is about 1 mile either way. The Wilburn Ridge Trail does join back to the AT. It is a tougher rock scramble, but I would recommend doing it on the way up rather than the way down.
Once you are back on the AT, proceed for another mile until you reach a junction of trails. This area is known as Rhododendron Gap and comes to an elevation of 5526 feet. At this junction, there is a large pinnacle rock. Climbing up the rock will give you gorgeous panoramic views that are a must-see of the hike. This area joins the AT with the Pine Mountain Trail and Crest Trail. Once you enjoy the view, make sure you follow the white blazes to stay on the AT.
You will then proceed on the AT for about 1.5 miles, walking through the bald area known as the Crest Zone, until you reach the Thomas Knob Shelter, protected by gates on both sides. This is a great place to grab a snack. There are also great views behind the cabin. This cabin sleeps plenty, since there is a ladder that goes to a second floor, allowing a little light through two small windows on the side.
Once you leave the shelter through the gate, you will be entering Lewis Fork Wilderness. Shortly after this point, to reach the summit you will need to leave the AT and proceed to the summit by taking the Mount Rogers Spur Trail for .5 mile straight ahead. The summit is marked by a simple USGS benchmark in the stone. There are two within 100 feet of each other, so make sure you find the correct one for any of you peakbaggers.
The Summit of Mt. Rogers resembles a rainforest. Pictured Below: the Thomas Knob Appalachian Trail Shelter; Adam on the summit.
Overall, the trail was really quite manageable for a 9-mile hike. The terrain is very nice in some points walking across flat lands, but there are some rocky parts, especially around the Wilburn Ridge Trail. My back and feet were in pain from having too much weight on my pack, but my muscles didn’t feel sore at all the next day.
There are just a few geocaches that you can find along the way. A couple of them are earthcaches, which do not have you finding a physical cache, but it teaches you about the geology of the area.
Christine told me that this hike has been her favorite ever. While there are a lot of contenders for me, this would definitely be a strong candidate for me as well. I feel that anyone interested in hiking in Virginia should make this a trail you must do. It is a day you will remember forever.
Trail Notes
Distance – 9 miles the way we went making a partial loop in the middle with the Wilburn Ridge Trail.
Elevation Change –About 1100 feet
Difficulty – 4. The actual trail wasn’t too tough, but due to the length we upped the difficulty. The Wilburn Ridge Trail does include a few rock scrambles, but is also manageable for most people that are the slightest bit nimble.
Trail Conditions – 3.5 The trail is well-maintained and traveled. There are muddy spots, especially through the Mount Rogers Spur Trail. The hike on the AT and Wilburn Ridge before the Rhododendron Gap area is quite rocky, causing you to watch your feet.
Views –5. Great views walking along the trail in all directions. The views from Rhododendron Gap are especially beautiful.
Waterfalls/streams –0. Non-existent.
Wildlife – 5. It doesn’t get much better than wild ponies. Bears and coyotes have been spotted also. Lots of bird-watching available also.
Ease to Navigate – 3. It is easy to get a little confused at Rhododendron Gap, but overall things are very well-maintained. Make sure you grab a map to have a backup plan.
Solitude – 2. You will get good spacing due to the length, but you will see other people due to the backpackers, AT hikers, and day visitors. It is the highest summit, which is going to draw crowds, especially at the shelter and summit.
Directions to trailhead: From Abingdon, take 58 East until you reachGrayson Highlands State Park on the left through SR 362. Continue for three miles to reach the Massie Gap parking area. The start of the trail at the gate is across the field to the north.
Molly’s Knob is the best known hike in Hungry Mother State Park. On a clear day, views of Mount Rogers can be seen from the summit.
Adam takes a look at Molly’s Knob from the viewing platform lower on the trail.
Adam Says
On our way down to Abingdon for a weekend of hiking and biking in the Highlands, we decided to stop by Hungry Mother State Park. There is an interesting legend surrounding the origin of the park’s name. Native Americans destroyed many settlements south of this park on the New River. Molly Marley and her child survived the raid and were taken captive. Eventually they escaped the raiders. They wandered through the wilderness until Molly finally collapsed. Her child wandered away, hungry and alone. Eventually the child was found by residents of a small settlement near where the park stands today. All the child would say was “Hungry Mother”. A search party went out to find Molly, but they were too late. There are some variations to this legend, but it is an interesting tale.
The colors of the fall leaves were really quite gorgeous in the park, so we decided walk around a bit. Of course, the hiking enthusiasts that we are, we decided to try the hike up Molly’s Knob.
We parked in a small lot on the northeast side of Hungry Mother Lake. We left the car and began walking the Lake Trail Loop, giving us glimpses of the beauty of the lake. After .5 miles, this joined the blue-blazed Ridge Trail. We continued on this up a steady uphill grade for .2 miles until we reached the viewing platform pictured below. With the beautiful colors on the mountain of Molly’s Knob in view, we decided to take the remaining trip to the summit. We continued up the white-blazed Molly’s Knob Trail for .9 miles. The trail was marked as a black diamond trail, but we didn’t find this portion to be too difficult. After the .9 miles, we began the fuchsia-blazed Vista Trail. This was the steepest portion of the hike, but once we got to the top, we were quite impressed by the view. While I scurried around looking for a geocache, Christine enjoyed taking a few pictures of the views. We shortened the trip back by just following the Molly’s Knob Trail to our car. We were worried about the hike taking too much out of us for our trip to Mount Rogers the next day, but it was worth the risk to see these views.
There are several geocaches to find in Hungry Mother State Park, but here are the few that I located on the trail:
The forest was filled with foliage of every color. Pictured Below: The golden foliage along this trail was especially spectacular. Adam even found several geocaches along the way.
Christine Says…
Going on this hike was completely unintentional. We wanted to drive through Hungry Mother State Park just to see what the park had to offer. But the foliage along the lake was so pretty, that we felt compelled to get out of the car and walk a bit. I thought a short stroll along the level Lake Trail would be pleasant and scenic.
After a short bit of walking, we reached the junction of the Ridge Trail, and decided to turn there to make a short 1 mile loop back to the car. At the top of the ridge, we saw the platform overlooking Molly’s Knob off in the distance. Next to the platform, a sign indicated that the summit was only 1.3 miles further. The short distance made the summit far too tempting, and we were on our way. I kind of regretted not changing clothes before we hiked. The impromptu nature of this hike had me wearing jeans, a dressy shirt and my hair was down. About halfway up the steep climb, I would have traded just about anything for a ponytail holder. As luck would have it, someone left a pack of hair elastics in one of the geocache boxes Adam found. I was much more comfortable with my hair up, but hiking in jeans is never fun.
The view from the top was obscured by fog and clouds, but it was still beautiful with all the fall color. Pictured Below: You get some nice views of the lake along the trail.
There were some steep sections of trail, but the fall colors were so beautiful I hardly noticed the climb. We had almost the entire trail to ourselves, too. We saw just two other solo hikers near the beginning of the hike, but after that we didn’t encounter a single soul. The wind was rustling through the treetops, sending colored leaves falling down all around us. Plumes of fog curled around the folds of the mountains. Off in the distance, we could hear a pileated woodpecker cackling. In no time, we reached the summit and its beautiful view of the valley. There were two benches built into the summit, so it was a perfect place to rest before hiking back down.
The trail down was so steep in some places, that momentum had us practically running downhill. The final stretch back gave us a very pretty view of the lake and the beach below. This hike turned out to be a great surprise!
Trail Notes
Distance – 3.8 miles the way we went making a partial loop. You can shed .4 miles off, by cutting out the Lake Trail Loop trail and Ridge Trail
Elevation Change –1000 feet
Difficulty – 3. The steepest parts were the Ridge Trail portion and the Vista Trail, but we found it to be a moderate hike.
Trail Conditions – 4 The trail is well-maintained and traveled. We found the Vista Trail to be a little slippery during the rain due to some clay surface.
Views –3.5. Great views from the summit and Hungry Mother Lake. On a clear day, you should be able to see Mount Rogers.
Waterfalls/streams –2. You do get some nice views of the lake. Since it used to be a stream before it was dammed, we thought it was worth mentioning.
Wildlife – 1. We saw a pileated woodpecker, but nothing else. There is some good birding in the area.
Ease to Navigate – 4. There are a few switches in trails during the path we chose, but everything was well-marked.
Solitude – 4. We only saw two people on the trail on a Saturday afternoon, so I’m guessing it is not very well-traveled. During heavy camping weekends, I would expect more traffic.
Directions to trailhead:
On I-81, take exit 47 and then take 11 South. After a little over a mile, take a right on to 16. Follow this into Hungry Mother State Park (fee required of $2-$3). Take a right immediately after the P6 lot and continue on the road until you reach a cul-de-sac parking lot. The sign for the Lake Trail Loop is at the end of the cul-de-sac.
The formation of Seneca Rocks is an exciting landmark for all to see. The trail is a pleasant three-mile hike along gentle uphill grades and switchbacks. The summit has a viewing platform suitable for all hikers and the opportunity for more adventurous folks to scramble out onto the exposed rock face for a more dramatic view.
The trail starts off over an arched bridge.
Adam Says…
When people first see the sheer rock face of Seneca, most probably assume they’re in for a really tough hike. However, I was surprised to find that this hike is not as difficult at all. This was my second time hiking up Seneca Rocks.
Seneca Rocks is probably most known among rock-climbers. You may see several dots scaling the face from the parking lot. There are multiple paths up the sections of rocks, but it is not for amateurs. Seneca Rocks is made of Tuscarora quartzite.
The trail starts off from the parking lot opposite of the Sites Homestead. You will see a sign marking the beginning of the trail, mentioning that it is 1.5 miles to the top along with 1000 feet of elevation gain. You will quickly come to a bridge across the North Fork River. The trail continues on the opposite side. There are interpretive signs along the trail that will give you a lot of information about the trees and geology of the area. You will slowly rise through the forests to meet a row of stairs which starts a steeper, uphill climb. You will have several switchbacks along the trail, but they help take the pain away you would feel for a steeper hike. Once you reach the top, there is an observation platform that allows for some gorgeous views to the west.
The view from the Seneca Rocks viewing platform. Below: Adam at the warning sign; More views
For those that are more adventurous, you will find a sign slightly above the observation point pictured above. You can continue past this point, but it is not for the faint of heart or the feeble-footed. This path will take you to actually hike the skinny area of the top of Seneca Rocks. At some points of this climb at the very top, you will be standing on rock about the width of your body with several hundred feet of drop-off on both sides of you. The views do allow you to see to the east and west from the top, but most people should stay at the observation point. Fearful of heights, the first time I did not venture much further past the warning sign. This time, I felt a little more confident and did explore things a little further. Several people have died on this portion, so do not attempt anything that is uncomfortable.
If you are interested in geocaching, there are several to find around the Seneca Rocks area. There are more than these listed, but these are the easiest to do while on this hike. Here are the ones I found in the area:
I would highly recommend anyone interested in taking a trip to West Virginia to take some time to visit Seneca Rocks. These formations are really an amazing site and the hike up is paid off by gorgeous views that will make you truly appreciate the breath-taking scenery of West Virginia.
Christine Says…
Seneca Rocks was the last stop of our whirlwind day in West Virginia. We’ve hiked this trail a few times, and wanted to take the time to share it on our website.
The hike is understandably the most heavily trafficked trail in all of Monongahela National Forest. Seneca Rocks has so much to see beyond its namesake attraction. The visitors center, located at the base of the rocks, is beautifully designed and is full of interesting exhibits, a theater and a small gift shop. The original visitors center burned to the ground in 1992, but the new one is even nicer than the original. The area also offers fishing, picnicking, nearby camping and even a restored homestead from the 1830’s. The Sites Homestead has lovely gardens and a spectacular view of the rock “spine” on the mountain above.
The Sites Homestead. Below: Horseback Riders; A peek between the rocks.
Since Adam has already described the hike itself so thoroughly, I wanted to share one of my memories from a childhood visit to Seneca Rocks. My family spent a lot of time camping and hiking in the area when I was a kid. On one trip to Seneca Rocks, I kept telling my parents that the “rock was shaped different”. My mom said that I probably didn’t remember what the rock looked like exactly. But, I insisted that a big part of the rock face had fallen right off the mountain. My parents just laughed at me. But, it turned out I was RIGHT. Two days before that visit, a large freestanding tower of rock (called the Gendarme) in the center notch of the rocks had toppled over and crumbled down the mountainside. You can see the Gendarme in this old historical engraving.
The hike to the top of Seneca is really pretty easy. You used to be able to take a guided horseback ride to the top, but Yokum’s Stables stopped operating in September of 2015.
Trail Notes
Distance – 3 miles out and back
Elevation Change –1000 feet
Difficulty – 2. The entire outbound hike is uphill along gradual grades and switchbacks.
Trail Conditions – 3.5 The trail is well-maintained.
Views –4. The view the platform is pretty to the west, but for a better view, climb beyond the platform onto the rocks for stunning east and west views.
Waterfalls/streams –3. The beginning of the hike takes you over an arched bridge and across a beautiful, wide section of the North Fork River. Several smaller streams converge near the trailhead.
Wildlife – 1. We saw lots of chipmunks and a gigantic black snake.
Ease to Navigate – 5. There is only one trail. It would be nearly impossible to get lost.
Solitude – 0. This is the most popular trail in all of Monongahela National Forest. Everybody hikes this trail, so expect lots of company along the way.
Directions to trailhead:
Seneca Rocks sits right at the junction of Rt. 33 and Rt. 55 in West Virginia. You can’t miss it. The hike starts out across the parking lot from the historic Sites Homestead.
Big Schloss is a moderate 4 mile hike with gorgeous views at the top. Located in George Washington National Forest’s Lee Ranger District, this trail is one of our favorite re-hikes due to great views and beauty of the trail.
Christine’s dad and Adam at the Big Schloss overlook.
Adam says…
Since Christine’s birthday is this week, her parents wanted to do something to celebrate. So, we decided to take them on a hike to Big Schloss and have a picnic. We’ve done this hike on numerous occasions, but this was the first time for her parents.
German settlers to this area named this rock outcropping “Big Schloss” due to its resemblance to a castle. “Schloss” means “castle” in German.
We parked at the Wolf Gap Campground. There are outhouses near the parking lot in case you need to make a pit stop before the hike. The Mill Mountain trailhead starts out from campsite #9. You’ll see the trail marker indicating a distance of two miles to Big Schloss.
Christine’s mom climbs the Mill Mountain Trail. Below: We saw lots of red and yellow in the trees already, the first panoramic view after the initial ascent, Christine’s Mom and Dad check out the small cave
The hike starts off with a fairly steep and steady uphill. However, you are getting this portion of the hike done with first, which is a nice bonus. After .66 miles, your climb ends. When you reach the ridge, the trail takes a sharp turn to the left. For most of the remainder of this hike, you will be walking on the top of the ridge, with occasional views through the trees to your left of the Long Mountain ridge and better views to your right.
At .78 miles, you will come to your first overlook. We noticed quite a bit of tree color on the trail and at the overlooks, which gets us both excited for some fall hiking. You’ll continue walking on the ridge, going slightly up and down, but not a lot of elevation change. At 1.75 miles, you will reach a signpost leading you to take a right to take the Big Schloss spur trail to the summit just .25 miles ahead. At 1.9 miles, you will see a campsite off to the left of the main trail and a small rock outcrop that holds a small cave.
You access the Big Schloss overlook via a small wood footbridge.
Shortly after this, you will cross a wooden footbridge and then reach the summit for the best views. There is not a ton of room on the rocks to view the summit, but you will likely have a spot to enjoy the view and eat a snack.
At the summit, we ate a small handful of trailmix and then made our way back to the parking lot for a picnic lunch. Christine’s mother went overboard on packing for the picnic. She brought about 15 pieces of fried chicken, various pasta salads, pineapple, grapes, cheese & crackers, three different bags of potato chips, assorted beverages, and two birthday cakes (lemon blueberry cake and coconut cake). We ate way more than should have, but we had a wonderful morning for a hike.
Adam and our friend Shannon found the Big Schloss Cache back in 2007.
If you are into geocaching, there is one that you can find not too far from the summit.
Big Schloss is one of my favorite hikes in the Lee District. It’s a beautiful hike in every season! Springtime brings a trail lined with mountain laurel and rhododendron. In the fall, the changing foliage colors spread across the valley below like a colorful tapestry (photo from Fall ’08). Summer brings fog in the valley and dense green foliage all around (photo from May 2007). In the winter, views are crystal clear and unobstructed for miles and miles.
Big Schloss offers beautiful, panoramic views – especially to the west.
The area is popular with central Virginians. The Wolf Gap campground is often full, and you’ll see hiking groups – especially on weekends. We’ve seen everything from hardcore mountain bikers to ultra-distance trail runners on the Mill Mountain trail. A couple years ago, we even met a team of competitive cyclists helping an injured teammate off the mountain. The terrain is very rugged, so I imagine you’d have to be an experienced mountain biker to travel this route.
On this particular day, we hiked with my Mom & Dad to celebrate my birthday. In addition to their wonderful company, I also got the gift of a new hiking gadget before starting the hike. My parents gave me a pair of Komperdell trekking poles. I’ve been wanting to get a set of poles for quite some time now, so I was thrilled with the present. I don’t really have the best of balance, so I loved the added stability the poles gave me hiking down the loose, rocky trail on the return trip. I was also amazed with how much strain they took off my knees. The model they gave me has cork handles, which are apparently cooler and chafe less than other handle types.
We were surprised to see how many colorful leaves had already fallen.
When we started out on our hike, the sky was brilliant blue with just an occasional cloud passing by overhead. By the time we got to the overlook, the sky was mostly cloudy and hazy. It wasn’t the best view that we’ve ever had from Big Schloss, but it was beautiful nonetheless. I loved seeing the hints of autumn starting to appear in the forest. The Virginia creeper was crimson. A lot of maples and dogwoods were starting to change, too. At every open viewpoint, we could see distant ridges with red, yellow and orange trees peppered into the greenness. Fall is definitely on its way, and I think it might be coming early this year.
We really didn’t stay too long at the summit, especially since we had a big picnic lunch waiting for us at the campground. As Adam mentioned, my mom went nuts with quantity and selection. I’m not complaining, but seriously… who brings two birthday cakes to a picnic lunch for four people?
My mom even brought birthday candles along. My family “sang” Happy Birthday to me while the breeze repeatedly blew out the candles. You’ll notice “sang” is in quote marks. I have to tell you, my family cannot sing – not a single note. They’re so bad, it’s become a family joke to make “Happy Birthday to You” sound like the saddest, most off-key, howl-inducing dirge you might ever imagine. Since we were in a public place, my dad and Adam put extra effort into singing it loudly and badly. I think I heard babies crying, dogs barking and campers exclaiming “What is that noise?”
After lunch, we parted ways with my parents and headed home. It was a great hike.
Note: There is another great trail starting out from the Wolf Gap Campground. If you have a couple days in the area, check out the Tibbet Knob trail.
Trail Notes
Distance – 4 milesout-and-back. Add another .1 mile to get to your car.
Elevation Change –1000 feet
Difficulty – 2. After a rather steep .7 mile climb at the beginning, the trail is mostly level and follows a ridge. There is one other short climb after the Mill Mountain Trail meets up with the Big Schloss spur.
Trail Conditions – 2.5. The trail is well-maintained but it’s rocky and has lots of loose footing in the first .7 mile.
Views –4.5. The view are pretty spectacular – especially on a clear day.
Waterfalls/streams –0. Non-existent.
Wildlife – 0 We didn’t see anything beyond chipmunks, birds and squirrels. We did see a fawn near the Wolf Gap campground.
Ease to Navigate – 4. Just stay straight on the trail.
Solitude – 2. This trail doesn’t see the same crowds as trails in Shenandoah National Park, but it is a popular hike with the local crowd.
Directions to trailhead:
From I-81, take exit 279. Follow Rte. 675 until it meets Route 42. Turn right on 42 and then take almost an immediate left on 675 (Wolf Gap Road). Follow Wolf Gap Road (you will have to make a few turns so keep an eye at road junctions) until you come to the Wolf Gap Campground (right on the Hardy County Line.)
Amherst County’s Cole Mountain Loop is a moderate 6 mile hike with serious payoffs at the summit. Situated in George Washington National Forest’s Pedlar Ranger District, this trail (also know as “Cold Mountain”) is one of Central Virginia’s only hikes to cross a bald, pasture-like summit. Views of the valley from the saddle and summit are open in every direction.
The Cole Mountain summit is open and offers panoramic views in every direction. In this shot you can see the white Appalachian Trail blaze and the USGS benchmark.
Christine Says…
Despite the busyness of our weekend, Adam and I made time to hike the Cole Mountain loop on Sunday morning. We had read a description of the trail on another hiking site. Their reviewer compared the summit to Scotland or Switzerland. I don’t know about that, but it was definitely some of the prettiest Virginia summit scenery I’ve ever seen.
We started out from home at 5:30 in the morning. It was still dark, but we wanted to hike before the crowds and heat got too bad. We made a short detour before the hike to visit Statons Creek Falls. It was just a couple miles from the trailhead, and was well worth a look.
The Appalachian Trail crossing is well-marked. Park across from this sign in a small lot.
The forest service road to the Cole Mountain trailhead is unpaved and bumpy. There is only room for five or six cars at the parking area, which is located right at an Appalachian Trail crossing.
The hike starts out downhill along the forest service road for a couple tenths of a mile. You’ll soon pick up the blue-blazed Hotel Trail on the right side of the road. The route follows the Hotel Trail for about 3.5 miles until a junction with the Appalachian Trail (AT). The AT takes you up a series of switchbacks, across the Cole Mountain summit and eventually back down to the parking lot where you started out.
Just a few of the gorgeous wildflowers on display in the meadow. Pictured below: The old hog wall, the open meadow along the Hotel Trail, a beautiful tree sheltering one of the loveliest backcountry campgrounds in Virginia.
The thing I loved about this hike was the ever-changing landscape along the way. It was a perfect sampling of Virginia’s varied scenery. The trail started off winding its way down through lush, green beds of ferns sheltered by old hardwoods. After passing through a short tunnel of pines, the forest gave way to a wide meadow-like clearing filled with shoulder high wildflowers in every shade of pink, purple, yellow and white. Descending back into the forest, we saw numerous remnants from a bygone mountain farm. Crumbling stone “hog walls” and errant apple trees were easily spotted along the trail.
The Cow Camp Gap Shelter. Pictured below: a checkerboard is painted onto the shelter floor, Adam enjoys reading the shelter journal
We took a snack break along a small stream just before the 3 mile mark. There was a fire pit and log seats that made a perfect place to enjoy some trail mix and water. We ended up taking another break a few tenths of a mile down the trail when we arrived at the Cow Camp Gap Shelter. This shelter is just one of many three-sided huts located along (or near) the Appalachian Trail. This one was especially nice. There was a checkerboard painted on the floor, with acorn cap and twig game pieces. The shelter had a newer log book, so there weren’t many entries to enjoy this time. The site also had the biggest picnic table I’ve ever seen. It made Adam look like he was hobbit-sized.
The shelter marks the beginning of the only serious uphill climb on this hike. About a half mile after leaving the shelter, you meet up with the Appalachian Trail and head north. Along the way, the forest begins to thin out, giving you glimpses of a view from rocky ledges along the trail.
Upon reaching the saddle of Cole Mountain, the terrain changes radically and instantly. The trees disappear and a wide, pasture-like alley appears across the summit. The field is dotted with giant boulders and speckled with wildflowers. It’s a great place for a picnic lunch. You certainly can’t beat the sweeping views in every direction.
Adam Says…
This truly was a wonderful hike! I don’t think this hike is very well known to those that don’t live in Central Virginia, but it is a true gem and definitely worth a trip no matter where you live. We had absolutely perfect hiking weather with beautiful blue skies, dappled with an occasional cloud. We plan on coming back down to this area soon to try the nearby hike of Mount Pleasant.
Cole Mountain is also commonly known as Cold Mountain (and is listed as such on Hiking Upward), but when we saw its official name through the USGS was Cole Mountain, we are sticking with their name. I know when I told my family about hiking Cold Mountain, they thought about the movie with Nicole Kidman and Jude Law. That Cold Mountain is actually in North Carolina, along the Blue Ridge Parkway.
The first lookout point along the Appalachian Trail was already showing some signs of fall.
To begin the circuit that we chose, we took the Hotel Trail. The origin of the name is supposedly derived from the landowner Joseph Richeson, whose house was known as The Hotel, due to the number of frequent guests.
Once you start the Hotel Trail, you will almost immediately come to a horse gate. Go through the horse gate and continue to follow the blue blazes. You will follow these blue blazes until you reach the junction with the Appalachian Trail. At .9 miles, you will reach the beautiful field of wildflowers on your left that Christine mentioned. At around 1.3 miles, you will reach a gorgeous spot for an overnight camp. I would highly recommend this to anyone that is planning on doing a backpacking trip. There is a large firepit formed with logs to sit and enjoy some S’mores over an open fire.
From the firepit, look to the northeast and you will see the blue blazes continue. At 1.7 miles, you will come across the “hog wall”, which is neat to think about people that used this area in the past. Continue down the trail until you reach the bottom of Cow Camp Gap at 2.9 miles. On our way down, I heard some strong howling off in the distant which sounded like coyotes. Since we’ve heard of this from other hikers, there must be some nearby. You will see on the other side of a small stream, the Cow Camp Gap Shelter. This is a great spot for any thru-hikers or people that just want to have a packed lunch, rest, or fill up water from the spring. We always enjoy reading the logs that thru-hikers and backpackers leave during their trips there. Once you see the shelter on the right, just stay on the trail until you reach the junction just ahead. The path to the right will take you to the shelter and the spring, but after your stop, you will take the path to the left. I imagine that during rainier times, this would be a nice spot to hear a trickling stream, but it was dried out when we were there.
From the junction at the shelter, you will have another .5 miles to reach the junction with the Appalachian Trail. At 3.5 miles, take a right (North) on the Appalachian trail. You will continue your ascent through a few switchbacks. At 3.7 miles, you will reach the first of two nice spots for an overlook at the edge of the switchback. Continue on the trail until you reach the large meadow with the summit. You will see a few vertical 4 foot high rocks sticking out of the ground. On the ground in the rock, you will see the USGS benchmark which marks the summit of Cole Mountain at 4,033 feet. Take a moment to enjoy the views at the summit and continue to follow the AT white blazes going north. You will see many gorgeous panoramic 360 degree views as you cross along the highlands for a few tenths of a mile. The scenery was truly breathtaking as we trekked across the highlands of the saddle, across the bald summit. (Note: camping and/or fires are not allowed on the bald of Cold Mountain.) At the end of the meadow at 5.2 miles, you will begin your descent into the woods and back to your vehicle. You will cross over a fire road, but stay on the white-blazed trail until you reach your vehicle.
Adam makes his way across the bald summit of Cole Mountain. Pictured below: this bush was heavy with berries.
If you are into geocaching, there are a two that you can find along the way. The first is at the “hog wall” and the second is near the summit. There was also another at Statons Creek Falls, which I feel is one of the prettiest waterfalls in Virginia. Here are links to the sites for those that are interested:
As a slightly humorous aside, we did see a couple of guys hiking that came over from another mountain. They had already hiked for about 8 miles, making this hike their second summit. They were planning on going back the way they came and making it a 17 mile hike to do in one day. We saw them around noon and they were hoping to make it back to their car around dinner time. They had a poor map and we tried to show them directions, but they were off quickly. However, they ended up going the opposite way away from their vehicle. We thought we should probably check the news to see if they became lost. I hope they got back safely, but I’m sure they had to reheat their dinner.
I would definitely say that this hike is one of my favorites in Virginia. The views were exceptional and the scenery along the entire trail was magnificent. Make this a “must-do” hike in your future planning! You won’t regret it.
Trail Notes
Distance – 6 miles loop
(Check out the stats from Map My Hike)* Note – the MapMyHike stats show the loop in reverse. When we rehiked the route on 6/25/16, we did it the opposite way so we hit the meadow views first.
Elevation Change – 1490 feet – The trail starts out both up and down, but the ascent to the summit is about 1.5 miles uphill.
Difficulty – 3. The trail starts with some ascents and descents. Once you meet the AT, you have about a steady uphill for 1.5 miles, but it wasn’t too tough.
Trail Conditions – 4. The trail is well-maintained and not too hard on the feet. There are some downhill portions that have some loose rock.
Views – 5. It doesn’t get better than panoramic 360 degree mountain views. We felt the scenery throughout the trail was gorgeous.
Waterfalls/streams – 0.5. There is a stream near the Cow Camp Gap shelter, but it was down to a trickle for us.
Wildlife – 1.5. We only saw a deer around here.
Ease to Navigate – 3. There aren’t a lot of turns here, but you may feel a little confused starting off.
Solitude –3.5. We did encounter a few people, but we had a lot of beauty to ourselves. Expect to see a few people along the highlands at the top, but there is a ton of room to enjoy the scenery privately.
* MapMyHike is not necessarily accurate, as the GPS signal fades in and out – but it still provides some fun and interesting information.
Directions to trailhead: Take Exit 188A off of Interstate-81, merging on to US-60 towards Buena Vista. After going through Buena Vista, take a left at Coffeytown Road/Rte 634. After 1.6 miles, take a right on to Wiggins Spring Road/Rte 755. While four-wheel drive isn’t necessary, I would recommend it since it is a rough gravel road. Stay on this for about 2.5 miles until you reach parking on the left side of the road. (GPS Coordinates for parking: 37.759652, -79.195336) Park your vehicle and then proceed further down the road for .2 miles. Before the road splits, you will see two posts marked with blue blazes which will begin the Hotel Trail.
This hike is an easy, 2.9 mile walk along (mostly) the Appalachian Trail to the summit of Shenandoah’s second highest peak. The two main vantage points along the way provide nice views of Skyline Drive and Skyland Resort below.
Little Stony Man Cliffs
Christine Says…
We chose this hike for a quick evening trip to the park. Before I get started on the trail description, let me share what an amazing night we had for wildlife watching. We saw eleven bears (four of them were young cubs), a couple pairs of twin fawns, many large bucks and a beautiful barred owl. No matter how many times we visit Shenandoah, the park always has something new to offer in form of scenery or wildlife.
Now, onto the hike! We started out at the Little Stony Man Cliffs parking area, a few miles north of Skyland Resort. The route is all uphill with 750 feet of elevation gain. For that bit of climbing, you get to enjoy the views from Little Stony Man Cliffs, which (in my opinion) are far prettier than the Stony Man summit. I love the way Skyline Drive looks winding through the woods from the cliffs’ vantage point. In autumn, the afternoon light sets the foliage ablaze at this spot. If the sky is clear, you get a beautiful view of the Page Valley. The lake you see down on the valley floor is Lake Arrowhead. We had a lot of haze on our trip, which was no surprise – thick, milky skies are the norm during Virginia summers. Until this week, we had been lucky and had been enjoying unseasonably clear skies (on the days it wasn’t raining, at least). 🙂
The haze seen from Stony Man Summit was so milky and thick.
There are several trail junctions along this route, so pay attention to the cement trail markers. If you keep following the arrows for the Stony Man summit, you can’t get lost. The climb to Little Stony Man Cliffs is short – less than a half mile of the hike. After crossing the cliffs, the grade of the trail moderates. At around the 1.3 mark, the Appalachian Trail crosses the blue-blazed Stony Man loop trail. You can take either arm of the loop at this point. We usually follow the right side of the loop up and take the other side back down. This section of the hike includes an interpretive nature trail. If you pick up a brochure at Skyland, you can read information coinciding with a series of numbered markers along the way.
When we got to the summit of Stony Man, it was cloudy, chilly and exceedingly windy. I could hardly take a photo without feeling like I was going to blow off the mountainside. We could still see all the cabins and main lodge of Skyland, but most of the valley view was completely obscured by the haze. We noticed that one small section of the cliff-side was closed for peregrine falcon activity. We didn’t stay long at the summit because sundown was rapidly approaching and I didn’t want to hike in the dark. On our way down, we crossed paths with a doe and her twin fawns. They were very cute, but quite skittish. They darted off into the woods before I could manage any photos. The entire walk back to the car was easy and downhill, and retraced the same route we had taken up.
These twin fawns quickly disappeared into the woods.
Adam Says…
This was a great hike to get big view payoffs with minimal effort. We were able to do this after dinner in a little over an hour.
The Little Stony Man Cliffs are a popular spot for Virginia rock climbing. The cliffs provide several different paths to climb and rappel off the cliffs. We once ran into a group of college students from The College of William & Mary that were learning rock climbing skills.
We encountered a pair of hikers as soon as we got to the first junction. The two hikers shown below were from Louisiana and they were taking seven days to hike the entire stretch of the Appalachian Trail that goes through Shenandoah National Park. They were averaging about 15-16 miles per day and were on their way to Skyland. Their backpacks were quite heavy, since they were packing for their entire trip. They told us they weren’t regular hikers, so we wondered afterward what compelled them to do this trip. It sounds like a fun trip!
We met two guys who were hiking the 105 miles of the AT through Shenandoah.
From Little Stony Man Cliffs, you can get a good look at the “stony man”. If you look to the south from the overlook, you can see the profile of what looks like a face. The Appalachian Mountains are some of the oldest mountains on the planet. The volcanic activity that occurred when tectonic plates moved against each other formed these mountains. Once you can picture the nose of Stony Man, you can quickly see the forehead, eye, mouth, and beard.
Stony Man from Skyline Drive – Can you see the face?
If you are interested in geocaching, there is a geocache through the Little Stony Man trail that gives you a lot of information about the geology of the area.
Difficulty – 2. This is a relatively easy walk with a little moderate uphill walking.
Trail Conditions – 3.5. There are some rocky sections and a little rock scrambling at viewpoints, but the trail is well-maintained.
Views – 3.5. Pretty views of the drive, Skyland Resort and the Page Valley
Waterfalls/streams – 0. None.
Wildlife – 2.5. Maybe some deer and birds. There are a lot of bears around Skyland, but we’ve never seen them along the Stony Man trail.
Ease to Navigate – 3.5. Pay attention at the cement markers. As long as you follow the arrows pointing to Stony Man, you won’t get lost.
Solitude – 1. This trail is one of the park’s most popular short hikes. If you want to avoid crowds, hike it on a weekday or very early on a weekend morning.
Directions to trailhead: The trail starts at the Little Stony Man Cliffs parking area along Skyline Drive. The lot is near mile marker 39.
Update: As of January 2018, camping is no longer allowed along the Camp 70 Road in Little Canaan Wildlife Management Area. More information.
The Camp 70 Road is a fantastic short bike ride along the Blackwater River.
The Camp 70 Road on a day with prettier weather.
Adam Says…
This is a great ride on a multi-purpose road. We had heard about this road being a good biking road from a local bike shop employee. You are likely to see some people hiking or biking on this road. Despite a lot of potholes, the road does run very smoothly if you keep your eyes open. The road goes along the Blackwater River and eventually ends right at the river. If you go to the very end, you will see a small blue-blazed trail. Continue this along the river for about .1 mile and you will come up to a swinging bridge. This bridge does look a little sketchy, but I convinced myself that the water wasn’t that deep if it all fell apart. I thought at one point there was one nail holding the entire thing together. There are a couple of geocaches along this trail While I was reviewing the geocache log for Blackwater Swinging Bridge Cache, I discovered some friends I met through geocaching found it the day before.
The Swinging Bridge is a short walk after the road ends
Christine Says…
So, we didn’t have great weather… this is still such a pretty, short bike ride – definitely a must-do when visiting the Canaan Valley area. There are so many gorgeous views of the Blackwater River along the way. The road is lined with popular fishing spots. There is even a deck built at one point to allow wheelchair access to fishing. The road surface has many potholes, but it’s easily handled by any mountain or hybrid bike. The ride out might be ever-so-slightly uphill, because the ride back is super-fast and makes for a fun race. 🙂
The Camp 70 Road follows the Blackwater River
Trail Notes
Distance – About 7 miles
Elevation Change – insignificant
Difficulty – 1.5
Trail Conditions – 3.5 Despite some potholes and larger gravel, this one is in good shape.
Views – 1. No views unless you count the river views
Waterfalls/streams -3.5. Nice views of the Blackwater River
Wildlife – 1.5. Mostly just deer in the area
Ease to Navigate – 4. The road is easy to navigate, but I dropped it down a point in case you were trying to find the swinging bridge. The trail is not the best marked out there, but just follow the river.
Solitude – 1. This road is extremely popular with bikers, campers, and fishers.
Directions to trailhead: The road starts behind the Shop and Save in Davis, WV. There is plenty of parking right along the road.
As one visitor commented, West Virginia was once part of Virginia, so today we’re stepping outside our home state to share one of West Virginia’s premier bike paths.
Along the Allegheny Highlands Trail
Adam Says…
We decided to try our hand (or feet) at the Allegheny Highlands Trail. This is a converted rails-to-trails bike path through the West Virginia highlands. This trail connects Elkins to Hendricks, mostly following Route 219. There are plans to extend the trail up to Thomas and beyond. Currently, there are about 25 miles of established trails. Parts of the trail are paved and parts are ground gravel, so conditions are nice for hybrid or mountain bikes.
If you are interested in doing the entire trail, I would suggest arranging a shuttle, dropping off a car at Parsons and then taking off from Elkins. This way seems to be a little easier than the opposite way due to the grade.
On our first visit to this trail, we did two segments of this trail – Parsons to Porterwood and Bretz to Hendricks. These were both two short and easy segments. This time, we decided to do the Montrose to Porterwood section which ended up being a little over 15 miles roundtrip. We started off in Montrose. The way to Portwerwood ended up being more downhill than uphill, which made to return trip about five miles on a gradual uphill. If you feel like getting the harder work done first, I would take off from Porterwood first. Since this is a rails-to-trails, the grade is not steep and any average cyclist will find the climb to be quite easy, but the uphill is definitely constant heading south.
The scenery along the trail is not amazing, but you do pass through some nice stretches through the woods. As you are getting closer to some of the towns, expect to see some houses near the trail. We actually found the Bretz to Hendricks area the prettiest of the areas.
If you are into geocaching, there are a ton of caches to find along the trail. The caches are not that tough to find, so it is a great idea if you are doing a family ride. Sadly, my GPS unit made its final find along the Allegheny Highlands Trail While I was loading the bikes onto the car, I put the GPS unit on the roof and promptly drove off with it still there. We never found it. It’s probably busted into a million pieces along Rte. 219.
Biking Along
Christine Says…
This bike ride would have been so much fun if I hadn’t developed a migraine about an hour into the ride. Literally, I felt like someone was stabbing me in the head with an ice pick. Adam kept telling me to stop biking, rest on the roadside, and let him bring the car to get me. But, I am stubborn – so I cried (yes, really) and pedaled my bike for about eight more miles. We managed to find some ibuprofen in our first aid kit, and that took a little of the edge off the migraine. I felt quite a bit better by the last couple miles, but for a lot of the ride I was simply miserable.
That said, I really recommend this bike trail for riders of any level. The climbs and descents are gentle and the trail conditions are very smooth and pleasant. There are several large stands of rhododendron along the path and the forest floor is covered with ferns. I’m always amazed by how few people use the trail. This weekend, the weather was gorgeous – 75, breezy and sunny. It was also a long, holiday weekend – but we still only passed a handful of other bikers. People don’t know what they’re missing!
Trail Notes
Distance – 25 miles worth of trails
Elevation Change – Some gentle and gradual changes in elevation.
Difficulty –2. Depends on which way you go and how far you want to ride.
Trail Conditions –3.5. The trail is paved in some sections, but the gravel sections consist of ground gravel which makes for nice riding.
Views – 1.5. Mostly views through wooded sections. Occasional views of a few forks of the Cheat River.
Waterfalls/streams -1. A few views of water, but not great looks.
Wildlife –0. Not much since it is so close to the road.
Ease to Navigate – 4. Easy to navigate, but there are a few passes that cross trafficked roads.
Solitude – 4. This is a slightly popular trail, so expect more people on weekends, especially around holidays. You still shouldn’t see that many people.
Directions to trailhead:
There are several places to park, depending on where you want to start your trail. The bike trail runs beside state road 219 that connects Elkins to Thomas. Brown signs let you know of parking lots along the way.


 Wookie Says…


