The Bubbles – Acadia National Park (ME)

Special: Acadia Edition

We’ve taken a detour from our normal coverage of Virginia hiking and biking!  For the next five posts, we’ll be doing a special edition covering the trails of Acadia National Park in Maine.

The Bubbles hike consists of two small mountains that overlook Jordan Pond.  One of the key features on this hike is a large glacial erratic hanging on the edge of the south Bubble.

Adam and Bubble Rock
Adam pretends to support the giant glacial erratic known as Bubble Rock.  Below: The first viewpoint along the trail up the South Bubble;  A view of Jordan Pond from the South Bubble; You can see how precariously the erratic hangs on the side of the mountain; When you visit the Jordan Pond House you get a great look at the Bubbles from a distance.  The two small mountains have such a distinct shape (photo from another trip).

The First View Jordan Pond from the South Bubble
Precarious
The Bubbles from Jordan Pond

Adam Says…

We had an extraordinarily tough drive up to Maine this year.  We left on a Friday with plans to stay in Sturbridge, MA for one night and then finish the trip to Maine the following day.  We were counting on a lot of weekend and rush hour traffic around Boston, so we thought breaking this into a two-day drive was a good idea.   Well, the drive on the first day should have taken us around 8 hours and ended up taking us over 12 hours.  We ran into an over two-hour delay near Allentown, PA and Connecticut traffic is always ridiculous.  On Saturday, we had a better day of driving to get to Mount Desert Island  We were very eager to stretch our legs when we got there.  When we vacation, we are not ones to idly relax; we like to pack in as much as possible.

We have hiked up the Bubbles a couple of times in the past, and have always enjoyed it.  Since this is a short hike, you should be able to fit it in a narrow time period.  From the Bubble Rock parking lot, start off on the Bubble Rock trail.  At .1 miles, you will reach a junction with the Jordan Pond Carry Trail.  We went past this and just continued straight on the trail.  In about .3 miles, you reach a junction where the North and South Bubble trail split.  Take a left at this junction and continue the path up to reach the top of the South Bubble.  Take in the views and then go back the way you came.  At the previous junction, then follow the path to the North Bubble summit.  You can this take this path back to the junction and then just take a left to head back to your vehicle.

South Bubble View
Another view from the South Bubble. Below: Trails are very well-marked throughout Acadia; Adam scrambles to the top of the boulder pile to reach the summit marker on the South Bubble; The sun came out a bit more by the time we climbed the North Bubble.

Trail Sign  Adam scampers up to the top of the summit marker A View from the North Bubble

When you reach the summit of the South Bubble, take in the views of Jordan Pond and also take some time to find Bubble Rock (not to be confused with Balance Rock, which is located along the Shore Path in downtown Bar Harbor).  It was amazing to see all the people that try to push on the rock in hopes that they can personally move a multi-ton granite boulder.  There was one family that we enjoyed watching that had a couple of younger boys with them.  One of them held a stick like a spear and seemed to have a little violent streak running through him.  He kept wanting to throw his stick at things.  We overheard him telling his family, “When I see things, I want to chuck my spear at it SOOOOO BAAAAAD!”  I’m curious to see how his deviant behavior develops over the years.  From the Bubble Rock, you can also get some views of the Park Loop Road below.  This hike pays off with stunning views despite little effort.

We also enjoyed talking with a couple at the North Bubble.  They were taking part of a quest to visit all of the U.S. National Parks.  They had been to lots of places over the last few weeks and had come from Canada a few days before Acadia.  They took some pictures of the two of us and we returned the favor.  They said they were sending their pictures to their friends that were cursing them at all of the things they have been able to do.  I guess once you make your friends envious, you have to keep it up.  I will say that the North Bubble is a little steeper to climb up, but the views from both of the Bubbles are great.

We hope that you enjoy our reviews of Acadia National Park hikes.  We have been going there for years and I think you will see that over the next few blog entries that this is a place that you should put on your “must visit” list!  There is a reason that nearby Bar Harbor, ME was once called “Eden”.  This area really feels like a paradise to both of us.

Christine Says…

We rolled onto Mount Desert Island, home of Acadia National Park, in the early afternoon after an easy six hour drive from Massachusetts.  It was a beautiful afternoon with a cold front pushing out the last of the dark, gray storm clouds and humidity from the day before.  We were really eager to start enjoying the park, so instead of going to our hotel, we immediately headed to the Acadia Visitor Center.  We changed into hiking clothes, bought our park pass and set out to do the short hike across the north and south Bubbles, overlooking Jordan Pond.

The hike is short and easy/moderate, so it’s very popular with families and novice hikers.  Even so, most of the traffic had cleared out earlier in the day, so we were able to find a parking spot right at the trailhead.  Anyone who visits Acadia knows how rare that is!  Acadia is one of the smallest and most congested national parks, so we always try to plan our activities at non-peak times to avoid crowds.

The trail climbs from the parking lot.  It starts off smoothly, but soon you’re scrambling over roots and up granite ‘stairs’.  It was a little wet from storms the night before, so we had to be careful of our footing.  There aren’t many footing surfaces more slippery than wet granite!

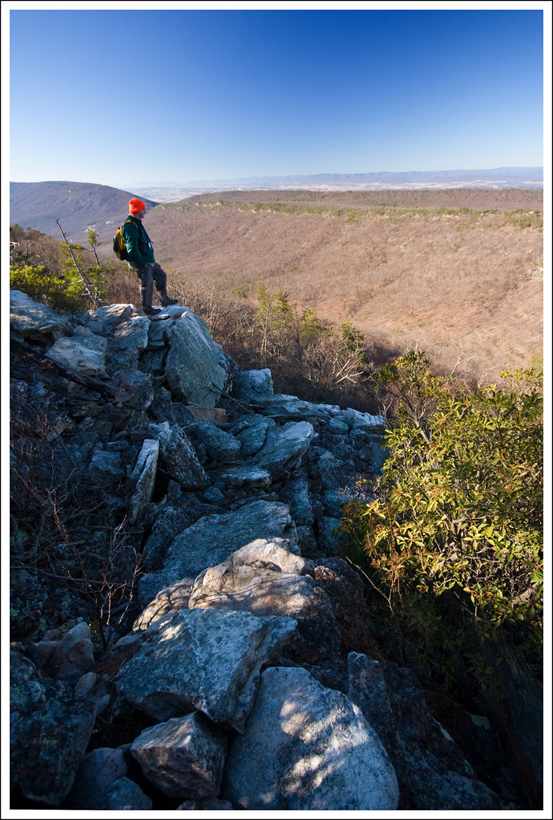
The first viewpoint we came too came atop a rocky shelf, mostly overlooking the mountains, but with a little snip of water visible.  After snapping a few quick photos, we made our way to the summit of the South Bubble.

The View from the North Bubble
The View from the North Bubble. Below: Christine and Adam enjoy views along the hike.

Christine Enjoys the View Adam enjoys the view

Of the two Bubbles, the south peak is quite a bit more popular due to the presence of ‘Bubble Rock’ – a glacial erratic that sits precariously on the side of the mountain.  It looks like it could go rolling down the mountainside at any moment.  It’s always fun to sit and listen to people plotting to push the boulder off its perch.  Some people think it would take a group pushing effort; others contemplate the lift power of a lever.  Personally, I think when the boulder falls; it will be solely Mother Nature who moves it.  I hope it doesn’t happen in my lifetime, because I like the boulder right where it is!  Another fun tradition is to take photos of your hiking buddies pretending to hold the boulder up.

If you hike past Bubble Rock, the trail leads over to an open view of Jordan Pond below.  It’s a lovely spot!

To get to the North Bubble, you simply retrace your steps back to a trail junction marking the path north.  The trail up the North Bubble might be slightly steeper, but it’s still a short and easy hike.  We spent a bit of time atop the peak, enjoying the view and luxuriating in the cool, breezy Maine air.  Being in Maine always makes me feel so happy.

We hiked back down the way we came and were back at our car quickly.  Even though the hike was nothing long or challenging, it was still a perfect way to kick off our week in Acadia!

Trail Notes

  • Distance1.7 miles
  • Elevation Change – approximately 1050 feet.  You first go up about 500 feet up to the South Bubble, go back down 200 feet and then up another 550 feet to the North Bubble
  • Difficulty – 2.5.  These trails are very short, so most people should be able to do them.  The South Bubble is fairly easy with the short distance and I would give about a 2 in difficulty.  The North Bubble is definitely more of a steep trail and is closer to a 3-3.5 in difficulty.
  • Trail Conditions – 3.  The trail is very well-maintained and traveled.  However, some of the footing can be slick in the rain on the granite.  The North Bubble does have some steeper sections which make the footing a little more treacherous.
  • Views – 4.  Great views from both Bubbles.
  • Wildlife – 0.  We didn’t really see anything, but you may be able to see birds soaring above or relaxing on the lakes below.
  • Ease to Navigate – 3.5.  This path we took was more like a T, since you split off in different directions.  Almost all of the trails in Acadia lead to other options to combine into loops with other trails.   
  • Solitude – 1Due to the distance, this is an incredibly popular hike.  You will very likely have several hikers to share in the views if you go over the summer.

Directions to trailhead: On the Park Loop Road in Acadia National Park, keep following the road until you reach the Bubble Rock parking lot.  This is just south of the Bubble Pond parking lot, so don’t be confused by the name.  The trailhead starts from about the middle of the parking lot. 

Duncan Knob

Duncan Knob is a great 3.4 mile hike in George Washington National Forest, located near Kennedy Peak and Strickler Knob.  Reaching the summit requires negotiating a Class III rock scramble.

Wookie Enjoys the View from Duncan Knob
Wookie Enjoys the View from Duncan Knob.  Below: The foliage along the trail was pretty;  The scramble is a foreboding pile of boulders; Adam and Wookie make their way up the scramble.

Rocky Trail View of the Scramble from the Bottom Scrambling with Wookie

Christine Says…

On Friday, Adam and I both took a vacation day from work to get in some fall hiking. We decided Duncan Knob suited our plans perfectly.  We wanted to avoid hikes in the national park (the crowds are dreadful this time of year) and we didn’t want to drive more than an hour. We did a little online research to look at our route options, and found pretty much everyone did the hike as an 8.7 mile loop.  The common route passes by just one spot with a view and includes significant uphill climbs on both the outgoing and return arms of the loop.

We decided to look at our maps to see if there was a more direct route to Duncan Knob.  I know lots of people primarily hike for the exercise. They love anything that makes the trail longer, steeper and more challenging.  I am not one of those people.  I don’t mind distance or elevation as long as there is a payoff for it.  But if there’s a more direct route to get the same view, I usually opt to take it.  Needless to say, we were pleased to find a 3.4 mile, out-and-back route that involved just 900 feet of elevation gain.

Blue Blazed Trail Gap Creek Trail
The Blue Blazed Trail Gap Creek Trail.  Below: The Gap Creek trail is well-marked;  Near the beginning of the trail you cross a small stream; Wookie enjoyed running back and forth across the bridge.

Gap Creek Sign Trail Sign Small Stream Wookie Running Across Bridge

The hike starts at the Gap Creek trailhead on Crisman Hollow Road.  You’ll walk a short way up a blue-blazed fire road until you see a campsite on the left side of the road.  The road continues uphill from this point, but you’ll want to cut through the campsite and cross the small bridge over the stream.  After crossing the bridge, the trail climbs steadily uphill.  For the first mile, the elevation gain is very gentle and is punctuated by flat stretches.  The trail is extremely rocky the entire way.  At mile 1.2, the blue-blazed Gap Creek trail intersects the yellow-blazed Scothorn Gap trail.  Continue on the blue-blazed trail until you reach a level place near the top of the ridge at 1.5 miles.  There’s a great campsite at this spot.  It has a big stone fire pit ringed by log benches.  There are lots of flat places to pitch tents, too.

Directly across from the campsite, the Duncan Knob spur trail begins.  The trail is blazed white and climbs steeply uphill to the summit.  As you walk along, you’ll notice the rocks on the trail are getting larger and more abundant.  Eventually, you step out of the woods and find yourself facing an enormous pyramid-shaped summit of jumbled rocks and boulders.

More Scrambling
Wookie and Adam scramble upward.  Below: The trail becomes progressively rockier; Adam explore the boulders; Wookie spots Adam climbing back down from the geocache.

Trail gets even rockier Adam scrambles Wookie sees Adam

Climb the rock scramble any number of ways (we followed a rather informal series of cairns along the left side of the rock pile) and you’ll be treated to sweeping views in almost every direction.  The scrambling was fun and not difficult at all.  I found a nice rock “chair” to sit on while Adam found a geocache hidden at the summit.  It was freezing cold and blustery sitting on the rocks, so we didn’t stay too long.

On the way down, we stopped back by the campsite and had some water and a snack.  We even gave our dog, Wookie, some graham crackers and marshmallows from our trail mix.  He did a great job on the rock scramble – especially considering how small he is.  The hike back down was pretty uneventful and just retraced our steps.  What a great hike!  I told Adam it’s been one of my favorite recent hikes.

Adam Says…

Ever since we did the Strickler Knob hike (actually our very first post!), I had been hearing that Duncan Knob also had amazing views.  I believe we put off this hike for a while due to the long 8.7 mile length, combined with lots of elevation gain.  So, I pulled out my map of the area to see if there was a different way.  Sure enough, you can easily get up to Duncan Knob by just sticking to the Gap Creek Trail.  The hike may have a little steeper of an elevation than approaching it from the Scothorn Gap Trail, but the hike up the Gap Creek Trail is much shorter and you aren’t missing much scenery.

The trail does include a few switchbacks once you start the trail over the bridge which takes the pressure of the elevation off your leg muscles.  The hike is almost all uphill, but before you know it you’ve reached the ridge where the campsite is.  We took a break here to see if there was anything else to see along the ridge, before proceeding up the white-blazed trail to the summit of Duncan Knob.  This white-blazed trail is slightly overgrown and some of the white blazes are quite faded, but it wasn’t too hard to navigate.  After only about .2 miles on this trail, we saw the looming rock scramble in front of us.  We decided to approach the rock scramble on the left-hand side.  Once you begin to climb up a few rocks, the views really begin to open up around you.  The rocks weren’t too tough to navigate, but it was harder to help navigate a small dog on a leash.  From the top, you will have great views of Middle Mountain, Waterfall Mountain, Strickler Knob, and Kerns Mountain.  The color was very nice and we took some time to soak in the scenery.

Adam enjoys the view
Adam takes in the view from Duncan Knob.  Below: A nice campsite on the ridge; Adam and Wookie take a break on the climb down;  Wookie did surprisingly well on the scramble, but occasionally he had to be carried.

Nice Campsite View on the Way Down Climbing Down

I left Christine to keep climbing up to the summit of the rock scramble and found the Duncan Knob Geocache.  A few people before me were not able to find it before me, so the owner had taken the posting offline until he had time to investigate.  I’m glad I was able to save the owner a hike back.  This was my 499th find, so I need to do something special for my 500th geocache.

If you haven’t done any hiking off Crisman Hollow Road, I would highly recommend making this a stop in the near future.  With the Massanutten Story Book Trail, Strickler Knob, and Duncan Knob hikes all off this road, I feel this road leads to some amazing hiking gems that are unknown to many.

Wookie Says...Wookie Says…

I’m so glad that I finally got invited to go hiking again!  I really enjoyed most of this trail because there wasn’t any water for me to cross.  When we first started the trail, I did a few runs across the wooden bridge with my masters on both sides.  I was feeling frisky and I was ready to get moving.  We made our way up the trail and I felt it wasn’t as bad as I was expecting.  When we got to the final rock scramble, I was a little worried.  I really enjoy climbing up on rocks, but I wouldn’t recommend it to my less-agile canine friends.  There were a couple of moments where I had to perform an iron cross and pull myself up some rocks, but Adam helped navigate me the right way through the maze of boulders.

Begging for Treats
Wookie enjoys trailmix!

The way down was a little more challenging, so Adam tucked me under his arm for most of the way down to make sure I didn’t get hurt.  I really enjoyed the views from the top of Duncan Knob and I enjoyed sniffing the air around me.  After our hike back down, my masters even let me sample a few pieces of trail mix.  I really liked the marshmallows best!  One time I dropped a marshmallow and when I picked it up again the dirt from the ground made it look like cookies and cream.  I look forward to my next time hiking and I’ll be sure to put on my pitiful, pleading face the next time Adam and Christine get ready to head out for a hike.

Trail Notes

  • Distance – 3.4 miles
    (Check out the stats from Map My Hike)*
  • Elevation Change –  900 feet
  • Difficulty – 2.5. The hike is squarely moderate – even with the rock scramble.
  • Trail Conditions –3. The trail is in good shape.  The rock scramble is not formally marked and there are some unbalanced rocks.
  • Views5. Beautiful views of the Massanutten Mountain area. The view looking toward Strickler Knob is awesome!
  • Waterfalls/streams –2. The stream is seasonal and may be dry part of the year.  When the stream is running, the area is popular with fishers.
  • Wildlife – 1.5. The area is popular with hunters, so animals tend to be reclusive.  We’ve heard of people spotting bears and deer in the general area, but we’ve never seen larger animals.
  • Ease to Navigate – 3.5. Trails are clearly blazed, but turns are not labeled and signed like they are in the national park.  It’s a good idea to have a map for this hike.
  • Solitude – 4.5. On a beautiful fall day, we saw just one other couple of hikers.

Download a trail map (PDF)

Directions to trailhead: From New Market, take 211 east.  In about 3 miles, take a left on Crisman Hollow Road. The road starts off paved, but turns to gravel.  At about 4.5 miles, park on the right at the Gap Creek trail.  Follow the fire road until you reach the first campsite on the left.  The trail starts behind the campsite at a wooden bridge.

Tibbet Knob

Tibbet Knob is a short, but steep, hike that leads to a beautiful, rocky outcropping that overlooks both Virginia and West Virginia.  It’s considered the sister hike to Big Schloss.

Tibbet Knob Summit
The yellow-blazed Tibbet Knob trail offers spectacular views. Below: The first overlook on the trail comes within the first few tenths of a mile;  The footing along most of the trail is extremely rocky.

First View Hiking Over Rocks

Christine Says…

After a string of eight 90-100+ degree days, we finally got a break in the heat and humidity!  We picked a shorter, easier hike to celebrate the cooler weather – Tibbet Knob.  We’ve found we’re doing lots of longer hikes lately – partly because we’ve simply run out of shorter hikes.

I don’t know how Tibbet Knob escaped our notice for so long, because it’s a beautiful hike.  Tibbet seems to play second fiddle to its sister hike, Big Schloss – though I’m not really sure why.  The views are nearly as spectacular and the crowds are much thinner.  The terrain is definitely steeper and rockier, but not so much so it would scare hikers off.

We started our morning with breakfast at Cracker Barrel in Woodstock (worst/slowest service ever *and* they burned the bacon!)  We finally made it to the trailhead a little after 9:00 a.m.  At the very beginning, the trail passes through several lovely, primitive campsites.  One even has a picnic table that someone dragged a couple tenths of a mile into the woods.  The ascent starts almost immediately and follows a steady, but gradual, uphill to the first open view of the valley below.  This overlook is pretty, but pales in comparison to the summit of Tibbet Knob.

Looking Toward Big Schloss
You can see Big Schloss way off in the distance (circled in yellow).  Below:  Adam enjoys his perch on the summit; The trail was often open and out in the sun; There is a lovely (but dry) campsite about 10 yards from the rocky ledge at the summit.

Adam on the Summit Open Trail Campsite at the Summit

From the first vista, the trail drops gently into a saddle.  The footing becomes increasingly rocky from this point on.  Through some sections, it’s like walking on a dry riverbed of basketball-sized stones – some smooth, some pointy.  The last .8 of a mile is very steep and rocky.  There are two short rock scrambles.  At the first one, I abandoned my trekking poles because they were seriously getting in the way.  I can telescope them shorter, but I decided it was just as well to leave them stashed along the trail to retrieve on my way down.

Shortly after the second scramble, we arrived at the summit.  We stayed at the top for quite a long while.  Normally, we’re not the lingering type, but the morning was so pleasant that we spent at least half an hour sitting on the rocky outcropping.  It was cool and breezy.  The sky was crystal clear and blue and the scent of pine trees was all around.  There were several rocks to recline on, so I laid back and closed my eyes while Adam hunted for his geocache.  We didn’t see another soul on the entire hike.  I love having a beautiful summit all to myself.

The return trip was more downhill than uphill, so it went by quickly and we were back at the car within 45 minutes.

Adam Says…

We had been meaning to try out Tibbet Knob for some time now, since we’ve been several times to do the Big Schloss hike, but this was our first experience on this hike.  The hike takes off from Wolf Gap campground.  This campground is a great area for camping and has a lot of established campsites.  We always see plenty of cars in the campground and usually many of the sites are taken, but you should be able to find a spot for overnight camping.  We definitely plan on doing a camping trip in the future since this site provides access to some great hiking trails.

As soon as you begin the yellow-blazed trail, you will come across several other campsites alongside the trail – one even had a picnic table near the firepit.  At about .6 miles you come to a nice overlook with a decent viewpoint to the south.  If you look closely, you can even see cars on the road below you.  You descend from this overlook for a short distance, but then you begin your climb.  At some points along the ascent, the terrain opens up to larger grassland areas.  You will also pass by several blueberry bushes along the trail, which reminded us of our hikes in New England.  Due to the already hot and arid summer, the blueberries were already past their peak so we weren’t able to pick any on the trail.  The terrain does get quite steep towards the end of the trail.  You don’t have to quite crawl up the slope, but it is almost that steep.  Once you get pass the two steep areas, you are very close to the summit.  The views from the top were gorgeous and I believe give you a little better view than Big Schloss, since you get a better perspective of the valley with mountains around you.  To the east, you can see the side of the Big Schloss hike.   There is also a primitive campsite near the top of the overlook if you wanted to camp at the top, but there is no nearby water source.

Signs of Fall?
Signs of Fall?  Maybe… but more likely evidence of the drought we’ve been having lately.  We saw lots of patches of red trees in the distant mountains, too.  Below:  The only wildlife we saw was a toad; Adam looked for, but did not find, the geocache; It was a beautiful, breezy, blue-sky day; the trailhead starts across the road from the Wolf Gap campground.

Trail Toad Looking for the Geocache
Tibbet Knob Summit Trail Sign

The trail does continue on from the overlook, but it just leads to SR 671 after about .7 miles.  You can actually approach this hike from SR 671 for a shorter, less steep option to give you a 1.5 mile out-and-back hike.  We stayed up at the top for a while to soak in the views and for me to look for a geocache.  I wasn’t able to find this one, but there is an alleged geocache here:

We really enjoyed the peaceful hike for the day.  We had the entire hike to ourselves on a day that was in the 70s and we even had the bonus of not having any bugs buzzing around our face.  This is a great short hike that provides enough challenge to get the blood pumping and marvelous views at the top.

Trail Notes

  • Distance – 3.1 miles out-and-back. Add another .1 mile to get to your car.
  • Elevation Change –830 feet
  • Difficulty 3. There are two significant climbs on this hike.  The first ascent gains several hundred feet in elevation and is pretty easy.  After a short, gentle series of ups and downs, the second ascent is significantly steeper/longer and includes two short rock scrambles.
  • Trail Conditions 2. The trail is extremely rocky.
  • Views –4. The view are beautiful and expansive – a little more than 180 degrees of mountains and valleys.
  • Waterfalls/streams 0. Non-existent.
  • Wildlife 0. The only creature we saw was a toad.
  • Ease to Navigate 4. Just follow the yellow blazes. There are no turns or trail junctions.
  • Solitude4. Tibbet Knob is less popular than its sister hike, Big Schloss. You may see a few hikers, but you probably won’t see large groups.

Directions to trailhead:
From I-81, take exit 279. Follow Rte. 675 until it meets Route 42. Turn right on 42 and then take almost an immediate left on 675 (Wolf Gap Road). Follow Wolf Gap Road until you come to the Wolf Gap Campground (right on the Hardy County Line.) The trailhead is across the road from the campground.

Massanutten Ridge Trail

The Massanutten Ridge Trail is part of the network of trails on resort property. This hike departs from the overlook at the top of Del Webb Dr. in Massanutten Resort.   The hike is extremely rocky, but offers superb views from an outcropping above the ski lifts.

Update 6/6/2016:  As far as we’ve heard, no one has seen goats on this hike for quite a while, so they may no longer be there.  Also… watch out for snakes along the rocky scramble.  While there have been no reported sightings of goats, we have heard about multiple rattlesnake sightings.  Timber rattlesnakes are generally reclusive and non-aggressive. They would prefer to stay hidden and not bite, so be respectful of their space, but don’t be unduly afraid. 🙂

Chased by Goats
The friendly goats were the highlight of the Massanutten Ridge Trail. Below: The hike also provided beautiful views of the valley below; blueberries (not ripe yet) were abundant along the trail; The goats used us like human salt licks; When we tried to walk on, the goat chased us down the mountain.

View From Trail into Valley Blueberries The goats chased us on the trail

Adam Says…

If I could have a movie made about this hike it would be called “The Men Who Are Licked by Goats”.  Who would have thought that there would be feral goats on the top of Massanutten?

An online hiking group I had joined, Valley Hikers, completed the Massanutten Ridge Trail Hike recently, but I was unable to attend.  While we have been up to the beginning of this trail before, we hadn’t completed the entire hike before.  We recently did the Kaylor Knob hike, so we thought we would also take care of the other hike from the top of the Massanutten overlook.

We parked one car at the Massanutten General Store near the ski slopes and then drove to start our hike at the overlook at the top of Del Webb Drive.  At the parking lot, you are treated to views of the ski slopes and mountains around.  You start the trail by climbing up a staircase to get to the level ridge.  The blue-blazed trail starts with a fairly well-trodden wide path.  There are spots along the way to peak through to see some views along the first .25 mile.  Around the .5 mile marker, the trail becomes much rockier.  You will need to constantly look where your feet are stepping or you could easily sprain an ankle.  This rocky, difficult portion continues for about 1.5 miles.  At mile 1.25 on the trail, you come to a nice overlook on the right side of the trail to see some views to the North.  At 2.25 miles, the trail eventually joins a gravel road.  You will see some blue blazes directly across the road, but there is not a trail there.  Simply take a right at this junction and climb the gravel road to reach the cellphone towers at the top.  The trail picks back up just to the right of the highest cellphone tower.  As soon as you rejoin this trail, you will come to the best views on the trail at some rocky overlooks.  At mile 3.0, you will also see a hang-gliding ramp.  It is insane to think of people just running and jumping off of this.  To your left, you will be able to see the ski lift drop-off for the top of the Diamond Jim and ParaDice ski trails.  During the ski season, the lift area is blocked off (maybe to keep people from illegally jumping on the ski trails).  There was a rope blocking it off still, but the cordoned area does not completely block access to the trail.  Continuing past the hang-gliding area, the trail continues and you start your descent.  At mile 3.25, the trail leads to an opportunity to walk down the ski slope.  You could continue further on the actual trail, but we were unsure how close it would return us to our car.  We jumped on to the slopes to take a steep descent back to our car at 4.0 miles.  During this last .75 miles, you descend about 1000 feet of elevation.  I highly recommend taking trekking poles to help keep your balance as you navigate the steep terrain.

The hike followed the ridge and provided many views of Massanutten Resort and the valley on both the eastern and western sides. Below: The middle two miles of the hike was extremely rocky and required quite a bit of rock scrambling; A view of a pond at Massanutten resort; Eastern Fence Lizards in a mating dance; We even stumbled across a Box Turtle on the trail.

Rocky Footing View of Pond Eastern Fence Lizards Box Turtle

The highlight of the trip definitely had to be the goats that we saw at the top of the ski slopes.  As soon as they saw us, they came running toward us to lick the sweat off of us.  It reminded me of a sign that we saw during our trip to Olympic National Park, warning us not to urinate in public or goats would come.  They love salt and were quite eager to lick the salt off of us.  So, beware if you are not into that thing, but I thought it was funny.  The goats were extremely friendly and followed us around for a while at the higher elevations.

There are a couple of geocaches that you could do from this hike:

This hike was tough due to the trail conditions, but it was great to see the views and the wildlife on the trail.

Christine Says…

I had art shows to work over the weekend, so we needed to find a short hike that was located really close to our home.  The Massanutten Ridge Trail seemed to perfectly suit our needs. I thought the hike would be a piece of cake because the ridgeline has very little elevation change overall.  So, I was rather surprised to find that it was a real hike with challenging terrain.  The middle section had a lot of tricky footing and rock scrambling.  It was a constant up-and-down, resembling a small scale roller coaster. Normally, it would be the type of terrain I really enjoy, but I was fighting off a cold all weekend.  My stuffiness and fatigue made this squarely moderate hike feel a lot tougher than it typically would.  There were definitely a few scrambles where I would have been happy to hang-glide right off the side of the mountain just to avoid climbing over anymore rocks!

Goat -
The Goats were fun! Below: The cell towers on top of Massanutten are a real eyesore; trail markers along the trail are blue and show mileage; for the brave – there is a hang-gliding launch on top Massanutten; the sign shows gliding regulations and disclaimers; the mountain laurel was in full bloom along the trail; at the summit there were many vultures soaring.

Ridge Trail Marker Hanggliding Lauch Ramp
Trail Sign at Peak Mountain Laurel Vulture

My favorite part of the hike was the unexpected amount of wildlife we saw along the way.  It started off with a cute Box Turtle walking along the trail. Then we saw numerous Eastern Fence Lizards – two were even participating in a courtship dance.  There were lots of butterflies fluttering about and at the overlooks we saw plenty of vultures soaring on the thermals.  But the best part was seeing the two goats living at the top of Diamond Jim.  I spotted them first through an opening in the woods, and squealed “GOATS!”  I couldn’t stop laughing at the way they licked.  They went nuts for the salty sweat.  We decided to name the goats.  “Diamond” – the white goat – is shy.  She follows the other goat everywhere, but does not participate in the vigorous licking.  The red and white goat, we decided to name “Salt Lick”.  I think the basis of that name is pretty self-evident.

All in all, the Massanutten Ridge Trail was a pleasant surprise.  The views and the wildlife both far exceeded anything I expected.

Trail Notes

  • Distance – 4.0 miles as a shuttle trail or 6 miles out and back. (If you do this as an out and back, you will not be walking on the ski slopes and will likely miss the goats)
    (Check out the stats from MapMyHike – for the out-and-back – added 4/4/15)
  • Elevation Change – 1000 feet
  • Difficulty – 4. The elevation doesn’t change a lot initially, but the terrain will make it hard work and slow going.
  • Trail Conditions – 1.5. About 1.5 miles of the trail is rocky and then a very steep downhill at the end requires trekking poles to be safest.
  • Views4.  You get some different views along the way, but the best views are from near the cellphone towers and hang-gliding platform.
  • Waterfalls/streams – 0.
  • Wildlife – 4. There aren’t many places you get to see free-ranging goats and I think most people see them here.  We also saw lizards and a turtle.
  • Ease to Navigate – 3.5.  There was a couple of spots where it was a little difficult to see which way the trail goes, but since you’re on the narrow ridge, it is not hard to just stay on that ridge.
  • Solitude –3.5. We didn’t see anyone there, but you do typically see a lot of people on the initial trail.  The people you see will generally be during the first .5 mile.  Not many people continue on this trail after that.

Directions to trailhead:
From Harrisonburg, head east on US 33 for about 10 miles. Turn left at the Exxon on the left and head on SR 644, Resort Drive.  Follow this road and take a left on Massanutten Drive.  You will reach a guard house.  Let the guard know that you are here to hike and they will give you a guest pass.  After about 3 miles, take a right on Del Webb Drive. Follow Del Webb Drive for about two miles until you begin to drive up to the ridge, where there is a parking lot on the left.  The trail begins up the small, wooden set of stairs leaving the parking lot.

Mount Rogers

The summit of Mount Rogers, Virginia’s highest peak, can be reached via a nine mile (total, out-and-back) hike starting from Grayson Highlands State Park.  The hike follows the Appalachian Trail for most of the way and crosses into Jefferson National Forest.

Mt. Rogers is beautiful, rugged and home to several herds of wild ponies.
Mount Rogers has beautiful and rugged terrain.  The area is home to several herds of wild ponies.

Christine Says…

Mount Rogers has long been on my list of must-do hikes.  The peak’s status as the state’s highest point was one draw, but personally, I wanted a chance to see the feral highland ponies that roam the area.

Our trip started under rather inauspicious conditions.  We missed a turn on our way to the park, and ended up an hour out of the way.  The weather had been forecast to be sunny, but the morning dawned with a thick, wet, windy cloud of bleakness blanketing the entire area.  But when you have driven almost four hours to do a long-anticipated hike, you’re going to do it regardless of minor complications like gloominess and getting lost.

The trail starts out from Massie Gap in Grayson Highlands State Park.

We parked at Massie Gap in Grayson Highlands State Park.  From there, we walked across a wide pasture, passed a sign warning of extremely erratic weather in the area and went through a horse gate.  The trail climbed upward along a wide, gravel path.

We almost immediately saw our first small group of wild ponies, clustered under the trees on a hillside next to the trail.  The fog was so thick; they looked like silhouettes in the mist.  I quickly got my camera out and started snapping shots.  The ponies were so small and rugged looking.  Their coats were thick and their manes long and wavy.  Some were solid colored and some were spotted.  They also turned out to be incredibly inquisitive and gentle.  While I was squatting down to take photos, a dark brown pony walked up to me and nuzzled her soft nose onto the back of my hand.  I know she was looking for food, but I had nothing to offer. We lingered with the ponies for a while, and then moved on.

(note:  The park rules prohibit feeding the ponies.)

The ponies are very friendly.
The ponies are very friendly.  They come right up to you, especially if they think you have food.  Although it may look like Adam is feeding the pony, he’s actually just unzipping his backpack.  Pictured Below:  More ponies; State park rules!

Grayson Highlands Pony in the Mist. This Mt. Rogers pony was especially friendly
Grayson Highlands Pony in the Fog. Mt. Rogers ponies have long beautiful manes
Adam laughs at the misspelled sign in Grayson Highlands State Park The sign at Grayson Highlands State Park misspelled the word Alcoholic

We soon reached the junction with the Appalachian Trail, followed the white blazes and headed south. The fog was such a transformative element on the morning of our hike.  Instead of the amazing mountain views we’d heard about, the thick mist made the scenery feel closer and more intimate. I told Adam several times that I didn’t feel like I was in Virginia at all.  I felt like I was walking through some storybook version of the Scottish Highlands.  It was so quiet and mysterious-feeling – no people, no tall trees rustling in the wind, no birds chirping. The terrain was open, studded with rocks and covered with scrubby low-lying brush.

The Wilburn Rock scramble was slippery, but fun.

The Appalachian Trail exits Grayson Highlands State Park at around the 1.5 mile mark.  The trail becomes increasingly rugged and rocky at this point.   There are a couple route options for the middle section of the trail.  Hikers can continue along the AT, or choose to branch off on the Wilburn Ridge Trail for a short rock scramble (and nice views on a clear day).  We chose to scramble.  In retrospect, we probably should have stuck to the AT.  The boulders on Wilburn Ridge were quite slippery.  After we finished scrambling, we passed through a thick tunnel of rhododendron that spilled us back out into another open pasture area.

When we rejoined the AT, we started to see signs of the sun burning through the cloud layer.  We soon reached a horse camp next to an enormous rock outcropping .  When we climbed to the top of the rocks, we both gasped in awe at the view.    The valley below us had been mostly cleared of clouds and fog, and a blanket of fall color spread out before us, as far as the eye could see.  Only a few wisps of mist were left hanging on the ridges below.  We sat on the rocks and took a break from walking.  A couple backpackers passed below, and we overheard them talking about hearing coyotes howling in the night before.  Instead of coyotes, we heard the distant squeal of ponies whinnying ahead on the trail.

We got our first view with clearning clouds atop a huge rocky outcropping.
We got our first clear view from atop a huge rocky outcropping. Pictured Below: fog and clouds lift off the colorful mountainside;  the ferns along the trail were turning gold; one of the pony stallions we saw along the way.

The clouds and fog begin to lift off Mt. Rogers The ferns on Mt. Rogers turn gold in the fall Pony Stallion on Mt. Rogers

After a short break atop the rocks, we continued along, passing through another thicket of rhododendron.  The area was completely shaded and nearly ankle deep in mud.  My trekking poles came in very handy traversing the sloppy footing.  This section of the trail runs almost parallel to the Mount Rogers horse trail.  There are many beautiful backcountry campgrounds nestled into the trees along this stretch.    We saw about a dozen more wild ponies near the campsites, including a couple stallions.

This gorgeous gray was hanging out near the campsites.
This gorgeous gray was hanging out near the campsites. Pictured Below: More ponies – they are everywhere along the trail through Rhododendron Gap.

Ponies at rest on Mt. Rogers Beautiful spotted pony on Mt. Rogers Adam watches the red pony on the Mt. Rogers hike

By this point in the hike, all the fog and clouds had blown off the mountain, giving us a great look at the gentle rolling terrain and spectacular open views.  You can’t help but feel like you’re on top of the world walking along this ridge.  The fall color was amazing!   We stopped for lunch at the Thomas Knob Appalachian Trail hut.  We shared the picnic table with several groups of day hikers and backpackers.  We read the logbook, stretched a bit and then made our final push for the summit.

The spur to the summit departs the AT and heads into a dense, rainforest-like grove of spruce-fir trees.  It was damp and green and draped with moss.  It reminded Adam and I of the forests in the Pacific Northwest.  The summit of Mt. Rogers is rather anticlimactic after passing by so many sweeping panoramic views and rocky pinnacles.  The marker lays set in stone, tucked into a shady spot in the woods.  There is no view to speak of, just a quiet little spot under the trees.

We only stayed at the summit for a few minutes, as there were quite a few people there.  We hiked the return trip to Massie Gap fairly quickly, stopping briefly along the way to admire ponies and take in views that had been obscured by fog earlier in the day.  The hike almost felt like a loop because the weather changed so dramatically between the hike up and the hike down.   My final treat along the hike came less than a mile from the end, when a young foal came bounding out of the brush, nickering loudly for his mother.  The foal was absolutely adorable.  I wanted to pack him up and take him home with me!  (Incidentally, the wild ponies are periodically rounded up and sold to keep the herd at a sustainable size.  Although, I don’t think our property owners association would appreciate me bringing a miniature horse home, so I’ll just have to keep the pony ownership idea in the realm of fantasy for now.)

We had beautiful autumn views hiking back down Mt. Rogers
We had beautiful autumn views hiking back down Mount Rogers. Pictured Below: A foal is curious; View from the trail on our return.

A wild Mt. Rogers foal stays close to his mother We had awesome views on the hike back.

We got back to our car, tired and happy.  The entire hike took around six hours – even with lots of breaks and dawdling along the way.  For its nine mile length, it’s a surprisingly easy hike.

I really can’t fully put into words how much I loved this hike. I went to sleep that night dreaming of wild ponies and gorgeous fall views.  I know I’ll revisit Mt. Rogers often in my mind until I have a chance to hike it again.

Adam Says…

We had such a great hike up Mount Rogers!  A co-worker that had previously hiked the mountain had described the scenery as God’s country and I couldn’t agree more.  While walking across the highlands, you can’t help but feel reflective about the beauty before you.  The land around you is vast and I guarantee you will be humbled by the nature.

The trail along the top of Mt. Rogers is surprisingly level.

Mount Rogers was originally named Balsam Mountain, but the name was changed to honor Virginia’s first state geologist and first president of MIT, William B. Rogers.  With the peak being the highest in Virginia at 5,729 feet, this is quite an honor.

One thing that does make this a special hike is the ponies.  Another co-worker of mine didn’t believe that there were wild ponies here (even with photographic evidence).  The ponies were originally placed here by the park service in 1974, but are currently maintained by the Wilburn Ridge Pony Association.  The ponies help protect the area from wildfires by eating grasses and underbrush.  The Wilburn Ridge Pony Association takes care of their veterinary needs and provides supplements of salt and hay in winter months.  There are close to 150 ponies, that are separated into three herds – some are in Grayson Highlands State Park, more are  in the Scales area of Pine Mountain, and the most are near Rhododendron Gap on the Mount Rogers trail.  The proceeds from the sale of the ponies at the end of September supports the vet and winter feed costs.

Adam points out the only sign of humans he can see for miles from Mt. Rogers
Adam points out the only sign of humans he can see for miles from Mt. Rogers. Picture Below: a pair of palominos; beautiful clouds and blue skies over the rocky vista.

Pair of palomino ponies on Mt. Rogers Rocky views and blue skies on the hike down Mt. Rogers

The geology of Mount Rogers provides an interesting tale of how things were formed over the years.  Geologists will be able to see evidence of gneiss, sandstone, rhyolite, and shale on their hike along the trail.

For people that like a little more direction for the route that we took, here are some points of interest along the way:

  • Cross the field at the Massie Gap parking lot and go through the gate to start the trail.
  • You will now be on the Rhododendron Trail for .8 mile until it intersects the Virginia Highlands Connector Trail.  Take a left on this trail for just .2 miles.
  • When you reach the junction with the Appalachian trail, head south.  You will shortly leave Grayson Highlands State Park and enter Mount Rogers National Recreation Area through a gate – continue straight on the AT at this point.  After another .25 mile, you will have the option to stay straight on the Appalachian Trail or turn left and proceed on the Wilburn Ridge Trail.  The distance is about 1 mile either way.  The Wilburn Ridge Trail does join back to the AT.  It is a tougher rock scramble, but I would recommend doing it on the way up rather than the way down.
  • Once you are back on the AT, proceed for another mile until you reach a junction of trails.  This area is known as Rhododendron Gap and comes to an elevation of 5526 feet.  At this junction, there is a large pinnacle rock.  Climbing up the rock will give you gorgeous panoramic views that are a must-see of the hike.  This area joins the AT with the Pine Mountain Trail and Crest Trail.  Once you enjoy the view, make sure you follow the white blazes to stay on the AT.
  • You will then proceed on the AT for about 1.5 miles, walking through the bald area known as the Crest Zone, until you reach the Thomas Knob Shelter, protected by gates on both sides.  This is a great place to grab a snack.  There are also great views behind the cabin.  This cabin sleeps plenty, since there is a ladder that goes to a second floor, allowing a little light through two small windows on the side.
  • Once you leave the shelter through the gate, you will be entering Lewis Fork Wilderness.  Shortly after this point, to reach the summit you will need to leave the AT and proceed to the summit by taking the Mount Rogers Spur Trail for .5 mile straight ahead.  The summit is marked by a simple USGS benchmark in the stone.  There are two within 100 feet of each other, so make sure you find the correct one for any of you peakbaggers.
The Summit of Mt. Rogers resembles a rainforest. Pictured Below: the Thomas Knob Appalachian Trail Shelter; Adam on the summit.

The Thomas Knob Applachian Trail Hut Adam claims a geocache on the summit of Mount Rogers.

Overall, the trail was really quite manageable for a 9-mile hike.  The terrain is very nice in some points walking across flat lands, but there are some rocky parts, especially around the Wilburn Ridge Trail.  My back and feet were in pain from having too much weight on my pack, but my muscles didn’t feel sore at all the next day.

There are just a few geocaches that you can find along the way.  A couple of them are earthcaches, which do not have you finding a physical cache, but it teaches you about the geology of the area.

Christine told me that this hike has been her favorite ever.  While there are a lot of contenders for me, this would definitely be a strong candidate for me as well.  I feel that anyone interested in hiking in Virginia should make this a trail you must do.  It is a day you will remember forever.

Trail Notes

  • Distance – 9 miles the way we went making a partial loop in the middle with the Wilburn Ridge Trail.
  • Elevation Change –About 1100 feet
  • Difficulty – 4. The actual trail wasn’t too tough, but due to the length we upped the difficulty.  The Wilburn Ridge Trail does include a few rock scrambles, but is also manageable for most people that are the slightest bit nimble.
  • Trail Conditions – 3.5 The trail is well-maintained and traveled.  There are muddy spots, especially through the Mount Rogers Spur Trail.  The hike on the AT and Wilburn Ridge before the Rhododendron Gap area is quite rocky, causing you to watch your feet.
  • Views –5. Great views walking along the trail in all directions.  The views from Rhododendron Gap are especially beautiful.
  • Waterfalls/streams –0. Non-existent.
  • Wildlife – 5. It doesn’t get much better than wild ponies.  Bears and coyotes have been spotted also.  Lots of bird-watching available also.
  • Ease to Navigate – 3. It is easy to get a little confused at Rhododendron Gap, but overall things are very well-maintained.  Make sure you grab a map to have a backup plan.
  • Solitude – 2. You will get good spacing due to the length, but you will see other people due to the backpackers, AT hikers, and day visitors.  It is the highest summit, which is going to draw crowds, especially at the shelter and summit.

Directions to trailhead:
From Abingdon, take 58 East until you reachGrayson Highlands State Park on the left through SR 362.  Continue for three miles to reach the Massie Gap parking area.  The start of the trail at the gate is across the field to the north.

Turk Mountain

Turk Mountain is a 2.2 mile hike of moderate difficulty.  The trail is located at the far southern end of the park, and is less-traveled than many of the park’s other hikes.

Wookie and Adam enjoy the summit of Turk Mountain.

Adam Says…

We weren’t feeling terribly energetic on Saturday, so we decided to do a short hike in the southern district of Shenandoah National Park.  Since it was cool, we even got to bring our pug, Wookie, along.  The Turk Mountain trail is only 2.2 miles long, but it seems a bit longer due to the uphill portion.  When you start, you will be on the Appalachian Trail for .2 miles. Then you will split off to join the Turk Mountain trail (marked by blue blazes).  The last half of a mile is all uphill.  During the climb, the side of the mountain blocks all breezes. We recommend hiking this on a cooler day with low humidity.  Most of the times we have hiked this trail, it has been hot and humid, and when the breeze is blocked it feels stifling.  There are some views to the east at about .9 miles into your hike at the last switchback, but the views are much better ahead.  When you reach the summit, the breeze will instantly greet you again.  Continue just past the marker to climb onto the summit rocks.  You will get some great views of a large talus slope and the valley below to the west.

The talus slope below the summit is expansive and impressive.

This is a fun hike that a lot of people try due to the shortness in distance and close proximity to the southern entrance to Shenandoah National Park.

Christine Says…

As we entered the park on Saturday morning, I was telling Adam that I don’t feel like we see as much wildlife in the southern district as we do elsewhere in the park.  Wouldn’t you know, as soon as the words finished coming out of my mouth, we passed a huge bear sitting right on the side of the road.  I like to think he was serving as the park’s official greeter that day.  A little later we passed a doe and fawn and a turkey with her brood of babies.  What are baby turkeys called  – turklings? turklets?

Baby Turkey? Turkling? Turklet?

I digress… and now onto the hike!  Turk Mountain is a fun, short hike that we’ve done several times in the past year.  It’s a hike I choose a lot when I want an excuse to go to Sonic (this hike is near the Waynesboro park entrance.  That town is home to our area’s only Sonic).  I just love their coconut creme pie milkshakes.  🙂

Wow, I digress again.  We had beautiful weather for this trip along the Turk Mountain trail.  For the first half of the hike, we enjoyed cool, pleasant, breezy weather. The conditions were ideal for hiking, and I started wondering if we’d made a mistake in not selecting a longer hike.  By the time we passed through the saddle and started our uphill climb, I was glad we’d decided to keep things short.  The uphill portion of Turk Mountain isn’t terribly steep, I think I was just a bit tired from my busy week.

Indian Pipes along the trail.
Indian Pipes along the trail.  Pictured below:  Butterflies and other wildflowers were also seen along the trail.

When we arrived at the summit of Turk Mountain, we had the entire rocky jumble all to ourselves.  We climbed around on the rocks and enjoyed the crisp, gentle wind. The rocks at the summit of Turk Mountain are somewhat different looking than other rocks in the park.  I don’t know much about geology, but the color seems to have more pink and gray undertones than other summits.  Because this summit receives less foot-traffic than other SNP hikes, the rocks are in better shape – still covered with lichen and other plants.  When you visit more popular summits like Old Rag or Stony Man, be sure to notice barren the rocks are.

The rocks on the Turk Mountain summit are different.

Wookie was so cute climbing around like a tiny mountain goat.  I’m always amazed by how confident and agile he is on rock scrambles.  The view from the top was a bit hazy, so I didn’t get any great photos.  But it was still a fun hike and a very pleasant morning in the park.

wookieWookie Says…

It’s been a while since I’ve gotten to accompany my masters on a hike.  The last hike I did with them was the Dry Run Falls hike and I got a lot of ticks that day.  Since the temperature was cool for late June, I was allowed to come along.  This hike had a few things that I like – scrambling over rocks and views.  I’m really good at climbing over rocks, so I was able to do this pretty well.  I wouldn’t recommend all dogs to attempt this hike, since you really have to watch your paws or you could hurt yourself.  Adam had to carry me over a few precarious rocks because I have short legs.  However, I was able to confidently go back quicker than he could.  On the way back down from the summit, I ran across a couple hiking up.  For some reason, the woman cowered behind her husband and didn’t want to be near me.  I tried to sniff her leg and she jerked it back quickly.  I guess she thought I was really scary or vicious.  Or maybe she was intimidated by my colorful Aztec-pattern collar.  The bonus for the day is that I didn’t get any ticks on me.

Trail Notes

  • Distance –2.2 miles out-and-back
  • Elevation Change – 690 feet
  • Difficulty 3.  This hike has some nice flat parts to it, but the elevation change is over a short distance, making this a strong uphill for a portion.
  • Trail Conditions 3.  Some of the trail is very smooth, but other parts are covered by sharp, pointy rocks.
  • Views –3. There are some nice views from the top, but there are better hikes with more expansive views.  The talus slope makes for some interesting scenery to add to the view.
  • Waterfalls/streams 0. Non-existent.
  • Wildlife 1. You likely won’t see a lot here due to the steepness of the trail.  The summit does provide for nice hawk and bird viewing.
  • Ease to Navigate 4.  Just one turn from the AT on to the Turk Mountain Trail.
  • Solitude3. There aren’t as many visitors to the southern section as other areas of SNP, but it is fairly popular.  The summit rocks don’t lead to a lot of room to get views, so you may be sharing the beauty with others during mid-day hikes.

Directions to trailhead:

Follow Skyline Drive to mile 94.1.  Park at the Turk Gap parking lot.  Cross the drive and pick up the trail.

Humpback Rock

Humpback Rock is a steep, but popular trail in the northern section of the Blue Ridge Parkway with great views.

The summit of Humpback is always crowded.

Adam Says…

This was the third of our three hikes in one day, with Crabtree Falls and The Priest making up the earlier hikes.  We both were quite exhausted.  Christine definitely didn’t want to do this when we arrived.  She blamed me for tweeting about it earlier, since she felt the tweet had publicly committed us to finishing all three hikes.  So, I think I’ll not be allowed to tweet for a while.  We were both low on energy, but we relied on each other to get ourselves up to the top.

It is surprising to see all of the different people that hike this trail and what they choose to wear.  We saw people with serious hiking gear and trekking poles.  We saw elderly people with business shoes and teenage girls wearing party dresses.  This is a steep trail through most of the hike, so be prepared and wear appropriate shoes/clothes or you may end up on a future blog.  As much as you will huff-and-puff on the way up, you will likely have a sadistic smile on the way down as you witness the effort on the faces of those ascending, knowing your work is behind you. We heard a lot of music when we were hiking up and couldn’t place it.  It turns out there was a bluegrass concert at the Humpback Rocks visitor center.

You can extend the hike an extra mile by taking off from the Humpback Rocks Visitor Center parking lot and taking the Mountain Farm Trail.  This takes you through a re-creation of an 1890s farm with lots of buildings you can inspect and think about a farming time long ago.  For us, we didn’t have any fuel left in our tanks to walk the extra mile and the concert was taking place at the farm.

You can see a little snip of the Blue Ridge Parkway from the summit.

The views from the top are quite remarkable and you will have some gorgeous views of the Parkway and the Blue Ridge Mountains.  Take some time to soak in the beauty of the area.

Christine Says…

Let’s see here – what do I remember more about Humpback Rock… the pain or the suffering? Really it’s so close; I’m going to have to call it a draw. All kidding aside, Humpback Rock is actually a fun and scenic hike. This isn’t the first time we’ve hiked it, and we normally enjoy the hike quite a bit. However, it was probably rather ill-advised for us to hike it as the final leg of our trifecta of hikes along the Blue Ridge Parkway. We hadn’t eaten anything in over eight hours (except for that half donut on the summit of The Priest). We were both really hungry and thirsty, but stupidly mused “How bad can one more mile of uphill really be?”

As we learned, it can be quite bad! Along the way, Adam and I moaned at every moment that someone else wasn’t in earshot. We took turns declaring that we should turn around, go back to the car and just get lunch at Sonic. At one point, I said to Adam “Here… take this blasted camera and go up to the top and take photos for me. I’ll wait here.” A few minutes later, I turned around and saw Adam sitting on a rock about thirty feet back. He told me that he didn’t think his feet would move – not even one more step. Basically, we were a big, stinking heap of melodrama.

Last time we hiked up to Humpback Rock was April of 2008. Sometime since then, the trail has been re-routed. The first half of the climb still follows a steep, but wide and smooth, pathway up the mountainside. In the past, the second half of the trail climbed up the backside of the rock. The terrain was more like a scramble than a trail, but it was fun. Now, in order to reach the top, hikers must climb around and under the rock and then follow a trail up the side to reach the summit.

By the time we got to the top, we were beat!

If you hit Humpback Rock on a nice, clear day – the views are beautiful and panoramic. The rock ledges at the top are fun to climb on and there are lots of places to sit and enjoy the view. The trail is exceedingly popular with central Virginians, so it’s not the kind of place you’ll find peace and solitude. On the beautiful Sunday afternoon we hiked the trail, we saw at least 50 other hikers.

Trail Notes

  • Distance – 2.0 miles out-and-back
  • Elevation Change – 800 feet
  • Difficulty – 3.5. This is short but fairly strenuous.
  • Trail Conditions – 3.5. There are some pointy rocks later on in the trail, but there is a lot of sections that are covered in gravel.
  • Views – 3.5. Nice views from the top.
  • Waterfalls/streams – 0. Non-existent
  • Wildlife – .5. I don’t think you’ll see much wildlife due to all the people.
  • Ease to Navigate – 3.5. The trail is not hard to follow.
  • Solitude – .5. If you do this during any normal day hours on a nice day, it will be tough to not have people in your view.

Directions to trailhead: The trail is located on the Blue Ridge Parkway between mile markers 5 & 6… although you can hike to the rocks via slightly longer routes from either the picnic grounds or visitors center.  For the route described above, there is a large parking lot with a information board near the trailhead.

Bearfence Mountain

Bearfence Mountain is a short, but deceptively challenging hike in the central district of Shenandoah National Park.  Although it  measures just 1.2 miles, it’s not for the faint of heart when it comes to heights.

The beginning of the Bearfence Trail

Adam Says…

We decided to do this one on short notice, because it’s so close to our house and we didn’t have a lot of free time today.  It is one of the southernmost hikes in the central district of the Shenandoah National Park.  While it is only 1.2 miles, the short length can be misleading.  The footing is tricky through the rock scramble and it is not a good idea to attempt for a lot of people.  If you have weak knees, aren’t flexible, have unsure balance or a fear of heights, this is not a hike for you.  Bearfence can also serve as good practice if you are planning on attempting Old Rag.  The rock scramble does take some planning to determine how you will traverse each obstacle.  The hike takes most people well under an hour, so it’s a great hike to combine with other short hikes in SNP (especially if you’re trying to add to your summit total.)

The rock scramble begins right after you round this rock outcropping

There is an earthcache geocache hidden here titled On Top of Bearfence Mountain.  While physical geocaches are not allowed in the park, earthcaches typically teach something about geology.  You will normally have to find some information or spot something regarding the geology and answer a few questions to be allowed to give yourself credit.

The scramble.
The scramble.

Christine Says…

Bearfence Mountain is usually a hike that offers great views of the western valley (photo from winter 2007) and Skyline Drive.  But today, we were socked in by unusual mid-day fog.  It was so odd – at our house (which may be ten miles away as the crow flies) it was mostly clear blue skies with the occasional puffy cloud.  But on Bearfence, it was like pea soup.

The trail was really crowded today, mostly by two vanloads of folks from Eastern Mennonite University.  They were inexperienced hikers, and moved at a snail’s pace across the rock scramble.  Luckily, they let us pass them along the way.  Several in the party were really struggling, and were obviously uncomfortable with the terrain.  They were hiking with two trained trailguides, so I was a little surprised to see the group on Bearfence.  Of all the hikes in the park, I see more people turn back on Bearfence than any other trail.  I think the short length misleads people into hiking something they’re not capable of or comfortable with.  Don’t get me wrong… most average hikers will find the rock scramble to be quite fun.  Personally, scrambles are my favorite type of terrain to hike.  I’d rather do a scramble than a sheer uphill any day!

view blog
What a view, eh?

The scramble on Bearfence starts after about the first quarter mile of the hike.  It’s really the only challenging portion of the trail.  After the scramble, you’ll walk along the ridge for a short while.  Eventually, you’ll meet back up with the Appalachian Trail and make an easy walk back to where you started.

While we hiked it in the spring this time, Bearfence is especially spectacular during the peak of autumn color.

Trail Notes

  • Distance – 1.2 miles loop trail
  • Elevation Change – 380 feet
  • Difficulty – 2.5. This is short and not strenuous, but if you’re not in good shape , you’ll find it more challenging.
  • Trail Conditions – 2. While the rest of the trail is in good shape, the rock scramble definitely brings this score down. (however, if you’re like us and love to scramble, this trail rates a 5!)
  • Views – 3.5. (usually)  Today was foggy.
  • Waterfalls/streams – 0. Non-existent
  • Wildlife – 1.5. We saw a deer up here and heard that a bear has been spotted along the AT on this mountain.
  • Ease to Navigate – 3.5. During the rock scramble you’ll need to look for the blue blazes, but it’s not very difficult to follow.
  • Solitude – 1.5. Expect to see people due to the short distance.  Also, plan on being held up by others through the rock scramble if you’re a faster hiker.

Directions to trailhead: The trail is located on Skyline Drive at mile marker 56.4.  Park at the the Bearfence Trail parking lot, cross Skyline Drive and begin the hike up, following the blue blazes.  Once you complete the rock scramble, you can continue up to the summit or turn right on to the Appalachian Trail to make your way back down. (the trail crosses the AT twice, so you can make your hike even shorter than 1.2 miles if you like)

Strickler Knob – via Scothorn Gap

The Strickler Knob hike is a beautiful, 5.5 mile hike in the Lee Ranger District of George Washington National Forest.  It offers fabulous views of the Page Valley and a short, but fun, rock scramble.

View from Strickler
The view of New Market Gap from Strickler Knob is amazing! Below: Park at Scothorn Gap; Adam crossing Passage Creek; Trail markers.

Park Here Crossing Passage Creek Trail Sign

Adam says…

This is a great hike that is still not very well known.  There are some great views at the top and a mini rock scramble that is good preparation for anyone who wants a little practice before tackling Old Rag.  I wouldn’t recommend this hike for small children or dogs due to the rock scramble.

The hike can be a little tricky to navigate, so I have provided some clear directions for following the trail.

After parking at Scothorn Gap, you’ll immediately wade or rock hop across Passage Creek.  The hike starts off on a fire road.  The way starts to get fairly steep at .4 miles, but levels off again at .65 miles. At .8 miles, the hike gets steep again, but levels at .95 miles. This is the hardest part of the hike, so once that is done, the elevation changes are small. At 1.07 miles, you will see a nice campsite for anyone that wants to stay overnight. At this point, you will see an arrow pointing to the right, where you will pick up the trail again. The trail continues SSE from the campsite and you will be leaving the fire road for a hike through the woods. At 1.3 miles, you will come to a junction sign. Head straight on to the orange-blazed Massanutten trail.

At 1.94 miles you will come to the junction with the Strickler Knob trail to the right. This trail was built and opened in 2006 by some anonymous trailblazers. The blazes for this trail are marked as pink on rocks and typically red or purple rectangles on trees. This trail is fairly rocky, so be careful not to turn your ankles. Around 2.5 miles, you will see gorgeous views of the Shenandoah River and the Blue Ridge Mountains to the east. To the west, you will see more of the Shenandoah valley and the Appalachian Mountains. At 2.67 miles, you will reach a rock scramble for about one tenth of a mile until you reach the summit. This is a great spot to have 360 degree views of the area around you. Tied to a tree, you will also see a logbook that someone placed for people to journal about their hike.  It’s definitely a good read to those that are interested.

For those that are interested, I also placed a geocache up there.  The direct link for the geocache can be found at:

Rock Formation
The hike to Strickler Knob has lots of interesting rock formations to scramble over! Below: One of the more interesting formations; Adam walks the mountain’s spine; Scrambling up the pinkish-purple blazed Strickler Trail; More rock formations.

Rock Formation Spine Walk Scrambling Rock Formation

Christine says…

We hiked the Strickler Knob trail on the recommendation of a friend of mine from Flickr.  He said it was a fun hike with excellent views.  He wasn’t kidding!

We walked the trail on a bitter, windy winter day shortly before the forest road closed for the season.  The section of road that leads to the trailhead is periodically closed in the winter to prevent damage to the road surface.  (You can always check the status of roads and trails in the George Washington National Forest on their website) The hike was fairly easy and passed through the beautiful woods of Massanutten Mountain.  The Strickler Knob trail branches off the main trail and follows a rocky ridgeline over to the knob.  I love scrambling on rocks, so the last portion of the trail was my favorite part.

When we reached the knob, the view was amazing.  We got there mid-day, so it wasn’t a great time for photography.  I’d like to hike it again in the afternoon sometime.  I think the late day light would be prettier on the rocks and over the valley below.

Trail Journal
There is a log book at the summit of Strickler Knob.  Below:  Adam takes in the view; Geocaching

Strickler View Geocache

While Adam hid his geocache, I spent some time reading the trail journal at the summit.  It was entertaining, and I even came across the name of an old co-worker in the book.    I also remember it being super windy at the summit.  It was so bad, my bag of trailmix blew over and (sadly) sent chocolate covered peanuts spilling all over the rocks.  I hate it when I lose chocolate like that.  I’m sure some stupid crow enjoyed it though.

Trail Notes

  • Distance – 5.5 miles round-trip
  • Elevation Change – 1,600 feet
  • Difficulty – 3.  There is some moderate climbing along the route.  The scramble might be tough/scary for some.
  • Trail Conditions – 3.   Most of the trail is nicely graded and well maintained.  But once you turn onto the Strickler Knob trail it’s rocky and requires some scrambling.
  • Views – 4.  Once you reach the top you have some great views.
  • Waterfalls/streams – 1.  Just a small stream to cross at the beginning.
  • Wildlife – 2.  Hunters like this area, so there must be wildlife (although we didn’t see any.) During hunting season, make sure you’re wearing bright colors and making noise.  A co-worker who was running up here also got attacked by a wild goat here.
  • Ease to Navigate – 3.   The blazes can be a little tricky to follow on the pink blazed Strickler Knob trail.  Otherwise, the trail is pretty straightforward.
  • Solitude – 2.  Since 2009, this trail has become increasingly popular.  We revised the solitude rating from 4.5 down to 2 in 2014.

Directions to trailhead:

Reach the trailhead by turning on to Crisman Hollow Road (FD 274) off of 211 near Luray. Continue on this road for a few miles and park at the Scothorn Gap trail parking.

Once you have parked follow Orange Blazes on Scothorn Gap trail.  Follow trail directions above.