Humpback Rock

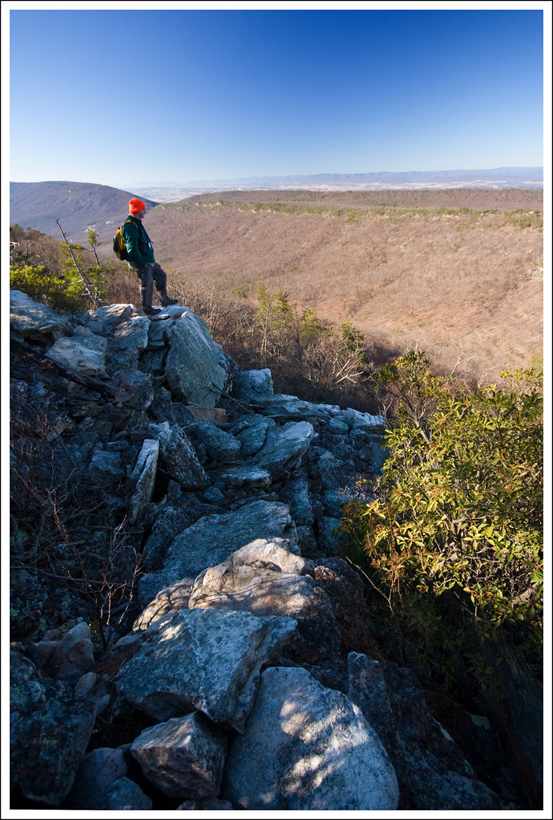
Humpback Rock is a steep, but popular trail in the northern section of the Blue Ridge Parkway with great views.

The summit of Humpback is always crowded.

Adam Says…

This was the third of our three hikes in one day, with Crabtree Falls and The Priest making up the earlier hikes.  We both were quite exhausted.  Christine definitely didn’t want to do this when we arrived.  She blamed me for tweeting about it earlier, since she felt the tweet had publicly committed us to finishing all three hikes.  So, I think I’ll not be allowed to tweet for a while.  We were both low on energy, but we relied on each other to get ourselves up to the top.

It is surprising to see all of the different people that hike this trail and what they choose to wear.  We saw people with serious hiking gear and trekking poles.  We saw elderly people with business shoes and teenage girls wearing party dresses.  This is a steep trail through most of the hike, so be prepared and wear appropriate shoes/clothes or you may end up on a future blog.  As much as you will huff-and-puff on the way up, you will likely have a sadistic smile on the way down as you witness the effort on the faces of those ascending, knowing your work is behind you. We heard a lot of music when we were hiking up and couldn’t place it.  It turns out there was a bluegrass concert at the Humpback Rocks visitor center.

You can extend the hike an extra mile by taking off from the Humpback Rocks Visitor Center parking lot and taking the Mountain Farm Trail.  This takes you through a re-creation of an 1890s farm with lots of buildings you can inspect and think about a farming time long ago.  For us, we didn’t have any fuel left in our tanks to walk the extra mile and the concert was taking place at the farm.

You can see a little snip of the Blue Ridge Parkway from the summit.

The views from the top are quite remarkable and you will have some gorgeous views of the Parkway and the Blue Ridge Mountains.  Take some time to soak in the beauty of the area.

Christine Says…

Let’s see here – what do I remember more about Humpback Rock… the pain or the suffering? Really it’s so close; I’m going to have to call it a draw. All kidding aside, Humpback Rock is actually a fun and scenic hike. This isn’t the first time we’ve hiked it, and we normally enjoy the hike quite a bit. However, it was probably rather ill-advised for us to hike it as the final leg of our trifecta of hikes along the Blue Ridge Parkway. We hadn’t eaten anything in over eight hours (except for that half donut on the summit of The Priest). We were both really hungry and thirsty, but stupidly mused “How bad can one more mile of uphill really be?”

As we learned, it can be quite bad! Along the way, Adam and I moaned at every moment that someone else wasn’t in earshot. We took turns declaring that we should turn around, go back to the car and just get lunch at Sonic. At one point, I said to Adam “Here… take this blasted camera and go up to the top and take photos for me. I’ll wait here.” A few minutes later, I turned around and saw Adam sitting on a rock about thirty feet back. He told me that he didn’t think his feet would move – not even one more step. Basically, we were a big, stinking heap of melodrama.

Last time we hiked up to Humpback Rock was April of 2008. Sometime since then, the trail has been re-routed. The first half of the climb still follows a steep, but wide and smooth, pathway up the mountainside. In the past, the second half of the trail climbed up the backside of the rock. The terrain was more like a scramble than a trail, but it was fun. Now, in order to reach the top, hikers must climb around and under the rock and then follow a trail up the side to reach the summit.

By the time we got to the top, we were beat!

If you hit Humpback Rock on a nice, clear day – the views are beautiful and panoramic. The rock ledges at the top are fun to climb on and there are lots of places to sit and enjoy the view. The trail is exceedingly popular with central Virginians, so it’s not the kind of place you’ll find peace and solitude. On the beautiful Sunday afternoon we hiked the trail, we saw at least 50 other hikers.

Trail Notes

  • Distance – 2.0 miles out-and-back
  • Elevation Change – 800 feet
  • Difficulty – 3.5. This is short but fairly strenuous.
  • Trail Conditions – 3.5. There are some pointy rocks later on in the trail, but there is a lot of sections that are covered in gravel.
  • Views – 3.5. Nice views from the top.
  • Waterfalls/streams – 0. Non-existent
  • Wildlife – .5. I don’t think you’ll see much wildlife due to all the people.
  • Ease to Navigate – 3.5. The trail is not hard to follow.
  • Solitude – .5. If you do this during any normal day hours on a nice day, it will be tough to not have people in your view.

Directions to trailhead: The trail is located on the Blue Ridge Parkway between mile markers 5 & 6… although you can hike to the rocks via slightly longer routes from either the picnic grounds or visitors center.  For the route described above, there is a large parking lot with a information board near the trailhead.

The Priest

The Priest is a wonderful segment hike along the Appalachian Trail in the George Washington National Forest’s Glenwood & Pedlar Ranger District.  The northbound trail access may be a little tough for some people to reach (4WD vehicles are strongly recommended), but if you can get there, you’ll be treated to magnificent views of the Tye River Valley.

Adam enjoys the view from The Priest

Adam Says…

This was hike number two for us on a three-hike-day.  This was our first trip up The Priest, and it was well-worth the bumpy drive to get to the trail.   See the directions to trailhead (below) for some special precautions to take when approaching the trailhead.  On route 826, we decided to go a little further than  Crabtree Meadows, but didn’t make it all the way up by car to the AT junction.  We ended up parking at a campsite and hiking up the fire road for .3 miles.  Many people will want to park at Crabtree Meadows, but that will add one mile to the overall distance.  Route 826 can be quite steep. In fact, some sections of the road are much steeper than anything you’ll see on the actual trail.  We saw a Jeep brigade coming down the steepest section of road, but they looked like seasoned off-roaders.

Route 826 gets progressively rougher.
Route 826 gets progressively rougher. Pictured below: A group of off-roaders make their way down the road.

When you reach the junction (you’ll see painted rocks indicating north/south) of the Appalachian trail, head north (left).  You will come across the Priest Wilderness sign and trail map. When I was telling someone earlier about doing this trail today, they were wondering about the origin of the name “The Priest”.  The true origin is unknown, but there are a few myths.  The first is that it was named after the DuPriest family that lived in the area.  The second is that a minister in the area gave some of these nearby mountains religious names.  The Cardinal and The Friar are both close to The Priest.

Adam enjoys reading the journal at the AT shelter.
Adam enjoys reading the journal at the AT shelter.  Pictured Below: Some of the entries are funny, some divulge a little bit too much information.

journal_3

We found that the trail was a steady incline, but nothing too strenuous.  There was supposed to be a side trail to The Little Priest at .7 miles, but we didn’t see it (but we weren’t looking too hard).  At .9 miles, you will see a blue-blazed spur trail to an Appalachian Trail shelter.  We definitely recommend taking the extra .2 mile round trip to visit the shelter.  These shelters are a great place for all of the AT hikers to get together and have a roof over their head for a night.  At most of the shelters, you can find a journal in which the hikers will write about their day or plans, leave notes for other hikers, etc.  Since this hike is The Priest, the theme of this logbook was to make a confession.  It was a lot of fun to read through the journal entries.  These confessions ranged from eating two Poptarts, to taking drugs, to not paying for supplies.  If you happen to be hiking the trail in June when most of the AT thru-hikers are passing through, consider bringing along some treats to share.  It’s a form of “trail magic” and is always appreciated.  (read the guidelines – there are some tips for dispensing good magic on the Appalachian Trail Conservancy Site)  We did see a few thru-hikers on the trail today, but we hadn’t thought ahead to bring anything.

Around 1.3 miles, you will see some overhanging rocks to the north that lead to some marvelous views.  Take some time to enjoy the views.  The summit is only .1 mile further, but there are no views at the summit.  We really enjoyed this hike and hope to do this one again as well as the nearby Spy Rock.

Christine Says…

The Priest was probably my favorite of the three hikes we did on this particular day. Discovering a new hike is always a real treat, especially when it turns out to be as nice as this one.

There are actually two different ways to access the summit of The Priest. The southbound ascent is longer and much tougher – it follows the AT along a series of forty switchbacks with just over 3000 feet of elevation gain. It might be the hike with the most elevation gain in all of Virginia. One hiker remarked in the journal that the southbound climb “made him realize that he’s not the man he thought he was.” I guess that’s one way of saying that the hike was a long, tough haul!

We chose the northbound ascent primarily based on our limited time. The hike was listed in our book as strenuous, but I did not find it to be tough at all. The uphill grade was constant, but gentle. Adam and I were easily able to carry on conversation without any huffing and puffing uphill.

The terrain on this hike was so pretty! Along the first part of the trail, forest floor was blanketed with lush ferns. Every now and then, we could catch glimpses through the trees of the valley below. The summit of The Priest is 4,063 feet, so we were pretty high up (by Virginia standards, anyhow).

This appeared to be a popular campsite.

When we finally gained the ridge, there was a perfect (and obviously popular) campsite. Encircling the area was a collection of huge boulders arranged in an almost Zen-like natural sculpture. Amidst the boulders, there was a fire pit and a large smooth, open place to set up tents. If I were to spend a night along the trail, this would be my ideal kind of campsite.

Shortly after the campsite, the trail split. One arm headed down to the shelter and the other continued along the AT up to the summit of The Priest. This section of trail was lined with mountain laurels and wild azaleas in full bloom. Several places along the trail were covered with a carpet of pink and white flower petals that had been blown from the bushes. It was almost dreamlike to walk through all the flowers. In the tree tops, we heard the constant sweet sound of warblers singing. We even caught a few glimpses of the birds. The ridge is fairly level, so this walking was very easy and pleasant.

Wild Azalea flowers carpeted the forest floor.
Wild Azalea flowers carpeted the forest floor. Pictured below: Many of the azaleas and mountain laurels were still in full bloom.

I had read that the summit of The Priest was a lovely shady place, but didn’t offer much in the way of panoramic views. So, it was much to my surprise and delight to find a worn path through the woods that led to an amazing outcropping of rocks with spectacular views of the entire valley below. Even though it was close to high noon, I loved photographing this spot along the trail. The sky conditions were a photographer’s dream – cerulean blue punctuated with both swishes and puffs of white cloud.

The summit was spectacular.

Adam and I sat on this spot for a good, long while. We shared a chocolate donut and some water, watched the hawks soar below and took in the valley view. Afterwards, we made the short walk to the actual summit. There was a fat toad sitting right along the trail at the summit. I like to think of him as the official summit marker.

This toad was our summit marker.

The hike back down to the car was fun – all downhill – just the way I like it!

Trail Notes

  • Distance – 2.8 miles out-and-back. We also recommend adding the .2 mile trail down to the AT shelter. If you park at Crabtree Meadows, add a mile on to the trail’s total length.
  • Elevation Change – 1,000 feet
  • Difficulty – 2. While the trail does have a moderate elevation change, the uphill is not too tough.  If you have to hike up the fire road from Crabtree Meadows to get to the trailhead, that will be much tougher than anything along the AT.
  • Trail Conditions – 4. Like most of the AT in Virginia, this section is nicely maintained.
  • Views – 4. Gorgeous views of about 150 degrees of views out into the Tye River Valley
  • Waterfalls/streams – 0. None, but there is a small spring-fed water source near the shelter.
  • Wildlife – 1.5. We didn’t see much, but this is wilderness area.  There are lots of nice birds for any ornithologists.  We saw a cerulean warbler, which has such a gorgeous song.
  • Ease to Navigate – 4.5. Just stay on the AT.
  • Solitude –4. Since it is difficult to get to, you may run across some backpackers or AT thru-hikers, but not many others.

Directions to trailhead: The best access to this trail is via VA-826.  If you are approaching from I-81, take exit 205 towards Steeles Tavern.  Take a left on to Rte. 11 and then a quick right on to VA-56 heading east.  Follow this past the Blue Ridge Parkway (near BRP Mile Marker 30) and then take a right shortly after the Fish Hatchery on to VA-826.  There is a sign at the entrance that you need to have four-wheel drive to travel on this road.  It is a bumpy gravel road where you have to cross several small streams.  Once you reach Crabtree Meadows, it is .5 mile before you can reach the AT trailhead to start The Priest trail.  Many cars should be able to get up to Crabtree Meadows, but the last .5 mile should be taken cautiously and done only if you have a confident driver and appropriate vehicle.

Crabtree Falls

Crabtree Falls is probably Virginia’s best-known waterfall hike. The hike is located a short distance from the Blue Ridge Parkway. The trail climbs alongside the falls and ends at an overlook of the Tye River Valley.

This is the first large cascade you'll encounter on the hike.
This is the first large cascade you’ll encounter on the hike.

Christine Says…

Crabtree Falls, located in George Washington National Forest’s Glenwood & Pedlar Ranger Districts, is one of the classic “must-hike” Virginia trails. When the area is experiencing good amount of rainfall, the 1,200 foot series of falls can be truly impressive.

Adam and I left our house at 5:45 a.m. on the morning of this hike. I wanted to get to the area before the sun started shining into the gorge. Sunny days usually mean crappy waterfall photos. On the morning of our hike, the area was forecast to have quite a bit of fog. I was really excited and had visions of the falls – cascading through the mist, lined with lush, blooming mountain laurel. Unfortunately, it was not to be. When we arrived, the fog was gone, the sun was already high in the sky and the laurel had mostly gone to seed. Nonetheless, I was still able to find a few shady spots along the way to take photographs.

The beautiful arched bridge over the Tye River.

The trailhead is located at the upper parking lot of the Crabtree Falls area. There is a $3.00 fee to use this area. Even though the trail starts from the upper lot, don’t miss walking down to the lower lot to take a walk across the beautiful laminated wooden arch bridge that crosses the Tye River. It was delivered to the area in a single piece and has graced the spot since 1978. Crossing the bridge used to be part of the hike, but improvements to the area expanded parking, added restrooms and shortened the trail.

As you start the hike, don’t neglect reading the bulletin board at the trailhead. It provides many cautionary tales concerning the waterfall’s deadly terrain.  As of June 2015, 29 people have fallen to their deaths at Crabtree Falls – most of them teenagers and young adults. The rocks surrounding the stream are coated with transparent algae. It doesn’t look wet or slippery, but it’s honestly as slick as grease in some spots. The forest service is always warning hikers to stay off waterfalls – but they really mean it at Crabtree.

Adam climbs the steps along the Crabtree Trail.

The first impressive cascade is at the very bottom of the trail and is accessible along a level, paved walkway. The trail to the summit starts on the right side of the paved path, and climbs quickly upward. The trail makes use of steps, railings, wooden walkways and switchbacks to traverse the steep terrain. Some of the switchbacks meander quite a distance from Crabtree Stream, but the sound of rushing water is ever present in the woods. You never move so far from the stream that you can not hear the sound of the waterfall. It’s such a soothing sound. There are five major cascades (and many smaller ones) that make up Crabtree Falls.

The trail is mostly well-graded and maintained. There are a few rocky sections, and some of the rocks may be loose or slippery. On the day we hiked, the trail was really muddy from all the recent rain, but it was still easily passable. I think most of the pretty sections of the falls are within the first three-quarters of the hike. The big, dome-shaped cascade at the top is impressive to see, but it just doesn’t photograph well. At the Tye Valley overlook at the top, you can’t see the falls below you at all. If you hadn’t just walked along the waterfall on your hike, you might not even believe it’s there. The view from the top is just so-so – mostly just tree-covered mountainsides. It pales in comparison to the waterfall views. Most hikers choose to turn around at this point, but you also have the option to continue the hike along the stream, ending up at Crabtree Meadows.

There are discrepancies about the length of this hike. On the internet, I’ve seen it listed everywhere from 2.2 to 4 miles. The on-site plaque at the base of the falls says the hike is two miles to the top, for a total 4 mile out-and-back. Our Blue Ridge Parkway hiking guide lists the hike at 3.4 miles, out-and-back. It seems like the happy medium distance, so we’ll go with that measure.

Adam Says…

The hike along Crabtree Falls is one of the best waterfall hikes, since you hike along the falls for most of the way.  I haven’t experienced any other hike in Virginia that allows you to walk along such an impressive series of falls.

Another beautiful section of falls along the trail.

This was our second trip to Crabtree Falls.  We were hoping to go in the late spring or early summer for views of mountain laurel along the stream.  It looks like in this area, we just missed the peak by about two weeks or the laurel didn’t bloom as well this year.  When you reach the top of the falls after a 1.7 mile hike, there is a stone platform at the top that provides you with nice views of the Blue Ridge Mountains.

The view from the top.

Near the entrance to the paved trail you will see a small family cemetery.  These are actually distant relatives of mine.  My great grandmother was a Fitzgerald and owned the farm next to the McCormick Farm.  My mother used to visit that farm often when she was little.  If you are interested in history, the McCormick Farm is open to visitors and has lots of exhibits showing the early farming techniques.  Cyrus McCormick was the inventor of the mechanical reaper which revolutionized farming.

This is a great hike that a lot of families do before picnicking at one of the tables near the lot entrance.  I know we will visit this location time and again.

Trail Notes

  • Distance 3.4miles out-and-back.
  • Elevation Change – 1000 feet
  • Difficulty – 3. This is a fairly steep trail with plenty of switchbacks.  However, most people will stop along the way to enjoy the falls, so it breaks up the pace.
  • Trail Conditions – 3. There are lots of pointy rocks along part of the trail, but there are some sections that are very nice.  The view to the lower falls is even paved for wheelchair access.
  • Views – 2. At the top of the falls, you get a decent view of the Tye River Valley
  • Waterfalls/streams – 4.5. This is one of the best waterfalls in the Central Virginia area.
  • Wildlife – .5. You probably won’t see anything here other than people.
  • Ease to Navigate – 4.5. Just stay on the trail.
  • Solitude –1. This is an extremely popular hike, so you will surely see people along the way.

Directions to trailhead: If you are approaching from I-81, take exit 205 towards Steeles Tavern.  Take a left on to Rte. 11 and then a quick right on to VA-56 heading east.  Follow this past the Blue Ridge Parkway (near BRP Mile Marker 30).  After a few more miles, you will see the signs for the parking area of Crabtree Falls on your right.  The parking lot loops around and you will see the trailhead and map near the restroom facilities.

Sugarloaf – Keyser Run – Hogback Mountain Loop

The Sugarloaf-Keyser Run-Hogback Mountain Loop is a lovely 4.9 mile hike through classic Virginia forest.  It passes by several nice panoramic viewpoints and makes use of the Appalachian Trail, a couple SNP trails and a fire road.

Mom on the Little Hogback Summit

Christine says…

We hiked this trail with my parents to celebrate a combination of (belated) Mother’s Day and (early) Father’s Day.  My parents are fit, active, outdoorsy people, so we knew they would enjoy a day of wildlife watching, hiking and picnicking in Shenandoah.

My Wonderful Mom & Dad

We picked the Sugarloaf-Keyser Run-Hogback Mountain Loop because it sounded like the perfect length and difficulty for the whole group.  For some reason, my mom had a hard time remembering the name of the hike, and kept referring to it as “Hogland.”  I chuckle every time I think of a hiking trail being called Hogland; it sounds like the name of a porcine-themed amusement park.

It definitely turned out to be a suitable hike for the whole group.  The first 3.5 miles were really easy going. The AT and Sugarloaf segments were both especially pretty. The section along the Keyser Run Fire Road was boring, as fire roads always are.  My mom and I agreed that fire roads are always a little dull compared to “real” trails. We saw a couple hikers coming out of the Little Devil’s Stairs area on Keyser Run Road.  They looked exhausted and sweat-drenched.  The day turned out to be a lot warmer than had been forecast.

The view from the summit of Hogback Mountain (the highest point on the trail) was a little underwhelming for me.  The valley vista was lovely, but it was hazy and the view was ruined by power lines and an obstructive radio tower.  The views from Little Hogback are definitely nicer, even though the vantage point isn’t as lofty in elevation. The saddle between Little Hogback and Hogback also has one especially beautiful view spot.

The saddle between Little Hogback and Hogback is very pretty

The whole hike only took us a couple hours to complete, even with water and snack breaks along the way.  Afterwards, we shared a delicious picnic lunch at Pinnacles and headed home tired and stuffed full of chocolate chip cookies and fried chicken.  It was a really fun day.

Adam says…

Since there are a lot of trails and options in this area, here are the trail directions we used.  After crossing Skyline Drive from the parking lot and proceeding .3 miles, you will come to a concrete post.  Take a right and follow the blue blazes down the Sugarloaf Trail.  Hike for 1.1 miles until you come to the next marker.  Take a left onto the Pole Bridge Link Trail.  Continue for .5 miles and then take a left on to the Keyser Run fire road.  Follow this for 1.1 miles, crossing Skyline Drive.  When you reach the AT junction, take a left heading south on the AT.  Keep on the south AT, going up Little Hogback and then Hogback Mountain.  You will cross Skyline Drive one more time on your descent.  Follow the south AT until you reach the parking lot.

The stream crossings were shallow and easy

This hike had some very pretty spots on the trail.  The fern-covered forest floor near the beginning of the trail and again near Hogback Mountain was really quite gorgeous.  I felt this trail was very easy and most people could handle it.  The only challenging portion was the brief half-mile set of switchbacks climbing up to the Hogback Summit.  Last year, a ranger told us this was the best hike in Shenandoah National Park.  I would disagree, but it was still an enjoyable hike and our first time on this particular route.

One of the prettiest section of trail was the Appalachian Trail crossing Hogback Mountain
One of the prettiest sections of trail was the Appalachian Trail crossing Hogback Mountain

We ran into our AT thru-hiker for a third time!  When we stopped to talk to him, I told him, “I promise we’re not stalking you.”  He laughed and asked “Don’t you guys ever go home?”  Quite funny that we’ve seen him so many times in a park that encompasses 196,000 acres!

Trail Notes

  • Distance – 4.9 mile loop.
  • Elevation Change – 700 ft.  Most of this is during the climb up to Hogback Mountain.
  • Difficulty – 1.5.  For most of the trail, the trail is level or slightly downhill.  There is a steep set of switchbacks to the summit of Hogback Mountain.
  • Trail Conditions – 4. The AT is well-maintained.  You also travel on the Keyser Run fire road for a little over a mile.
  • Views – 3.  The view from the summit of Little Hogback was the nicest unobstructed view.
  • Waterfalls/streams  – 1.  A couple of very small stream crossings, but not photo-worthy.
  • Wildlife – 2. Some signs of bears in the area, but you’re more likely to see some deer along the way.
  • Ease to Navigate – 4.   There are a couple turns, but the directions are well-marked on cement posts.
  • Solitude4.  Likely to see AT hikers mostly during June, but we didn’t really see many others.

Directions to trailhead:

Park just south of the Hogback Overlook, in the parking lot located at mile marker 21 on Skyline Drive.  At the south end of the lot, you will find the AT marker.  You will cross the drive here, go slightly uphill, and then start the descent.

Hawksbill Summit Loop

The Hawksbill Summit is a fairly easy, 2.9 mile trail that takes you to the highest peak of Shenandoah National Park at 4,049 feet.

This is the first of the four summit views you'll come to along the Hawksbill Loop Trail.
This is the first of the four summit views you’ll come to along the Hawksbill Loop Trail. Pictured below (left to right): The third viewpoint – the hack box for the falcon chicks is along this rock shelf; The CCC constructed summit; Adam climbing around the rock jumble at the summit.

Hawksbill Summit Hawksbill Summit - Shenandoah National Park Adam on Summit

Adam Says…

We really had one of those almost perfect days in Shenandoah National Park.  We made it up to the park before 7AM.  There was a lot of fog on the mountains that made for tough visibility, so we decided to grab breakfast at Skyland Resort before setting out on our hike.  While we were eating breakfast, our waitress pointed out a black bear right outside the dining room window.  It stayed out there for several minutes while people photographed it (they got really close – within 10-15 feet of the bear). While Christine made an attempt to grab her camera from the car for her own photo opportunity (which she missed), I noticed the AT thru-hiker we met on the Loft Mountain Loop had just sat down to dive into a hearty breakfast.  I talked to him about how we were thinking about him braving the thunderstorms the last few days.  He said that the Tuesday night storms had indeed been brutal.

After breakfast, we drove south from Skyland to start our hike on Hawksbill Summit.  The posted trail board listed an out-and-back hike of 1.7 miles and a loop hike of 2.8 miles.  We decided to do the loop and were very glad that we did!

Peregrine Falcons are such fast flyers. Adam took this shot and felt lucky to have even part of the bird, in-focus and in the frame.
Hawksbill Mountain is a great place to watch birds of prey.  While I was photographing the scenery, Adam took this shot of a bird soaring overhead. He felt pretty lucky to have even part of the bird, in-focus and in the frame.  He sometimes feels overwhelmed by all the controls on the dSLR, but I think he does a great job whenever he takes photos.

At around the half mile mark, we heard some screeching up ahead and above.  We came up to the first of three talus slopes and sure enough there were a pair of peregrine falcons swooping around.  We tried to get some pictures of them flying, but they swooped by way too quickly for the camera to lock focus.  When we came to the second talus slope, one of the falcons had landed about 15 feet in front of me, gave me a quick cry, and darted off at eye level from us.  We’ve never had an opportunity to see these birds up close.  We usually vacation in Acadia National Park every summer.  The park’s Precipice Trail is a great place to view falcons; however, this trail is closed off during much of the summer for falcon nesting and we have had to resort to viewing them through binoculars.

The Byrd's Nest #2 Shelter is available for day use only. It's a three-sided structure.
The Byrd’s Nest #2 Shelter is available for day use only. It’s a three-sided structure.

Once we arrived at the Byrd’s Nest Day Shelter near the summit, we ran into a SNP Volunteer who has been monitoring falcon activity in the area.  Shenandoah National Park has been working with the College of William & Mary’s Center for Conservation Biology to help reintroduce these birds to the park ecosystem.  It was fascinating to learn about these birds of prey. He pointed out the cliff-side hack box that currently houses six falcon chicks.  Students find falcons nesting around Williamsburg and Norfolk, grab the babies when they’re a few weeks old and deliver them to SNP for rehoming.

The volunteer feeds the falcon chicks twice per day, giving the birds quail through a slot door in the hack box. The chicks never actually see the person.  The goal is to keep the chicks completely unaware of the human intervention.

The feeder told us a funny story about his time on the mountainside. He was on his way to feed the birds that morning when he was charged by a deer.  He reached for a slingshot he had in his pocket, but the deer was too close.  He ended up using the slingshot as a club and thumping the doe lightly on the head.  It just stared at him like he was crazy.  He realized as he looked down that he had almost stepped on her newborn fawn.

The volunteer told us that there was a belief that the peregrine falcon pair that we saw was moving over from their established nest site on Old Rag.   They have been observing the Old Rag falcons for a while, and are hoping they stay put.  If the Old Rag falcons relocate to Hawksbill, the hack box holding the chicks will have to be moved to a new location.  The volunteer was trying to read numbers on the bands of the falcons swooping by to see if he could identify them as the same pair from Old Rag.

After a bit more chatting, we left the volunteer and proceeded on to the summit.  When we came back to the shelter, we noticed that there were now three falcons swooping around near the summit.  We found the volunteer and told him.  He told us that seeing the three falcons might help prove that these birds might not be the pair from Old Rag.  We felt proud to have been able to provide some useful information for their research.

Christine Says…

It’s kind of ironic, but Adam really didn’t want to go to the park at all on this particular morning.  He thought the trails would be sloppy-muddy from all the rain.  Also, he was longing for a morning of sleeping in, followed by loafing on the couch and possibly even some video games.  But, being the insanely cruel morning person I am, I dragged him out of bed and told him that I wanted to hike Hawksbill.  After all was said and done, he ended up declaring this to be “one of our best days in the park ever!”

At the trailhead, Adam lobbied for the shorter out-and-back, but I really wanted to do the longer loop.  It’s more scenic and there are many more opportunities to see wildlife along the way.  Besides, the out and back is a tough, boring, uphill climb – straight up the side of Hawksbill Mountain.  You don’t see anything special – you just climb.

I bet this magnificent buck gets a lot of female attention in the fall.
I bet this magnificent buck gets a lot of female attention in the fall. The photo below is another of the bucks from the group.

Buck

A quarter mile into the hike, we saw three impressive bucks.  Even this early in the season, these guys were already displaying large, velvety racks of antlers. During the summer months, it’s not uncommon to see groups of big bucks hanging out in mini-herds like this.  I think they’re planning strategies on how to get the girls in the fall.  🙂  They were completely indifferent to our presence, so we stayed and watched them for a few moments.  I wish it hadn’t been so dark in the forest.  I would have loved to get some better photos of these handsome guys.

This is the talus slope where we first spotted the peregrine falcons.

Seeing the falcons near the talus slopes was simply amazing.  I’ve never seen peregrines so close in the wild before.  They’re truly expert aerial acrobats.  I also really liked talking to the naturalist at the summit.  No matter how much time I spend in the park, I still feel like I see and learn new things on every visit.

Our view at the CCC-established summit was largely obscured by clouds and fog, but it was still a beautiful, breezy day.  Hawksbill gives full views in every direction.  You get a nice look at Skyline Drive winding its way through the forest and a wonderful, distant view of magnificent Old Rag Mountain.  Hawksbill Mountain actually has four excellent viewpoints along the summit. You only see two on the out and back hike.  Typically you can see all four on the loop hike, but on this particular day one viewpoint was closed off for the falcons.

Although you can't tell in the photo, the trail back down Hawksbill Mountain is quite steep.
Although it’s relatively level here, the trail back down Hawksbill Mountain is quite steep.

The hike back down is pretty steep, but the trail is well-maintained and covered with gravel.  My knees always ache climbing down Hawksbill – there are no switchbacks to gentle the grade.  It’s straight down the mountainside.  Hikers should be careful to follow the correct trail back down the mountain!  There are trails leading back to Upper Hawksbill and Lower Hawksbill parking lots.  There is also a fire road.  If you don’t pay attention to the cement marking posts, you may end up on the wrong trail and have an extra mile or so of hiking to do along Skyline Drive to make it back to your car.  We saw a couple who had made that exact mistake walking along the road when we finished our hike.  They didn’t look too happy.

Trail Notes

  • Distance – 2.9 mile loop.  A 1.7 mile strenuous out-and-back is one option, but the loop is recommended for it’s scenic beauty and wildlife viewing potential.
  • Elevation Change – 800 ft
  • Difficulty – 1.5.  If you do the loop.  The out and back may be shorter, but it’s more strenuous.
  • Trail Conditions – 4. The AT portion is well-maintained.  The trail down from the summit is covered with small gravel.
  • Views – 4.  The view from the summit is impressive on a clear day.
  • Waterfalls/streams  – 0.  No streams on this trail.
  • Wildlife – 4. We did hit some great luck this day, but we saw several deer including three bucks and you have some decent chances of spotting peregrine falcons in the summer.
  • Ease to Navigate – 3.   There are a couple turns,  but the directions are well-marked on cement posts. Pay attention on your way back down the mountain.  There are several descents to choose from.
  • Solitude2.  The hike is fairly popular and featured often with SNP handouts, but we never seem to run into many people up there.  I hear the summit gets very crowded on pleasant weekend afternoons.

Directions to trailhead:

Park at the Hawksbill Gap parking lot which is located around mile marker 45.6 in the Central Section of Skyline Drive.  The trail can be done as an out-and-back hike taking a steep trail to the summit, but we recommend that instead of going straight up to the summit,  take the spur trail to the Appalachian Trail and follow the signs to the Hawksbill Summit.

Loft Mountain Loop

The Loft Mountain Loop is an easy, 2.7 mile trail that makes use of a fire road, the Appalachian Trail and the Frazier Discovery Trail. It takes you past one of Shenandoah National Park’s finest views.

Adam on the Loft Mountain summit

Christine Says…

Adam and I love visiting the park on weeknights after we get off work.  The traffic is usually light and the animals tend to be more active.   On Tuesday night, we saw many deer, a timber rattlesnake, a couple rabbits, a bear with three cubs and only a handful of human beings. If you live close to the park, weekday evenings are the perfect time for a quick hiking escape – especially on June nights when twilight lingers until 9:00 p.m.

On this particular night, we chose to hike the Loft Mountain Loop, which is located in the south district of the park.  Generally, fewer people visit the south end of the park than the other two districts (north and central), so it always feels quiet and peaceful.  I have so many fond memories of camping at Loft Mountain as a child.  We had a rickety, second-hand, pop-up camper.  I remember waking up on cold mountain mornings to the smell of bacon cooking over the campfire and going to sleep at night after roasting marshmallows and listening to my dad’s goofy “ghost stories”.   Ah… such nostalgia!

A friendly rabbit along the fire road.

The hike starts out on a fire road almost directly across Skyline Drive from the Patterson Ridge Trail.  The hike goes uphill for a short distance until you reach the Ivy Creek Hut (used by the Potomac Appalachian Trail Club for maintenance activities) and the Ivy Creek Spring.  Pass through the site and follow the blue blazes uphill for a couple hundred yards to the junction with the Appalachian Trail.  The stretch along the AT climbs steadily uphill for about a mile.   It eventually levels out on the ridge of Loft Mountain.  At this point the terrain opens up – the trees are further apart and the trail is grassy and almost meadow-like.  Adam kept getting ticks on him (FIVE!), but I didn’t get any at all.

The PATC maintenance cabin
The Ivy Creek Hut is used by the PATC.

Your first nice view will come on a small rock outcropping facing northeast, but the big payoff for this hike comes at the 1.5 mile mark.  The southwest facing summit of Loft Mountain is awesome – definitely one of the park’s most spectacular views.

We reached the vantage point in time to see the building storm clouds to the west.  We shared the summit with an Appalachian Trail thru-hiker camping nearby.  He was from Boston and had been on the trail since March.  He told us he had covered 22 miles that day and was looking forward to spending an upcoming night off the trail at the Big Meadows Lodge.  He remarked that he was thinking hard about a big cheeseburger and a cold beer.

I couldn’t help but think of the guy later on in the evening when we were back in our car, watching the Loft Mountain area being pummeled with lightning and torrential downpours.  I love hearing trail stories from thru-hikers, but I don’t think long distance backpacking is for me.

We stayed on the summit for about fifteen minutes, and then quickly made our way down the Frazier Discover Trail and back to our car.

Adam Says…

This is a trail that we both enjoy quite a bit.  It’s not too tough and has some nice views to both the east and west, which is not common for Skyline Drive.  If you do this hike early in the morning or late in the evening, you should be able to see a good view for a sunrise or sunset.  There are also a couple of possible campsites along this stretch of trail and a developed campground along Skyline Drive at Loft Mountain.

The trail was lined with little flowers.

It was very interesting to talk to the AT hiker.  June is the month when most of the northbound thru-hikers are passing through Virginia.  If you have a chance, it’s worth talking to some of these people about their experiences.  Most of them use trail names instead of real names during the hike.   The one we talked to this night was very friendly and talkative.  He said that his toughest leg so far was in the Smoky Mountains, but this was largely due to the snow that was still there.  He was enjoying his first sunset view in SNP.  It’s quite an accomplishment to be able to hike the entire AT.  I would love to be able to have the chance to do this some day.

The rock cliff below is an impressive sight to find along the Frazier Discovery Trail.

This giant rock wall can be found on the descent along the Frasier Discovery Trail
This giant rock wall can be found on the descent along the Frazier Discovery Trail

Trail Notes

  • Distance – 2.7 miles
  • Elevation Change – 600 ft
  • Difficulty – 1.5.  Other than a mile of climbing along the fire road and the Appalachian Trail, the hike is either level or downhill.
  • Trail Conditions – 4.5.   The trail is extremely well-maintained.
  • Views – 4.  The view from the Loft Mountain summit is really spectacular.
  • Waterfalls/streams  – 0.  No streams on this trail.  There is a spring near the PATC maintenance cabin.
  • Wildlife – 2.  We saw deer and a rabbit.
  • Ease to Navigate – 4.   There are a couple turns, but the directions are well-marked on cement posts.
  • Solitude3.  The hike is short and near one of Shenandoah’s campgrounds.  So, on busy weekends, expect to see a fair number of people.  We hiked it on a weeknight in June and came across a pair of backcountry campers and an AT thru-hiker.

Directions to trailhead:

Park at the Loft Mountain Wayside at Skyline Drive mile marker 79.5.  Walk north along the drive for a 150 yard and then cross the drive to pick up the fire road. The trailhead is almost directly across the drive from the Patterson Ridge trail.

Bearfence Mountain

Bearfence Mountain is a short, but deceptively challenging hike in the central district of Shenandoah National Park.  Although it  measures just 1.2 miles, it’s not for the faint of heart when it comes to heights.

The beginning of the Bearfence Trail

Adam Says…

We decided to do this one on short notice, because it’s so close to our house and we didn’t have a lot of free time today.  It is one of the southernmost hikes in the central district of the Shenandoah National Park.  While it is only 1.2 miles, the short length can be misleading.  The footing is tricky through the rock scramble and it is not a good idea to attempt for a lot of people.  If you have weak knees, aren’t flexible, have unsure balance or a fear of heights, this is not a hike for you.  Bearfence can also serve as good practice if you are planning on attempting Old Rag.  The rock scramble does take some planning to determine how you will traverse each obstacle.  The hike takes most people well under an hour, so it’s a great hike to combine with other short hikes in SNP (especially if you’re trying to add to your summit total.)

The rock scramble begins right after you round this rock outcropping

There is an earthcache geocache hidden here titled On Top of Bearfence Mountain.  While physical geocaches are not allowed in the park, earthcaches typically teach something about geology.  You will normally have to find some information or spot something regarding the geology and answer a few questions to be allowed to give yourself credit.

The scramble.
The scramble.

Christine Says…

Bearfence Mountain is usually a hike that offers great views of the western valley (photo from winter 2007) and Skyline Drive.  But today, we were socked in by unusual mid-day fog.  It was so odd – at our house (which may be ten miles away as the crow flies) it was mostly clear blue skies with the occasional puffy cloud.  But on Bearfence, it was like pea soup.

The trail was really crowded today, mostly by two vanloads of folks from Eastern Mennonite University.  They were inexperienced hikers, and moved at a snail’s pace across the rock scramble.  Luckily, they let us pass them along the way.  Several in the party were really struggling, and were obviously uncomfortable with the terrain.  They were hiking with two trained trailguides, so I was a little surprised to see the group on Bearfence.  Of all the hikes in the park, I see more people turn back on Bearfence than any other trail.  I think the short length misleads people into hiking something they’re not capable of or comfortable with.  Don’t get me wrong… most average hikers will find the rock scramble to be quite fun.  Personally, scrambles are my favorite type of terrain to hike.  I’d rather do a scramble than a sheer uphill any day!

view blog
What a view, eh?

The scramble on Bearfence starts after about the first quarter mile of the hike.  It’s really the only challenging portion of the trail.  After the scramble, you’ll walk along the ridge for a short while.  Eventually, you’ll meet back up with the Appalachian Trail and make an easy walk back to where you started.

While we hiked it in the spring this time, Bearfence is especially spectacular during the peak of autumn color.

Trail Notes

  • Distance – 1.2 miles loop trail
  • Elevation Change – 380 feet
  • Difficulty – 2.5. This is short and not strenuous, but if you’re not in good shape , you’ll find it more challenging.
  • Trail Conditions – 2. While the rest of the trail is in good shape, the rock scramble definitely brings this score down. (however, if you’re like us and love to scramble, this trail rates a 5!)
  • Views – 3.5. (usually)  Today was foggy.
  • Waterfalls/streams – 0. Non-existent
  • Wildlife – 1.5. We saw a deer up here and heard that a bear has been spotted along the AT on this mountain.
  • Ease to Navigate – 3.5. During the rock scramble you’ll need to look for the blue blazes, but it’s not very difficult to follow.
  • Solitude – 1.5. Expect to see people due to the short distance.  Also, plan on being held up by others through the rock scramble if you’re a faster hiker.

Directions to trailhead: The trail is located on Skyline Drive at mile marker 56.4.  Park at the the Bearfence Trail parking lot, cross Skyline Drive and begin the hike up, following the blue blazes.  Once you complete the rock scramble, you can continue up to the summit or turn right on to the Appalachian Trail to make your way back down. (the trail crosses the AT twice, so you can make your hike even shorter than 1.2 miles if you like)

McAfee Knob

IMPORTANT: Please read these important regulations and helpful tips before hiking in this area

McAfee Knob is an 8.3 mile hike along the Appalachian Trail near Roanoke.  The summit offers truly magnificent views of the Catawba valley below.  On a clear day, you can also get great views of the Peaks of Otter (Sharp Top and Flat Top) along the Blue Ridge Parkway.

McAfee Knob's View of the Catawba Valley
McAfee Knob’s View of the Catawba Valley

Christine says…

We picked a perfect day in April to hike McAfee Knob.  The trees were still mostly bare of leaves, but the skies were crystal clear and completely free of the milky haze that dominates the Virginia summer.  We got to the trailhead right at 9:00 a.m. and the parking lot on 311 was already about halfway full.  From what I’ve been told, this trail rivals Old Rag in popularity for folks in the southern part of the Shenandoah Valley.

The trail is meticulously maintained.  I believe the Roanoke Appalachian Trail Club and local Boy Scouts do most of the trail work.  There are many wooden bridges and walkways in the first two miles of the trail that were built as Eagle Scout projects. I think the hike, despite its eight+ mile length, qualifies as a solidly moderate hike.  It’s not steep and the trail is smooth and pleasant.  It feels a lot shorter than eight miles.

The first few miles of the hike make their way through beautiful, classic Virginia mountains.  The trees are a mix of hardwoods and pines that smell delicious as they warm in the sun.  There are also expansive stands of mountain laurel along the way.  I’m certain they’re a site to behold when they bloom in June.

The view finally opens up when you complete the toughest part of the climb and walk along the ridge of the mountain.  The gnats were something else on the day we hiked.  If we so much as paused for a few seconds, the bugs swarmed us like mad.  The walk along the ridge is brief and leads you past a very cool series of rock formations nicknamed the Devil’s Kitchen.  After walking past the giant boulders, you come to a short spur trail to McAfee knob.

The hike is an out-and-back, so the return trip simply retraces your steps.

I think this is a hike I’ll return to time and again.  I thought it was one of the most spectacular views I’ve seen in the state.

Adam says…

This was a truly wonderful hike.  The views are spectacular and  are likely the best views I can remember in Virginia. I grew up in Lynchburg, VA and we used to always hike up Sharp Top at the Peaks of Otter on the Blue Ridge Parkway.  I think the views here are better than Sharp Top and well worth the mileage.  You can continue the trek on to Tinker Cliffs, but that adds several miles onto the trek and would work better as an overnight backpack trip.  The views of the ridgeline and Tinker Cliffs are breathtaking.  There is a lot of space at the top to chill out on some rocks and eat a snack.  You will often see pictures like the one below when you see pictures for the Appalachian Trail.

I do a lot of geocaching and there is a geocache here if you approach it from the fire road and not the hike on the AT.  However, I left my notes in the car, so I just tried to go from my memory and GPS.  I tried hiking off the trail and up the mountainside and it took away all my energy.

This View of McAfee is an Appalachian Trail Icon
This View of McAfee Knob is an Appalachian Trail Icon

Trail Notes

  • Distance – 8.3 miles round-trip
  • Elevation Change – 1,740 feet
  • Difficulty – 4.  The trail is fairly easy walking, but because the length, we scored it a 4.
  • Trail Conditions – 5.   The trail is well maintained.
  • Views – 5.  One of the finest views in Virginia.
  • Waterfalls/streams – 0.
  • Wildlife – 2.  We saw a lot of Eastern Fence Lizards, but nothing else.
  • Ease to Navigate – 5.   It would be nearly impossible to get lost.
  • Solitude – 1.  The trail is exceedingly popular.  Parking can be a challenge if you arrive mid-day.

Special regulations for this area:

  • Maximum group size, day hikes: 25
  • Maximum group size, backpacking/camping: 10
  • No alcohol
  • Dogs must be kept on leash at all times
  • No camping or campfires outside of seven designated areas (north of Va 624/Newport Rd, the only legal campsites are Johns Spring Shelter, Catawba Shelter and campsites, Pig Farm campsite, Campbell Shelter and Lambert’s Meadow Shelter and campsites)
  • No camping or campfires on McAfee Knob or Tinker Cliffs

Directions to trailhead:

Take I-81 to exit 141.  Follow signs to VA-311.  The parking lot is located about 5.5 miles down 311.  Park ONLY in the designated lot.  Roadside parking is prohibited and will result in towing.

Strickler Knob – via Scothorn Gap

The Strickler Knob hike is a beautiful, 5.5 mile hike in the Lee Ranger District of George Washington National Forest.  It offers fabulous views of the Page Valley and a short, but fun, rock scramble.

View from Strickler
The view of New Market Gap from Strickler Knob is amazing! Below: Park at Scothorn Gap; Adam crossing Passage Creek; Trail markers.

Park Here Crossing Passage Creek Trail Sign

Adam says…

This is a great hike that is still not very well known.  There are some great views at the top and a mini rock scramble that is good preparation for anyone who wants a little practice before tackling Old Rag.  I wouldn’t recommend this hike for small children or dogs due to the rock scramble.

The hike can be a little tricky to navigate, so I have provided some clear directions for following the trail.

After parking at Scothorn Gap, you’ll immediately wade or rock hop across Passage Creek.  The hike starts off on a fire road.  The way starts to get fairly steep at .4 miles, but levels off again at .65 miles. At .8 miles, the hike gets steep again, but levels at .95 miles. This is the hardest part of the hike, so once that is done, the elevation changes are small. At 1.07 miles, you will see a nice campsite for anyone that wants to stay overnight. At this point, you will see an arrow pointing to the right, where you will pick up the trail again. The trail continues SSE from the campsite and you will be leaving the fire road for a hike through the woods. At 1.3 miles, you will come to a junction sign. Head straight on to the orange-blazed Massanutten trail.

At 1.94 miles you will come to the junction with the Strickler Knob trail to the right. This trail was built and opened in 2006 by some anonymous trailblazers. The blazes for this trail are marked as pink on rocks and typically red or purple rectangles on trees. This trail is fairly rocky, so be careful not to turn your ankles. Around 2.5 miles, you will see gorgeous views of the Shenandoah River and the Blue Ridge Mountains to the east. To the west, you will see more of the Shenandoah valley and the Appalachian Mountains. At 2.67 miles, you will reach a rock scramble for about one tenth of a mile until you reach the summit. This is a great spot to have 360 degree views of the area around you. Tied to a tree, you will also see a logbook that someone placed for people to journal about their hike.  It’s definitely a good read to those that are interested.

For those that are interested, I also placed a geocache up there.  The direct link for the geocache can be found at:

Rock Formation
The hike to Strickler Knob has lots of interesting rock formations to scramble over! Below: One of the more interesting formations; Adam walks the mountain’s spine; Scrambling up the pinkish-purple blazed Strickler Trail; More rock formations.

Rock Formation Spine Walk Scrambling Rock Formation

Christine says…

We hiked the Strickler Knob trail on the recommendation of a friend of mine from Flickr.  He said it was a fun hike with excellent views.  He wasn’t kidding!

We walked the trail on a bitter, windy winter day shortly before the forest road closed for the season.  The section of road that leads to the trailhead is periodically closed in the winter to prevent damage to the road surface.  (You can always check the status of roads and trails in the George Washington National Forest on their website) The hike was fairly easy and passed through the beautiful woods of Massanutten Mountain.  The Strickler Knob trail branches off the main trail and follows a rocky ridgeline over to the knob.  I love scrambling on rocks, so the last portion of the trail was my favorite part.

When we reached the knob, the view was amazing.  We got there mid-day, so it wasn’t a great time for photography.  I’d like to hike it again in the afternoon sometime.  I think the late day light would be prettier on the rocks and over the valley below.

Trail Journal
There is a log book at the summit of Strickler Knob.  Below:  Adam takes in the view; Geocaching

Strickler View Geocache

While Adam hid his geocache, I spent some time reading the trail journal at the summit.  It was entertaining, and I even came across the name of an old co-worker in the book.    I also remember it being super windy at the summit.  It was so bad, my bag of trailmix blew over and (sadly) sent chocolate covered peanuts spilling all over the rocks.  I hate it when I lose chocolate like that.  I’m sure some stupid crow enjoyed it though.

Trail Notes

  • Distance – 5.5 miles round-trip
  • Elevation Change – 1,600 feet
  • Difficulty – 3.  There is some moderate climbing along the route.  The scramble might be tough/scary for some.
  • Trail Conditions – 3.   Most of the trail is nicely graded and well maintained.  But once you turn onto the Strickler Knob trail it’s rocky and requires some scrambling.
  • Views – 4.  Once you reach the top you have some great views.
  • Waterfalls/streams – 1.  Just a small stream to cross at the beginning.
  • Wildlife – 2.  Hunters like this area, so there must be wildlife (although we didn’t see any.) During hunting season, make sure you’re wearing bright colors and making noise.  A co-worker who was running up here also got attacked by a wild goat here.
  • Ease to Navigate – 3.   The blazes can be a little tricky to follow on the pink blazed Strickler Knob trail.  Otherwise, the trail is pretty straightforward.
  • Solitude – 2.  Since 2009, this trail has become increasingly popular.  We revised the solitude rating from 4.5 down to 2 in 2014.

Directions to trailhead:

Reach the trailhead by turning on to Crisman Hollow Road (FD 274) off of 211 near Luray. Continue on this road for a few miles and park at the Scothorn Gap trail parking.

Once you have parked follow Orange Blazes on Scothorn Gap trail.  Follow trail directions above.