Linville Falls (NC)

North Carolina Hikes

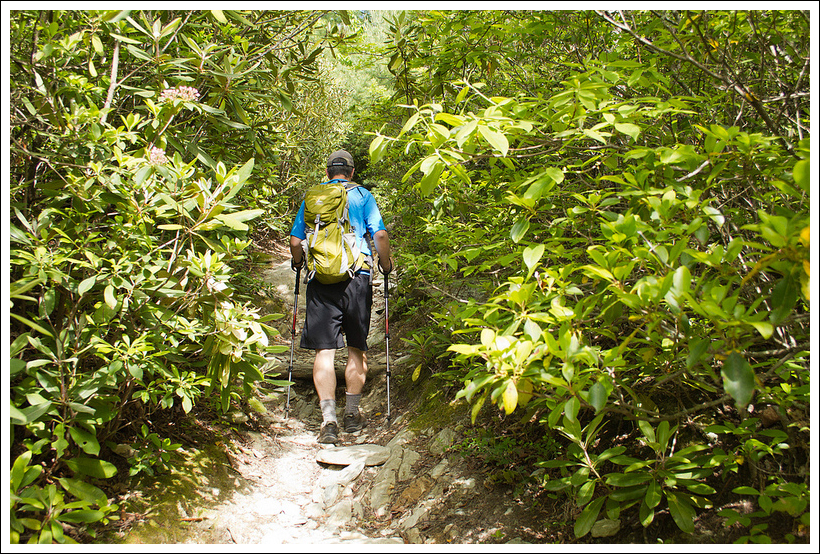
This wonderful little network of trails gives you the opportunity to view Linville Falls from every angle!  You can choose short/easy routes or longer/harder routes depending what you’re in the mood to do.  When all was said and done, we hiked a little over 3.5 miles and enjoyed several views of the falls.

View the full album of photo from this hike

Adam Enjoys a View of Linville Falls
Adam enjoys a bird’s eye view of Linville Falls. Below: The forest service information station; the trail network offers many options; beautiful blooming rhododendron.

Forest Service Info Station Trail Network Flame Azalea

Adam Says…

To finish our trip to North Carolina, we had to visit Linville Falls along the Blue Ridge Parkway.  While overcast days are better days for photographing waterfalls, we had to take what we were given.  The sun was high in the sky and it was quite hot on the hike, but we knew this wasn’t going to be too long of a hike.

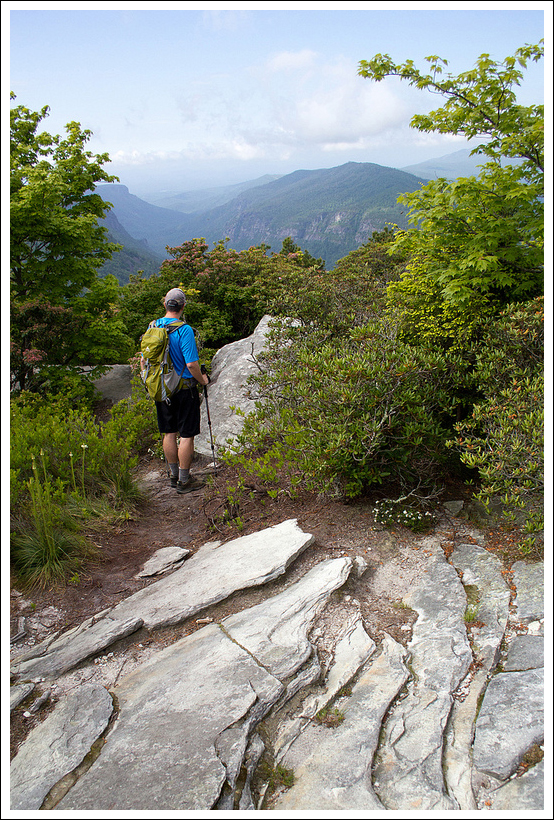
We drove up the gravel Wiseman’s View Road and went first to the USFS Visitor’s Center.  Two women were inside and gave us some information on how to tackle the falls.  We were looking for a place to eat lunch before the hike and they recommended Famous Louise’s Rock House, especially for their pies.  We took their advice and refueled for the hike.  We ventured back up Wiseman’s View Road and parked in the large gravel lot at the to the left of the road.  The trail starts from the eastern side of the lot and begins with a steep descent.

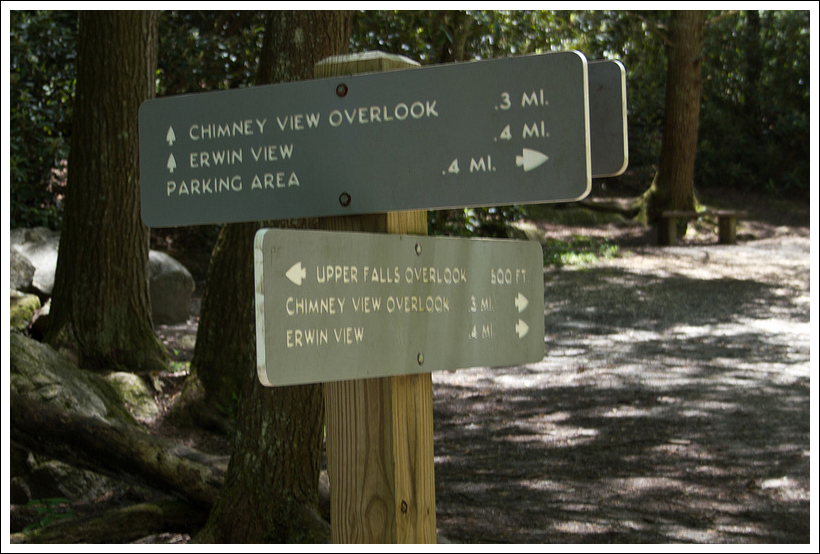
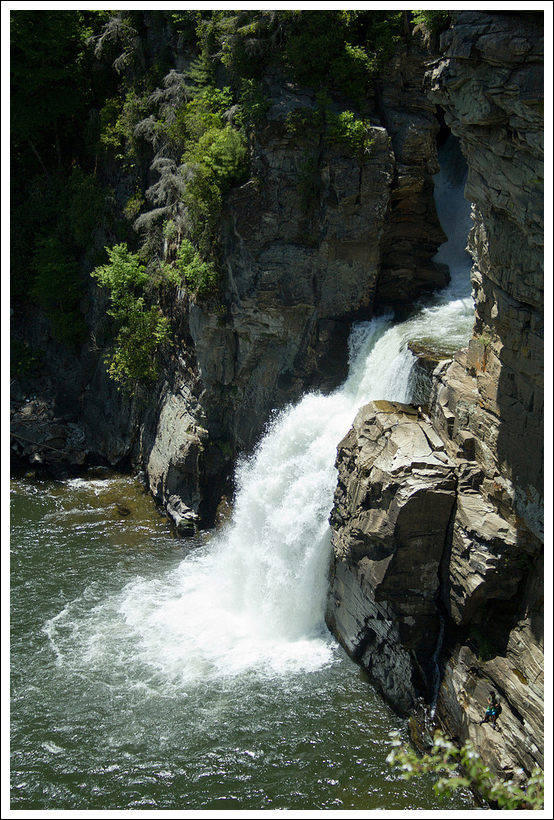
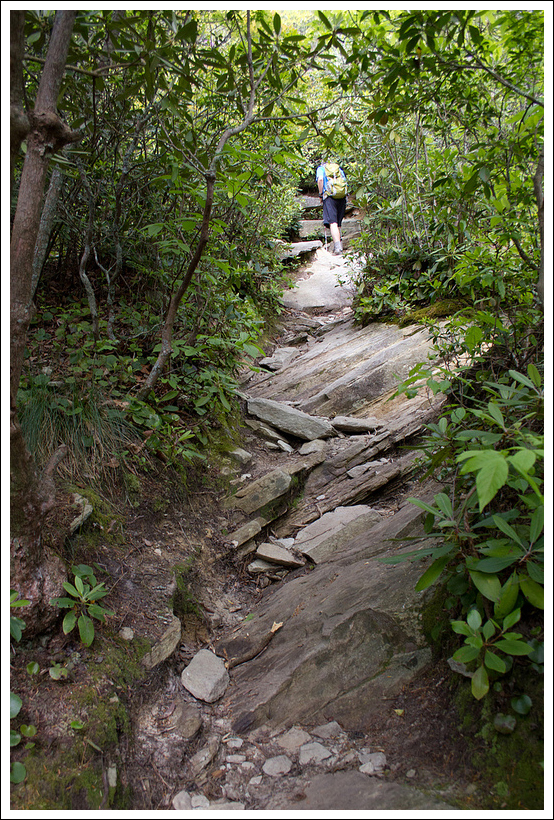
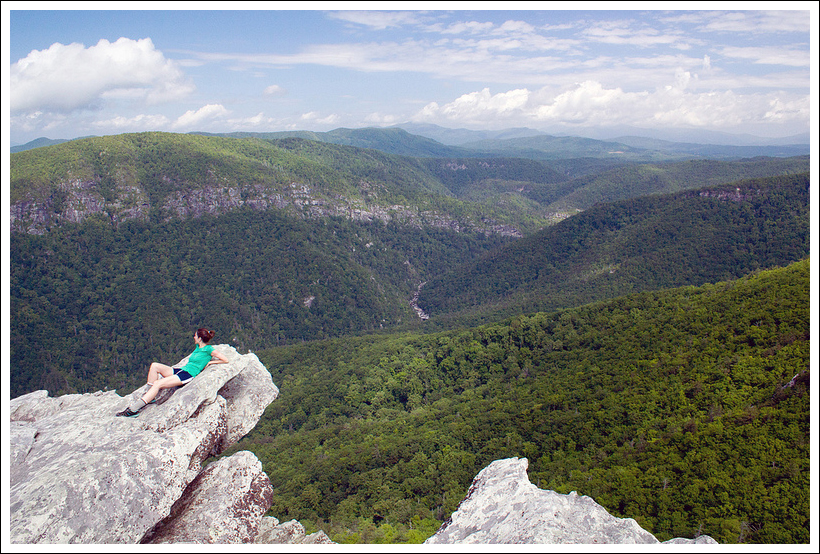
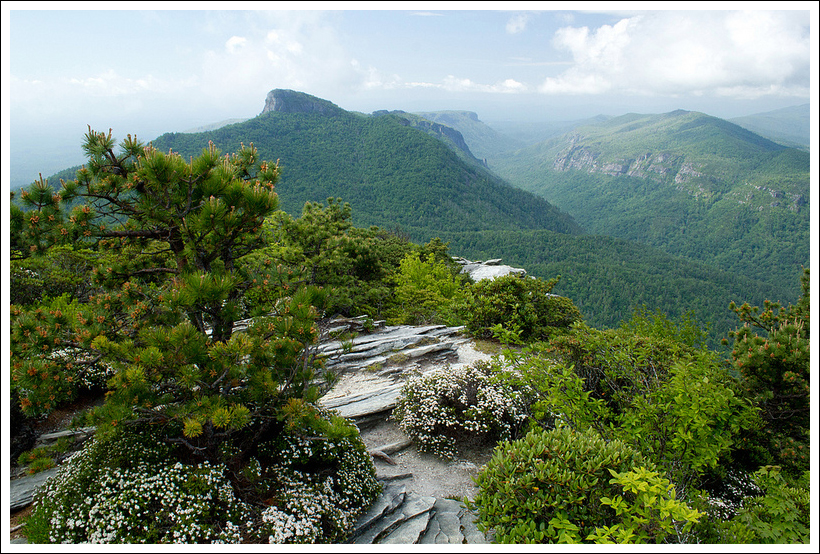
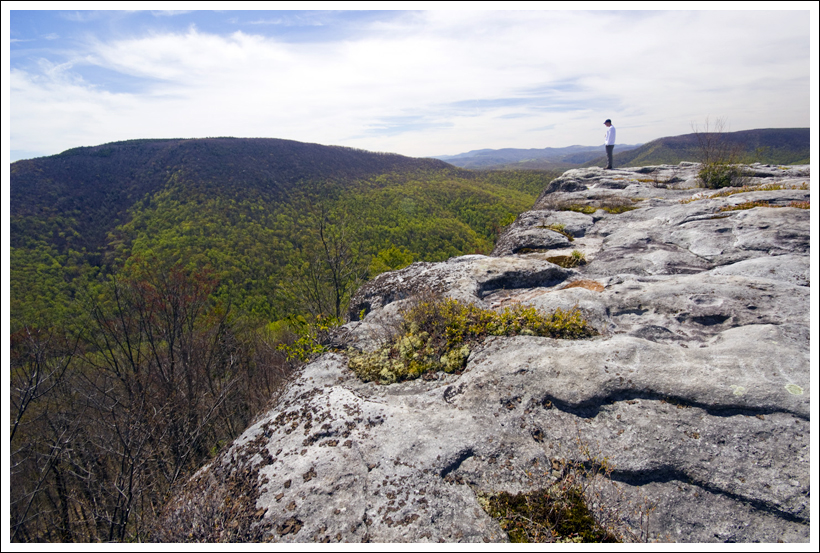
At about .2 miles of a descent, we reached a junction.  We took a right here to make our way to the series of overlooks of the falls.  In a short distance, we reached another smaller junction with the trail to the Upper Falls, but we decided to approach that on the way back.  Since there are so many choices to make about the order in which you take in the views, I will not list all the distances; but you can tell from the downloaded map the distances to each.  We opted first to take a left for the trail to Chimney View, which provided a viewpoint to see the upper and lower falls.  From this point, we backtracked to the main trail and took a left.  Shortly, we came on to the side trail on the right for the Gorge View.  The views from here showed the canyon of the gorge but the views didn’t allow you to see the bottom of the canyon.  Next was the end of the main trail, which ended at Erwins View.  This view gave you the furthest view away from the falls, but it was still spectacular.  We backtracked and made our way back to the Upper Falls viewpoint.  From here, you could see the water plunge down the falls from a closer distance.

Upper Falls View
The upper falls view. Below: A view into the gorge; Adam hikes along.

Gorge View Linville Trails

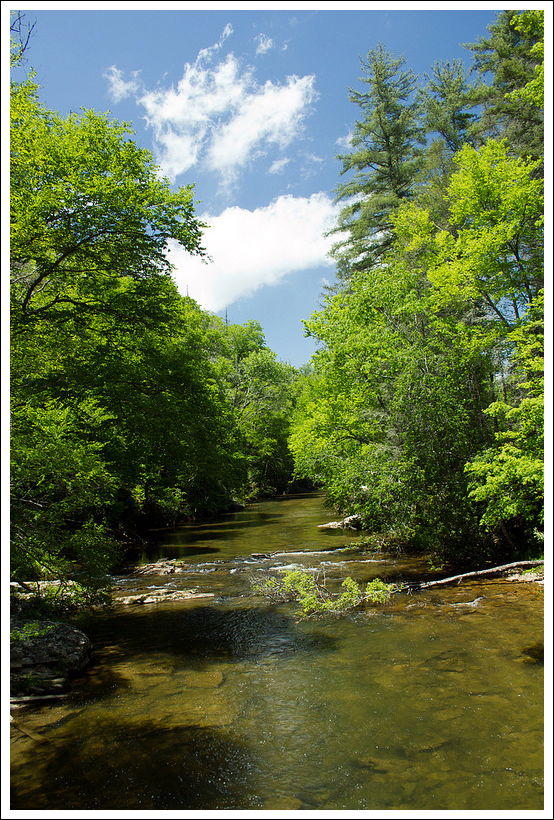
From seeing people on the opposite side of the water and very close to the falls, we decided to take the trail down to the Linville Falls Visitor Center.  The trail was wide, road-like and going slightly downhill.  We eventually came to a bridge over the Linville River and the Visitor Center was on the opposite side.  We grabbed a few cold waters from the center and talked to the rangers about the trails on the other side.  We were fairly tired by this point, since we had done so much hiking during the week, but the temptation of the falls kept us pressing forward.  From the front of the Visitor Center, the trail headed into the woods on the eastern side of the building.  In a few feet, the trail branched and we took a right to head to the next overlook.  This trail branched off after about .3 miles.  We took a right at the junction, descending to reach the Plunge Basin overlook at .5 miles.  This point gave you a vantage point to see the water shoot through the gorge and down below.  We watched one man standing on the cliffside below, fishing from a precarious position.  We then made our way back to our car by returning to the Visitor Center, back across the bridge, and taking a right to the trail junction that led us back to our vehicle.

We had a great time visiting Linville Falls and this is definitely a hike that most people could do with their families.  A return trip in the peak of fall color with an overcast sky is something we will try to do.  While many waterfalls allow you to get very close to them, the trails here mostly keep you at a distance.  However, the view of the gorge with the waterfalls is breathtaking.

Christine Says…

Linville Falls was a perfect hike to end our trip through Tennessee and North Carolina – short and very easy! Ten hikes packed into eight days was pretty rigorous and I had the sore knees, bruises and sunburned arms to show for it!  Truth be told, I was secretly pleased that the ninth day of our voyage was stormy and rainy, because it meant we’d go home a day early instead of biking the 33+ miles of the Virginia Creeper.  Don’t get me wrong – I LOVE biking the Creeper, but I was exhausted from our whirlwind trip.  Maybe we ought to relax more on vacations – like normal people!  Nah…. probably not.  🙂

Linville Falls were a gift to the National Park Service from John D. Rockefeller.  So many of our favorite parks would not have existed without his generosity. Acadia, Shenandoah, Yosemite, the Grand Tetons, and the Smokies were all established, in part, due to his financial support.

Plunge View
The plunge view of the falls. Below: The Linville River; Beautiful desserts from Storie Street Grille.

Linville River Dessert

Adam did a thorough job describing all the different paths we took, so I don’t have a lot of details to add about the terrain. The only thing I would say is that you can walk to the bottom of the falls.  It’s about about .8 miles of hiking (some steep).  We opted to skip the view from the bottom on this trip, mainly because we were tired and could tell that the base of the falls was extremely crowded.

I enjoyed stopping in the visitors center and talking to the park ranger.  He was a pretty serious hiker and we enjoyed trading trail tips.  He suggested Crabtree Falls, NC for a future hike.  I was also fascinated by the cross section of an enormous tree hanging in the center. It fell when the Linville Gorge flooded in September of 2004. The hurricane-related flooding was so severe, that it washed away half of the visitor’s center and left many gigantic, toppled trees in its wake.  Water is such a powerful force!

Linville Falls has one of the highest water volumes of any waterfall in the Blue Ridge, so it’s not surprising that it floods so easily.  The high volume of water also makes the gorge perilous for people. Swimming is not allowed in the river near the falls, but numerous fatalities have still occurred in the area.

After finishing our hiking for the day, we retreated back to our cabin at the Pineola so we could get showered and dressed for dinner.  We decided to go fancy for our last evening in the area, and enjoyed a fabulous dinner at the Storie Street Grille in Blowing Rock, NC.  In addition to lovely outdoor patio seating, hey had a great wine line, beautifully prepared entrees, and amazing desserts.  Even though I’d already had pie a la mode earlier in the day, I could not pass up their dark chocolate – coconut bread pudding.  Adam’s banana creme brulee was equally delicious.  It was a fitting end to a fabulous trip!

Our next post will actually be a Virginia hike – shocking!  But then we’ll be going back to some more out-of-state posts.  We’re headed for the White Mountains of New Hampshire in a couple weeks, and are hoping to bring back at least a couple posts from that area.  Stay tuned!

Trail Notes

  • Distance – 3.65 miles
    (Check out the stats from Map My Hike)*
  • Elevation Change – 350 ft.
  • Difficulty –  1.  The trail does have a little climbing up and down on the trail, but most people should be able to do it without too much trouble.  We saw people of all ages and all levels of fitness on the trail, so it should be doable by anyone willing.  The options for different viewpoints allow for people to choose what they can handle and decide when to stop.
  • Trail Conditions – 4.5.  Most of the trail is either gravel or dirt and is well-worn.
  • Views – 4.  Great views of the gorge and waterfalls.
  • Streams/Waterfalls – 5.  There are many viewpoints to see the waterfalls.  The only challenge will be to enjoy it with few others around.
  • Wildlife – 1.  You may see squirrels and some birds flying around, but it would be unlikely to see much else.
  • Ease to Navigate – 4.   There is a large branching of side trails here, but using the map should guide you along.
  • Solitude – 0.  With such a close proximity to the Blue Ridge Parkway along with the ease of difficulty, this hike is crowded. 

Directions to trailhead:  From US 221, turn on to NC 183.  In .7 miles, turn right on to Wisemans View Road at the large curve.  The parking lot is a short distance on the left and the trail starts from the eastern side of the parking lot.

* MapMyHike is not necessarily accurate, as the GPS signal fades in and out – but it still provides some fun and interesting information.

Hawksbill Mountain – Linville Gorge Area (NC)

North Carolina Hikes

This 1.8-mile, moderately steep hike takes you to the summit of Hawksbill Mountain where you can enjoy stunning views of Linville Gorge.

View the full album of photos from this hike

Sand Myrtle and Views
The beautiful, myrtle-crowned summit of Hawksbill. The distinctly shaped mountains on the left side of the gorge are Table Rock and Short Off. Below: Trailhead sign; Adam climbs through thick laurels and rhododendrons; Blooming Catawba rhododendron.

Trail Sign Thick Vegetation Catawba

Christine Says…

Shenandoah National Park has a Hawksbill Mountain.  It’s a nice hike and has lovely views, but Hawksbill Mountain in North Carolina’s Pisgah National Forest is even more impressive!  With a dramatic skyline of mountains with interesting profiles and a plunging view into Linville Gorge, this short hike offers scenery unparalleled by our Virginia Hawksbill.  (sorry… I have to be honest!)

Adam and I woke up early on our last morning at the Pineola Inn.  After a grueling day on Grandfather Mountain, we were in search of low-key hiking.  My knee was hurting; every step I took on even the slightest downhill elicited stabbing pain under my kneecap.  I thought to myself,  ‘if only we could find a hike without much elevation change, I can gut this out!’  I referred to our hiking guide for the Blue Ridge Parkway and found a few short, easy hikes in the Linville Gorge area.  The first was Hawksbill.  The description was pretty vague, but it sounded easy and short – good enough to fit the bill for the day.

We had breakfast and made our way to the trailhead.  The drive down Table Rock Road was dusty, bumpy and pitted with axle-rattling potholes.  Fortunately, we were on the road only a short while.  We parked near the trailhead and started up the Hawksbill Trail.

First Views
The views only get better from here! You have to scramble over boulders and through brush before the views really open up. Below: The steeper, rockier part of the trail; Blooming mountain laurel; The rocks at the summit had a wavy pattern in some places.

Steeper Rockier Trail Laurel Cool Rocks

There’s really not a lot you can say about a .9 mile trail that pretty goes straight up a mountainside.  There weren’t many noteworthy features on the route.  It started off gentle, but became increasingly steep and rocky as we approached the summit.  We saw mountain laurel and Catawba rhododendron blooming along the way.  After a short while of walking, the trail leveled out on a rocky summit.  At first, we didn’t see any views.  But then we followed a series of worn footpaths through the brush and over boulders.  On the other side, we found magnificent views that far exceeded any expectations we had for the hike. Linville Gorge is a precipitous plunge from the summit of Hawksbill.  If you look deep into the canyon, you can see the river trailing through the forest. All the mountains around the gorge have unusual shapes.  Instead of gentle rounded domes like most mountains, they have cliffs and plunges and missing chunks.

There were tons of places to sit and enjoy the views in every direction.  When we visited, morning clouds were still swirling around the summits – making the vista even more dramatic.  We saw a large group of cedar waxwings cross the summit, pausing to eat berries from the trees.  Much of the summit was crowned with sand myrtle.  And best of all, we had the entire place to ourselves!  We stayed up there for about 45 minutes before climbing back down.

On the descent my knee nagged at me, but I still wanted to get one more little hike done after Hawksbill!  Because, what would a visit to the Linville Gorge area be without a visit to the famous Linville Falls?  We opted to stop for lunch at Famous Louise’s Rock House before visiting the falls.   The restaurant sits simultaneously in three different counties  (Burke, McDowell, and Avery), and is very well known for its pies.  I enjoyed a slice of their five fruit pie with ice cream, then it was on to our final hike of the trip!

Gorge View
You can see the river making its way through the gorge. Below: A cedar waxwing; Another view of Table Rock and Short Off; The pattern in the rocks was beautiful!

Cedar Waxwing Wider View Wavy Rocks

Adam Says…

When we started off our hike from the parking lot up Hawksbill Mountain, there were lots of cars at the trailhead.  After seeing some of the people preparing for the walk, we noticed they were bringing a supply of ropes and carabiners for rock climbing.  As it turns out, Hawksbill is more popular for rock-climbing than hiking, featuring several moderate and difficult routes.  We jumped on to the trail not knowing how many people we would see, but as it turns out we were the only ones hiking the trail on this gorgeous day.

Diving Board
We thought this rock formation looked like a diving board over the gorge. You can’t tell from the photo, but the drop beneath was pretty scary! Below: Pie!

Pie

The trail started off very gradual, which felt fine to our sore joints from hiking up Grandfather Mountain the previous day.  At .6 miles, the trail took a sharp left up the mountain.  I’m not sure, but this may be the point that the rock climbers veer off the main trail since we saw a faint trail leading out from this point.  The trail then becomes more steep and there are some very large steps to take in places up rocks to keep climbing up the trail.  At .8 miles, we reached the height of the trail.  We headed to the left and within a short distance,  we could see the views open up.  We walked on a faint trail at the top until we reached a nice rock outcropping to take in the views of the gorge.  Across from this viewpoint was Table Rock and Short Off.  We talked about how we would like to come down here again and hike those two.  As we were taking in the views, we saw several cedar waxwings chasing each other in the air.

We initially thought this viewpoint was what we came to see, but I wondered where the rock climbers were.  So, while Christine took some more photos, I decided to scout back to the top of the trail we traveled and headed the opposite direction.  I could tell this opened up to even grander views, so I backtracked and brought Christine back.  We walked about .1 mile to this other viewpoint which had a large rocky cliff-face to take in the view.  We climbed around on the rocks for a while taking in the views of the gorge and mountains.  One rock that I stood on pictured above wobbled a bit when I stood on it, so be very careful on the edges!

We made our way back to the trail, again not encountering any other people.  We were so glad that we had found this gem of a hike.   This is another one of those hikes that has outstanding views with not a lot of effort.  I would recommend it to anyone visiting the Linville Gorge area.

Trail Notes

  • Distance – 1.8 miles
    (Check out the stats from MapMyHike)*
  • Elevation Change – About 700 ft.
  • Difficulty –  2.  A little bit of the hike is steep and rocky, but it’s so short that most people should be able to tackle the route with ease.
  • Trail Conditions – 4.   The trail is in nice condition.
  • Views – 5.  Beautiful views of the gorge, Table Rock Mountain and Short Off Mountain
  • Streams/Waterfalls – 0.  None.
  • Wildlife – 2.  We saw a flock of cedar waxwings and a lizard.
  • Ease to Navigate – 4.  The trail is a straight shot up the mountainside. There are a variety of footpaths around the summit, and lots of places to take in the view.
  • Solitude – 4.  Oddly, we did not see a single other person after we left the parking lot.  We had the summit all to ourselves for a full 45 minutes.

Directions to trailhead:  From Banner Elk, NC (a good hub for this area).  Follow NC 105 south for about eight miles, turn left on NC-181 S/US-221 S/Linville Falls Hwy for about three miles,  turn left onto NC-181 S/Jonas Ridge Hwy for six miles, turn right onto Ginger Cake road and continue onto Table Rock Rd.  The trailhead will be marked with NFS signage.

* MapMyHike is not necessarily accurate, as the GPS signal fades in and out – but it still provides some fun and interesting information.

Table Rock (WV)

The drive to the trailhead is probably tougher than the actual hike, but this 2.4 mile out-and-back in the Canaan Backcountry has spectacular views and is well worth the bumpy ride to get to the trail’s start!

Christine on Table Rock
Table Rock has great views of the valley. Below: When the weather has been wet, there are several muddy sections to cross (it was quite dry when we visited); Later this summer, the rocks will be covered with blueberries.

Muddy Crossing Blueberry Blooms

Adam Says…

This hike was definitely one of those pleasant surprises you find once in a while.  We have been going to Canaan Valley for years (my wife has been going since she was a kid) and we never knew about this great place for hiking that was just a short distance from where we always stay.  I’ve driven by the Canaan Loop Road and thought to myself, “I wonder where that road goes.”  If I had known earlier that it led to this area of hiking, we would have tried this out a long time ago.

We had picked up the Day & Overnight Hikes: West Virginia’s Monongahela National Forest book a couple of years ago and have done a few of the hikes before.  This one led us right to the Canaan Loop Road for this great out-and-back hike.  When we started on the road, we passed by a few houses on the gravel, pothole-laden road and then quickly came upon a school bus parked in the middle of the road, blocking any traffic.  I thought this was odd (and possibly a little like the start to a horror movie), but I didn’t see anyone inside.  I walked up and saw a man about halfway down the bus that was straightening some things up.  I asked if he was moving and he darted up front, started the bus, and gunned it down the road.  We followed the bus for a while, but it was quickly leaving us in the dust kicked up from the gravel road.  After a few miles, we came upon the bus again as it was parking for a scouting group that looked like they were packing up after a large picnic.  We continued past the group on a very bumpy and narrow road that has some precarious edges that you just pray that another car doesn’t come the other way.  We only came across one other vehicle on the road, but I would warn you to be cautious as you make your way along the road and drive slowly.

Thick Rhododendron
The rhododendron along this trail was thick and jungle-like. There were lots of buds, so it should be a pretty bloom this year! Below: Trails are not typically well-marked in the Canaan backcountry; Adam walks through open forest; Crossing another muddy section.

Trailhead Sign Open Forest Mucky

After driving for exactly 10 miles on the Canaan Loop Road, we came to the parking area to the left for Table Rock.  We started down the trail.  The trail is technically blue-blazed, but you will likely only see a few of these blazes on the trees.  The trail is fairly obvious, but I can imagine after the leaves first fall, it could be a little tough to find your way.  The trail starts almost in a jungle of rhododendron, but that quickly opens up to an open forest of larger beech, maple, and birch trees.  The trail stays relatively flat the entire way and there are a few areas of mucky ground or pools.  Rocks and logs have been placed over in some of these to help you traverse, but in some areas after a good rain, you will likely need to get your shoes wet.  After about 1.1 miles, you come across a campsite.  Just ahead is Table Rock.

The outcropping has phenomenal views.  The rocks have crevasses that can be quite deep, so watch where you are stepping and be careful around the edges since there are huge drops below.  Since this place isn’t visited often except by locals, this will be a great off-the-beaten path hike that you can likely enjoy the views all by yourself.  The spruce-covered mountain across the gorge is Green Mountain.   Since this trail is flat, almost anyone could enjoy this hike.

It was quite breezy at the top and I had to hold my hat a few times as the wind picked up.  You can tell that this area does get a lot of wind that funnels quickly through the gorge.  We look forward to coming back to this area sometime soon and visit some of the other trails that crisscross around the Canaan Loop Road.

Christine Says…

Normally when we visit the Canaan Valley area, it’s all about hiking and nature and waterfalls!  This visit was all about… cleaning.  Adam and I agreed to take care of the annual spring cleaning of my parents’ rental property in the area.  In the three days we were there, we scrubbed, scoured, swept and probably did more than 20 loads of laundry.  It wasn’t a fun trip, but we did manage to get out for one short, nearby hike.

I have no idea how the trails off the Canaan Loop Road escaped our notice.  I guess when you’re close to Dolly Sods, Seneca Rocks, and Spruce Knob, other trails fall a bit by the wayside.  But, I’m really glad we took the time to drive the ten bumpy miles to this trailhead.

Greening Up
I love watching green creep up the mountainsides each spring. Below: Lovely trillium, A couple views of Table Rock.

Trillium Table Rock Table Rock

The hike to Table Rock was short, but had a spectacular payoff in terms of views and solitude.  The path led through gorgeous forest, alternating between dense stands of rhododendron and open, mossy forest.  The whole route is flat and easy, so in about 20-30 minutes, you’re already at the overlook.  The rocky shelf stands over a magnificent, undeveloped valley.  When we visited in mid-spring, the emergence of leaves created the effect of green creeping up the mountainsides.  So beautiful!  There were tons of blooming blueberry bushes in the area, too. It would be nice to visit in August and pick berries!

I also enjoyed the Painted Trillium along the trail.  Most of the trillium I see along the trails in Shenandoah is plain white or pink, so seeing a different variety was a nice change of pace.  We were there a little too early to see the rhododendron bloom, but most of the plants were abundant with buds.  It should be really pretty when they finally open!

Trail Notes

  • Distance – 2.4 miles
    (Check out the stats from MapMyHike)*
  • Elevation Change –  195 ft
  • Difficulty – 1. This trail is very flat, so just about anyone could enjoy it.
  • Trail Conditions – 3.5.  The trail isn’t that well-used, but it was still a worn path.  You may have to do a little rock-hopping to make it across some of the larger puddles.
  • Views4. Breathtaking views are clear from this point.  We enjoy not being able to see houses from great viewpoints and you shouldn’t see many signs of civilization from this outcropping.
  • Waterfalls/streams – 0. Non-existent.
  • Wildlife – 2. Other than a few birds, we didn’t see anything on the trail. 
  • Ease to Navigate – 3. There is only one trail on this hike, so there shouldn’t be any confusion.  The only reason to downgrade this is because it is not blazed often at all and in the fall it could be a little challenging to follow the path.
  • Solitude – 5.  We didn’t see anyone on a beautiful weekend day in the afternoon. 

Directions to trailhead:

From Davis, WV, head south on WV 32.  In 3.2 miles, turn right on to Canaan Loop Road (Forest Service Road 13).  Follow the road for exactly 10 miles.  The parking area is on the left and there is a wooden sign that shows the beginning of the trailhead.

* MapMyHike is not necessarily accurate, as the GPS signal fades in and out – but it still provides some fun and interesting information.

Beacon Heights (NC)

North Carolina Hikes

The walk to Beacon Heights is just another short, easy leg-stretcher we did on our fall trip down the Blue Ridge Parkway.  Beacon Heights has the bonus of offering two separate, but equally spectacular, vistas at the summit.

Beacon Heights View
Adam takes in spectacular foliage from the view atop Beacon Heights.

Rolling Mountain Scenery Beacon Heights Trail Sign Beacon Heights Boulder

Adam Says…

The Beacon Heights trail, like the Rough Ridge trail nearby is a trail that gives you great views for minimal effort.  This trail has two different expansive viewpoints at the top.

We started off our hike by parking in the parking lot at mile 305.2 on the Blue Ridge Parkway.   Across the parkway, you can see Grandfather Mountain looming overhead.  Behind the parking lot is another parallel road, SR 1513.  We crossed that and found the trailhead easily.  The trail goes up and comes to a junction shortly.  Take a right at this junction to follow the Mountains-to-Sea/Beacon Heights trail.  At .2 miles, you reach another junction as the Mountains-to-Sea trail and the Beacon Heights trail splits.  Take a left on the Beacon Heights trail.  At .3 miles, you reach a junction where the trail splits where their is a stone bench.  Each junction leads to views from Beacon Heights.  The path to the left leads to an outcropping that provides great views to the north and west.  The path to the right leads to another outcropping with views mostly to the east.  Either spot provides plenty of room to spread out and take in the scenery.  Head back the way you came for about a .7 mile round trip.

Due to the shortness of the hike, you should expect a lot of people at the top.  I’ve heard this trail referred to as a “leg stretcher” and that is an accurate description.  It is not too difficult, so there isn’t much of a need to get geared up for an intense hiking experience.  My favorite of the two viewpoints was at the junction to the left of the bench, since it did provide views of Grandfather Mountain from the top.   With a cell tower visible on the other junction, it takes a little away from the view for me.

Beacon Heights View
The view on the right side of the bench.

Christine Says…

This was the last mini-hike of three we did in one day near the Linn Cove Viaduct.  It was a great way to finish the day, and a good way to work off some of the English Pub fare we enjoyed for lunch.  The walk was short and followed a gentle uphill grade.

The two views at the top were beautiful, and the fall color was simply spectacular!  If we had planned our day a little more thoroughly (and if I hadn’t been so sick), I would have liked to park near Beacon Heights and then follow the Tanawha Trail from Beacon Heights all the way over to the Rough Ridge area.  It would have been a great out-and-back with lots of scenery and view pay-offs.

After Beacon Heights, we briefly discussed tacking on another short hike up to Table Rock, but in the end I was just too worn out to go any further.  Adam and I agreed at the end of the day that we must make a return trip to the area to make up for all the stuff we missed seeing on this trip.

Trail Notes

  • Distance – About .7 miles
  • Elevation Change –  120 ft
  • Difficulty – 1. This is a fairly easy hike.  It’s slightly uphill, but almost anyone should be able to make it up.
  • Trail Conditions – 3.5.  The trail is in great condition, but rain could leave a few areas slick.
  • Views4.5.  Just docked it half a point for the cell tower visibility.
  • Waterfalls/streams – 0. There are no streams on this hike.
  • Wildlife – 0. This area is heavily traveled, so it’s unlikely you’ll see wildlife.
  • Ease to Navigate –4. Follow the signs to Beacon Heights and you won’t have a problem.
  • Solitude –1.  We saw quite a few people on this hike.

Directions to trailhead: Follow the Blue Ridge Parkway to mile marker 305.2  Park in the parking lot or along the road.  Behind the parking lot is another parallel road to cross and you will see the trailhead on the other side.

Rough Ridge (NC)


North Carolina Hikes

Rough Ridge is a short hike that leads to wonderful views of Grandfather Mountain, the Linn Cove Viaduct and the valley below.

Christine Enjoying the Rough Ridge View
Rough Ridge is a great place to enjoy an autumn view. Below: A glimpse of the Blue Ridge Parkway below Rough Ridge; A series of boardwalks protects fragile ecology;  Christine’s hair shows the windy conditions.

A View of the Blue Ridge Parkway from Rough Ridge  Rough Ridge Boardwalks WIndy Rough Ridge

Christine Says…

After we finished our short hike around the Linn Cove Viaduct, we drove a short distance north on the Blue Ridge Parkway to hike Rough Ridge.  This short hike is one of the Parkway’s most popular – understandably, because the views are truly breathtaking.  The trail starts with a small series of log stairs that climb steeply into the woods.  Shortly after the steps, there is a small footbridge over a chasm.  Perhaps in wetter conditions, a small stream might flow under the bridge.  When we visited it was dry.

The trail climbs uphill for about .3 mile, across muddy and rocky trail, until it reaches a series of boardwalks.  The wooden pathways are intended to keep hikers off the fragile terrain.  This part of the parkway is home to numerous rare species, and careless footsteps can do all sorts of damage.  From the rocks beside the boardwalk, hikers are treated to a wonderful panoramic view of the scenery.  The viaduct is almost always visible off in the distance.

After leaving the boardwalks, the trail continues a little more steeply uphill.  There are more rocks to climb and more mud to traverse.  At the top, you’ll reach a giant, sheer-faced boulder with a line of affixed cable.  Use the cable to pull yourself to the top of the boulder.  You’ll be treated to another amazing view. The impressive face of Grandfather Mountain looms above and pristine nature spreads out below.  It’s nothing short of spectacular.

We stayed atop the boulder for a very short while – just enough time to take in the view and snap a few photos.  The wind was so strong, it could almost blow a person of their feet!  The hike down went very quickly, and simply retraced our steps.

After this short hike, we headed into the little town of Blowing Rock for lunch.  What an adorable town!  If you visit the area, don’t miss a visit to the nearby town.

Adam Enjoys Rough Ridge
Adam enjoys the rocky outcroppings on Rough Ridge.  Below:  Adam climbing the trail; We made it to the top; Christine crossing one of the footbridges;  Log steps descending the trail.

Climbing the Rough Ridge Trail At the Top of Rough Ridge Bridge on Rough Ridge
Log Stairs Climbing Down Rough Ridge

Adam Says…

Rough Ridge was one of the hikes we were most excited to do on this trip.  When we were at the Linn Cove Viaduct, we were hoping that the Rough Ridge hike would give us great views of the viaduct and we were not disappointed.

The trail starts from the parking lot by going up a few log steps.  At the top, you reach a junction of the Tanawha Trail.  Take the trail to the left and follow uphill until you reach the boardwalk at .3 miles.  Interestingly enough, while they tell you to stay on the trail, they have left an opening to climb out onto a large flat rock.  Just be careful if you have any children, since the edge has a large dropoff.  From this viewpoint, you can see the Linn Cove Viaduct which looks quite straight from this perspective as you are looking at it straight on.  After the boardwalk, the trail continues to climb and then takes a sharp turn leading up to another rock formation that daring people could climb onto.  Continuing on, at .6 miles, you reach a junction with the Tanawha Trail again and see the trail blocked off to protect vegetation.  There are a few different rocks to get great views, with the best being from the rock Christine mentioned above with a cable to hold to guide yourself up.  There are some great spots here to have a quick snack and enjoy the views all around you.  From the summit, you can see Grandfather Mountain rising above the Linn Cove Viaduct (which you can see snake from the summit) and views down into the Linville Gorge.  On a clear day, you should be able to see for miles

One of the more popular rock climbing spots in the South lies below Rough Ridge in an area known as Ship Rock.  If you are a skilled rock climber, I could see this being a way to do some climbing on the rocks before taking this trail to hike to the top.

This is definitely an easy hike for most people that has a huge payoff for minimal effort.  If you are traveling along the Blue Ridge Parkway, I would make this a must-do hike along the way for a short 1-1.5 hour break.

Trail Notes

  • Distance – About 1.2 miles
  • Elevation Change –  480 ft
  • Difficulty – 2. This is a fairly easy hike.  It’s mostly uphill, but never steep.  The final viewpoint at the top requires a short, rope-assisted climb to a boulder top.
  • Trail Conditions – 3.  The trail is good condition, but it can be muddy and slick.
  • Views5.  AMAZING!
  • Waterfalls/streams – 0. There are no streams on this hike.
  • Wildlife – 0. This area is heavily traveled, so it’s unlikely you’ll see wildlife.
  • Ease to Navigate –4. This trail is an easy to follow out-and-back.
  • Solitude –1.  We saw quite a few people on this hike.

Directions to trailhead: Follow the Blue Ridge Parkway to mile marker 302.8  Park at the Rough Ridge overlook.

Linn Cove Viaduct (NC)

North Carolina Hikes

The Linn Cove Viaduct is one of the Blue Ridge Parkway’s most recognizable features.  A short (less than one mile!) loop hike lets you see the viaduct from all angles, while enjoying a lovely walk through the woods.

Linn Cove Viaduct
The Linn Coves Viaduct hugs the side of Grandfather Mountain. Below: Adam walks beneath the viaduct; Tanawha trail blazes; Markers along the trail.

Walking Under the Viaduct Tanawha Trail Marker Tanawha Trail

Christine Says…

We recently spent a few days in western North Carolina along the Blue Ridge Parkway.  What a spectacular area!  On our first full day, we did a trio of short, ‘leg-stretcher’ hikes in the vicinity of Linn Cove – the Viaduct Trail, Rough Ridge and Beacon Heights.  In retrospect, we think we should have covered all three of these hikes as one long out-and-back (or shuttle) along the Tanawha Trail, but you live and learn when you visit a new place.

Our first mini-hike of the day was a short loop that passed underneath and then alongside the famous Linn Cove Viaduct.  The viaduct is a feature I had been wanting photograph for years, and to be able to visit at the peak of fall color was a real treat. The serpentine curve of the viaduct hugging the shoulder of Grandfather Mountain is a classic scene – probably one of the Parkway’s most iconic.

Our hike started out from the Linn Cove Visitor Center.  The paved trail begins at the far end of the parking area.  For almost a quarter mile, the trail passes underneath the viaduct.  Cars rumble across the span overhead, while underneath walkers can marvel at the engineering it took to put the viaduct in place.  At the end of the paved section, a set of stairs climbs up a hillside and the trail begins to run through the woods, parallel to the viaduct.  If you continue uphill, you’ll find yourself on the Tanawha trail.  A trail lower on the hillside follows the road more closely and crosses a couple small bridges.  It really doesn’t matter which trail you follow, both will lead to the same place – a great vista just above the viaduct.

The trail to the vista is just a small, well-worn footpath through the woods.  Be careful you don’t miss it!  If you continue on, you’ll be following the Tanawha Trail for quite a while.  The best clue that you’ve reached the side trail is that you’ll be able to see the north-end of the viaduct through the woods.  Follow the trail until it reaches a jumble of rocks just off the side of the road.  Climb the rocks, and you’ll be able to enjoy a beautiful view of the viaduct curving off around the side of the mountain, with the rolling valley beyond.  It’s GORGEOUS, especially in early morning light!

After you’ve enjoyed the view, take the footpath up to the main trail and return the way you came.

Walking Through the Woods Alongside the Viaduct
The trail went through the woods, roughly running parallel to the viaduct. Below: The trail passed some interesting boulders; This tree’s roots really have to reach toward the ground; A paved section of path underneath the viaduct.

Boulders Near the Linn Cove Viaduct Interesting Tree on the Viaduct Trail Paved Trail

Adam Says…

Normally, if I were to hear someone suggest that I take a short hike with the highlight being a view of a paved road, I would think they don’t know what a nice hike is.  However, I would be wrong in this case.  It is impressive to think about how this feature was built and the bend in the road leads to some gorgeous views off the side.  And when you hit this on a beautiful fall day, you have quite a scene.

I would recommend a trip inside the visitor center to learn more about the construction of this feature.  I was impressed to learn that the viaduct was created with the purpose of not impacting the surrounding environment.  Many times when roads are being constructed, they will cut into the mountain to build the road.  The Linn Cove Viaduct was actually built by putting seven foundations below and then having 153 segments lowered down onto seven piers.  This kept construction vehicles from having to build a temporary road to haul heavy construction vehicles and equipment on to the mountain, minimizing the stress on the nearby environment.   For more information on how this feat was accomplished by the Figg & Muller Engineering Group, check out the NPCA’s website for details.

On our way down to North Carolina, we had extreme heavy fog and light drizzle.  Visibility was at times only allowing us to see about 20 feet in front of the car.  We had driven over the viaduct and didn’t even really know what we were missing.  Pedestrians aren’t allowed on to the viaduct.  To get the classic photo you see above, there was a side trail once you reach the other side of the viaduct that leads to a boulder for the birds-eye view.

This was a great start for a few days of hiking along this area of the Blue Ridge Parkway.  The foliage near the peak of fall color made us excited to take in as many autumn views as we could.

Trail Notes

  • Distance – About one mile
  • Elevation Change –  negligible
  • Difficulty – 1. This is an easy hike, part of it is even accessible and follows a paved path.
  • Trail Conditions – 4.  The trail is in excellent condition.
  • Views4.  The best views are from the small, rocky outcropping just above the road.  You’ll also get some glimpses of the valley through the trees.
  • Waterfalls/streams – 1. There is one small waterfall cascading under the viaduct.  You’ll pass over it on one of the small footbridges.
  • Wildlife – 0. This area is well-populated by people, so it’s unlikely you’ll see wildlife.
  • Ease to Navigate –3. We aren’t really sure what part of the hike was the Tanawha trail and what part was the interpretive trail for the Viaduct, but it really didn’t matter since the area is so small and close to the road.
  • Solitude –1.  While we saw almost nobody on our visit, I think it was the exception.  This area is typically very popular and heavily trafficked.  When we passed the same area later in the day, it was swarming with people.

Directions to trailhead: Follow the Blue Ridge Parkway to mile marker 304.  Park at the Linn Cove Visitor Center.

Pemetic Mountain – Acadia National Park (ME)

Special: Acadia Edition

This 2.9 mile segment hike starts from Bubble Pond, crosses Pemetic Mountain and comes out at Jordan Pond. You will either need access to two cars or the free Island Explorer Shuttle Bus.

Adam on the Pemetic Summit
Adam enjoys views from the Pemetic summit. Below: Christine climbs steeply up the trail; Views of Eagle Lake in the morning clouds; Adam walks across Pemetic in the direction of Jordan Pond; Jordan Pond.

Uphill Climb Foggy View of Eagle Lake
Adam Hiking Down Jordan Pond

Adam Says…

We had hiked up Pemetic Mountain as an out-and-back on previous trips up to Acadia National Park, but we decided that we wanted to try a different route this time to incorporate both sides of the mountain.

We started from the Bubble Pond parking lot early in the morning.  This lot has space for about 20 cars.  If you’ve been to Acadia before, you will know that there will be a lot more traffic than what this lot can accommodate.  The proximity to the carriage roads makes this a popular spot for cyclists to park.  By 10 a.m. this lot will likely be full and you will have to park elsewhere.

From the parking lot, we walked, taking a left, over the Bubble Pond bridge and down the carriage road.  Within about 200 feet you will see a sign for the trailhead to Pemetic Mountain.  The trail starts off with a steep grade through the deep woods, climbing up through exposed roots and rocky surfaces.  The rain had come down heavily the night before, so this made for some slippery footing.  After about .8 miles, the trail began to open up to a nice viewpoint where you could see across to Cadillac Mountain and down to the southern edge of Bubble Pond.  The trail begins to open up at this point as you will continue to rise until you climb above the treeline at the one mile marker.  In 1.2 miles, you reach the summit post of Pemetic Mountain, giving you panoramic views of the mountains, lakes, and ponds around you.

Bubble Pond Bridge
The Bubble Pond Bridge. Below: Bubble Creek was flowing heavily due to the previous day’s flooding rains; The first part of the hike is along the carriage trail;  The trailhead marker; Adam climbs over rocky terrain.

Bubble Creek Carriage Road to Trailhead  Trailhead Marker Rocky and Rooty Trail

From the summit, we decided to take a different path down and went down the South Pemetic Mountain Trail (you can also take the Northwest Pemetic Mountain Trail to form around a 4 mile loop with the Carry Loop).  This led across the open granite face of the mountain and we followed cairns along the way to ensure we were going the correct way.  The views on the way down this way were also spectacular.  At the edge of the exposed mountaintop, we reached a junction with other trails around the 2 mile marker.  We headed to the right towards the junction with the pond trail.  This put us back below treeline down a steep decline that was slicker than the way we went up.  We were both glad we brought our trekking poles to balance us on the wet granite trail.  At 2.4 miles, we reached the junction with the Pond Trail.  We took a right on this which descended until leveling out.  We crossed a small rockway bridge which took us right to the Jordan Pond House.

Lush Forest
The woods were beautiful. Below: Steep climbing; Tricky and complicated footing; The higher we climbed, the foggier it became.

Adam Climbing Complicated Footing Into the Fog

We went to the front of the house and caught one of the Island Explorer buses waiting out front which carried us straight back to the Bubble Pond parking lot and our vehicle.

Usually I am a little skeptical about bus systems and how convenient they are to use, but the Island Explorer system in Acadia won us both over for convenience and ease of use.  We used them earlier in the week to rent bikes and ride along the carriage roads.  They had a few bike shuttles running in the morning from the center of Bar Harbor.  We just lined up and we only had to wait about 15 minutes before the bus came to load up our bikes and took us to Eagle Lake.  I brought a bus schedule with me on this hike and there were buses coming by the Jordan Pond House about every 20 minutes that could take you back to Bubble Pond.    And if you start your hike early enough, you can be back at Jordan Pond to enjoy a nice lunch with popovers outside with your view of Jordan Pond and The Bubbles.  There is not much of a better reward for a great hike than that.

While we were relaxing at the top of Pemetic Mountain, Christine and I were ranking our favorite hikes in Acadia.  Over the years, we have done most of the hikes up here and there are so many great trails here.  But after much pondering, here is how I would rank my favorites:

  1. Cadillac Mountain South Ridge
  2. Penobscot Mountain/Sargent Mountain Loop
  3. Gorham Mountain
  4. Cadillac Mountain North Ridge to Dorr Mountain Loop
  5. Pemetic Mountain

Christine Says…

Before I share my thoughts about the Pemetic hike, I wanted to talk a little about the impact of inclement weather when hiking in Acadia.  Some years, we head to Acadia and have a full week of bluebird skies and seventy-degree days.  Those years are always glorious and memorable. Other years, the island seems to stay trapped under a stationary area of low pressure – with ongoing rain, fog and humidity. 2012 happened to be one of those years.  We had a few nice (though still hot and muggy) days, but more days ended up foggy and rainy.

Normally, if it rains on a hiking trip, you throw on your rain gear and press on.  However, with all the slick, exposed granite in Acadia, it can be a dangerous place to hike when it’s been raining. Evidently, the summer of 2012 was quite rainy and a very bad summer for hiker injuries in the park.  In the several weeks before we arrived, a man slipped, fell and broke his leg on Dorr Mountain, another woman slipped and seriously injured her back on Gorham Mountain, and sadly another young woman (an experienced hiker) slipped and fell to her death on the Precipice Trail.  Hiking in wet, rainy conditions is not something to be taken lightly on Acadia’s unforgiving terrain. If it’s raining, and you still want to hike, try the Carriage Roads instead.  They’re lovely and always safely passable.

Pemetic Summit
The Pemetic Summit.  Below: Adam climbs over granite as we approach the summit; A foggy view of Bubble Pond; A view of Jordan Pond from the summit; Adam enjoys the view.

Nearing the Pemetic Summit  Foggy View of Bubble Pond
Jordan Pond from Pemetic  Flat Granite on Pemetic Summit

The day before we hiked Pemetic, Mount Desert Island and Acadia received a lashing of bad weather. Streets flooded, ponds jumped their banks, and waterfalls poured off the mountainsides in places where there normally isn’t any running water. The rain lasted most of the day before finally slowing to a drizzle in the evening hours. In the morning, it was still wet and foggy, but the forecast called for the clouds clear off by mid-morning. It was our last day of vacation, so we wanted to get out there and do one last hike, even if it meant slogging through a bit of mud and taking our time to be careful on slippery terrain.

We decided to climb Pemetic Mountain, which is tucked into the space between Bubble Pond and Jordan Pond. We’ve hiked it before. I remembered it being steep, and covered with a tangle of roots and loose rock. I took a hard fall there a few years ago. I slipped on a layer of wet pine needles on granite and fell about ten feet onto a dead, and very spiky, spruce. One of the broken limbs stabbed through my shirt, into my back and left a puncture wound with a large surrounding bruise. Ouch!

Needless to say, we took great care climbing up this time, choosing our steps wisely and making sure footholds were secure. I remembered the trail being much tougher and steeper than it was, but I’m in better shape now than I was a few years ago. The wooded part of Pemetic is stunningly beautiful – lush and green. There are evergreens all up the mountainside, with their tall straight trunks leading to an umbrella-like canopy of green. The forest floor is colored in a patchy pattern of soft-red of pine needles and vivid green moss.

The Bubbles
A view of the Bubbles across Jordan Pond. Below: The trail downhill went through forest; The Island Explorer Bus.

Adam Hiking Down Island Explorer Bus

As we climbed, the woods became increasingly foggy. It was beautiful in a quiet, mysterious kind of way, but I worried that we would miss out on any views from the top. The first viewpoint we came to was at a small outcropping overlooking Bubble Pond. Banks of fog moved across the opening, sometimes we could see the pond and sometimes we could not. We took a short break for water and continued toward the summit. For a short stretch after the view, the trail dipped back into the forest until finally stepping out onto open granite for the final push to the summit. At the summit, we ended up having a decent view of Jordan Pond and Frenchman Bay beyond. There was still a lot of blowing fog and low clouds, but the openings between them were generous enough to make the view worthwhile.

We chatted with a few other hikers at the summit about different hikes on the island, enjoyed the views, and ate some trail mix. We took photos at the summit marker, looked for hikers across the way on Penobscot and Sargent, and then made our way down the opposite side of Pemetic. The granite dome of the mountain was impressive on the downhill hike – smooth and expansive, offering more views of the offshore islands. Eventually, we ended up back in thick, evergreen forest for the steepest part of our downhill climb.

At the base of the mountain we met the Pond Trail which took us slightly around Jordan Pond and then back to the Jordan Pond House. We contemplated getting popovers a la mode, but Adam really wanted to head back into town for lunch. We ended finishing our hike at just the right time! An Island Explorer Bus headed toward Bubble Pond was waiting for us to hop right on. It was such an easy way to hike Pemetic without doing one trail as an out and back.

By the time we finished hiking, every trace of clouds and fog had cleared off!  After lunch, we actually did a second hike – Gorham Mountain, which is one of our perennial favorites!

Trail Notes

  • Distance 2.9  miles (makes use of the Island Explorer Shuttle)
    (Check out the stats from MapMyHike)*
  • Elevation Change – About 950 feet
  • Difficulty – 2.5 The hike up and down Pemetic Mountain is quite steep, but with the short distance isn’t too grueling.
  • Trail Conditions – 3.  The trail is well-maintained and clear, but the roots and rocks make all of the hiking in Acadia a little difficult.
  • Views– 5.  Panoramic views for miles on a clear day. 
  • Streams/Waterfalls – 3.  The parking area for the trail is alongside Bubble Creek.  The Pond Trail also runs alongside a small stream – and of course, Jordan Pond is lovely.
  • Wildlife –2.   We only saw a few red squirrels on the trail.  You may see some migrating hawks if you are lucky.  An occasional loon may be spotted in one of the ponds, but typically only around dawn.
  • Ease to Navigate – 3.5.  The trail wasn’t that hard to follow as long as you followed the blazes or cairns. 
  • Solitude – 3.  With proximity to Bubble Pond for bike riding and Jordan Pond, this is a fairly popular hike.  Expect to see people lingering at the summit, but the mountaintop is so large that you should be able to stake out your own area for solitude.

Directions to trailhead:  From Bar Harbor, head west on US-233 for about a mile.  Enter Acadia National Park on the left and take a right onto the Park Loop Road.  Travel about 1.9 miles until you see the Bubble Pond parking lot on the left.  Head down towards Bubble Pond on the carriage road.  The trail head starts off on the left about 200 feet along the carriage road.

* MapMyHike is not necessarily accurate, as the GPS signal fades in and out – but it still provides some fun and interesting information.

Laurel Falls (TN)

Special: Smokies Edition

Introductory Guide to Visiting Great Smoky Mountains National Park

This paved, easy 2.6 mile (round-trip) walk leads to Laurel Falls.  The 80-foot tall cascade is one of the Smokies most popular waterfalls.

Laurel Falls
Laurel Falls is easily accessed and one of the park’s prettiest waterfalls.

Christine Says…

If there is a trail most everyone does when visiting the Smokies,  it’s Laurel Falls.  This hike is popular for a number of reasons: 1) the falls are gorgeous 2) the trail is short, paved and not very steep and 3) the trailhead is close and easily accessed from Gatlinburg.

Adam and I always enjoy solitude when we hike, so we cooked up a plan to eat breakfast early and get to the falls before the crowds.  However, it turns out it’s very hard to find breakfast in Gatlinburg that starts serving before 7:00 a.m.  Even the free breakfast at our hotel wasn’t put out until 7:00.

We decided we would have to go with the flow and hope that most people would have a 9:00 a.m. breakfast and take their time starting their activities for the day. It turned out to be a great decision because we had an amazing breakfast at the Pancake Pantry.  Let’s just say, I was still very full on strawberry crepes and bacon when we got to the Laurel Falls trailhead.

I guess most people do prefer a more leisurely start to their day, because there were only a few cars in the lot when we arrived.  The trail climbs several hundred feet over the course of 1.3 miles.  The entire path is paved, making this trail ideal for families with children in strollers.  A person might be able to get a wheelchair up the trail, but the paving is not smooth and while the grade is gentle, it’s still all uphill until the very end.

Laurel Falls Trailhead
The hike begins with distance markers, interpretive brochures and bear warnings. Below: These Pancake Pantry pancakes are too yummy not to share, and they made a perfect pre-hike breakfast!

Pancake Pantry

There really isn’t much to say about the actual hike to the falls.  It was typical Smoky Mountain forest with a few glimpses of bigger mountains through the trees.  I imagine most people would be able to cover the distance in about 30 minutes.

The falls are spectacular and tumble down over several rocky tiers.  The upper falls are accessed directly by the trail.  Viewing the lower half of the falls requires a short boulder hop downhill off the trail.  Both parts of the falls are well worth visiting up close, so if you feel confident doing a little rock scrambling, do take the time to climb down.

We were lucky enough to have the falls mostly to ourselves.  A few people came by while we were there, but no one stayed long.  The heavier traffic started rolling in on our walk back down.  We passed so many people – dozens and dozens – making their way up the trail by 9:00 a.m.

In short, Laurel Falls is definitely worth a visit, but I recommend arriving early.  If you’re a photographer and want to take long exposures on the waterfall, the area is completely in the shade in the early morning, but I’m pretty sure sun would hit the falls by mid-day.

Adam Says…

We have just started to purchase art prints from all of the national parks we have visited.  The ones we have been buying are produced by Lantern Press and are for sale in the national park visitors centers.  We are hoping to one day frame and hang them in an area of our house.  When we were deciding which one we would get to represent the Smokies, we decided on the Laurel Falls print.  So, we definitely had to hike this one since we had the iconic image.

Christine Hiking the Paved Trail
Christine hikes along the paved path to Laurel Falls. She carried her big, heavy-duty tripod on this outing. Below: Christine jumped in the photo to add a sense of scale to Laurel Falls.

Laurel Falls and Christine

As Christine said, the hike just to the waterfall stays on the concrete path and it is uphill almost all of the way.  We saw several families on the way back that were not in the best of shape that were huffing and puffing their way to the falls and asking how much further.  However, I do think that most people should be able to make the hike.

If you are interested in making this a longer hike, you can continue past the falls to the top of Cove Mountain, making it a 8.0 mile out-and-back hike.  The trail after the falls isn’t paved and you would be looking at 2300 feet of elevation gain in the remaining 2.7 miles.  At the top of the mountain is a tower, but from what I have read part of the tower has been blocked off for a weather station and the views are not that remarkable.

Lower Laurel Falls
Accessing the lower falls requires a short, simple scramble from the trail.

There is a reason that this waterfall is so popular – it is one of the prettiest you will see.  The upper falls drop down 75 feet over three tiers.  The water running down is the Laurel Branch that is coming down from Cove Mountain and it will eventually feed into Little River.  I would encourage you to go after some rain has hit the Smokies to get the most water flowing through.  The lower part of the falls does take careful navigation to get down to the bottom, but if you want to venture down below, backtrack about 50 feet and you will see a common path to reach the bottom.  We witnessed a couple that tried to hike down to the bottom another way and the man fell hard on his way back up.

We had the falls for a few minutes by ourselves (it does pay to start early), but we soon met a newlywed couple.  Christine showed the wife how to do some long exposure pictures and then we went on our way.  We saw the hoards of visitors coming up the path and I could tell it was going to be a busy day at this popular spot.

Trail Notes

  • Distance2.6 miles
  • Elevation Change – about 300 feet
  • Difficulty –  1.  This is a short, easy hike with not much elevation change.
  • Trail Conditions – 5. The trail is paved and is suitable for strollers.
  • Views1.  A couple peeks through the trees.
  • Streams/Waterfalls – 5.  The falls are gorgeous!
  • Wildlife – 2.  Because of the popularity of this hike, I would guess a lot of animals are scared away.  Although… bear warnings are posted in the area.
  • Ease to Navigate – 5.   Very simple – just follow the path and you can’t get lost.  The trail continues past the falls, but we didn’t go that far.
  • Solitude – 0.  Expect to see masses of people!

Directions to trailhead:  Past the Sugarlands Visitor Center, take the Little River Road for 3.5 miles until you see signs for the falls.  Parking was available on both sides of the road.

Byrd’s Nest #4 Loop

This short 2.4 mile loop takes you along the Appalachian Trail, the Neighbor Mountain Trail and the Hull School fire road.  The highlight of the loop is a visit to the Byrd’s Nest Day Shelter.

Byrd's Nest
Byrd’s Nest #4 sits in a lovely opening off the Neighbor Mountain trail. Below: Parking is available at the Beahm’s Gap Overlook; the trail begins after crossing the railing; Blooming azaleas along the trail.

Parking at Beahms Gap Start of Hike Blooming Azaleas

Christine Says…

We were supposed to go backpacking, but when we heard terms like ‘flooding rains’, Nor’easter and ‘wash out’, we decided to delay the trip.  When Saturday morning dawned, it was sunny and warm and beautiful!  I made a trip into town, worked on a photography project in the arboretum, bought a bunch of veggies and strawberries (yay!) at the farmers’ market and got a haircut, figuring that the rain had to be on its way.  When I got home, it was still sunny and gorgeous with no sign of the coming deluge.  Adam suggested we hop in the car, go for a short hike and then have lunch in the park.  It sounded like a great idea to me, so off we went.

We decided on the short Byrd’s Nest #4 loop, starting from the Beahms Gap Overlook.  The trail started with a hop over the retaining rail at the overlook – a cement trail marker post will show the spot to cross the rail.  The trail goes slightly downhill along a short spur to the Appalachian Trail.  Follow the AT north until the junction with the Neighbor Mountain trail.  Take a right onto the Neighbor Mountain trail and follow it uphill until you reach a clearing and the Byrd’s Nest shelter. For the return trip, follow the grassy path in front of the shelter downhill.  The path quickly widens to the Hull School fire road.  After a few tenths of a mile, you’ll come back out on Skyline Drive.  Follow the drive south for about a tenth of a mile back to your car.

Adam Hiking Along the Rocky Appalachian Trail
Adam hikes along a rocky section of the Appalachian Trail.

Although there are no sweeping views or rocky outcroppings, this hike is a lovely leg-stretcher.  The Byrd’s Nest shelter is a perfect place to enjoy a picnic lunch.  We had planned to relax at the shelter for a while, but when we arrived we found it already occupied by a picnicking couple.  Not wanting to infringe on their space, we took a few photos and headed back on the return arm of the hike pretty quickly.

We decided to have lunch at the Big Meadows Wayside.  It was packed – more crowded than we’ve ever seen it!  They had some new selections on the menu, which was a pleasant surprise.  The menu has been pretty much the same for years!  I got a grilled chicken sandwich with roasted red peppers, provolone cheese and aioli.  It was surprisingly juicy and delicious.  You don’t expect amazing food from park concessionaires – but this was actually one of the best grilled chicken sandwiches I’ve ever eaten.  Go figure!

It was still beautiful and sunny when we left the park around 2:00 p.m. – but by 4:00 heavy thunderstorms had moved in and it rained pretty much non-stop the next 48 hours.  I was glad that we had decided to postpone our backpacking trip.

Adam Says…

I was originally thinking that we would just take a drive on Skyline Drive when I whisked Christine away.  But, I decided to bring our Shenandoah National Park Falcon Guide hiking book and had Christine thumb through to find this hike we hadn’t completed yet.  We had done the majority of this trail before on our Appalachian Trail hike from Elkwallow to Thornton Gap.  The last time we had been on this trail, we saw the post that showed this side trail, but we decided to avoid more hiking.  The Falcon Guide book actually mentioned another trail that should have looped back to the AT, but that trail no longer exists (at least the posts have been removed).

Another View of Byrd's Nest
A front view of Byrd’s Nest. Below: Adam walking along the Neighbor Mountain trail; A few dark clouds rolled over on the short section of road walking at the end of the hike.  They quickly passed and blue skies returned.

Adam Walking the Neighbor Mountain Trail Road Walk

The cabin is named for Senator Harry Byrd Sr., who donated four of these shelters for the national park (the other three are at Old Rag, between the Pinnacle and Meadow Spring Trail, and Hawksbill mountains).  His name also graces the Visitor’s Center near Big Meadows and he hiked Old Rag annually into his 70s.  It appears that the cabin up here must have had a few other buildings or other things nearby since you can see some nearby foundations.  I’m not sure if this area once served as someone’s home or if it was an overnight shelter with a spring and a privy.  It is listed as a day-use shelter only.

Once we descended from the shelter down the fire road, we both thought we saw a bear dash off into the woods.  We saw a black shape and a big crashing through the brush, so we are convinced it was a bear.

The cabin is definitely the highlight of the trail, but we were disappointed that others had taken it completely over to eat lunch.  So, we quickly got on our way to not interrupt them.  Overall, there are definitely more interesting trails in Shenandoah National Park.  But if you want a quick hike with a possible place to eat a packed lunch, this could be one for you.

Trail Notes

  • Distance 2.4 miles
  • Elevation Change –850 feet
  • Difficulty – 2.  There is a substantial amount of uphill climbing, but the overall distance is short.
  • Trail Conditions – 5.  The trail is in excellent shape, like most of the AT through Shenandoah.
  • Views– 1.5.  There is a partially obscured view at the Byrd’s Nest Shelter.  It was probably much more panoramic and open when the shelter was originally built.
  • Streams/Waterfalls –0.  There are no streams or waterfalls, but you will pass a spring-fed water source.
  • Wildlife – 3.  We heard lots of birds, and *think* we saw a bear.
  • Ease to Navigate – 2. After leaving the AT and Neighbor Mountain trails, it was all guesswork.  Nothing was marked and the description of the trail in our Falcon Guide was inaccurate.
  • Solitude – 3. This is a fairly popular family hike.

Directions to trailhead:  Park at the Beahms Gap Overlook parking lot around mile 28.5 on Skyline Drive.  From the lot, you should see a cement post marking the start of the trail on the other side of the log barrier.

Edith J. Carrier Arboretum

The Edith J. Carrier Arboretum is a 125-acre botanical preserve located within the city limits of Harrisonburg on the campus of James Madison University.  There are between three and four miles of interconnecting trails through the arboretum.  (Maps) Spring is a fabulous time to visit this special spot and witness flowers opening and the forest coming back to life again!

Arboretum Pond
Spring is a gorgeous time of year to visit the Edith J. Carrier Arboretum. Below: The paths in the arboretum are all well-maintained; Adam hunts down a geocache; Enjoying the labyrinth.

Pathway in the Arboretum Finding a Geocache Enjoying the Labyrinth

Christine Says…

What do you do on a morning you want to get out into nature, but you don’t have time for a longer hike in the national forest or Shenandoah National Park?  If you’re anywhere near Harrisonburg… you go to the Arboretum.  It’s a beautiful, lush, wooded spot in the middle of Harrisonburg.  Trails covered with wood chips or gravel wind their way through the forest.  There are two ponds where you can spot ducks — usually mallards, but sometimes wood ducks if you’re lucky.  Squirrels crunch through the understory, woodchucks duck into holes when they hear approaching footsteps and birds sing in the trees overhead.  There are even a few hawks that call the Arboretum home, so be on the lookout for them!

Beyond the wildlife, the Arboretum has abundant plant life – both wild natives and cultivated species.  In the spring, flowering trees – redbuds, dogwoods and magnolias – burst with color.  One section of the trail passes through an area populated by hundreds of daffodils.  Bleeding hearts bloom in quiet corners. Trillium, Virginia bluebells, snowdrops, hellebore and even some yellow lady slippers can be found along the paths. There is always something new and different blooming, so it’s a place we visit time and time again.

Abundant Daffodils
Daffodils are abundant and impressive at their peak! Below: Adam checks out the arboretum map.

Map

On this particular morning, Adam and I hiked the path along the perimeter of the arboretum.  We walked through the daffodils, passed the quiet, smaller pond near the greenhouse and then climbed into the natural wooded section.  On the return half of the walk, we stopped at the labyrinth and spent a little time walking the maze.  All in all, we walked about two miles.  We could have walked more if we had taken all of the side paths and connectors, but on this morning, two miles was enough.  It was a beautiful morning!

Take a moment to stop by the arboretum’s Flickr site to view hundreds of photos from their grounds!

Adam Says…

This should probably be listed as a “hike” with the quotation marks since it is more of a walk through a nice arboretum.  We do like to cover hikes for all different types of abilities and this should be one that most people can do.  There is even a wheelchair-access ramp down to the pond, so anyone can enjoy this.   You will likely see several families here on pretty days by the lake or perhaps see some wedding or family photos taking place nearby.  This is a place to stroll through and enjoy the scenery.

Turtles Sunning
Turtles can usually be spotted basking in the sun. Below: A mallard swims in the pond.

Mallard

One thing that is exceptional here is all the beautiful flowers.  At this time of year, everywhere you turn your head you’ll be greeted with vibrant colors from the blooming trees and flowers.  You can read more about the history and flora on their website.  There are probably a few key highlights of the arboretum.  The most prominent is the pond.  You will most likely see mallards floating on top and a coin-operated machine to purchase feed for the ducks.  At certain times of the year, there is also a poet-tree where the Arboretum hangs a wicker basket.  People are invited to write a poem and leave it there for others to read.  Another highlight is the rock labyrinth that is located off a trail.  While it is not a labyrinth created to the level that you may have seen in The Shining, it is a path made with rocks in the ground that produces a zen-like rock garden feel.

We started from the northern parking lot and made the large loop around the perimeter of the park, starting near the picnic pavilion.  The end of the perimeter loop brought us by the education center, to the lake, and back to the parking lot.  We then walked around the upper terrace Caroline Sinclair Memorial Garden.  With everything blooming typically in April-June this is a great place to visit in the spring!

Bridge
Adam enjoys a view of the pond from the bridge.

You can download a map of the Arboretum here.

If you are interested in geocaching, there are also several geocaches here in the Arboretum.  This might be another thing to enjoy as a family here.

Trail Notes

  • Distance 1.7 miles for the long path around, but it can vary based on how far you want to explore the side trails inside.
  • Elevation Change – Negligible
  • Difficulty – 1.  These gentle paths can be walked by nearly anyone.  There is even an accessible path around the main pond.
  • Trail Conditions – 5.  The trails are in great shape – covered with gravel or wood chips
  • Views – 0.  This is a wooded walk, so there are no views.
  • Streams/Waterfalls –3.  There are two ponds, a small man-made waterfall and a pretty stream passing through.
  • Wildlife – 3.  Many bird species and small mammals.  Occasionally deer are spotted.
  • Ease to Navigate – 5. All the paths interconnect and lead back to the center hub.
  • Solitude – 0. This arboretum is very popular!

Directions to trailhead:  The best way to get directions is using the website google directions here.