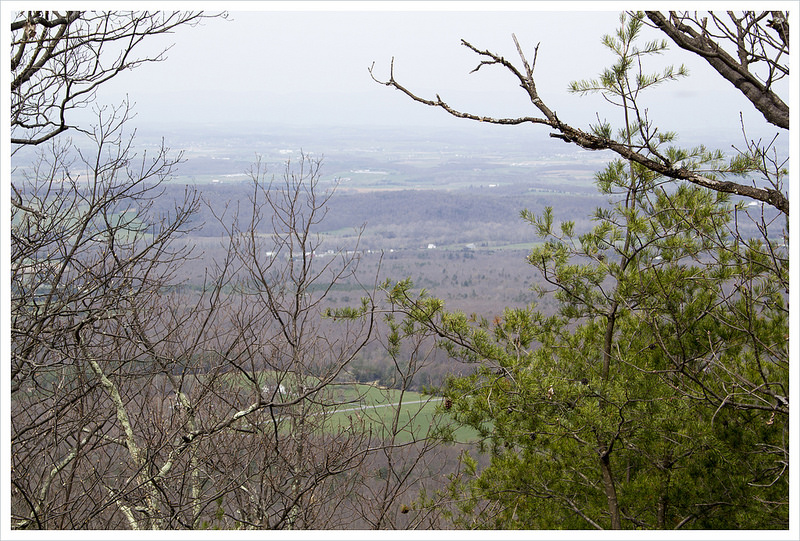
This easy 4.5 mile out-and-back along the Appalachian Trail offers great views in many places! It would be a perfect family hike or a leg-stretcher for folks riding along Skyline Drive.
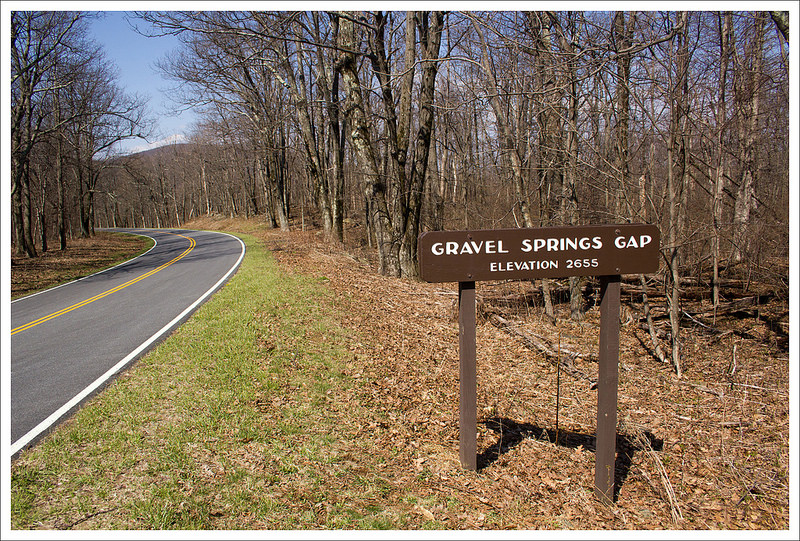
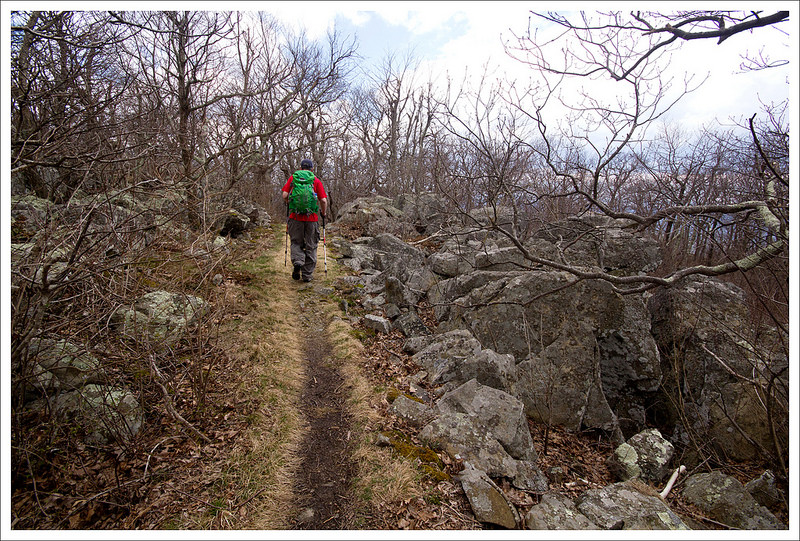
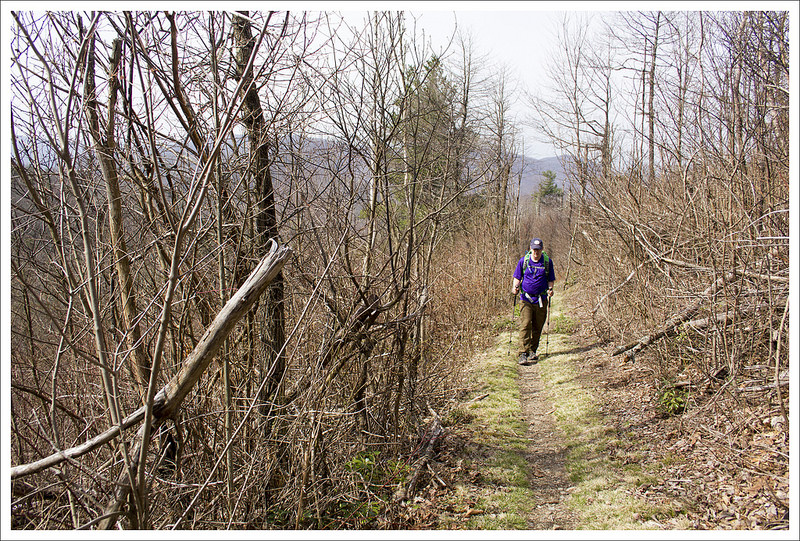
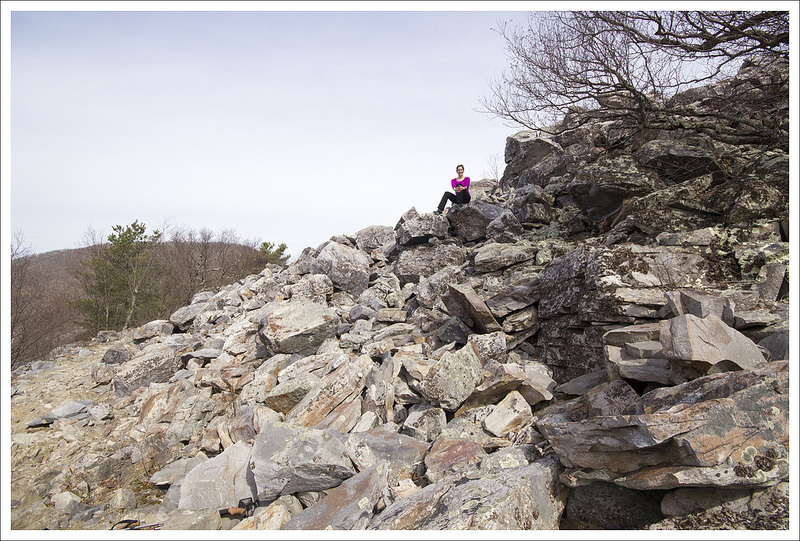
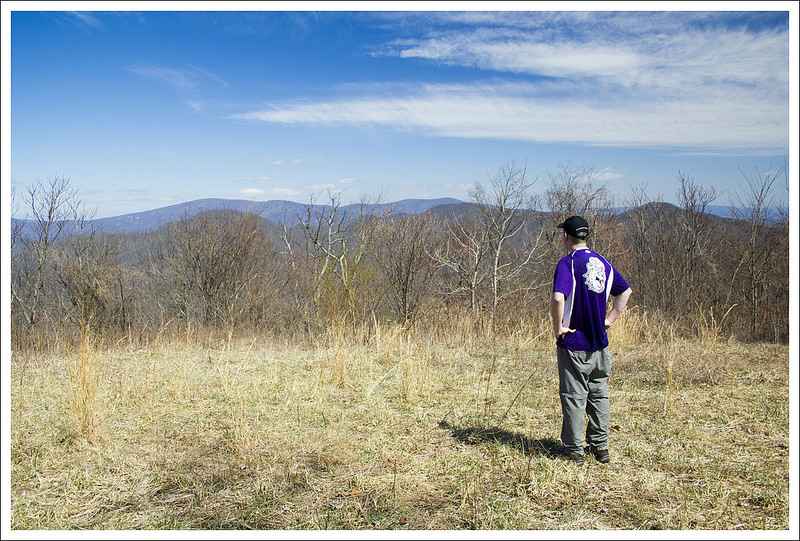
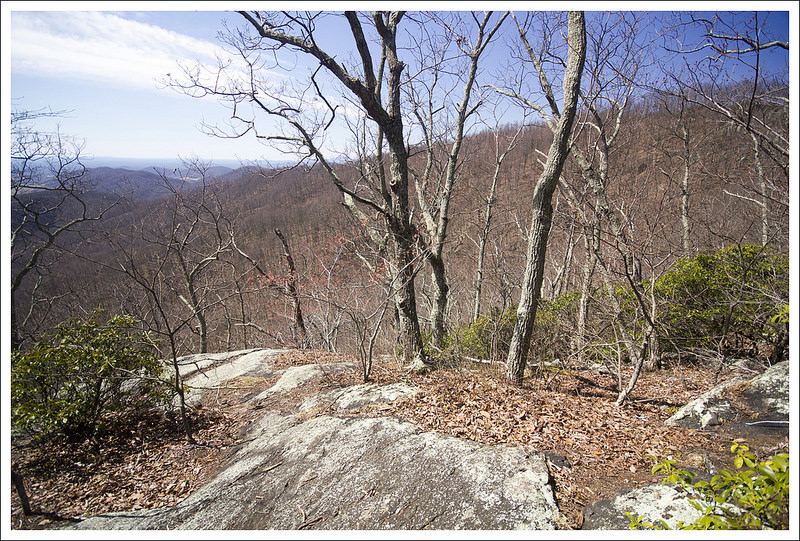
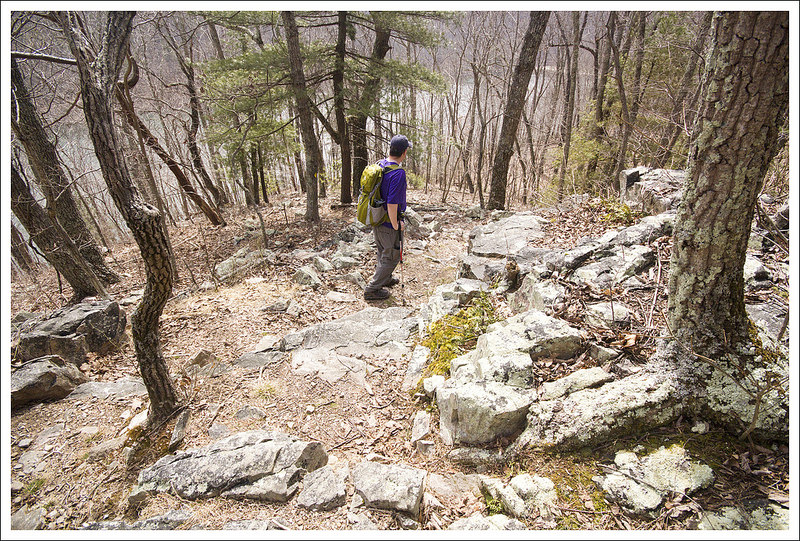
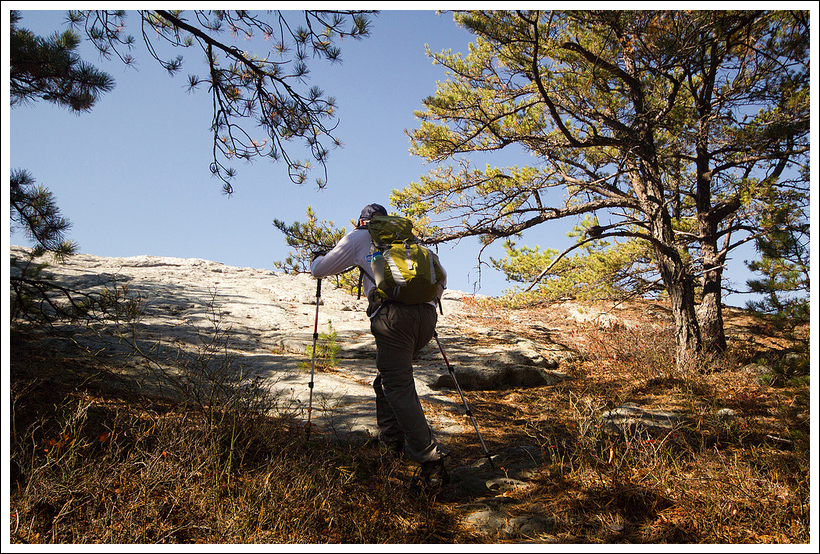
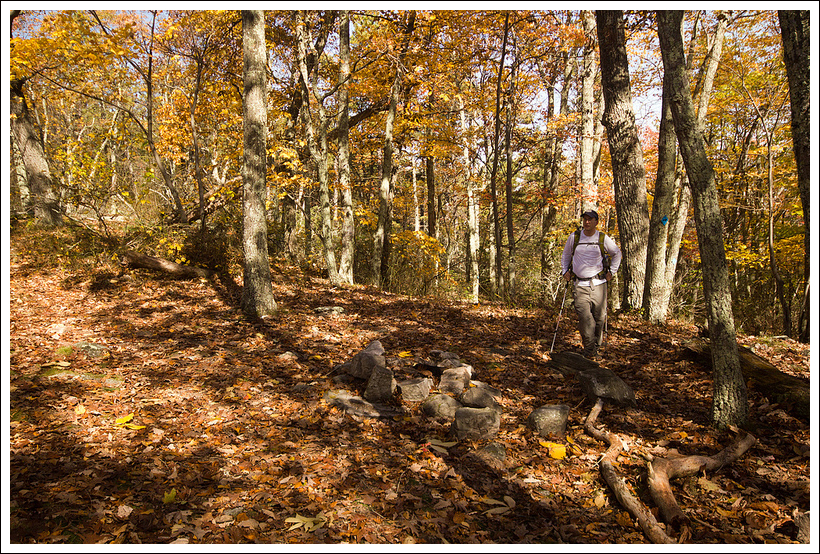
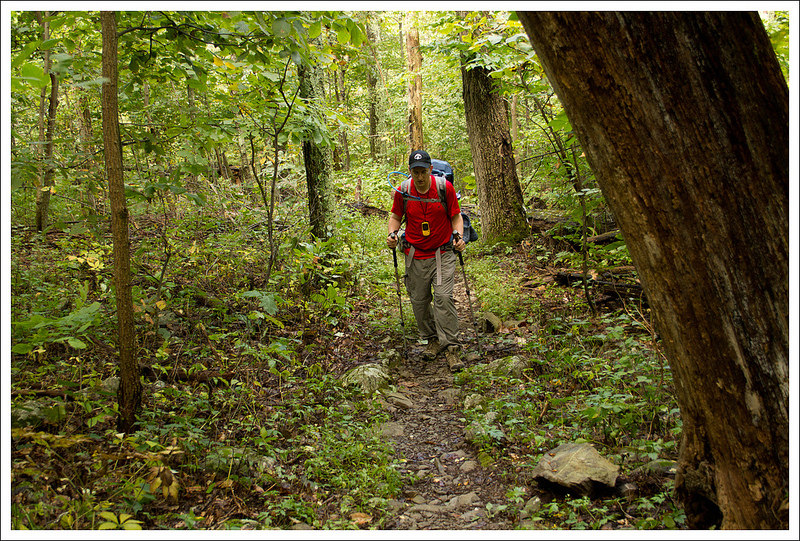
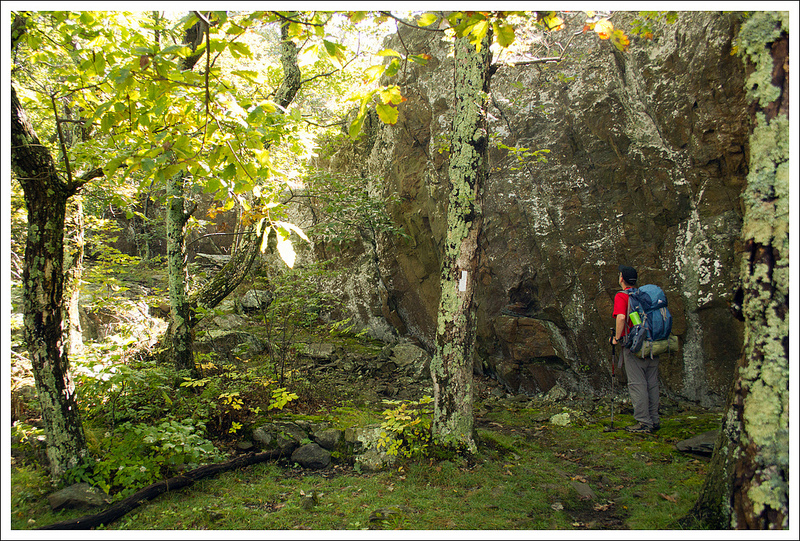
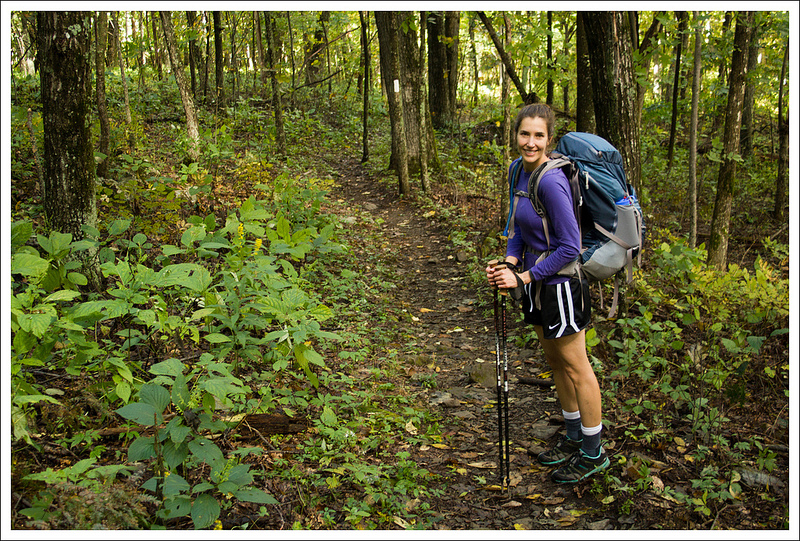
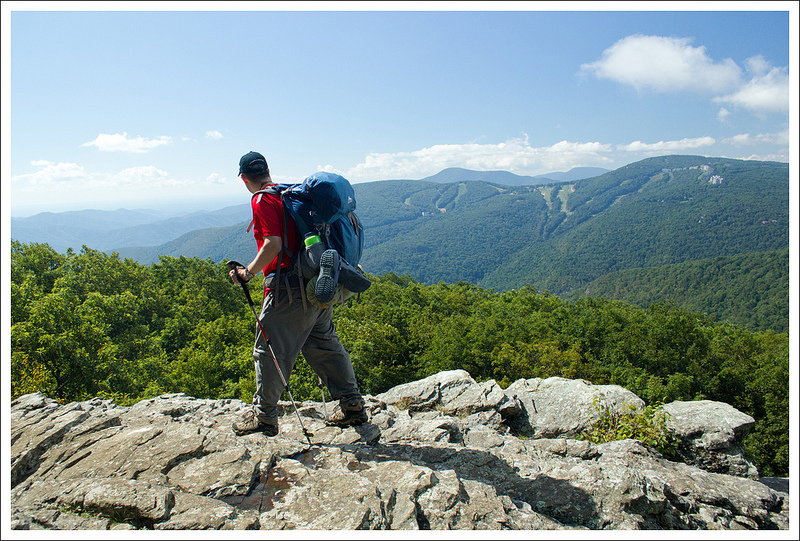
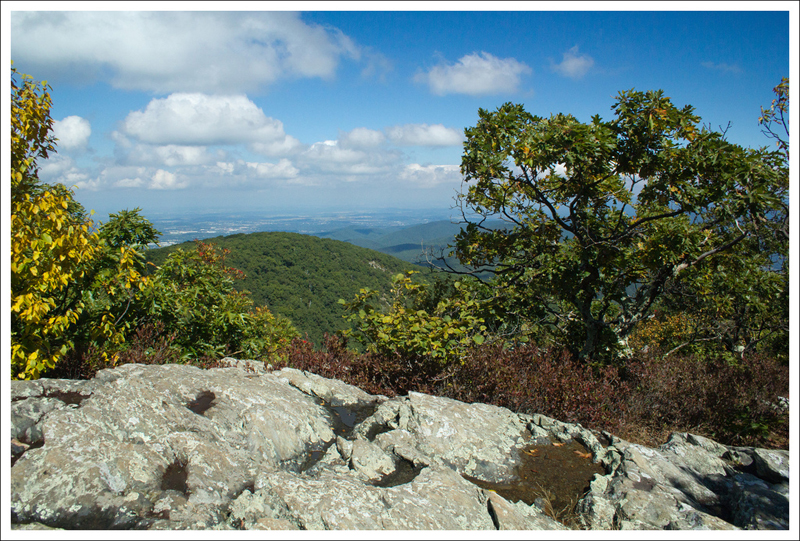
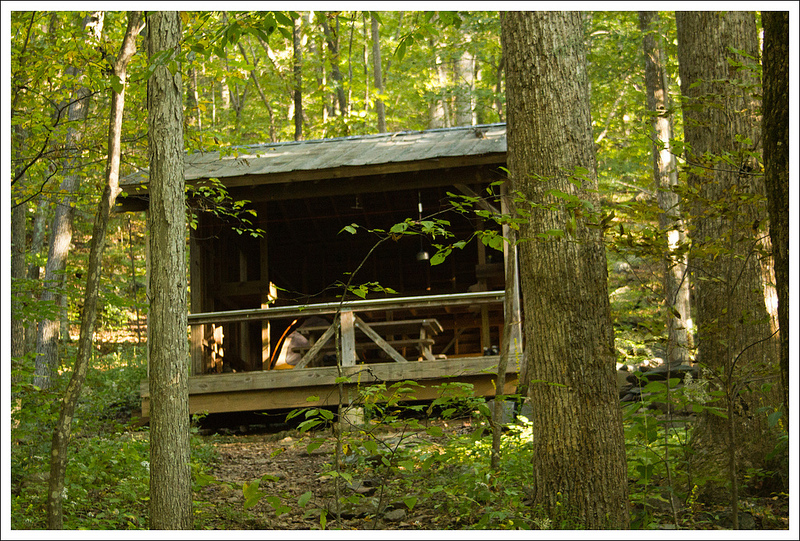
Adam takes in the view from North Marshall. Below: This hike starts from Gravel Springs Gap; Christine on the AT; Adam approaching South Marshall’s summit.
Adam Says…
This is one of those hikes where you get a lot of payoff for minimal effort. There are some great views from both South Marshall and North Marshall along the way, making this an excellent family hike. Technically, both peaks are part of the larger Mount Marshall, though they feel like two distinct mountains. We had covered the Marshalls on a longer section hike along the Appalachian Trail, but we felt this would be a great out-and-back that most people could do.
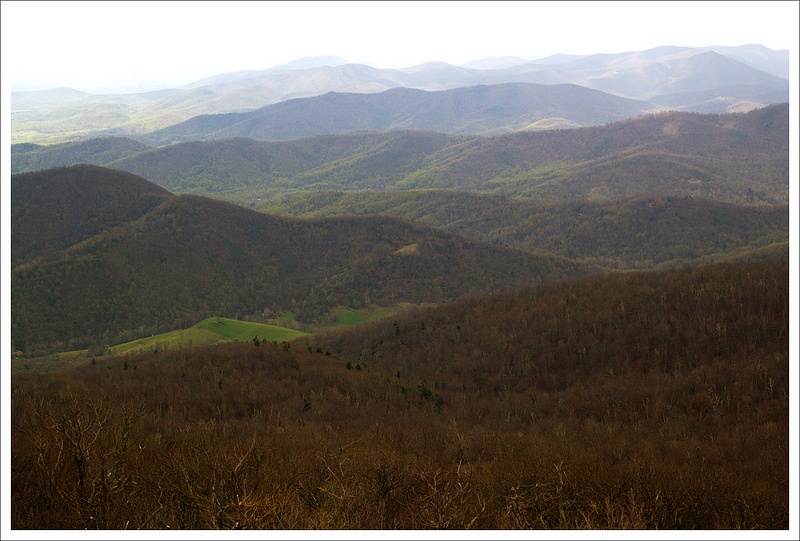
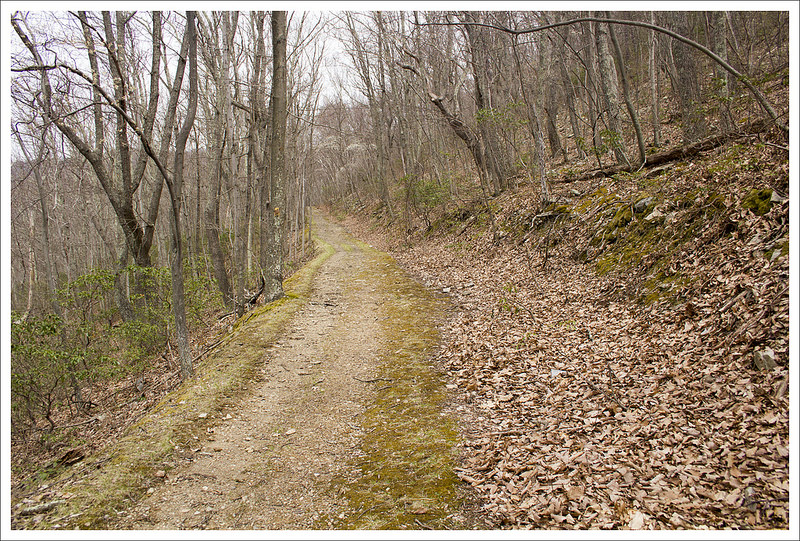
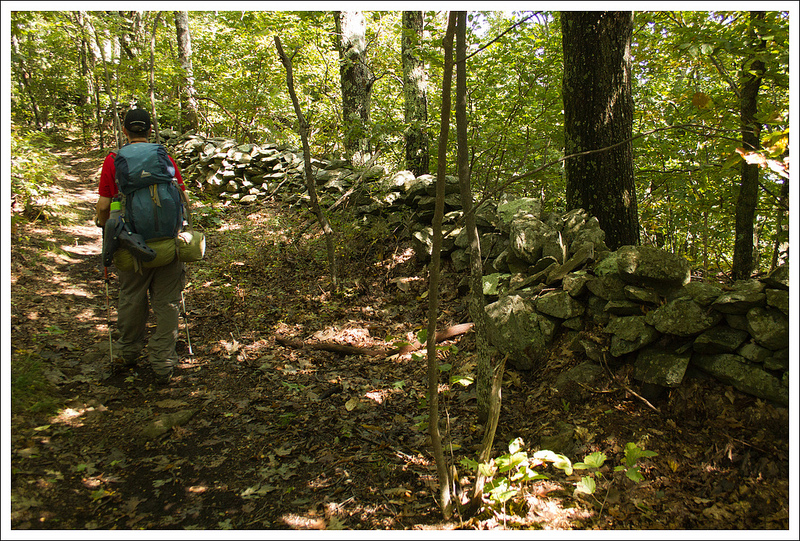
We started our hike from the Gravel Springs Gap parking lot. We crossed the road and picked up the white-blazed Appalachian Trail heading north. The trail goes through a wooded area and has a gradual ascent. After .9 miles, you reach your first grand set of views on your climb up South Marshall. Continuing a little further, there are a couple of other viewpoints along the ridge. At 1.1 miles, you reach the highest point of the trail over South Marshall and begin your descent. At 1.6 miles, you cross Skyline Drive to continue on the Appalachian Trail and begin your ascent up North Marshall.
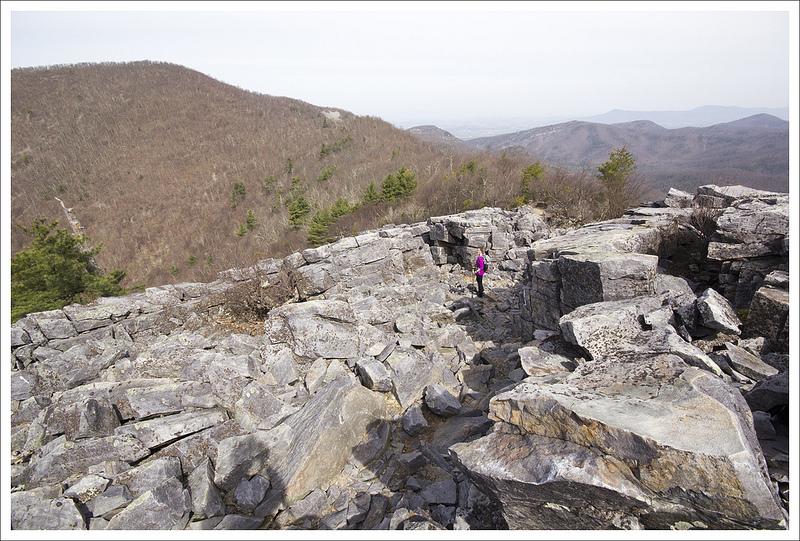
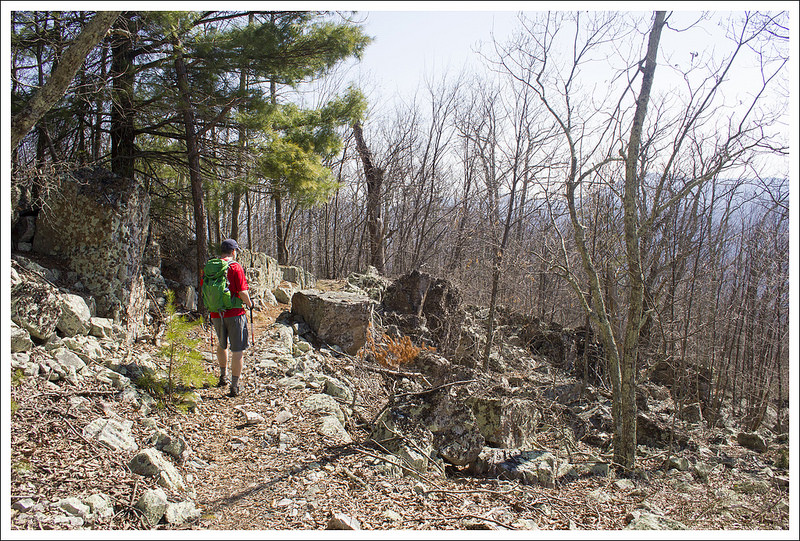
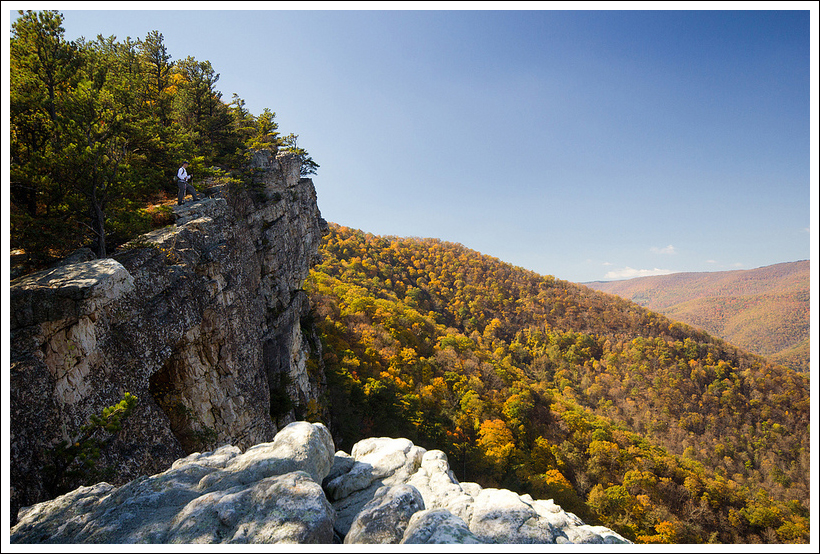
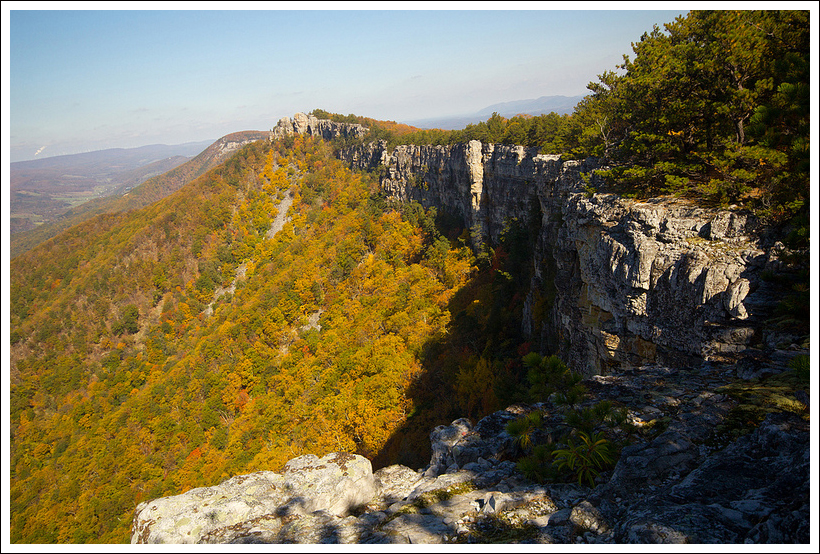
These views from South Marshall are the first on the trail. Below: Great view from South Marshall; Christine enjoys the rocky summit; There is another viewpoint along South Marshall’s ridge.
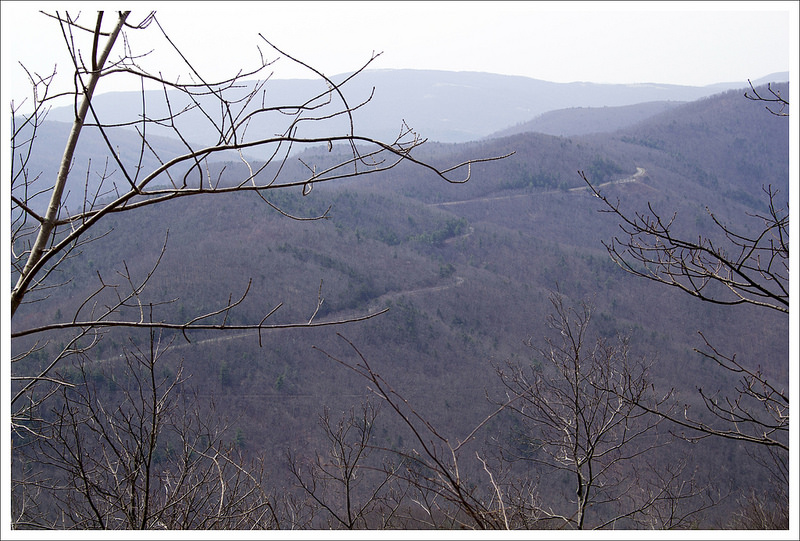
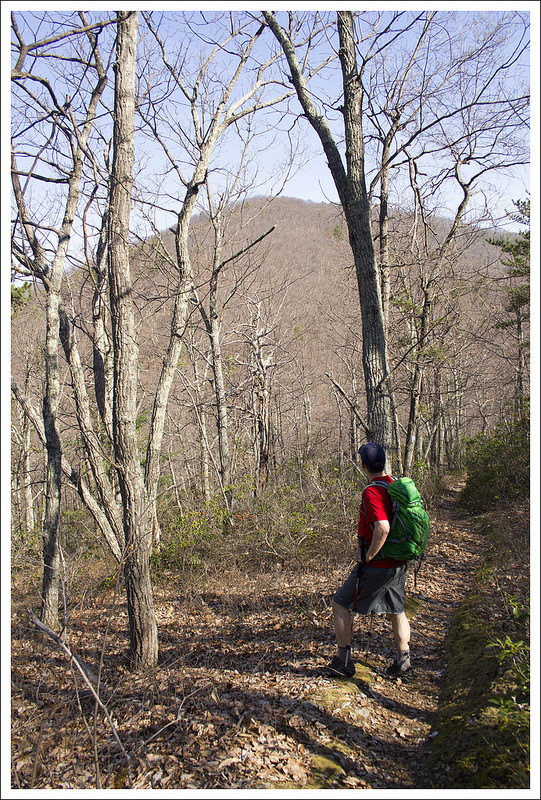
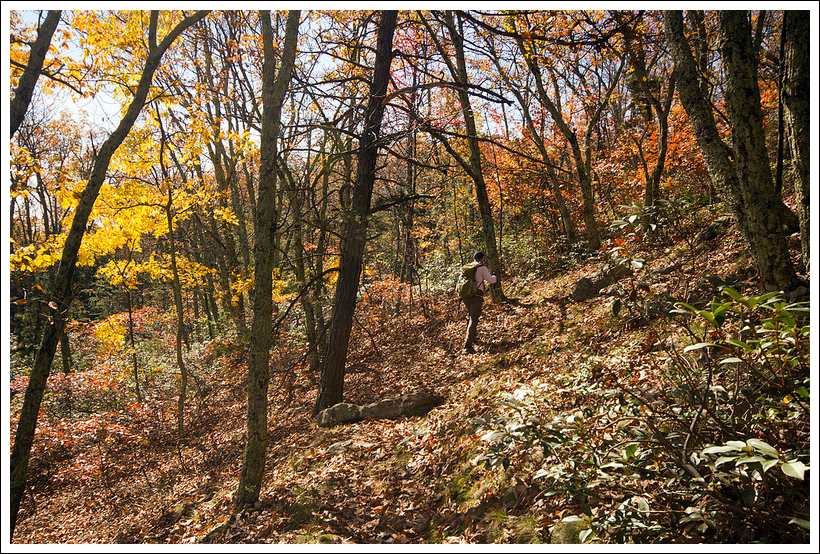
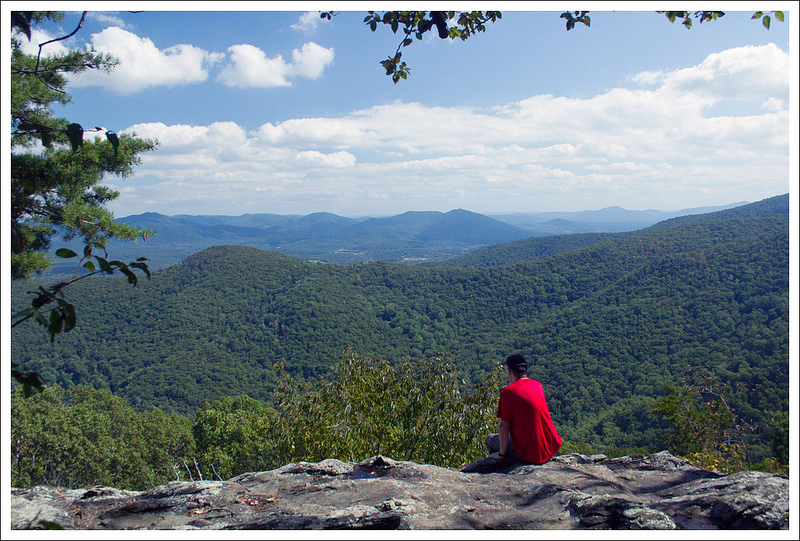
The trail up North Marshall is a steeper section than what you experienced at South Marshall. Around 1.7 miles, you reach a very steep, rocky section, resembling a stony staircase up the side of a hill. At the top of this staircase, you see a large, monolithic rock. On our climb towards this rock, we heard a loud crow that was cawing at us madly. The toughest part of the climb was now over. I noticed a small, unmarked path around this monolithic rock and decided to explore. I was pleased to find a few rock outcroppings on this path that led to more spectacular views and you can even see Skyline Drive snake through the mountains. The crow continued to announce his displeasure and I’m guessing there was a nest we were nearing. As I made my way around one of the rock outcroppings, I stuck my hand in a big pile of bird droppings – I’m guessing the crow got his last laugh. After cleaning up, we rejoined the trail. Around 2.2 miles, we reached the last set of views from North Marshall. We continued just a little further to reach the summit, marked only by a small metal survey marking post in the ground, to bag a second peak on the trail. We made our return trip from this point, reaching our car at 4.5 miles.
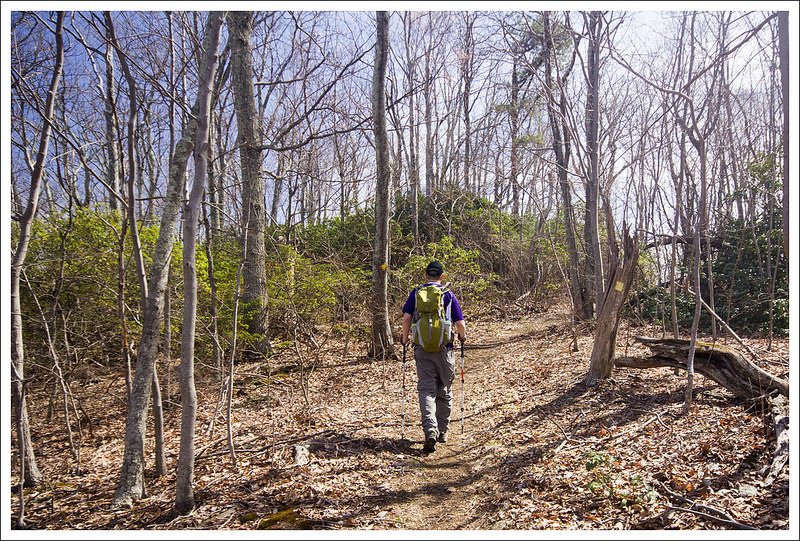
After crossing Skyline Drive, the climb of North Marshall begins.
The North and South Marshall Mountains were once known as Bluff Mountain, but were renamed in honor of John Marshall, who served as the fourth Chief Justice of the United States, serving for 35 years (the longest-serving justice in our history). He was appointed by President John Adams and previously served as Secretary of State and leader of the Federalist Party.
Christine Says…
We’ve been spending a lot more time hiking than writing lately! That’s a great thing (for us), but it’s leaving us quite a backlog of posts to pull together. This hike of The Marshalls is a route I wanted to cover for families and other people looking for shorter/easier hikes. I feel like most of the moderate hikes in Shenandoah are already heavily traveled and well-known. The Marshalls offer spectacular views, but I doubt many casual hikers even know they’re there!
We had great weather at the beginning of our hike. It was sunny and breezy – perfect for hiking. It was still early enough in the season that trees in the mountains were bare and only a few wildflowers were starting to bloom. Whenever we came to open vistas, we could see the vivid green color of spring trees starting to creep up the mountainsides from the lower elevations in the valley. It was beautiful!
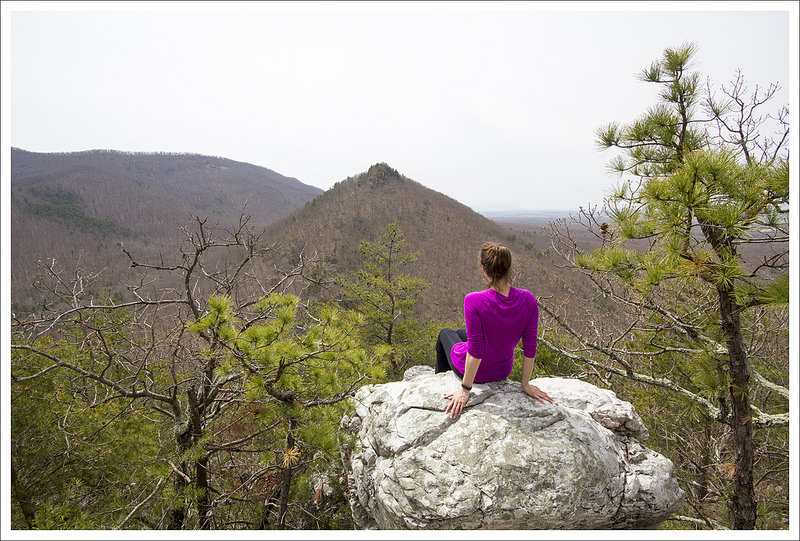
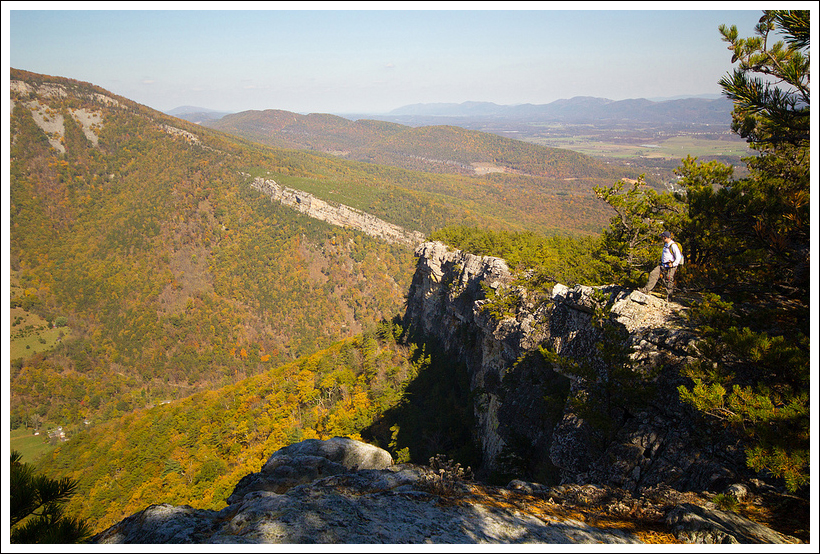
More great views are to be found along an unmarked path that departs the Appalachian Trail. Below: The views from the unmarked path were fantastic; Adam making his way down from his perch.
When we hiked this area last time – on a backpacking tip in 2012, we skipped climbing the unmarked trail to the cliff-sides on North Marshall. I’m glad we stopped on this trip, because the rocks were fun to climb and provided some especially nice off-trail views.
After the cliff views, we reached the trailside view from North Marshall pretty quickly. I couldn’t remember if there were any additional views along the ridge, so we walked along a couple more tenths of a mile until we found the survey marker. After the survey marker, the trail descends into the deeper woods.
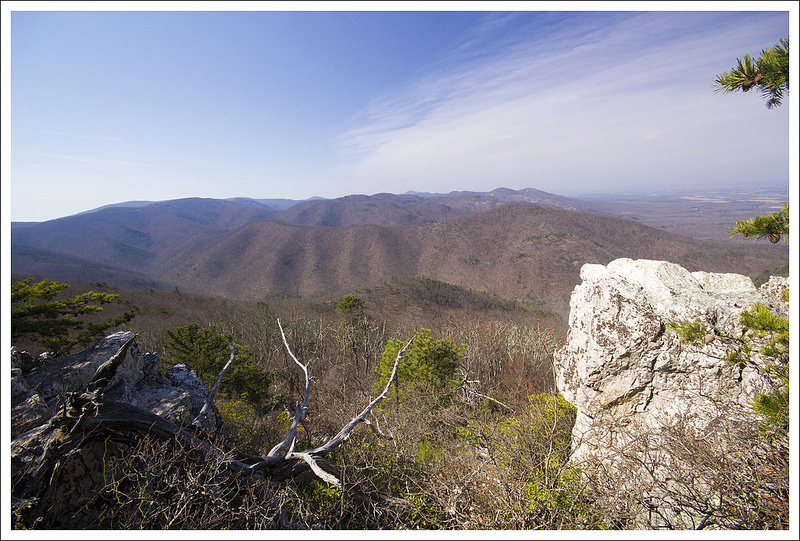
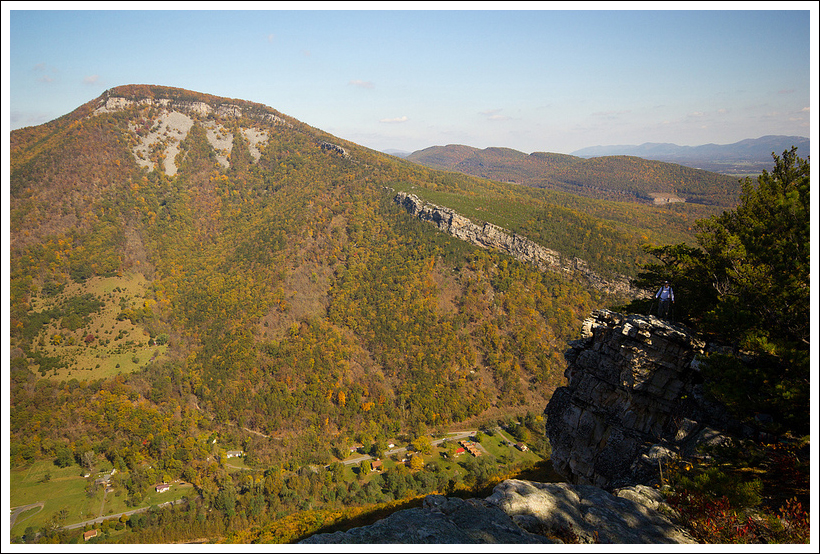
The view from North Marshall with the approaching front. Below: Walking the North Marshall ridge; South Marshall’s view was a lot different when we passed by on the return leg of our trip!
On our return hike, the weather shifted quickly. What had been a pleasant, sunny day quickly turned cloudy and windy as a front approached. We could see shadowy columns of rain off in the distance and the clouds looked dark and angry. We hiked faster than usual back to the car. We made it back to the car before any rain fell.
We decided to drive home through Luray so we could grab something quick for lunch. In this case – fried chicken! It’s not something I eat very often, but I always feel that hiking earns me an occasional indulgence. 🙂
Trail Notes
Distance – 4.5 miles (Check out the stats from Map My Hike)*
Elevation Change – About 900 ft.
Difficulty – 2. There is only one steeper section on the North Marshall Mountain, but it a short stretch.
Trail Conditions – 4. The trail was in excellent shape.
Views – 5. There are so many spots to get views on this hike.
Streams/Waterfalls – 0. Non-existent.
Wildlife – 2. You may see deer on this hike and a few soaring birds.
Ease to Navigate – 4. Just follow the white-blazed AT. Be careful and keep your bearings if you venture off the trail to get the views near the monolithic rock climbing up North Marshall.
Solitude – 3. Since this trail is in the northern section, expect to see more people that are visiting from Northern Virginia/DC. You should expect to see others near some of the view outcroppings.
Directions to trailhead: In the northern district of Shenandoah National Park. Park at Mile Marker 17.6 at the Gravel Springs Gap parking lot. Cross Skyline Drive to pick up the Appalachian Trail, heading north-bound.
* MapMyHike is not necessarily accurate, as the GPS signal fades in and out – but it still provides some fun and interesting information.
This 9.5 mile loop in the southern district of Shenandoah National Park offers vistas, streams and quite a bit of solitude! We think it would make a great short backpacking loop with a beautiful stream-side campsite along Paine Run.
Adam Enjoys Blackrock summit. Below: Adam hikes the Appalachian Trail just north of Blackrock Gap; Christine climbs on the rock pile; Adam spots the spur trail that leads to the Trayfoot Mountain Trail.
Christine Says…
Every weekend this April has provided glorious hiking weather! I’m feeling so grateful that we’ve been able to get out so often and take full advantage of the warm, sunny days. On the Saturday before Easter, we chose to hike the challenging 9.5 mile Trayfoot Mountain – Paine Run loop.
This hike begins at the Blackrock Gap parking area (not to be confused with Blackrock summit parking). From the lot, cross to the eastern side of Skyline Drive and make your way north along the Appalachian Trail. After a couple tenths of a mile, the trail crosses back over the drive and heads steadily uphill for a little over a mile. As you climb, you’ll come to a junction – stay on the white-blazed AT, the turn to the right goes to the Blackrock shelter.
At 1.3 miles into the hike, you’ll reach a cement marker for the Trayfoot Mountain Trail. Do NOT take this turn unless you want to miss the splendor that is Blackrock Summit! Continue another tenth of a mile to the massive jumble of boulders and jagged rocks that makes up this impressive summit viewpoint. We took some time to enjoy the views and climb on the rocks. The views from this spot are probably the best on the entire hike, although there are a couple more nice spots yet to come.
The trail passes through a corridor of rock. Below: Adam passes through the narrow opening; Climbing Trayfoot Mountain; From the ridgeline of Trayfoot there are several openings in the trees that give you views of a distant Skyline Drive.
The Appalachian Trail skirts around the front edge of the summit before coming to a spur trail that leads down to the Trayfoot Mountain trail. The spur descends through a corridor of flat-sided slabs. When spur reaches the junction with the Trayfoot Mountain trail, turn right and follow the trail uphill along an old fire road.
The uphill climb along this section is steady going! Near the top, you’ll pass another marker pointing toward the Furnace Mountain trail. Pass this and continue on the Trayfoot Trail until you reach the cement post marking the summit and high point of your hike. There are no views from this summit, but this starts the beginning of a lovely, easy ridge walk.
The ridge rolls gently along, offering nice views of the Paine Run valley and a distant glimpse of Skyline Drive. The trail eventually begins a long gradual descent to Paine Run. Your last sweeping vista on this hike comes at a pretty outcropping of rocks overlooking pointy Buzzard Rock.
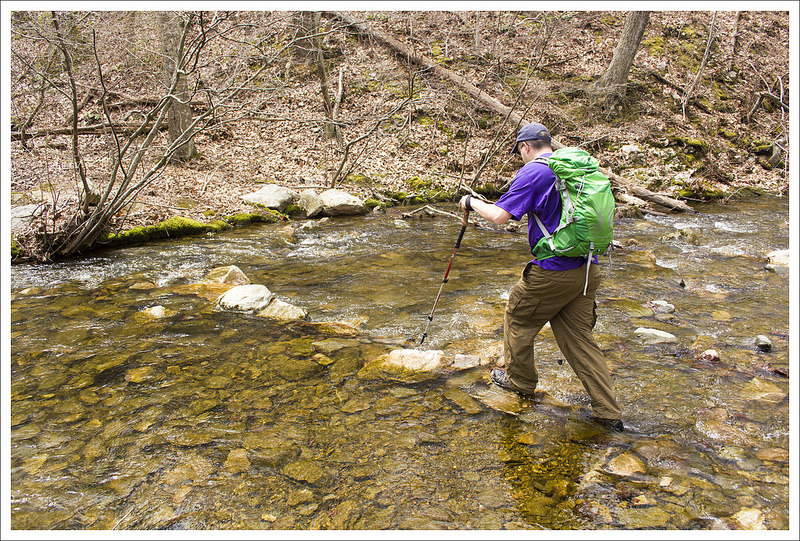
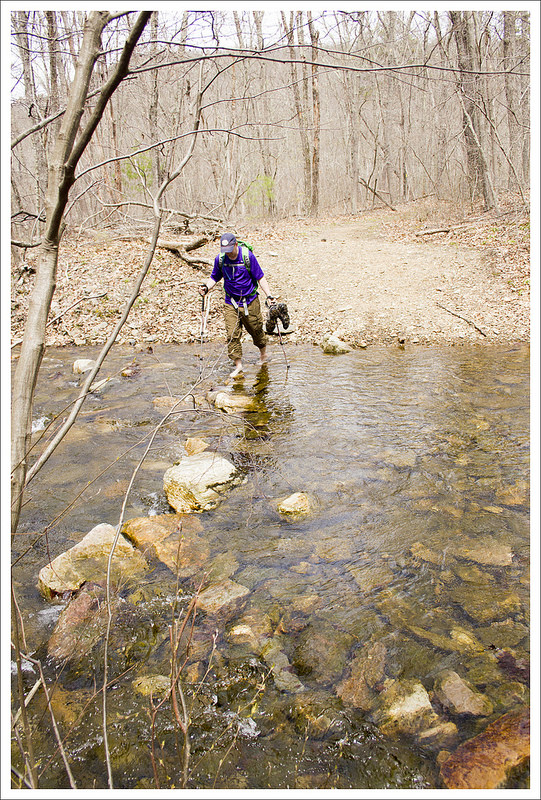
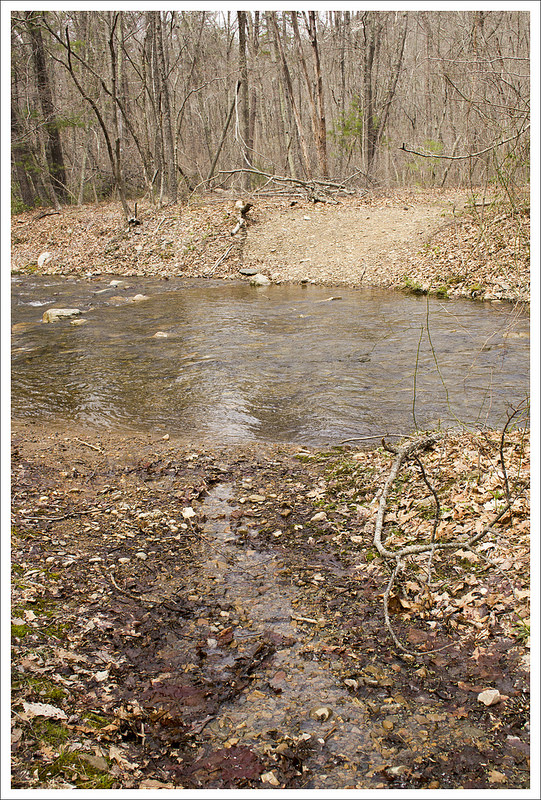
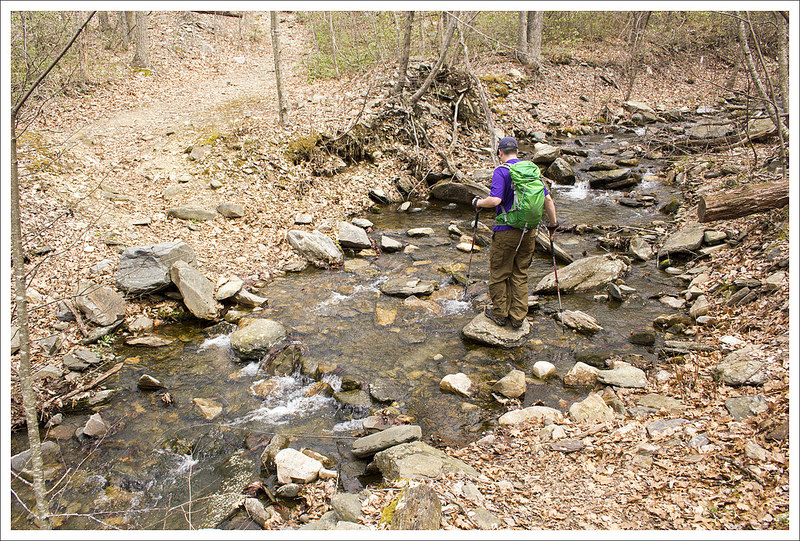
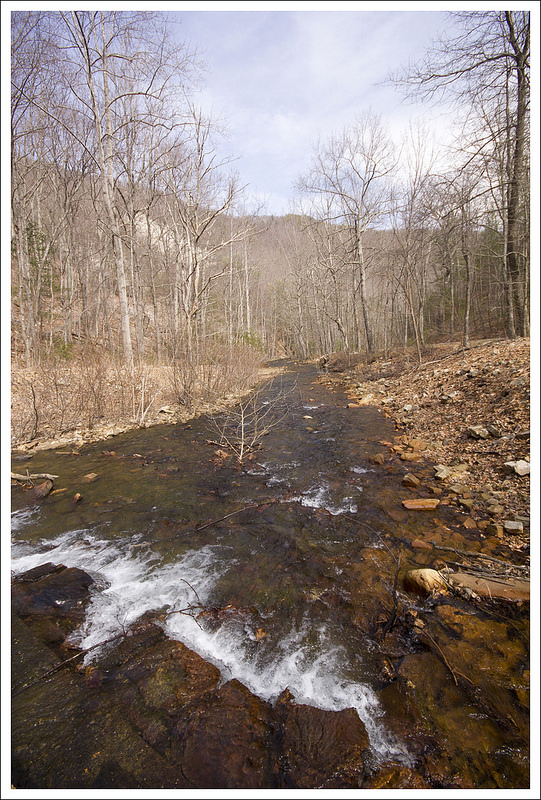
Switchbacks take you swiftly down to Paine Run. Near the first stream crossing, a cement marker points you left onto the yellow-blazed Paine Run Trail, which is essentially an old roadbed. There were several stream crossings on this section of trail. All of them but the second crossing were easy. We found the stream wide and flush with water. Most of the stones people use to cross were underwater. Instead of trying to attempt the rock-hop, we took off our shoes and waded across. Refreshing!
You get a nice view of Buzzard Rock before descending to Paine Run. Below: Some interesting rock formations along the trail; Lunch stop; Glimpses of farm land.
The Paine Run trail is very pleasant for a couple miles – sounds of running water and mountain views through the trees. When we hiked, the stream was flowing with lots of rapids and tiny waterfalls. I imagine it will run low and dry later in the summer. The path climbs so gradually you hardly notice you’re ascending! Eventually, you leave the streamside and head back toward Skyline Drive. After one final sharp switchback, you have one more moderately steep ascent back to your car.
All in all, I was pleasantly surprised with both the views and streams on this route. We had a great time! MapMyHike said this hike is only 9.3 miles, but all other sources put it at 9.7-9.8… so who knows!
Adam Says…
We feel like we have covered so much of Shenandoah National Park on our blog, but it seems there is always another trail or loop that you can try. We talked about a hike to Blackrock summit before in our coverage of an AT segment, but this is a longer loop version that offers a few additional views and a stream to enjoy. Other than the Blackrock summit, you will likely not see a lot of people on this trail. We only saw a few people the entire day, which was a little shocking for a beautiful weekend day that happened to also be a free National Park entry day.
As Christine mentioned, you could skip the Blackrock summit trying to follow the signage, but you don’t want to miss the best part of the hike. When we hiked previously, our route bypassed the spur trail that leads to the Trayfoot Mountain Trail. This spur immediately gives you some additional views and some interesting rocks to scramble around. Most people that are doing an out-and-back just to the summit from the northern approach will miss this area also.
Adam makes a first attempt to cross (with shoes). The second (successful) attempt was barefoot. Below: Adam descending to Paine Run; The shoeless crossing attempt, The trail goes right through the middle of the stream.
One thing that Christine and I both mentioned throughout the day is how this would make for a great overnight backpacking loop. If you choose to do so, I would tackle all of the tough uphill climbing the first night, making your way through the Trayfoot Mountain trail and camp somewhere near Paine Run. This will provide a great water source and there were some nice campsites near the water. The following day, you’ll just have a steady, but not too strenuous hike back uphill to your car.
When we started walking the ridgeline of the Trayfoot Mountain trail, I felt like we stumbled across the best place I’ve ever seen to spot grouse. We encountered three along our walk. A couple of years ago, while hiking in Great Smoky Mountains National Park, we encountered our first grouse on a trail. The beating of its wings created a strange echoing syncopation in our chest which made us both wonder if our heartbeats were going haywire. Seeking sources online, we found it was a common sound for mating grouse. We actually spotted several on this trail and when they took off in flight, we could briefly hear that same noise that perplexed us before. What a relief to actually spot the culprits this time.
Christine walks the wide, gradually ascending Paine Run Trail. Below: We found several blown-down bird’s nests along the trail; Pretty Paine Run; Another stream crossing.
Further along the Trayfoot Mountain Trail, we climbed up on a few rocks to enjoy our lunch and get some views. I managed to pick some rocks which were not in the least bit contoured to our bodies, which made for an uncomfortable sitting. It reminded me of how fast food chains design their seating area so the chairs are only comfortable for a short amount of time to prevent loitering. We quickly ate and moved on.
Around the 4.0 mile marker, the ridge line ends at a nice rock outcropping which gives you some last views before descending towards Paine Run. Some local families like to park on the western outskirts of the park and hike up to this area for views.
When we reached Paine Run, the water was a little high from the recent rains. There were a few places to rock-hop across. In one spot, we did have to shed our shoes to make our way across. Christine said I looked like a hobbit with my pantlegs pulled up halfway as I crossed. I responded back in my geekiest way, “May the hair on my toes never fall off.” I will say the water was very cold, but it felt so refreshing to my feet. The sensation of the freezing water made me feel as if I had just received a nice massage on my feet. After the refresher, I felt I could hike a lot longer.
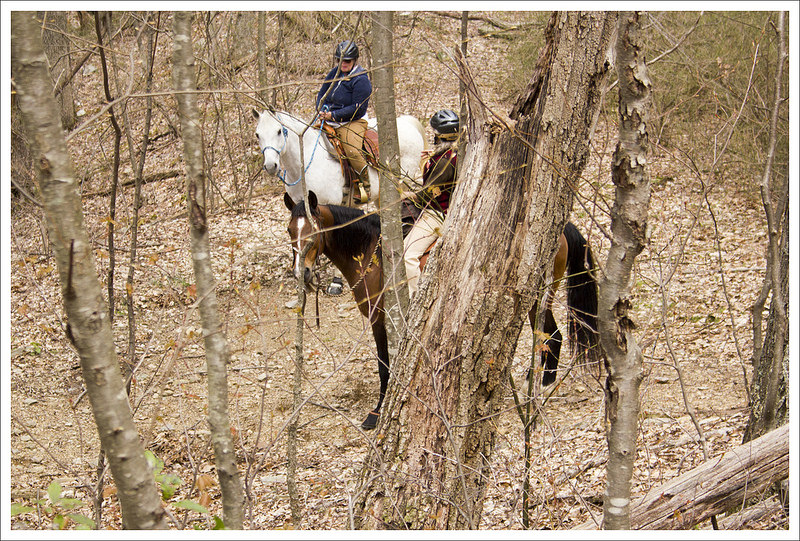
The Paine Run Trail is popular with horseback riders. Below: The final ascent to the parking area; We spotted a bear on the drive home; Before we went home, we stopped for famous Shenandoah blackberry ice cream.
The stretch on the uphill Paine Run trail was very gradual. While some people may think this was more of a boring stretch, I enjoyed the views of Paine Run along the side. There were even a few very small waterfalls to enjoy since the water level was high. We also came across a group horseback riding along the trail. All yellow-blazed trails, like the Paine Run trail, in Shenandoah National Park allow horses on the trails. This would be a great trip to take down to the water and let the horses rest and get a drink before returning.
We got back to our car and then heading north along Skyline Drive. Within a few miles, I spotted a young black bear on the side of the road. We were excited to have our first bear sighting of the year. The bear quickly ran away once it knew it was spotted, but we hope we get to see many more this year. We stopped at the Loft Mountain wayside to get our first blackberry milkshake of the year. Appalachian Trail thru-hikers talk about these treats for days in advance of getting to Shenandoah and the hype is worth it. However, their milkshake machine was broken and we had to settle for blackberry ice cream. It was still a just reward for a long hike.
While we realize this hike is longer and not as popular as some of the others in the park, this hike really has some nice gems along the trail. I was pleasantly surprised at what this had to offer!
Difficulty – 3.5. The climbs to Black Rock summit and Trayfoot Mountain can be a little steep, but the climb from Paine Run back to the parking area is very pleasant and gradual. The length adds to the difficulty rating of this hike.
Trail Conditions – 4. The trail was clear and in great shape!
Views – 5. The views from Black Rock summit are spectacular. While the summit of Trayfoot Mountain has no view, there are other nice views from the Trayfoot Mountain trail – especially the outcropping that overlooks Buzzard Rock.
Streams/Waterfalls – 3. Paine Run was surprisingly pretty and broad in the early spring. As we hiked up the Paine Run trail, we had many stream crossings and nice views of the water.
Wildlife – 3. We saw deer and lots of grouse on the trail. We also saw a black bear shortly after leaving the parking area to come home!
Ease to Navigate – 4. There are only a few, well-marked turns on this hike.
Solitude – 4. We saw a few people near the stream that had come in from the western perimeter of the park, a few people on Black Rock Summit, and a trio of women on horses. All-in-all, we enjoyed a lot of solitude for a long stretch of trail on a pretty ‘free park entry’ day!
Directions to trailhead: Located in the Southern Section of Shenandoah National Park. Park at the Blackrock Gap parking lot around MM 87.3. Cross the road and find the cement post for the Appalachian Trail. Take a left, heading north, to start your hike.
* MapMyHike is not necessarily accurate, as the GPS signal fades in and out – but it still provides some fun and interesting information.
The full Rocky Mount lariat is known as one of the Shenandoah’s most punishing hikes, but if you do it as an out-and-back (like us!), you get a moderate 6.8 mile hike with great views and a lot of solitude! Our route eliminates the less scenic Gap Run Trail on the back side of the mountain.
Adam takes in the view from the summit of Rocky Mount. Below: A view of Rocky Mount from the parking area on Skyline Drive; Wild violets along the trail; Adam walks through the mountain laurel.
Adam Says…
We’ve covered most of Shenandoah National Park already – there aren’t many trails we haven’t written about! But, Christine did some research and found a hike we hadn’t done yet. We entered the park at Swift Run Gap. We needed to buy a new annual pass, since ours had expired. The park ranger asked where we were going and we said, “Rocky Mount”. She looked at us with a disapproving pause and questioned why we would want to do that one. Christine told her we had covered most of the rest of the Park and the ranger just handed back our pass with a shake of her head. After leaving the fee station, we began to wonder how tough this hike really was. We had heard it was one of the toughest in the park due to the elevation gain split over several tough climbs. Most of the reviews we read were based on the Rocky Mount-Gap Run lariat loop which incorporates the Gap Run Trail. The back side of the mountain, which uses the Gap Run Trail, is repeatedly described as very steep and lacking in any noteworthy scenery. So, we decided to do this one as an out-and-back hike that hit the big view payoffs.
The weather was quite warm based on what we had grown accustomed to during the cold winter. The temperature was already in the 60s and it was barely 9:00 a.m. We parked at the Twomile Run Overlook and then walked north for a short distance. After the barrier wall ended on the western side of the road, we saw the concrete post on the left which marked the beginning of the blue-blazed Rocky Mount trail. The trail begins with mostly descending through the woods. You drop down about 700 feet (some level sections, some steep sections) until you reach the junction with the Gap Run Trail at 2.2 miles. We stayed straight at this point and began a steeper ascent. The trail climbs along a path that wraps around Rocky Mount, leading to a few (mostly obstructed) views along the way. At 3.4 miles, the climb ends near the summit and you can see a short side path to the left leading to a rock outcropping. Here is where the best views on the mountain can be seen.
Adam takes in a view of Rocky Mount through the trees.
We paused for a while to take some photos and eat some lunch. However, there were biting bugs that were trying to eat me alive. It took away from the experience! After swatting and flailing like a man possessed, I covered my body in DEET. Those insects were probably drooling over their first available human meal after months of starvation. For some reason, they preferred me over Christine, who got quite a chuckle over my melodramatic gesticulations. One thing that I don’t like about hot weather hiking are the insects. Hopefully this isn’t a sign of what’s to come for the rest of the warm season. We headed back the way we came, arriving back at the junction with the Gap Run Trail at 4.7 miles. The trail then starts a rather long climb back up. We finished the climb and got back to the trailhead to make the out-and-back trip 6.6 miles.
Christine Says…
An out-and-back route was the perfect way to tackle Rocky Mount – we enjoyed all of the views and suffered none of the slogging! Certainly, there are some folks who like tough climbing and don’t need spectacular scenery to have an excellent day on the trail. I’m not one of those people! If I’m going to have a great time a tough hike – there must be views or waterfalls or a near 100% guarantee of seeing wildlife. Don’t get me wrong, I love the cardio challenge. It’s just not enough to make me endorse a hike as a must-do hike.
The trail gets rockier near the summit. Below: Trail junction with Gap Run; Views from the trail – sometimes we had nice views, sometimes they were tree obstructed; The summit of Rocky Mount.
The day we hiked Rocky Mount was unseasonably warm. I loved being back in shorts and a tank top again! My mom always tells me that I should wear long sleeves and long pants to avoid ticks, but honestly the only ticks I’ve ever found attached to me have been on days that I DID wear full-coverage clothing and repellent. I think it’s just easier to spot ticks moving on bare skin and flick them off before they attach. I’ve also had good luck with using a combination of DEET and treating my clothing with permethrin. Ticks are such a huge problem in our part of Virginia, and the recent increase in cases of Lyme disease is shocking and scary. The threat isn’t enough to keep me off the trail, but I am definitely vigilant about preventative measures and doing thorough tick checks. Typically, if you remove a tick within a few hours of it attaching, there isn’t time for Lyme disease to transmit into your blood stream. OK… end of my public service announcement!
Adam did a thorough job describing the terrain and distances. I’ll just add that I found the ascents at both the middle and end of the hike to be fairly moderate. They were probably a little tougher that day since we weren’t accustomed to the warmer weather yet. It was in the low 80’s by the end of the hike. The trail also had quite a bit of direct sun exposure. The route will be shadier as the park gets leafier, but right now there is still a lot of light coming through the canopy. I got a little bit of sunburn on my shoulders, but I was glad that the bare trees gave us views that we wouldn’t have been able to enjoy later in the season.
Christine enjoys views through the trees on the walk back. Below: Adam takes in views; More views; pine needle covered trail.
We ate lunch on the rocky outcropping near the summit of Rocky Mount. For whatever reason, the biting flies just weren’t bothering me. Poor Adam – he’s not exaggerating when he describes his flailing. He was pretty close to having a full insect-driven meltdown! After lunch, we returned the same way we came and headed back to our car.
Over the course of the hike, we didn’t see a single other hiker! When we got back to the parking area, there was one guy who had just come off the trail, but he had done the loop in the opposite direction and our paths never crossed. Rocky Mount is definitely one of the less-traveled trails in the park, but I think it is definitely worth doing. I thought the views were well worth the climbs! Ambitious hikers might enjoy the extra challenge of the mountain’s backside, but for me the 6.6 mile out-and-back was just right!
Trail Notes
Distance – 6.8 miles
Elevation Change – 1,937 ft.
Difficulty – 4. The hike to the summit wasn’t too tough, but the return trip has a long, slogging uphill climb.
Trail Conditions – The trail was well-maintained with only one blowdown on the entire trail. The path was very clear and only covered by leaves in a few places.
Views –4. Great 180-degree views for miles from the rock outcropping.
Streams/Waterfalls – 0. Nothing to report.
Wildlife – 1. We didn’t see any wildlife on the trail, but we saw a ton of signs of either bobcat or coyote droppings on the trail. Pressing forward from the summit, we did startle a hawk resting on a log.
Ease to Navigate – 4. As soon as you follow the trailhead, you just head straight on the Rocky Mount Trail. The side path for the views at the rock outcropping isn’t marked, so it could be possible to just walk right past it.
Solitude – 4. We didn’t see anyone else on the trail, but at the trailhead we did run into a solo hiker that had finished the entire loop.
Directions to trailhead: In the Southern Section of Shenandoah National Park, park at the Twomile Run Overlook at MM 76.2. Head north a short distance. When you reach the end of the retaining wall, you’ll see the concrete post marking the trailhead (around MM 76.4) on the left (western) side of the road.
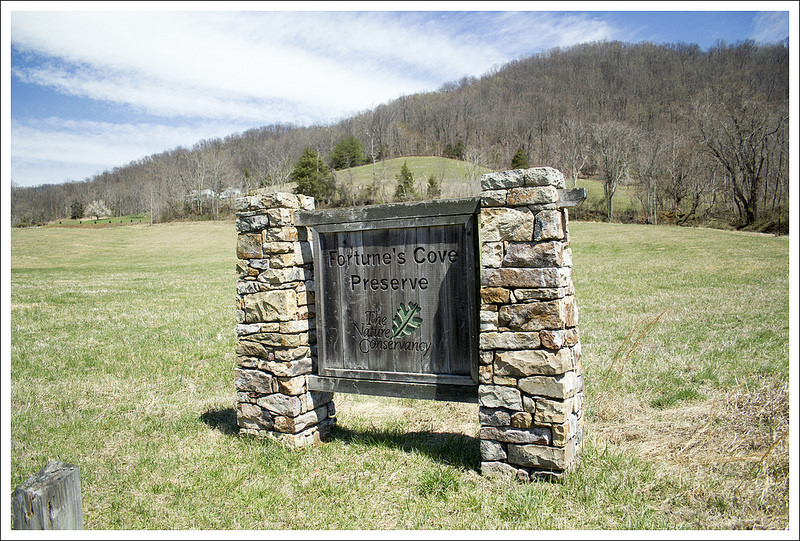
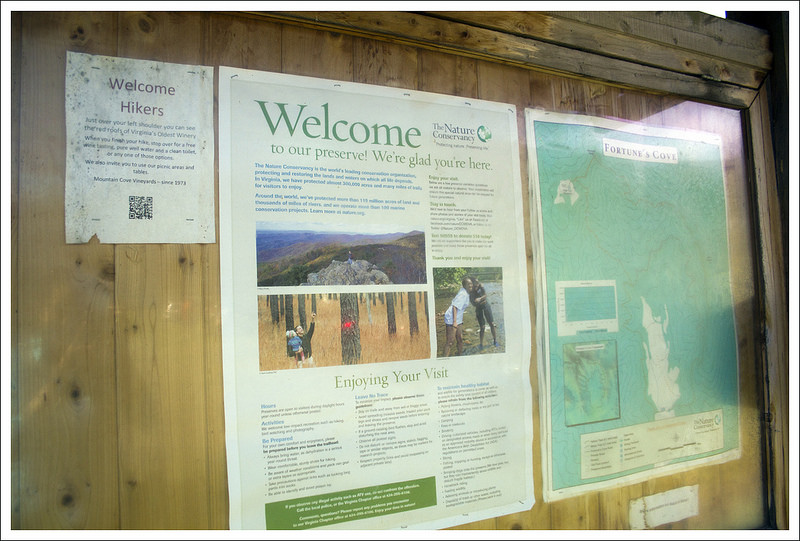
Views from the Fortune’s Cove trail. Below: The preserve at Fortune’s Cove is operated by the Nature Conservancy; The trails are all well-marked and carry the Conservancy logo; Informational panel at the trailhead.
Christine Says…
Wow – the first weekend of April 2014 was GORGEOUS! I think we (and every other hiker in Virginia) decided to hit the trails. We tossed around the idea of going backpacking, but we just didn’t get our act together. We perused our hiking book collection, a bunch of maps and several websites. We settled on a hike we found on Hiking Upward – Fortune’s Cove. It wasn’t a long drive from our house and looked like a good choice for early-season hiking.
We got to the trailhead parking lot right around 10:00 and found it jam-packed. There was one group of about 15 hikers getting ready to depart. I feel a little bad saying this, but I’m always a little deflated when I get someplace and find that we’re going to have lots of company on our hike. We set out immediately, in hopes of putting a little distance between ourselves and the large group. We hike quite a bit faster than most social groups, but the self-inflicted pressure to keep moving made me feel like I couldn’t pause to take photos. I took most of my pictures while still walking, so they might be a little blurry or random.
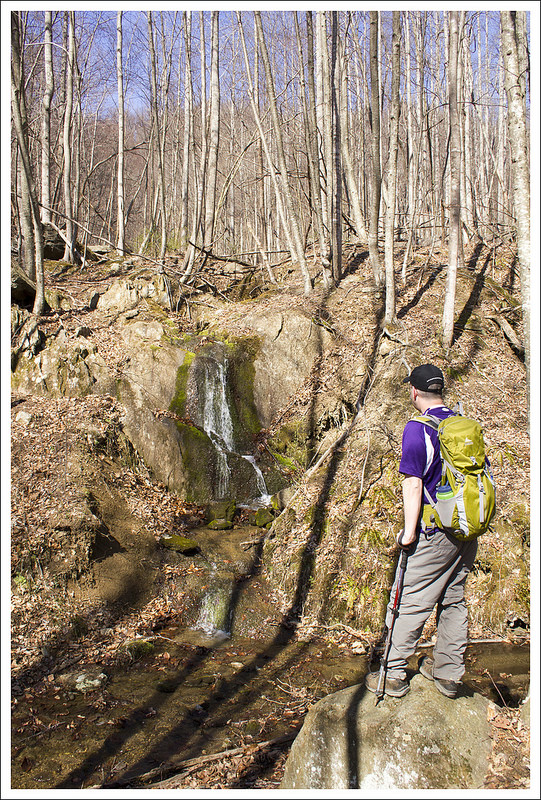
We passed this small, but pretty, waterfall early in the hike.
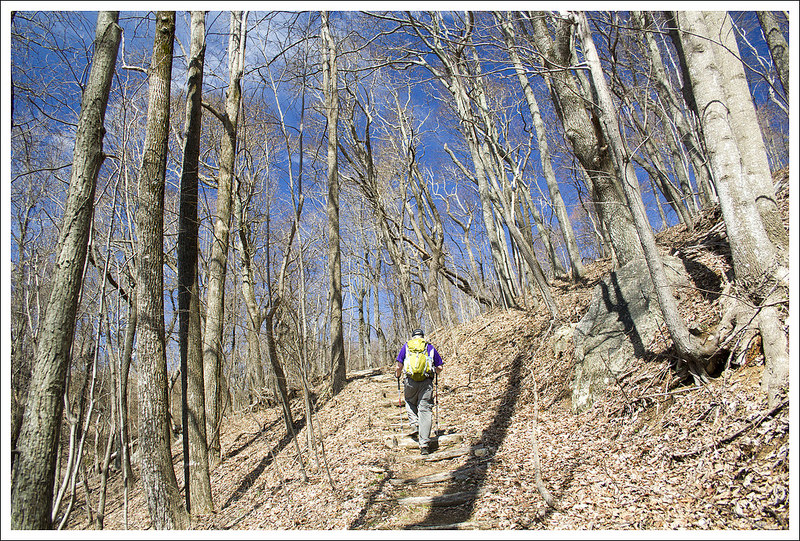
We hiked the trail in the opposite direction of Hiking Upward. In retrospect, I think I’d go the way their directions suggested – the ascent is longer, but more gradual. We started our hike at the end of the parking lot with the informational bulletin board. The trail actually starts from the main road, right before the turn-off to the parking lot. Initially, the hike rambled along over rolling hills, climbing gradually uphill above the cove. After crossing a small wooden footbridge over a creek, we were treated to a small but pretty waterfall. After the waterfall the hike followed a series of switchbacks uphill. We eventually crossed a fire road and continued a short flat section of trail. Soon, we reached a junction. At this point, you can take the shorter, easier Lower Loop around the cove, or follow the challenging, longer Upper Loop. We wanted views, so we went with the Upper Loop. From the junction to the cell towers atop the high knob, the climbing was pretty brutal – I’m not going to lie. Sometimes there were switchbacks to ease the ascent, but other times the trail went straight up the mountainside. We were still hiking hard to stay ahead of the group, so I was very relieved when the towers came into view through the trees. The climb was almost DONE!
Near the towers, the trail comes to another junction. One spur leads to the tower and several decent views (although – the presence of towers really does detract from the beauty of the views). The other direction continues to follow the Upper Loop trail around the perimeter of the cove. The remainder of the loop is rolling hills and ridge walking. There are several big descents and a couple short, steep ascents, but all the tough uphill is behind you at this point. We chose to have lunch at the first little rocky outcropping with views. It was nice to see Wintergreen and The Priest through a few (still bare) trees. There was a ton of mountain laurel on the back half of this hike. It should be beautiful in late May – early June!
Adam traverses steps on one of the steeper uphill sections. Below: the trail junction of the Upper and Lower Loop Trails; Adam approaches the towers at the high point of the hike; The views from the tower area are decent, but a little obstructed by trees.
Some of the downhill on the back loop was very steep and covered with deep, slick, dry leaves. We were both really thankful to have trekking poles. We continued to enjoy occasional views, mostly looking into the cove, as the hike progressed. At one point, we were hiking along in companionable silence, when suddenly a large German Shepherd bounded in our direction, barking loudly – fortunately he was friendly. It turned out that a couple of hikers had two unleashed dogs on the trail. We love dogs, but they’re not allowed in Fortune’s Cove. The restriction is clearly marked at trail entries and the rules are posted online, so please leave your dog home!
Eventually the Upper Loop and Lower Loop met back up at the final trail junction of the hike. The last bit of the hike was fairly consistent, knee-grinding downhill. Adam asked me to hike in front of him, so he could ‘grimace in pain’ in the rear. I was hiking along, when out of the blue, Adam bellowed and shouted. At first I thought he hurt himself, but it turned out that a gigantic black snake had just slithered across his feet. The thing was easily five feet long. I love snakes – Adam is less fond.
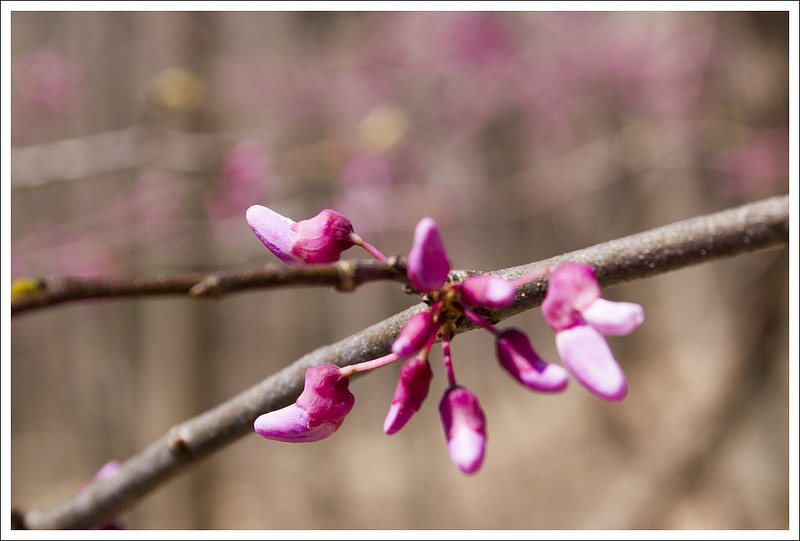
Through the trees, we could see our car in the parking lot drawing closer and closer. We walked the last little bit of trail, enjoying the budding and blossoming trees at the lower elevations. We saw cherry, redbud and pear all starting to flower. It was a great hike for a pretty spring day.
There were nice views through the trees on the descent. Below: Our lunch spot; Abundant mountain laurel, Nice mountain views.
Adam Says…
Fortune’s Cove Preserve consists of 755 acres that was donated by Jane Heyward to The Nature Conservancy. The staff and volunteers help maintain this land and hiking trails.
As Christine mentioned, when we arrived at Fortune’s Cove, there were a ton of cars in the parking lot and a bunch of hikers ready to hit the trail. I told Christine “Grab your stuff quickly and let’s get going.” We didn’t want to experience this hike with a larger group and having to play leapfrog up the trail as we stop to take pictures. I know that some people like to meet new people and enjoy the outdoors as a group, but we tend to hike with just the two of us or just another couple of people. When we took our first pause for photos, we could see the group approaching, so we rushed ahead. In fact, I would say we ascended the trail much faster than normal so we could stop to take photos at all. Since this was one of our first hike with real elevation change in a while, we probably pushed ourselves harder than we wanted.
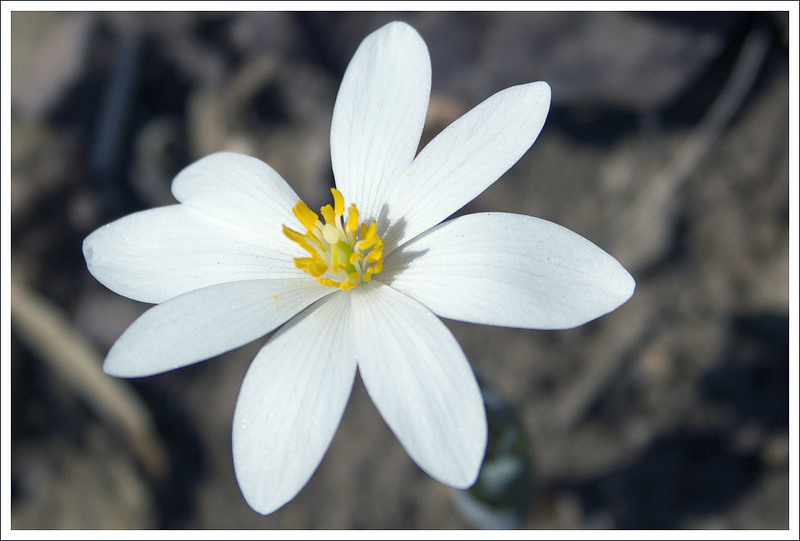
From the ridge, you could see the winding road through the cove. Below: More views on the way down; Blooming bloodroot; Redbuds are started to bloom, too!
From the parking lot and behind the large trail map of the preserve, we walked up the road about 20 yards and then saw the trail sign on the right of the road that marked the start of the trail. The yellow-blazed trail starts off on a small ascent through a serene, wooded area. You can see glimpses of the farmland to the right of the trail as you skirt around the property. Eventually you will cross a couple of bridges over some creek beds and see a small, yet picturesque waterfall along the lefthand side of the trail around .75 miles. Continuing from this point, the trail starts a more steady ascent. At 1.1 miles, you reach the intersection with the white-blazed lower loop trail. We took the upper loop trail, which had a warning sign for the steepness of the trail. This truly was no joke as the trail had us slogging up the mountainside. At 2.25 miles, we finally reached the top summit. There was a small trail (only a tenth of a mile) to the left which led to the top of High Top Mountain, which had a large cell tower at the top. The view was obstructed around us and being near a large tower didn’t make us feel like we were getting away to nature. We rejoined the upper loop trail and continued on our hike. We were now doing ridge-walking, so the toughest bit of climbing was behind us. We took a brief rest to eat our packed lunch while seeing the obstructed views of The Priest and Wintergreen across the valley in front of us.
We pressed along the ridge hike, which quickly began to lead back down the mountain. We were pleased to see there were several spots along the trail that led to some outcroppings of rocks with open views. The views below sum up what I picture when I think of Central Virginia – rolling mountains and farm houses. We continued down the steep trail, which had my knees feeling some pain. At 4.4 miles, you reach another intersection with the white-blazed lower loop trail. We continued down the mountain and made our way back to our car at 5.1 miles, passing through two blue posts before reaching the road and parking lot.
The cove from the parking lot at the bottom. Below: Pear trees blooming; Blue Mountain Barrel House is just a few miles down Rt. 29; Beers!
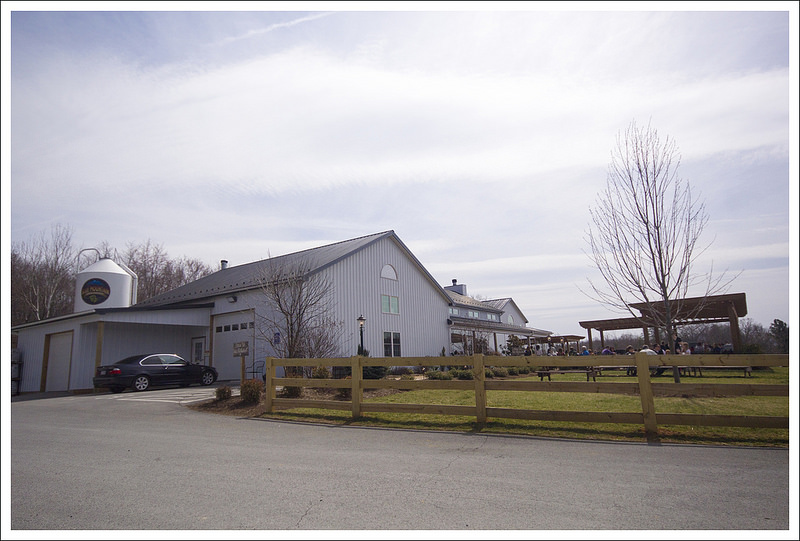
After the hike, we decided we had earned a trip to the nearby Blue Mountain Barrel House to sample some beer and get a snack from the food truck located outside. We enjoyed sitting outside with a few beers and were able to look out into the mountains on a gorgeous spring day. If wine is more of your thing, you can get samples from March-November on Wednesday-Sunday afternoons at Mountain Cove Vineyards, Virginia’s oldest vineyard.
Elevation Change – 1700 ft. (the big climb is about 1450, but once you add in all the little ups and downs, it’s closer to 1700)
Difficulty – 4. There is some pretty serious climbing on this hike. It surprised us how challenging it was!
Trail Conditions – 4. The trail was in great shape in most places. There were a couple mucky spots near drainage, and dry, fallen leaves made some of the descents slippery.
Views – 3. From the cell towers atop the High Knob to the junction with the Lower Loop, there are nice views in many spots along the trail. Even though there are many views, we’ve marked this down to a 3 because most of the viewpoints are partially obstructed.
Streams/Waterfalls – 2. There is a small waterfall that probably only runs part of the year on the early part of this hike.
Wildlife – 2. We didn’t see anything but a few birds and squirrels. DOGS ARE NOT ALLOWED ON THIS PRESERVE!
Ease to Navigate – 5. The trails on this preserve are more abundantly marked/blazed than almost any other place we’ve been.
Solitude –1. We had heard this place wasn’t well known or popular, but on the day we went, we encountered a large group people hiking together (shout out to the PATC – Charlottesville Chapter) , plus about a dozen groups of 2-4 people. It was a very busy day on the trail. We’re not sure if this is the norm, but we’d give this hike low marks for solitude.
Directions to trailhead: From Charlottesville, head south on US-29 for 28 miles. Take a right on State Route 718. Follow this for 1.6 miles and take a right on to State Route 651. Follow this for 1.6 miles, passing Mountain Cove Vineyards on the right and then reaching the small parking lot. The way we approached the route, was walk on the road past the large trail map board about 20 yards. You’ll see the trail post to mark the start of the trail on the right side of the road.
* MapMyHike is not necessarily accurate, as the GPS signal fades in and out – but it still provides some fun and interesting information.
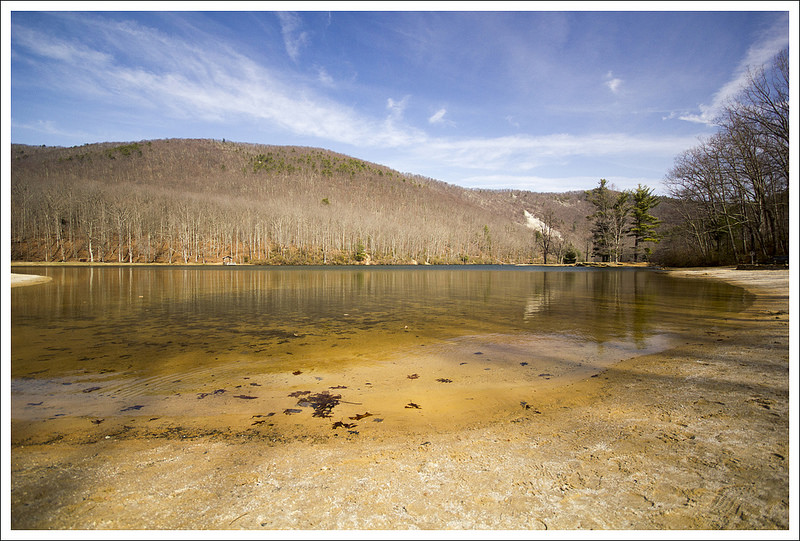
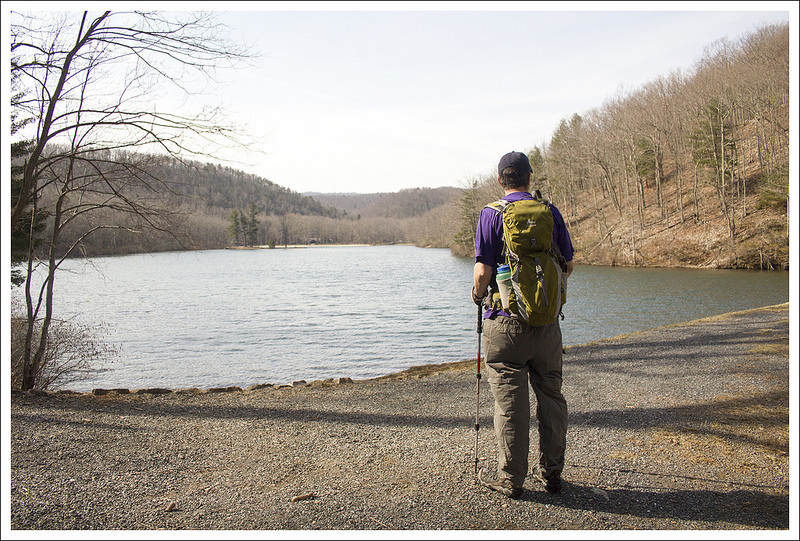
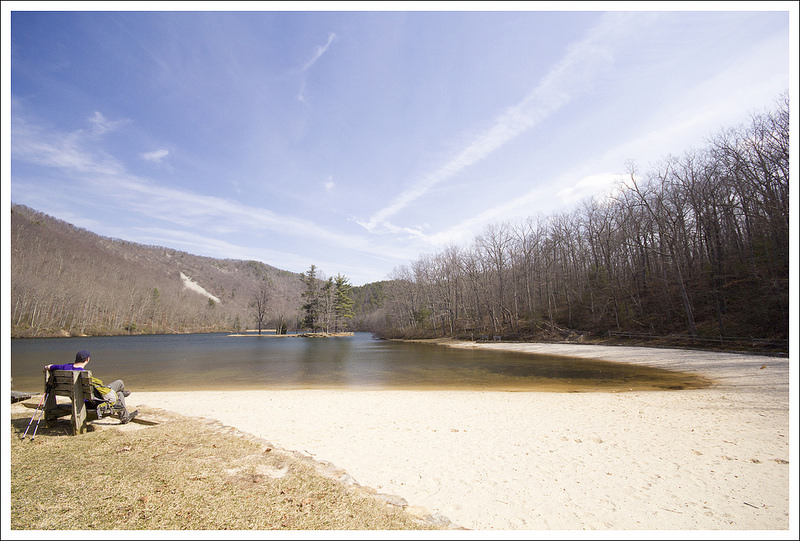
Sherando Lake is a popular camping/swimming area for locals. It’s just several miles off the Blue Ridge Parkway.
Adam Says…
This has been quite the harsh winter for snow and cold temperatures. And when it hasn’t been too cold, it seems to have been raining. So, we were glad to get out on a nice day to get a little exercise outdoors for a change.
Sherando Lake is a multi-purpose recreation area. In nice weather, you will see people swimming, fishing, camping, and hiking. To visit, there is a fee per vehicle – check out their fee schedule. The area is officially open from early April through October. The road gates are often closed during the off season based on weather. There is camping available if you wanted to make a nice weekend trip, but reservations should be made in advance.
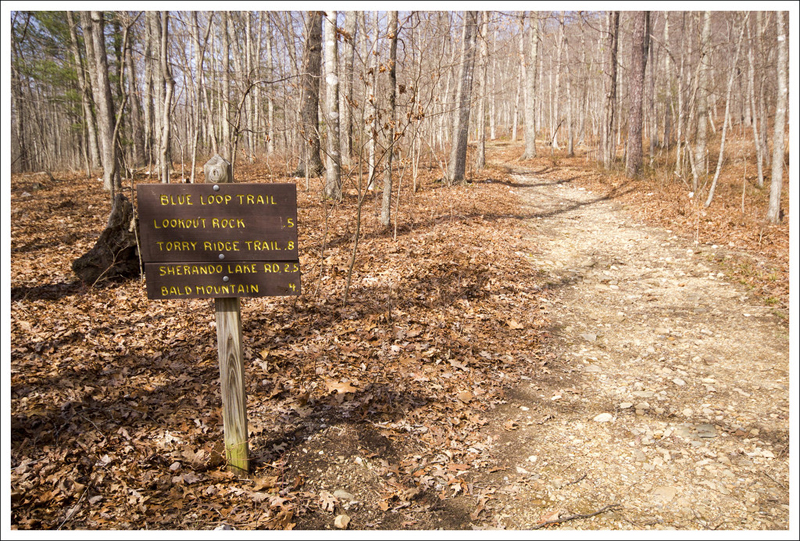
We started off our hike from the Fisherman’s Parking Area. There were a few other vehicles there also, but they were all there for the fishing. The lake is stocked with trout throughout the year. Facing the lake, we started our hike on the left by heading up the Cliff Trail. This trail was a short gradual climb with a few switchbacks before the trail levels out. About .4 miles into the hike, there is a small outlook to the right from a rock that gives you a few obstructed views from the lake. Continuing on the trail, it begins to descend and the lake gets back into view. At .8 miles, you reach the lakeside and see the sign that shows the junction with the Lakeside Trail (a trail that wraps around the lake). We took a few minutes to go out onto the sand and enjoy the views of the lake. I saw a wood duck escorting a few ducklings on the far banks of the lake.
The fisherman’s parking lot is located at the dam end of the lake. It is where our hike begins. Below: The trail starts off rocky; Overlook View.
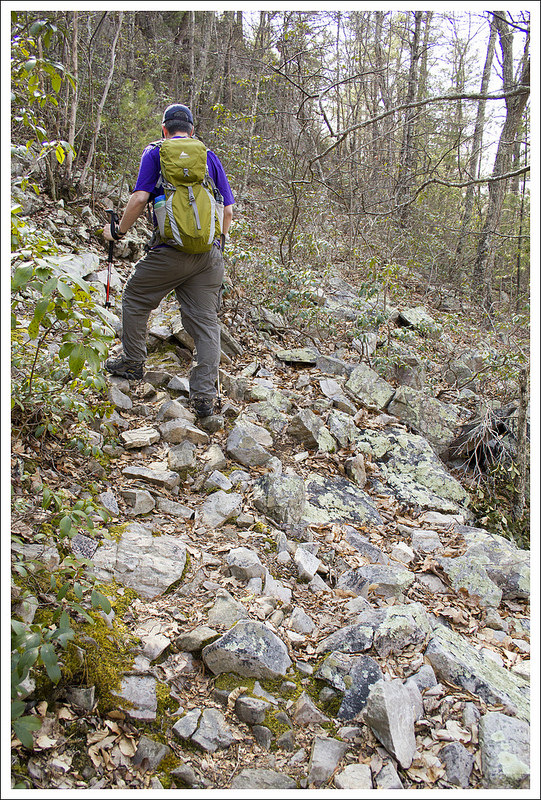
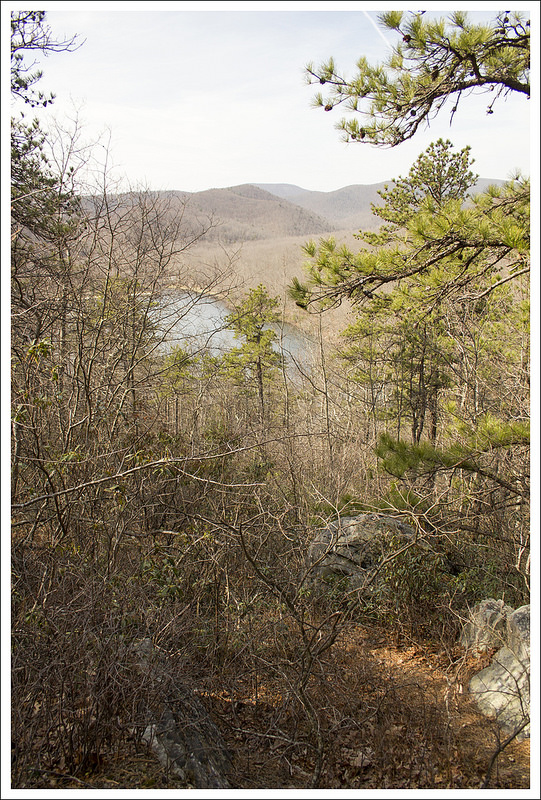
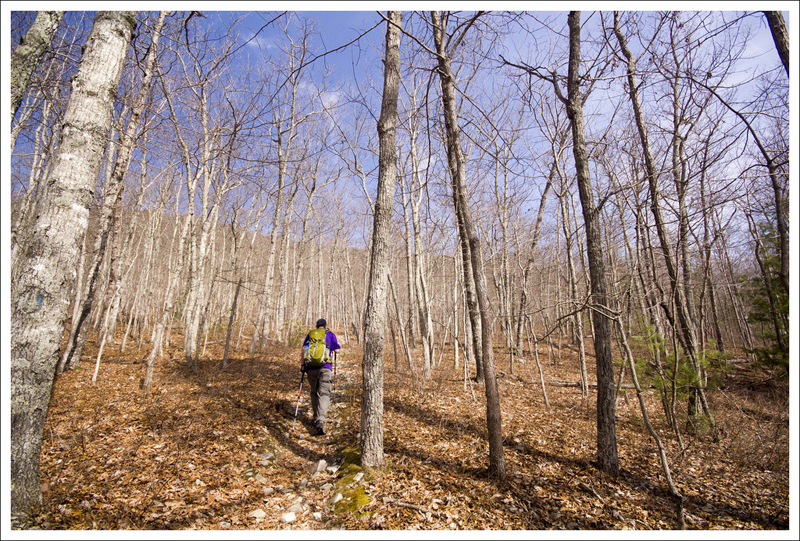
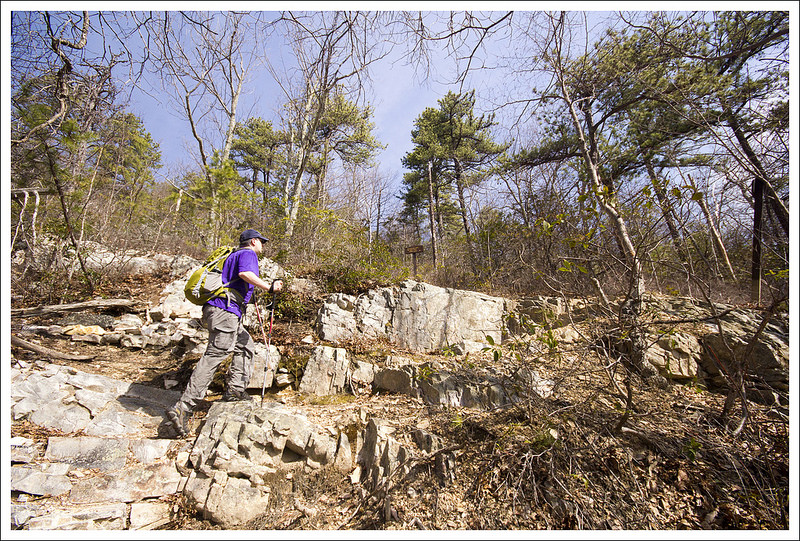
We walked back behind the large building/gift shop, crossed a couple of bridges and rejoined the trail on the northwestern side of the bank. We took the blue-blazed Blue Loop Trail, leading us past a few campsite areas before climbing up into the woods. The trail is rockier, especially in the beginning, than the Cliff Trail and is steeper. The trail climbed through a few switchbacks. At 1.5 miles, you reach a junction shortly after a switchback with the Dam Trail. This will be your return route. Continue up the Blue Loop Trail, which begins to take an uphill climb to the left up the mountain. At 1.75 miles, you reach Lookout Rock. We took some time there to enjoy the view and then went back the way we came until we reached the junction with the Dam Trail. We took this trail to the left, which leads steeply down the mountain. You begin to see the lake through the trees again and we reached the lakeside around 2.25 miles. We continued on the trail until it reached a small bridge that crossed over the dam stream and led back to the parking lot.
Adam takes in a beach/lake view. Below: Services are typically open April through October; Trails are well marked; Adam hikes the Blue Loop Trail.
One thing that was going through my mind during the hike is this would be great for a family outing. Grab your family for a quick hike followed by a picnic by the lake. Make a weekend of it if you want to do some camping, swimming, and fishing.
Christine Says…
I enjoy playing in the snow, but I’m very ready for warmer weather. I want to see flowers blooming. I want to feel warm sunshine on my face. I’m so ready to see a canopy of green across the mountaintops. I have spring fever. So, I was especially thankful for a particularly warm and sunny Saturday because it gave us a chance to get out and hike.
We chose Sherando Lake, mainly because it was nearby and easy. It would have been a great day to go on a longer hike, but Adam was still getting over a bad cold. And I was not willing to spend more than an hour in the car. I had spent the past two weekends in a 12-passenger van, making a 15 hour ride to and from the Florida panhandle and was still a bit road weary.
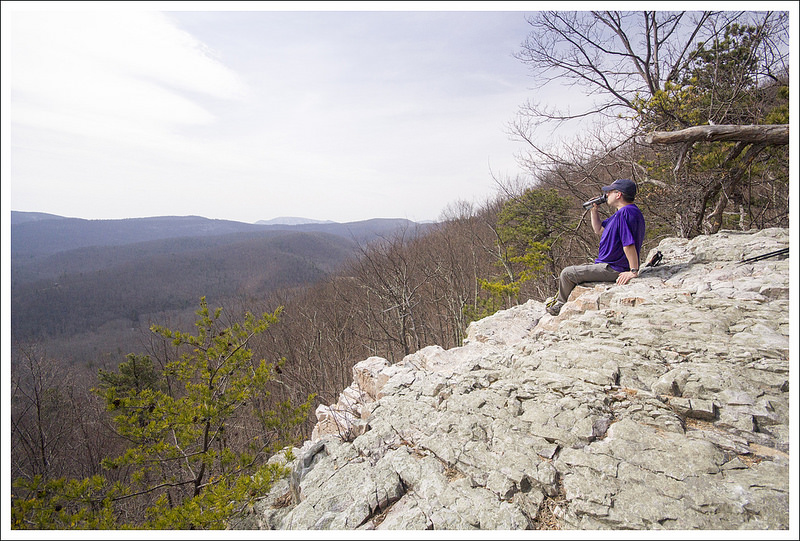
Lookout Rock provides a nice view of the valley, lake and mountains. Below: Adam climbs his way toward Lookout Rock; Checking out the view, Making the descent.
My trip to Florida was a service-learning trip with a group of nine JMU students. We traveled to a Nature Conservancy preserve – Apalachicola Bluffs & Ravines to do a week’s worth of environmental work. We camped, we hiked, we learned about the local ecosystem, and most importantly – we planted 90,000 plugs of native wiregrass seed that will be used to restore the natural habitat of that part of Florida. It was hard work, but I think we made a difference. We even had one free day on our trip. We chose to spend it spotting manatees, gators, and other wildlife at Wakulla Springs State Park. If you want to see more photos and read more about my service trip, I’ve uploaded a large set of captioned photos to my Flickr account.
Now, back to Sherando Lake! I had been to the lake a couple times before, but had never actually taken the time to hike any of the trails in the area. I was pleasantly surprised by the trail system. There is something for everyone – a practically flat trail that goes along the lake shore, a steeper trail around the lake that offers a couple nice views, and a connection into the larger, longer trail system along the Blue Ridge Parkway.
I liked sitting on the sand and enjoying the pretty lake view, and I really enjoyed climbing up to Lookout Rock on the Blue Loop Trail. The rocky outcropping provides a nice view of the lake and the mountains beyond. Although the snow was gone on the trails we walked, we could still see plenty of snow on the distant, higher ridges.
The hike ends after crossing a cement bridge over the spillway. Below: The stream leading away from the lake; Christine crossing the concrete bridge, Blue Mountain Brewery food and brewery.
The walk back down from Lookout Rock was really steep and slick, especially with the thick bed of dry, fallen leaves. Once we reached the bottom of the descent, we crossed a concrete bridge beneath the spillway and returned to our car. We finished hiking a little bit before noon, so we decided to make the short drive to have lunch at Blue Mountain Brewery (near Afton Mountain). They have great food and great beer. Adam enjoyed a flight of nine different beers and I tried their Daugava Baltic Porter. I think everyone in central Virginia had the same idea to visit the brewery for an outdoor lunch. The place was packed, but it was a perfect ending to the day.
Directions to trailhead: From I-64, take Exit 96 just east of Stuarts Draft. Go south on State Route 624, which becomes State Route 664 at Lyndhurst. Continue south on State Route 664 approximately 8 miles to the entrance to the Sherando Lake Recreation Area on the right. The gatehouse is approximately 0.5 miles ahead which will take the fee for your vehicle. Past the gatehouse, you’ll take a right to the fisherman’s parking lot. Park there and make your way to the left for the Cliff Trail.
* MapMyHike is not necessarily accurate, as the GPS signal fades in and out – but it still provides some fun and interesting information.
This 6-mile hike is a bit challenging – tough climbing and a little hard to follow – but payoffs at the end make the effort well worth your while. The views are spectacular – some of the best in the mid-Atlantic!
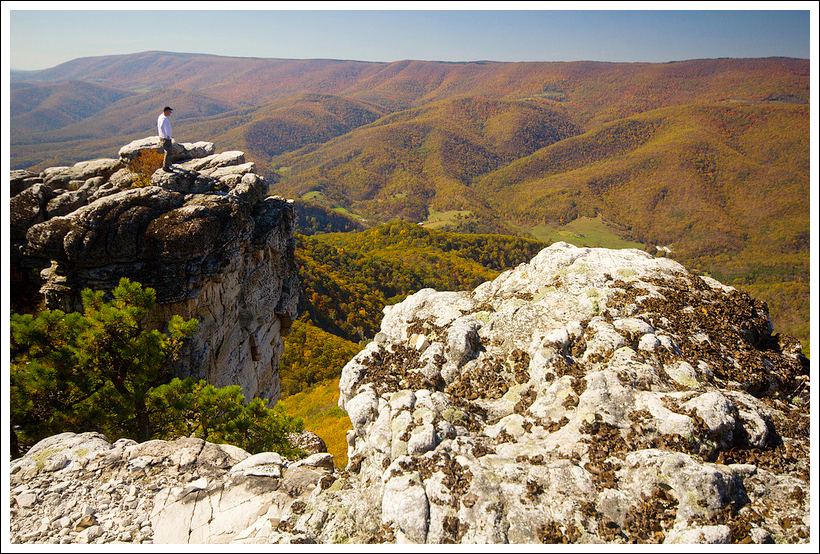
Amazing views from Chimney Top! Below: Adam checks out the trail information board; The spine of the mountain offers many magnificent views, if you’re willing to do a little climbing.
Adam Says…
Our first experience hiking on North Fork Mountain was on my birthday in 2012 (birthday hikes are a tradition for us!) We decided tackle a little piece of the the trail from the base of the mountain to the well-known outcropping of Chimney Top. This August day ended up being one of the hottest days of the year. While hiking up the backside of this mountain, there was absolutely no breeze so the air was stifling. We were quickly questioning why we chose this one, but we had to press on for tradition’s sake. We reached the ridgeline and walked along for a while. We eventually came across a few rocks that seemed to denote a path up. We semi-bushwhacked up this trail and came to a rock column and climbed up to the top to enjoy the views. We thought this may have been Chimney Top. When we got back home and did more research, we realized we hadn’t found the true Chimney Top, so we vowed to return – and we did… on our sixteenth wedding anniversary in fall 2013.
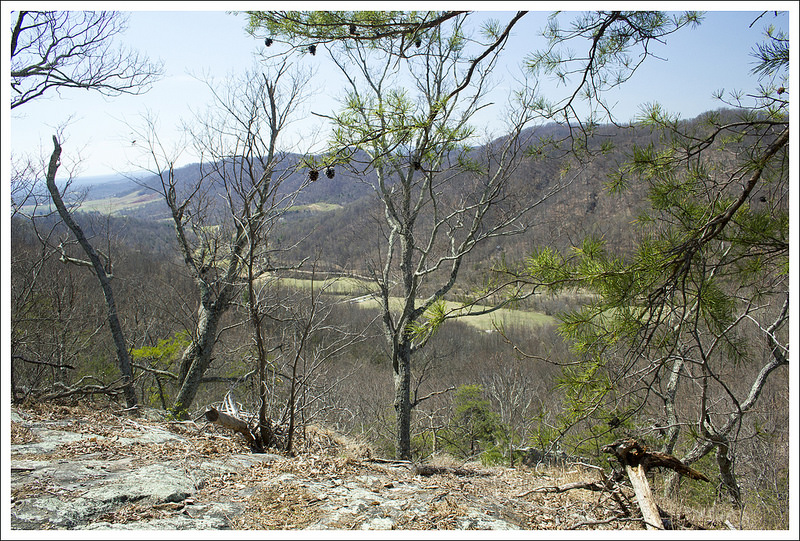
The first outcropping offers stunning views. Below: The view in the other direction from the first outcropping,
It was a perfect October day with the leaves just a shade past peak. One of the difficulties about this trail is there are no solid online resources for maps and even using our mapping software (alltrails.com), the full trail doesn’t appear on any kind of topo maps. We used our MapMyHike app on our phones to try and get accurate readings and I traced that outline on a topo map through alltrails.com to try and get a good resource if you want to attempt this hike.
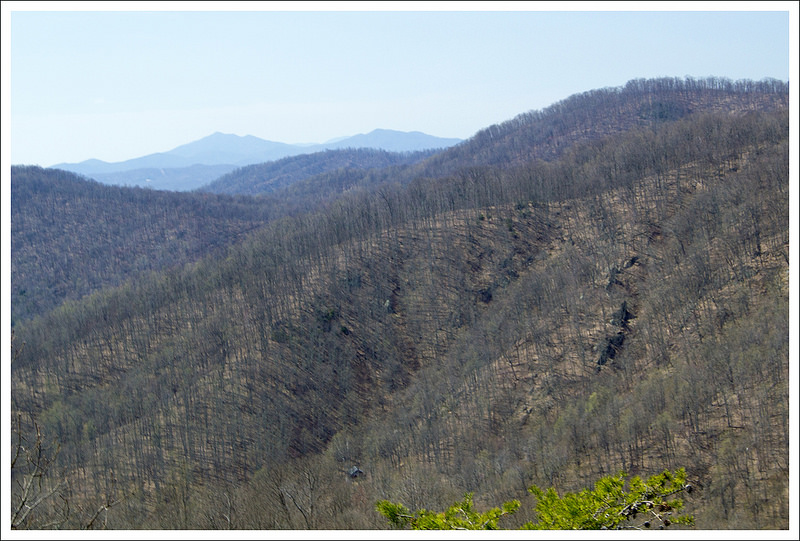
We arrived at the small parking area and made our way up the trail. The trail meanders for the first two miles through the woods with some slow switchbacks to help you gain elevation. The thick canopy is high above you, but you will notice you will rarely feel much wind on this side of the mountain. Around 1.5 miles, you make a steeper ascent up the mountain and reach the top of the ridgeline around 2.0 miles. Once you reach the top, you can see down below to the North Fork of the South Branch of the Potomac River and WV-28/55 on the other side. Both times we have been, you can see dots of people fishing in the river. Across the way, you will see ridges of mountains with Canaan Valley hidden behind them. Looking along the ridgeline, you’ll see sheer cliffs of rock, making this quite a remarkable scene. From this ridgeline, we continued along the path. The trail stays on the ridgeline allowing for several opportunities to check out the views for the next .5 mile. Around 2.5 miles, the trail has been rerouted away from the ridgeline and you descend the mountain. The signs say that it was to protect the nesting/hatching peregrine falcons, who have nested on the cliff faces. The signs are at least five years old, and October is not nesting season, so we’re not sure if the signs are still valid.
Fall color was pretty nice! Below: The trail is often rocky and rough; Adam walks along the increasingly hidden trail.
The trail continues through this terrain for another .5 miles and then starts to gain elevation again. At 3.0 miles, we came to a well-established campsite and could see the ridgeline just above it. I walked over to the ridge, but the views were fairly obstructed. I then saw a smaller campsite to the right of the trail. Going to that campsite, I walked a short distance behind it on a small trail towards the ridgeline to discover the elusive Chimney Top. The photos we will place should lead you to the proper campsite that leads to the correct trail. We ate some lunch from the top of the cliffs near Chimney Top Exploring a little around this area, you are able to see a most-impressive cliff face (where I’m assuming is the section protected for peregrine falcons).
After we ate our lunches and took in the scenery, I decided I wanted to try to climb up Chimney Top. I had to find some good footholds, but I was able to get up without too much trouble, but please be careful if you try to do the same. There are many sheer drops from here, so I wouldn’t advise any unsupervised children to be given free reign on this hike. Head back the way you came to make this a 6 mile out-and-back.
I do believe that the scenery from this spot is one of the most dramatic and beautiful views you will get in Virginia and West Virginia. The trail was called the best trail in West Virginia by Outside magazine in 1996 and I can see why. Some people like to backpack the entire 34 miles of North Fork Mountain. Since you are at the top of the ridgeline for this hike, there isn’t a reliable water source to be found so you would need to pack in a lot of water for this backpacking trip. I would strongly recommend trying this hike on a beautiful spring or fall day.
Christine Says…
I’ll admit – I’m the reason it’s taken over three months to get this hike posted. A foot injury, a lingering cold, and the unusually frigid temperatures have sent me into a state of lassitude. I haven’t felt particularly motivated to hike or write. I’m sure I’ll snap out of it completely sooner or later. But today, I decided to give myself a little push and get this post live!
Fall foliage and amazing views. Below: Adam checks out one of the campsites; A nice view of the cliff face along the mountainside.
We were really excited to try this hike again. Our trip on Adam’s birthday had been rewarding even though we missed out on the main view. We started the morning with a big breakfast at Bright Morning Inn (Pumpkin Pancakes with Walnuts and Maple Butter Sauce!). It’s one of our favorite places to eat in Canaan Valley/Davis – everything is always excellent there!
After parking, we started climbing the mountain, following the familiar ground we had covered the previous summer. We spent a little time exploring the first of several impressive rock outcroppings on this hike. While there, we took some time to chat with the only other two people we saw on the trail – a couple from Pennsylvania. They were recent empty-nesters and were returning to backpacking for the first time in 20+ years. They still had all their gear from the late 80’s/early 90’s – external frame packs, old fashioned sleeping pads, and I think I may have seen something cast iron! It looked like a heavy load!
After leaving the first view, we pushed along the trail, passing the spur trail to our lunch spot from the 2012 attempt. This spot is marked by a rock cairn and the worn footpath is well established.
I thought this rock formation near Chimney Top looked like a tortoise. Below: More views; Adam checking out another rock outcropping along the way.
The route follows a series of rolling hills after passing the spur trail. I thought the trail was pretty hard to follow along this section. It’s a reroute, and vestiges of the old trail are still apparent. It may have been because the trail was under so many leaves, but I still think the reroute isn’t fully established. As we continued along, I asked Adam how much further we should go. According to old information, we had hiked far enough to be well past Chimney Top. As it turns out, the reroute is just longer and follows a wide arc around the preserved cliff face.
Eventually, we reached a spot with numerous campsites. That’s usually a good indicator that you’re near something desirable to hikers/campers. In this case, spotting the campsites let us find yet another unmarked trail that led out to the spectacular view from Chimney Top.
We spent quite a while up there, enjoying the fall foliage and awesome views, eating our lunch and taking photos. The hike back went very quickly… mostly downhill and along a route that felt a little more familiar.
Difficulty – 3.5. The trail has some decent climbing on it. Both times we’ve hiked it, there wasn’t any wind until the top, so the temperatures can be stifling.
Trail Conditions – 1.5. Trails are largely unmarked with reroutes not always clear. Finding the actual viewpoint of Chimney Top can be a little challenging. Watch out for loose rock on the ridgelines in case you go to check out any views.
Views – 5. Absolutely stunning views and great ridgeline walking.
Streams/Waterfalls – 1. From way above, you’ll see North Fork Gap. There isn’t a water source on this trail.
Wildlife – 1. We barely saw squirrels, but you may have some views of preying birds. Watch out for timber rattlesnakes on the rocky ridgeline.
Ease to Navigate – 2.5. There is basically one trail to follow here, but it can be tricky finding Chimney Top.
Solitude – 4.5. Typically, you’ll only see a few people on this trail. Most will go to the first overlook and stop.
Directions to trailhead: From Seneca Rocks, WV head northeast on WV-28N/WV-55E for 15.2 miles. Take a right on to County Route 28/11/Smoke Hole Road. You immediately cross a bridge where you may see people fishing in the stream. In about .4 miles, there is a small parking lot on the right-hand side. You’ll see the brown board which denotes the start of the trailhead.
* MapMyHike is not necessarily accurate, as the GPS signal fades in and out – but it still provides some fun and interesting information.
This 14.5 mile section of the Appalachian Trail includes great views of Wintergreen Resort from Humpback Mountain. The campsite for the evening is the Paul C. Wolfe Memorial Shelter, which is located on the bank of lovely, rushing Mill Creek.
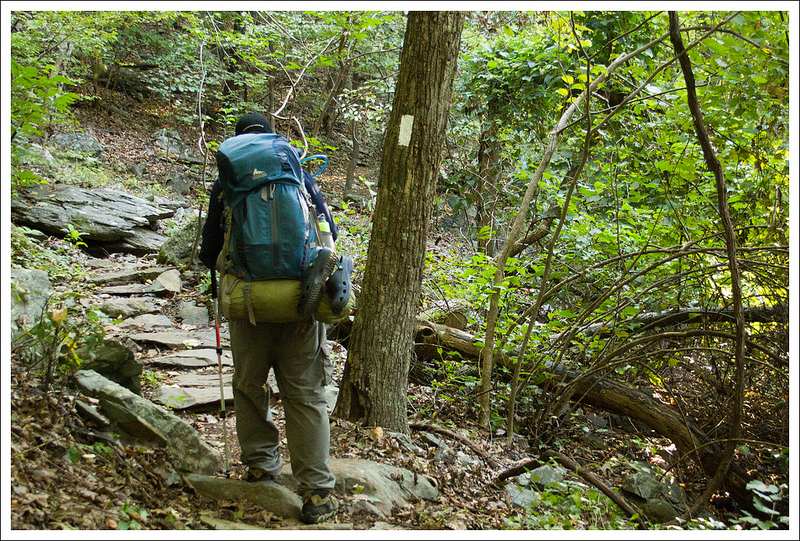
Adam traverses Humpback Mountain. Below: We found trail magic right away on our hike; Adam climbing the southern side of Humpback Mountain; Rock walls along the trail.
Day One
For Christine’s birthday this year, we decided to do a quick overnight backpacking trip along the Appalachian Trail. Following an all-day soaking rain and a cold front on Saturday, we had ideal weather for hiking and camping on Sunday into Monday – low humidity, clear skies, daytime highs in the 70s and a nighttime low near 45. It was perfect!
We started our morning with a big breakfast at Thunderbird Café and then made the 40 minute drive to the trailhead. For this hike, we left one car parked in the small lot near where the Blue Ridge Parkway (BRP) crosses I-64 and Rt250. From there, we drove our second vehicle to the Dripping Rock parking area at mile 9.6 on the BRP. The name Dripping Rock refers to the small spring adjacent to the parking area. Supposedly, it was a water source well-used by Monocan Indians en route to summer hunting grounds.
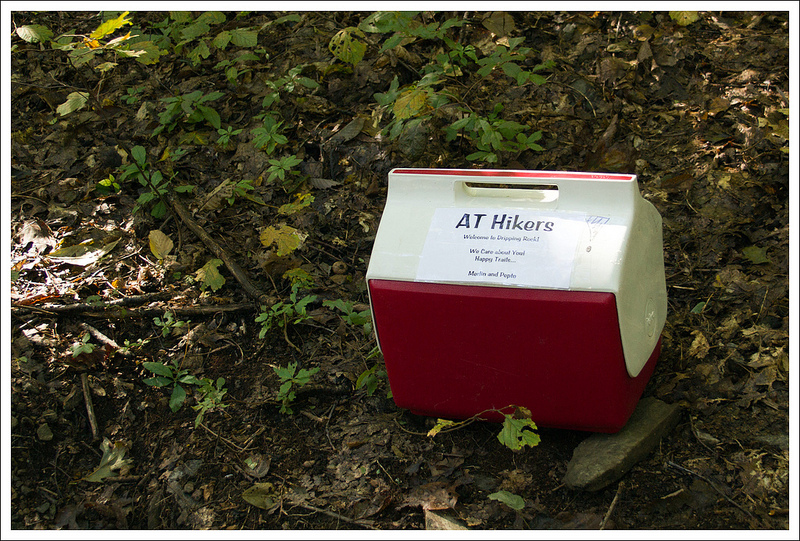
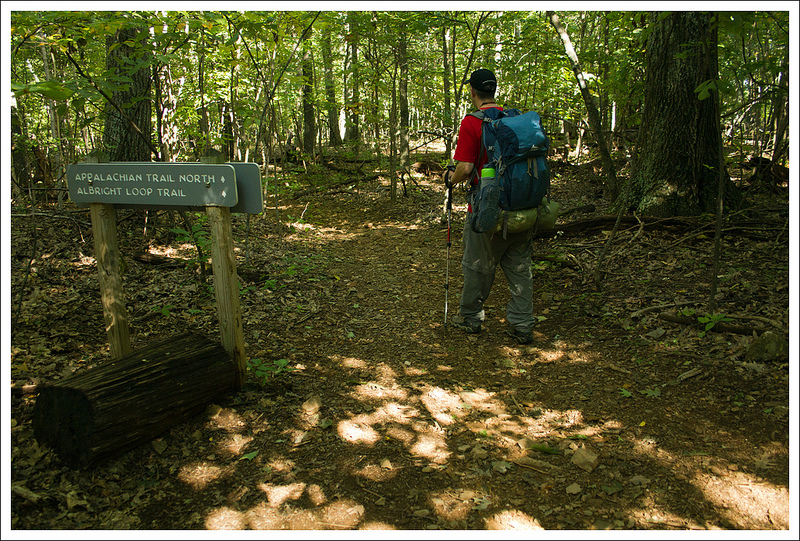
The AT crosses the parkway at this point, so it’s an easy place to hop on without using any access trails or spurs. The hike starts out climbing gently uphill through the woods. Almost immediately, we spotted a small cooler alongside the trail – trail magic! We didn’t need (or take) any trail magic on our hike, but we were curious so we opened the cooler to see what was inside. We found a log book, a camera, a small whiteboard, a bottle of ibuprofen and a nice supply of granola bars. The camera and whiteboard were provided so that hikers could take photos with their trail names.
A couple tenths of a mile down the trail, we passed even more trail magic in the form of 2 liter-sized bottles of tap water from Wintergreen Resort. Typically by September, streams and springs in the Shenandoah Valley are dry or running very low, so the free, clean water would be quite welcome. The bottles were situated next to one of the trail’s spring-fed water sources. We noticed the sign marking the spring indicated that water might be contaminated and should be filtered or boiled. The sign included an outline drawing of a moose, and we both found it comical to think about the implausibility of Virginia water being contaminated by a moose.
Christine enjoys the outcropping overlooking Wintergreen. Below: Hiking up Humpback Mountain; Adam checks out the view of Wintergreen; Pretty views.
The hike continued gradually uphill along the side of Humpback Mountain. We saw several nice campsites along the trail. Soon after that, the views started to open up. We didn’t really have any expectations for great views on this hike. We figured we might take the side trail to Humpback Rocks and eat lunch there. We also knew from past hikes on Dobie Mountain that we’d be passing one decent overlook at Glass Hollow. However, we were pleasantly surprised to find spectacular views along the rocky, spiny ridge of Humpback Mountain. These views are about 2.5 miles from the better known outcropping of Humpback Rocks, and we thought they were even nicer! The crowds, graffiti and car noise always take away from the experience at Humpback Rocks. We had this lofty ridge all to ourselves.
We took some time to take off our heavy packs and enjoy the view. We could see the Priest, Three Ridges and the slopes of Wintergreen Resort. When we got home, we read more about this section of the trail and learned that the view is named Battery Cliff, because the condos on the slopes of Wintergreen look like fortifications from a distance. The rocks on the cliffs are Catoctin greenstone formed in an ancient volcanic eruption. When you sit on these rocks and look across to Wintergreen, you’re looking over to where the Appalachian Trail used to traverse the mountains. Five miles of the trail used to cross the resort. But in 1983, the resort sold the land to private developers – basically pulling the rug out from under the Appalachian Trail Conservancy. Luckily, the organization was able to quickly pull funds together and preserve the land across Humpback Mountain – where the trail currently sits.
Leaving the open ridge, we dipped back into the woods and continued walking along a long, impressive stretch of stone ‘hog wall’. People living in the area before the establishment of the parkway built these long walls to roughly mark property and attempt to contain livestock. Eventually we arrived at a junction, one direction headed toward Humpback Rock and the other continued downhill along the Appalachian Trail. We decided to skip the extra mileage it would take to visit the Rock and continue toward our destination. We’ve seen the Rocks many times and didn’t really want to face the crowds that arrive with beautiful-weather Sundays.
Adam walks along one of the many hog walls.
As we walked downhill, we started contemplating our lunch break. We decided that the next spot with good ‘sitting rocks’ we’d stop for lunch. As it turned out, the next rocks we found were just a few, big random flat boulders right alongside the trail. We had lunch of apples, peanut butter, cheese, and energy bars. As we ate lunch, two groups of people passed us – a couple with their dog and a man who had just visited his daughter at JMU’s family weekend. All in all, we only saw a total of eight people over the entire ten miles of hiking that day. The solitude was nice!
After lunch, we continued the 5.5 mile descent toward our evening stop point. The trail was in great shape and the downhill was easy going. At the bottom of Humpback Mountain, the Appalachian Trail intersects with the Howardsville Turnpike – an old toll road that was heavily used to transport goods before the Civil War. It’s long been reclaimed by the forest, but the wide, flatness of the trail still has the definite feel of a well-traveled road. We continued along the Appalachian Trail until we spotted a small sign marking the Glass Hollow overlook. We followed the short access trail and spent a good twenty minutes relaxing on the beautiful rocky viewpoint. The views this time were much clearer than they had been two years ago when we visited.
Taking in the view at Glass Hollow. Below: Trail lunch, AT logos carved on deadfall; Pretty trail with late season wildflowers.
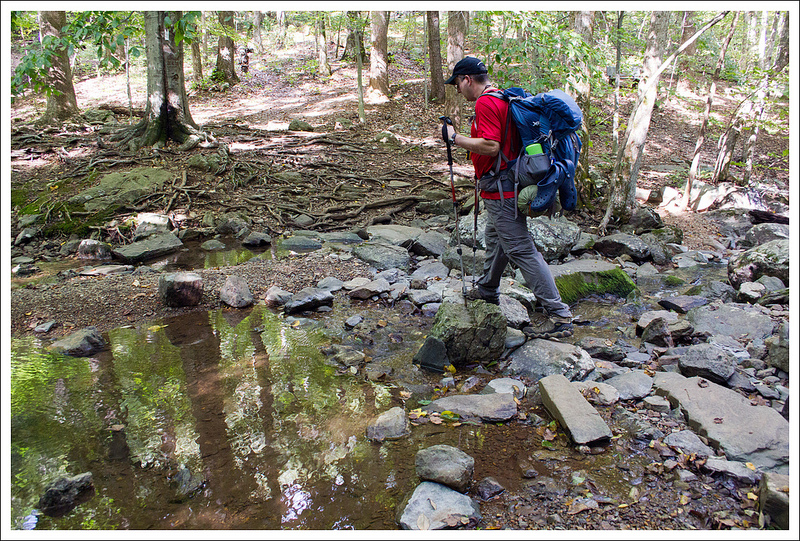
After leaving the overlook, we continued along the Appalachian Trail, passing the junction with the Albright Loop Trail – a popular day hike in this area. From this junction, you can follow the Albright Trail for two miles back to Humpback Rocks parking. We continued northbound on the Appalachian Trail, descending Dobie Mountain. The trail follows a series of gradual, well-graded switchbacks. There is one nice view of the valley about halfway down the mountain. Eventually, we started hearing the sounds of running water through the trees. After crossing Mill Creek, we arrived at our stop point for the evening – the Paul C. Wolfe shelter. This shelter is one of the nicest we’ve seen. The location is beautiful, the picnic table is on the porch and the shelter has sidelights, so it’s bright and cheerful inside. So many shelters are gloomy and dark. We will caution you – the privy at Paul C. Wolfe shelter is kind of weird – the door is only a half-door. When you sit on the toilet, you have a nice view – but people can also see you sitting there.
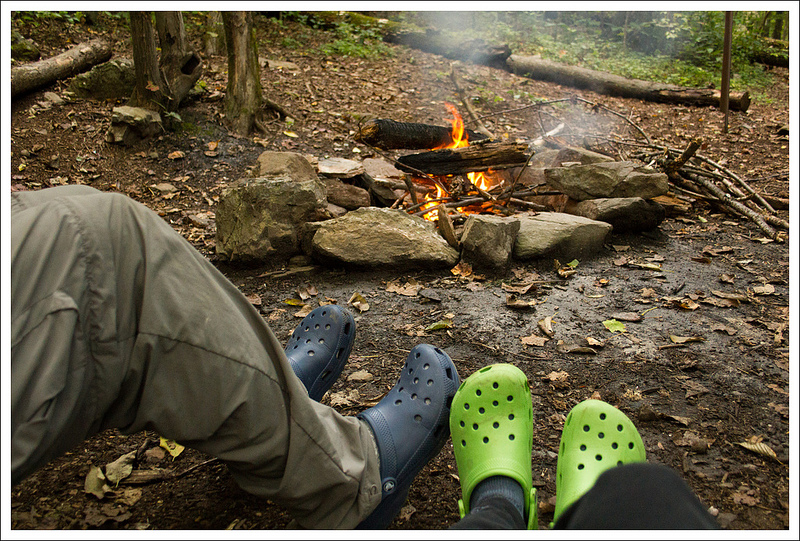
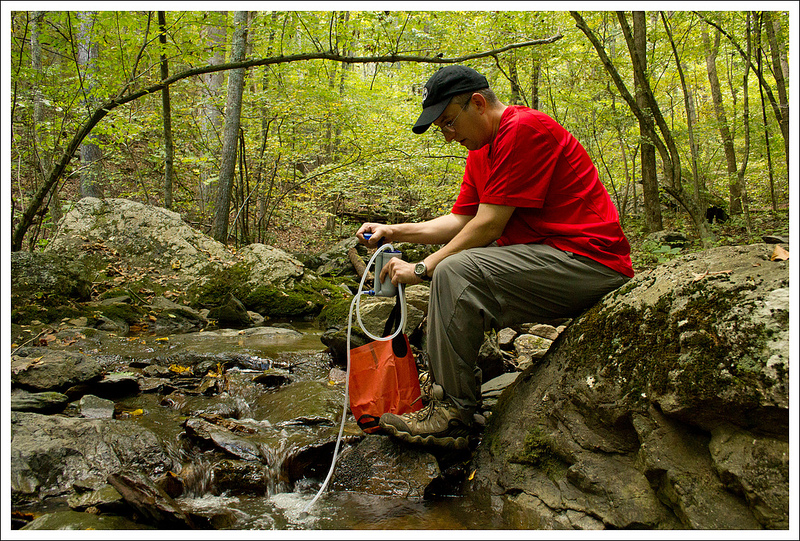
We were the first campers to arrive for the night, so we got a prime campsite near the banks of Mill Creek. We had our own established fire pit and our own bear pole – fancy! We immediately got started setting up camp and taking care of necessary chores. Mill Creek was running beautifully, so we had a clear, cool water source to filter from.
Our nice campsite along Mill Creek. Below: Overlook on the descent of Dobie Mountain; Junction with the Albright Trail; Crossing Mill Creek
We decided to take our dinner up to the shelter so we could use the picnic table for meal prep. Dinner consisted of pepper steak, wine and dark chocolate cheesecake. As we were finishing up dinner, a southbound thru-hiker named Nightwalker arrived at camp. He told us he had hiked almost 30 miles that day. He was from the Boston area and freshly out of high school. We chatted with him a bit and marveled at him eating huge handfuls of candy corn mixed with Skittles. He had the look of a true trail-weathered hiker – beard, tattered long-johns and feet held together by duct tape.
When the sun was going down, we headed back to our own camp. Despite the heavy rains the night before, we were able to find enough old wood to have a small campfire for a while. We heard another southbound hiker arrive sometime after sunset, but we never met him. With the temperatures dropping with the darkness, we headed to bed around 9:00. Both of us slept pretty well, but Christine woke up around 3:00 a.m., struggling to close both of the doors in the tent fly. It was in the upper 30’s and she’s a cold sleeper.
Our nice little campfire. Below: Adam filtering water; The Paul C. Wolfe Shelter; The steep climb that starts Day 2.
Day Two
We were up at first light, but noticed both the thru-hikers were still sleeping. We didn’t want to disturb them, so we cooked our breakfast of oatmeal, cheese, coffee and hot chocolate near the fire pit at our campsite. We were packed up and back on the trail within 45 minutes of waking up.
The morning’s hike consisted of a rather steep climb up Elk Mountain. From the back of the shelter, the trail climbed almost straight up via a series of switchbacks. We had about 1000 feet of climbing in just about a mile. A8fter that, the remainder of the hike was more moderate or even gently downhill.
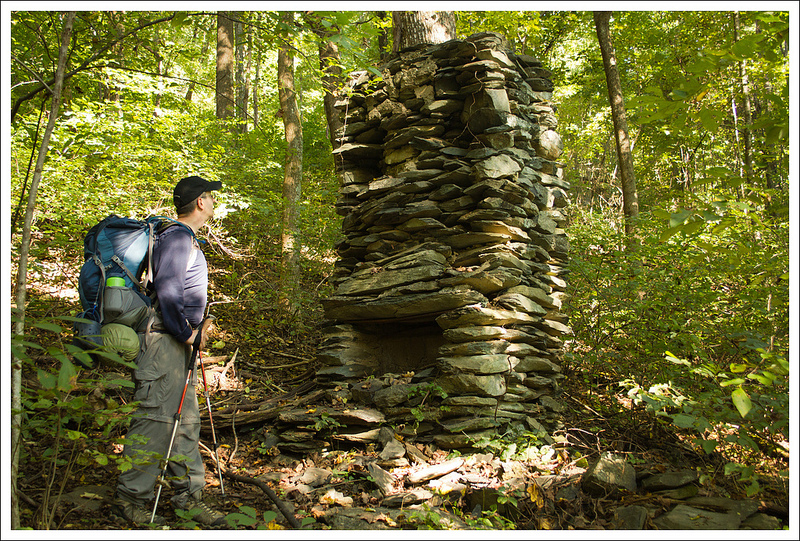
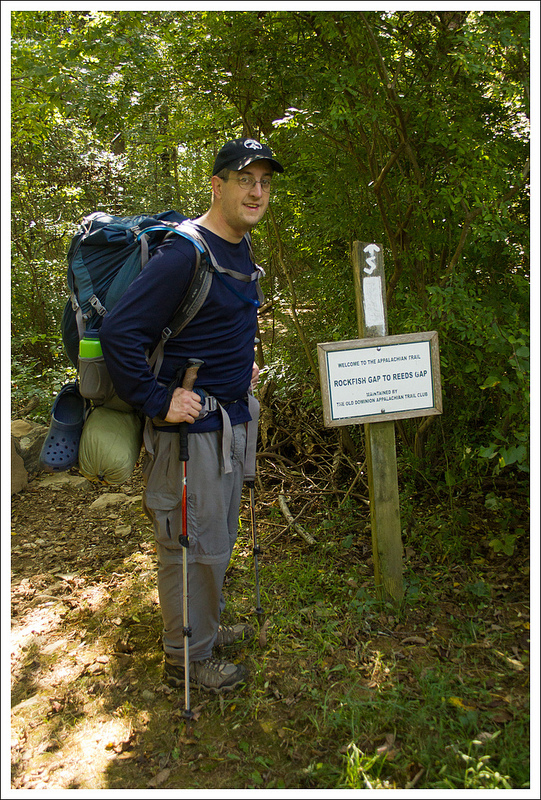
The remnants of an old cabin sit right along the trail. Below: Approaching Rockfish Gap; We can see Rt. 250; Waynesboro’s great network of trail angels.
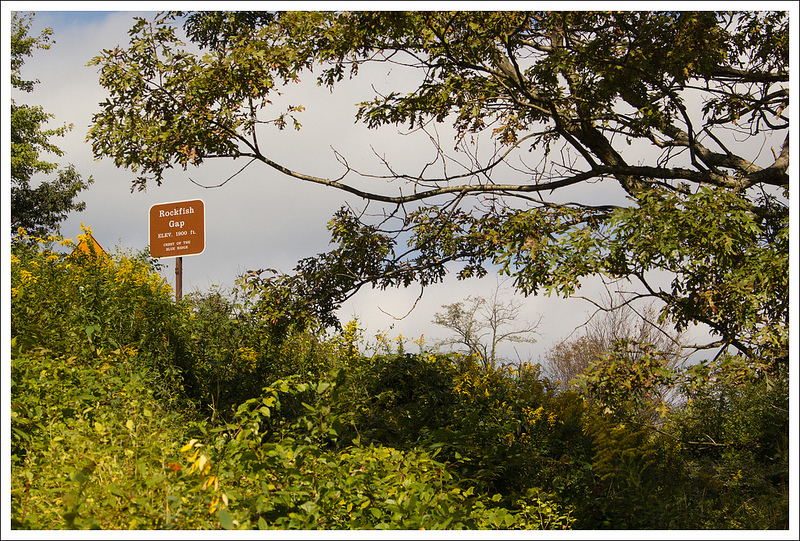
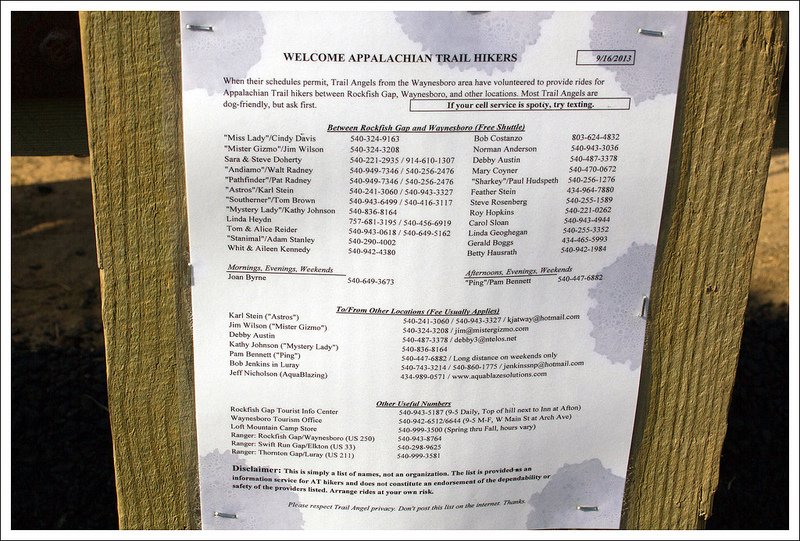
The five miles of trail back to Rockfish Gap are largely unremarkable; just a nice walk through the woods. There are a few small stream crossings, but no views along the way. The one noteworthy feature would probably be the ruins of an old cabin, about 1.7 miles north of Paul C. Wolfe. The chimney and hearth are still standing right alongside the trail. Evidently, there is also a cemetery for the Lowe family and additional cabin ruins somewhere east of the trail, but we didn’t see it. The trail exits onto Route 250 at Rockfish Gap through an opening in the guardrail. Thru-hikers can find lists of trail angels at the guardrail opening. Waynesboro has one of the best organized trail angel networks along the AT. It’s easy to find a ride or shelter at this point on the trail.
We arrived back to our car around 10:30 in the morning. By the time we shuttled back to our car parked at Dripping Rock, we were already thinking about lunch. We realized how close we were to Devil’s Backbone Brewery and decided it was a perfect place to wrap up our backpacking weekend. We had a huge lunch – beers, a big soft pretzel to share, and sandwiches (French Dip for Christine, BBQ for Adam). After lunch, we decided to take Rt. 151 back to Waynesboro. This allowed us to also pass Bold Rock Cidery. It’s definitely worth a stop if you enjoy hard cider. Since it was a Monday, we were the only people there. We got to go behind the scenes into the cider pressing room and the fermentation/bottling facility. That was really neat!
The tasting room at Bold Rock. Below: Enjoying a post-hike beer at Devil’s Backbone.
Trail Notes
Distance – 14.5 miles (9.5 miles on Day One, 5 miles on Day Two) (Check out the stats from Map My Hike – [Day One] [Day Two])*
Elevation Change – 1800 ft. on Day One, 1100 ft. on Day Two
Difficulty – 2. This is an easy backpacking trip with moderate, well-graded climbing.
Trail Conditions – 4.5. Trails are in excellent shape.
Views – 4. Views from Humpback Mountain and Glass Hollow are beautiful!
Streams/Waterfalls – 3. Mill Creek is pretty and a great water source. There is a small waterfall and swimming hole downstream from the shelter.
Wildlife – 2. We saw a few deer and heard owls at night.
Ease to Navigate – 4. There are several intersections/junctions to pay attention to, but following the white blazes is pretty easy.
Solitude – 4. Because we avoided Humpback Rock, we only saw a small handful of people on a beautiful Sunday.
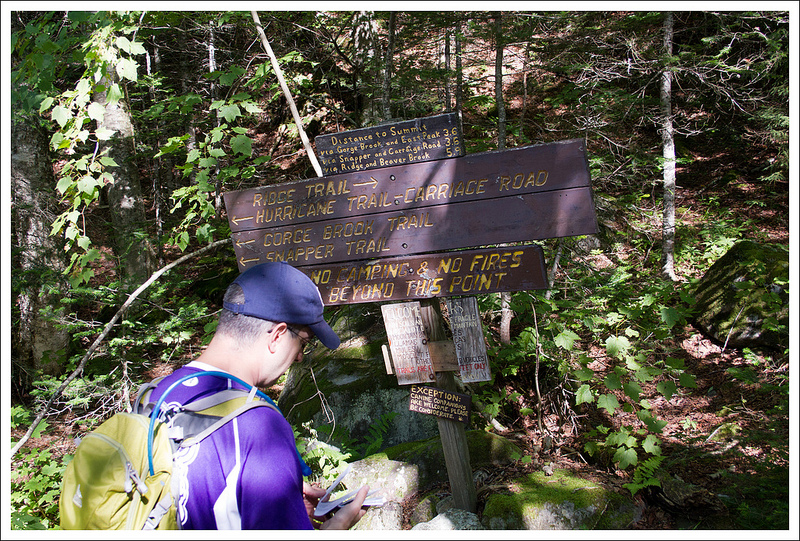
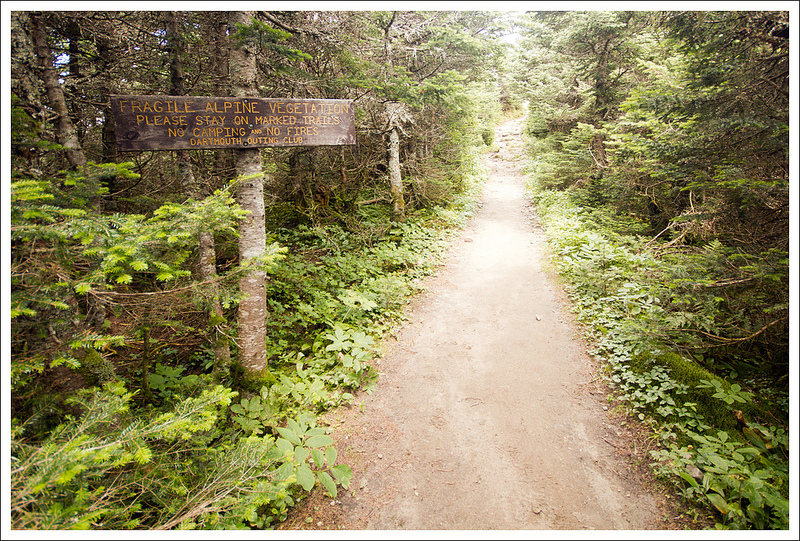
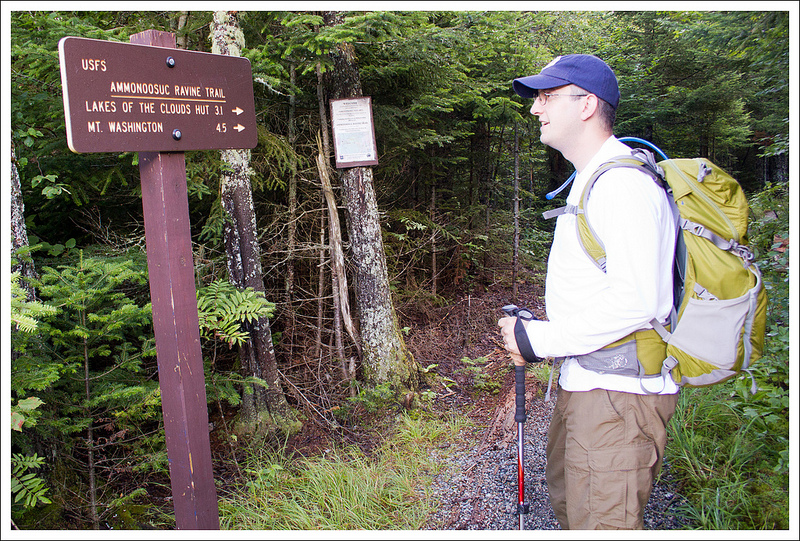
This 7.2 mile hike takes you to the summit of Mt. Moosilauke – Dartmouth College’s ‘home mountain’. It’s also the first place in New Hampshire where Appalachian Trail hikers walk above treeline in the alpine zone.
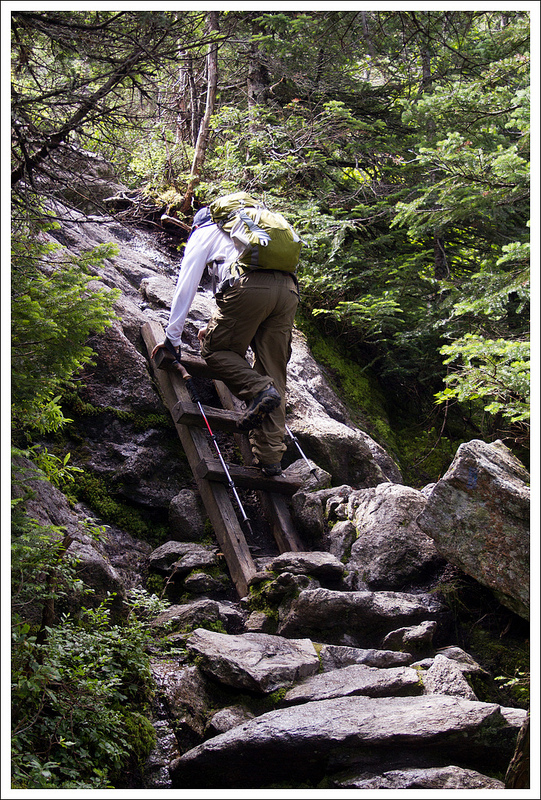
Adam enjoys the summit of Mt. Moosilauke. Below: Damage from Hurricane Irene forced the rerouting of trails; Adam climbs the Gorge Brook Trail; Open views along the ‘balcony’ section of the hike; The area right below treeline was thickly forested with evergreens.
Christine Says…
For the final hike of our granite-state adventure, Adam and I chose to hike the western-most of New Hampshire’s 4,000-footers – Mount Moosilauke. At 4,802 feet, Moosilauke is the first spot northbound Appalachian Trail thru-hikers truly walk above the treeline. Yes… there are balds and high grassy meadows in the south, but those are not created by the unforgiving alpine climate it takes to truly create areas above the treeline.
There are several different routes up Moosilauke. We chose a 7.2 mile loop following the Gorge Book Trail, the old Carriage Road and the Snapper trail. It’s probably the most popular route for dayhikers.
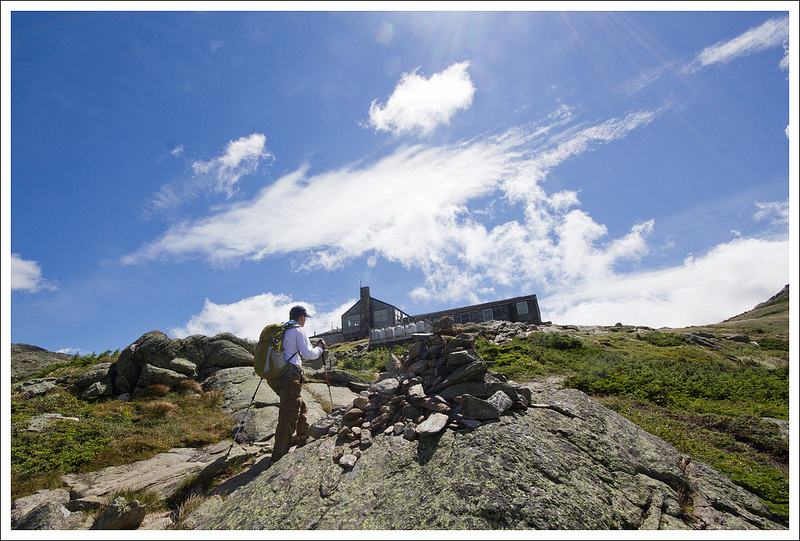
We started off from the Moosilauke Ravine Lodge. Before I get started talking about the actual hike, I wanted to take a moment to talk about how much I enjoyed visiting the Ravine Lodge. The lodge and several surrounding bunkhouses were built in the late 1930’s and were originally used as a hub for competitive skiers. Nowadays, the lodge is owned by Dartmouth College and run by students. You can stay the night or just come in to enjoy a hearty home-style dinner. The lodge is everything you would imagine a rustic mountain cabin to be – antique skis, old trail signs and mooseheads adorn the walls. There’s a big stone fireplace (yes… a fire was necessary and burning cheerfully on this chilly August morning) and an old piano along one wall of the dining room. There’s even a cozy library on the lower level! The lodge windows and back porches also offer stunning views of its namesake mountain.
Dartmouth College owns and runs the Moosilauke Ravine Lodge. Below: The lodge is very rustic and comfortable. It was even cool enough in August to have a fire in the fireplace; The food at the Ravine Lodge is supposed to be pretty good!; Adam checks out out route.
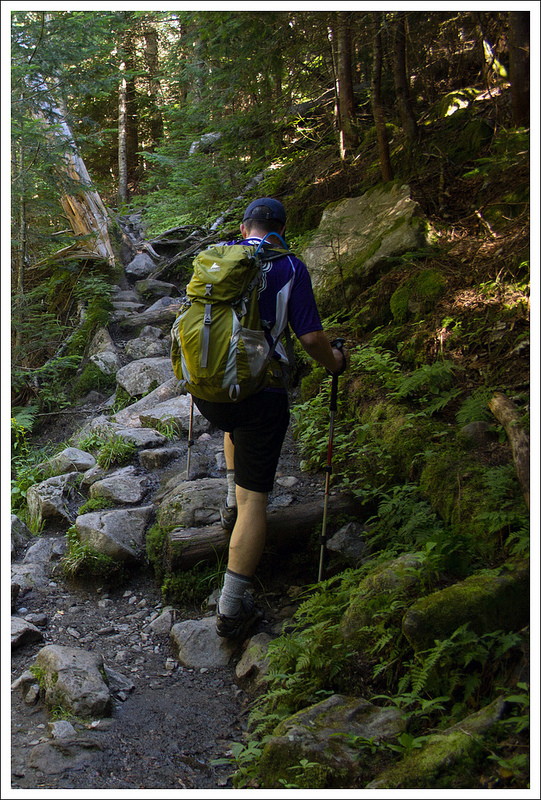
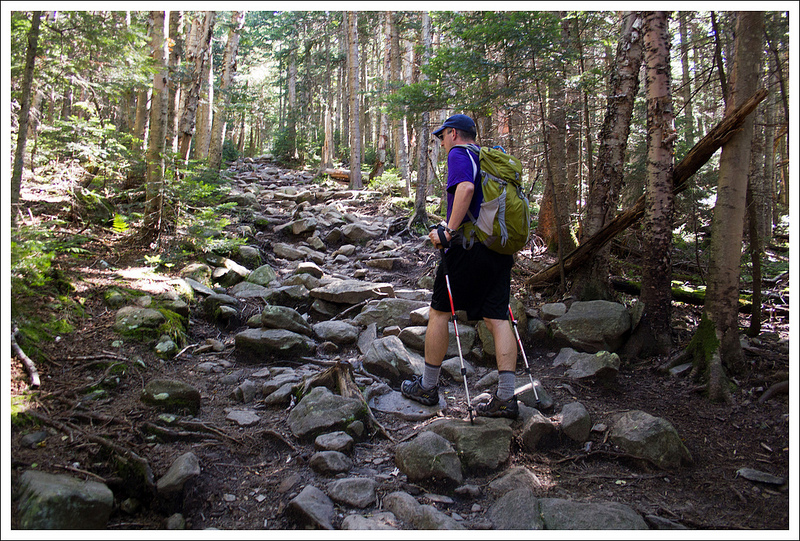
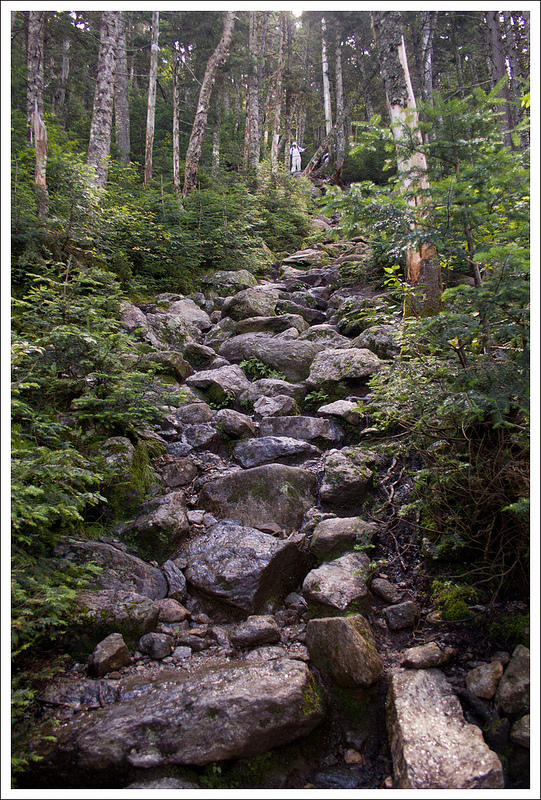
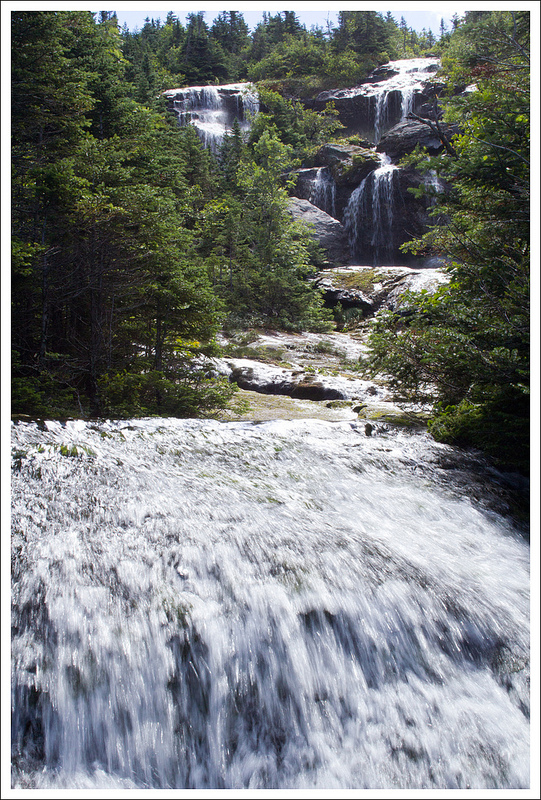
Now back to the hike… our route started off behind the lodge. We almost immediately crossed the Baker River on a nice, sturdy bridge. The Gorge Brook trail climbs uphill gradually over rocky terrain. We soon came to a sign announcing a reroute of the Gorge Brook Trail. Evidently, the heavy rains from Tropical Storm Irene caused rock slides and irreparable damage to part of the original route. A group of Dartmouth students built the Wales Carter Connection, a short section of trail that bypasses the damage. The connection eventually came back out on the Gorge Brook trail near it’s junction with the Snapper Trail. We continued gradually uphill on Gorge Brook. Much of this section of trail followed a pretty stream. After passing a memorial plaque and a sign for ‘last sure water’ we moved away from the stream and into forest increasingly made up of evergreens.
At 2.3 miles, we got our first open views of the hike. Through a wide opening in the trees, we could look across the valley in the direction of Mount Cardigan – our first hike of the trip! Around this part of the hike, we came across our first human company! One group of three was carrying on a loud and detailed conversation about the best spots to get clear 3G service in the wilderness. Another group, maybe a father/daughter, was arguing about the nature of God – whether he’s benign and quietly observes suffering or if he’s like a menacing boy who enjoys pulling the legs off of bugs to watch them struggle. I think we overheard them talking about Shakespeare, too, but I can’t be certain. Usually when Adam and I talk on the trail, we talk about the scenery/wildlife or we just walk in companionable silence. It made me curious… are you a chatty hiker? What are your typical trail topics?
Adam climbs the rocky Gorge Brook Trail. Below: Beautiful stream scenery; The Gorge Brook trail was very rocky; Our first views along the way.
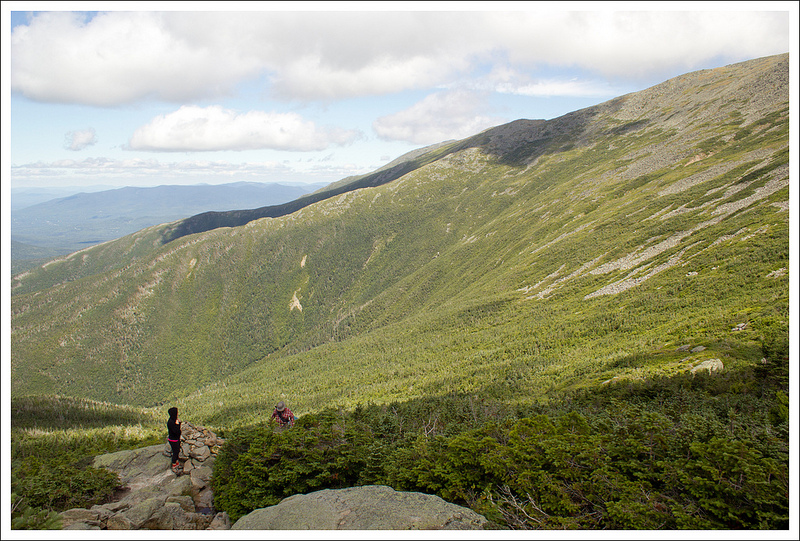
After the first view, the trail got a bit steeper and the trees a bit sparser. We enjoyed several nice views from a section of the trail called ‘The Balcony’. After climbing the massive stone steps along the Balcony, we dipped in and out of thick stands of evergreens. It was almost like walking through an overcrowded Christmas tree farm.
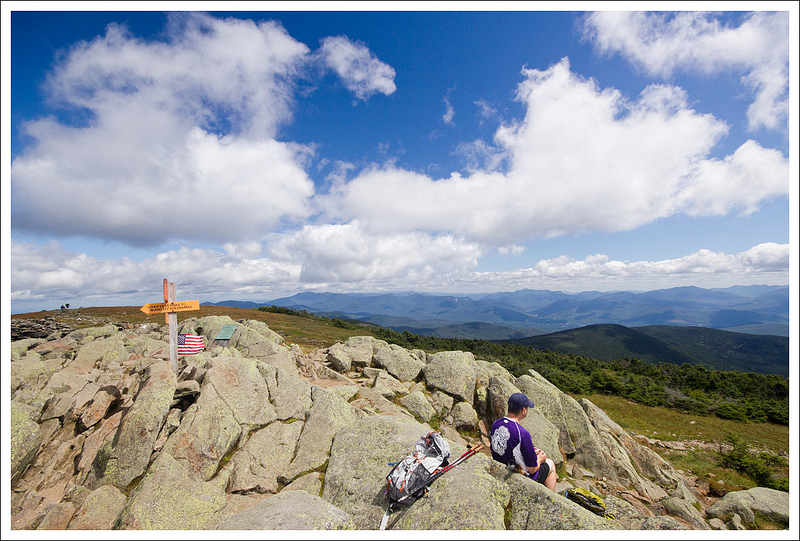
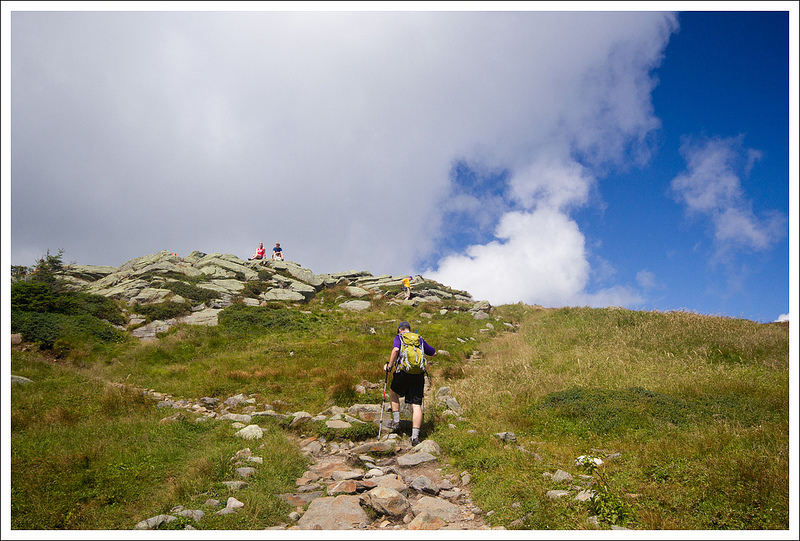
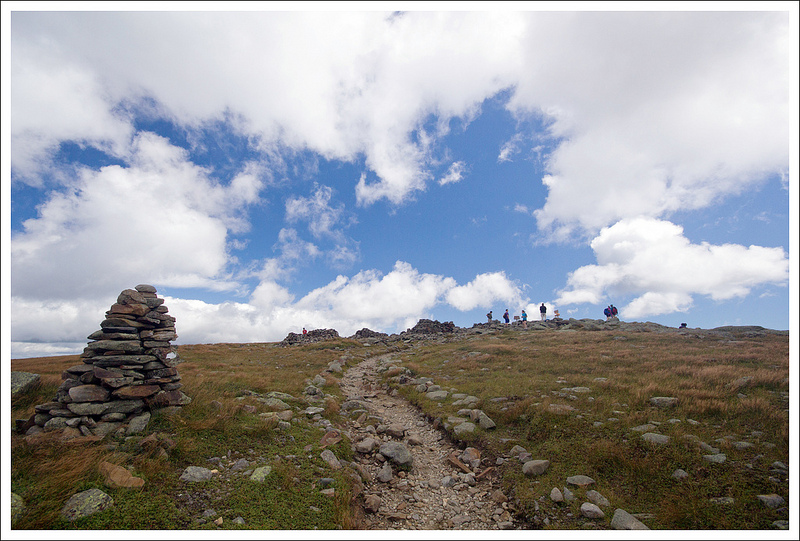
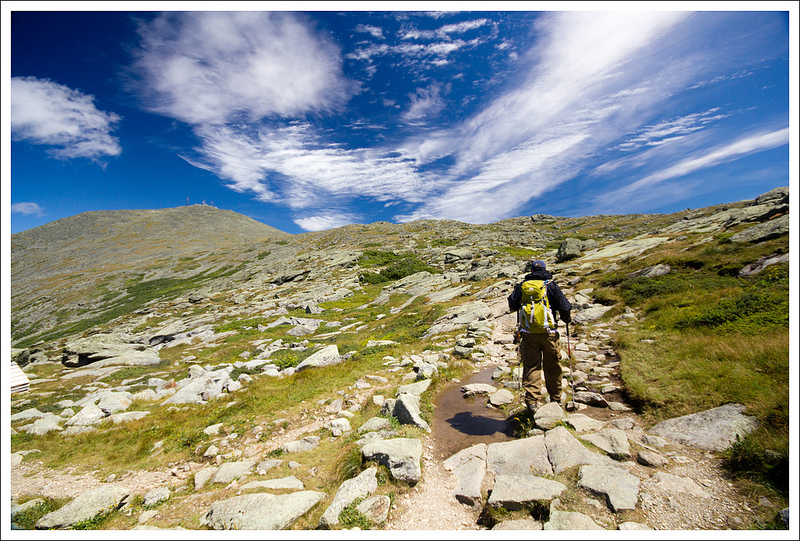
We soon stepped out into the alpine zone – the barren rocky expanse that exists above the treeline. We could see the rocky path winding across the bare terrain toward a copse of rocks a top the summit of Moosilauke.
As soon as we were in the open, I had to dig my fleece out of my backpack. It was a good 15-20 degrees colder (and much windier) on the summit. We enjoyed a snack, took our photos at the summit sign and marveled at the views. I especially liked looking across and seeing the Kinsmans, Franconia Ridge and the distant Presidentials.
Mt. Moosilauke is the first New Hampshire peak on the Appalachian Trail that includes an alpine zone. Below: Coming out of the trees; The final push to the summit; At the summit marker.
Leaving the summit, we briefly followed the white-blazed Glencliff trail (which is also the Appalachian Trail across this mountain) to its junction with the Carriage Road. This section of trail was almost perfectly flat and went through more areas that resembled large groupings of Christmas trees. We could have taken a detour to visit the South Peak of Moosilauke, but we decided to skip it.
The Carriage Road was wide and graveled, but a little steep. I can’t imagine people coming up this route in horse-drawn carriages! This part of the hike was pretty uneventful, and we were glad to finally reach the Snapper Trail.
The Snapper Trail descended gradually through stunningly beautiful New England woods. There were thick beds of moss, peeling white birches and several small bubbling streams. It was a lovely way to bid farewell to New Hampshire trails. Before we knew it, we were back at the Ravine Lodge and finished with a productive week of hiking!
Adam Says…
Mt. Moosilauke was one of the three hikes we most wanted to do in New Hampshire. Having hiked Mt. Washington and Franconia Ridge earlier that week, we were feeling a little tired and sore but we decided to press on to cover Mt. Moosilauke. We try to get a lot accomplished on our vacations, so we didn’t want to have any regrets of not doing a certain hike. We always say that we can be tired when we go back to work, so we run ourselves ragged on our vacations.
Parking at Mt. Moosilauke can at times be a challenge. There is one long gravel road and during the summer, you will likely see cars lining one side of the road, parallel parked. We had to drive to the end of the road and then turn around and backtrack, but we were able to find a decent spot since we left so early in the morning.
We first visited the lodge and you can just imagine the history here. The lodge is rustic but has that snuggle-by-the-fire cozy feel to it. Since this is maintained by an Ivy League school, my mind began to wonder if there were academic secret society meetings held here or if famous alumnus, Robert Frost penned any of his poetry here. All I witnessed were a few students playing Magic: The Gathering in the basement.
The first trail we used for our descent was the Appalachian Trail, also called the Glencliff trail in this area. Below: Christine makes the descent; Looking back through the pines toward the summit; Alpine zone marker.
The trail had us a little confused to start off on the right path. My recommendation would be to go to the back of the lodge and as you are looking into the backyard, head down the lawn towards the right. You will soon come to a path that will lead you to the Baker River. In a short distance, you will cross the bridge over the river. The Gorge Brook Trail starts off to the left. The trail takes a right turn in a short distance and you begin a moderate ascent through a very rocky trail. You’ll hear the sounds of the Gorge Brook to the left of the trail at times as it carries water to the Baker River. As you keep climbing, at .6 miles you will reach the junction with the Snapper Trail, your return route. The trail has been rerouted at this point with the Wales Carter Connection. Follow the signs through this .5 mile connection to continue along the Gorge River Trail. The trail continues to ascend through a steeper section of trail through the woods.
At 2.3 miles you reach a break in the trees and can see your first views of Mount Carr, Mount Cardigan, and Mount Kearsarge. The trail continues to ascend and then loops back around to the northwest as you gain some more views from the area known as The Balcony at 3.0 miles. The views were quite delightful and gave us something else to focus on as we labored up more rocky steps. The trail then ducks away from the views and you find yourself soon immersed into a dense forest of spruce and fir as the trail snakes through. You will see signs reminding you to stay on the trail to protect the fragile vegetation. At about 3.25 miles, you will come out of the trees and into the open alpine area. Large cairns are placed on the side of the trail. The summit looks misleadingly close, but due to the open nature it still takes about 10 minutes to reach the summit at 3.5 miles.
At the summit, the wind had picked up quite a bit across this vast, open area. We found lots of people huddled up against rocks, trying to protect themselves from the wind. We ate some lunch on the trail, snapped a few photos from the summit, and made our way back on a different set of trails.
The Snapper Trail was delightfully green and shady. Below: Adam descends the Old Carriage Road; The Snapper trail was mossy; Water crossing on the Snapper Trail.
From the summit marker, we followed the signs for the Glencliff Trail (also known as the Appalachian Trail) southwest of the summit. This trail started off as a ridgeline hike which gave us even more views along the way to start our hike. At 4.4 miles, the Appalachian Trail ducks off to the right to take you to the South Peak summit. We stayed on the main trail which is the Moosilauke Carriage Trail, which drops steeply down the rocky “road”. The trail was fairly uneventful, but the downward climb can be hard on the knees. At 5.7 miles, we reached a junction and took the Snapper Trail. This trail was thickly wooded and had lots of beautiful fern along the trail. At 6.4 miles, we rejoined the Gorge Brook Trail and made our way back to the lodge, which we reached at 7.2 miles.
The trail returns to the Ravine Lodge. Below: Looking back toward Mt. Moosilauke; A pleasant patio spot to take in views of the summit; Lodge decor
One thing that amazed me about this hike is how Dartmouth College has integrated with and adopted this mountain. They maintain and run the lodge and the network of trails is maintained by students in the Dartmouth Outing Club. We had the opportunity on our visit to New Hampshire to step on the campus and actually walked into the Dartmouth Outing Club building. Yes, this college has a building designated for this club and they even post information for Appalachian Trail thru-hikers to get them connected to where they could stay for the night. I was amazed at how the students have made this a strong tradition of caring for the mountain and environment. They even hold freshman pre-orientation trips where they all meet up at the Ravine Lodge. I wish more colleges and universities had more intentional connectivity with the outdoors.
What a great last hike for our trip to New Hampshire! We felt so blessed to have great weather for the entire week and our hiking adventures whetted our appetites for more trips in the future.
Directions to trailhead: From Interstate 93, take exit 32 for NH-112 toward North Woodstock/Lincoln. Follow NH-112 West for 3.2 miles. Take a slight left onto NH-118 S/Sawyer Highway. Follow this for 7.1 miles. Take a right on to Ravine Road. Follow this gravel road for 1.5 miles. The entrance to the lodge is on the left. Go behind the lodge across the lawn to the right to start the hike.
* MapMyHike is not necessarily accurate, as the GPS signal fades in and out – but it still provides some fun and interesting information.
This 4.5 mile ascent of Mt. Washington follows challenging, steep, slick terrain along a ravine that showcases waterfall after waterfall. Once you clear the treeline, you are treated to a hut visit and some of the most dramatic alpine walking in the east.
From Lakes of the Clouds Hut, you follow the Crawford Path (America’s oldest continually used hiking trail) to the summit of Mt. Washington. In this photo, you can see the summit and its weather towers looming in the distance. Below: The trailhead begins near the cog railway on Basecamp Rd; The beginning of the trail is deceptively easy; There are many water crossings en route to the top – some easy, some not so easy.
Adam Says…
Hiking to the summit of Mount Washington (also known as ‘the most dangerous small mountain in the world‘) was definitely a bucket-list item for me. Making it to the top of the highest peak in New England feels like an accomplishment and we definitely have memories from the hike that we will never forget.
We arranged for Christine’s parents to meet us at the top and shuttle us back to our car. Many people descend by trail, but there is a hiker shuttle and a limited number of seats available on the Cog. It’s important to note that you should always be prepared and have a plan for walking off the mountain. Trains and shuttles book up quickly and the auto road closes from time to time. Ultimately, you are responsible for your safety and the manner of your descent. Visit New Hampshire’s Hike Safe site so you can learn more about mountain safety and the state’s expectation that every hiker be prepared.
The entire Ammonoosuc Ravine trail followed a stream which tumbled down the mountainside in waterfall after waterfall. Below: Lakes of the Clouds advertisement; The early parts of the trail are rocky, but only slightly uphill.
As we were driving along the road to the parking lot, the sky was completely cloudy. The online forecast said it was going to be a perfect day, but the clouds were saying something different. We hoped that the weather would push off and made it to the parking lot. We packed some extra gear knowing that the temperature was going to be much cooler at the top. We started off from the parking lot and filled out our parking permit, enclosing $3 in an envelope to allow us to park in the lot. The parking lot was already getting full and we could tell that all the people getting ready to hike were in great shape. We hoped we were ready for the challenge and started on the Ammonoosuc Ravine Trail from the end of the parking lot. The trail started off relatively flat through a thickly forested area. At .25 miles, we reached a stream crossing. Because a heavy rain fell just the day before, the crossing, which is normally easy, presented a real challenge. We saw a few others cross in different areas, but ultimately decided the best route was tightrope-walk across a thin log that spanned the creek. This is always more unnerving when you are carrying expensive camera gear, but we made it across without a hitch. We were worried how many other crossings we would have to make seeing the Ammonoosuc River on our trail map coming ahead.
At 1.0 miles, the trail reached the Ammonoosuc River, but the trail turned quickly to the right. We saw the rushing water of the river and glimpsed up at the sky, which looked less foreboding than earlier. The trail hugs the riverside and begins a steep ascent up a rocky slope. At 2.1 miles, we reached the Gem Pool, a serene swimming hole created by a small waterfall. We rock-hopped across to continue the path from the pool and stopped for a short rest in this peaceful area. After leaving the Gem Pool, the trail becomes very steep as you climb up the rocky slope. At 2.35 miles, a small trail to the right leads about .1 miles to The Gorge waterfall. I highly recommend checking out this waterfall, which you can see plunging over 100 feet. We returned from The Gorge and rejoined the trail. The trail continues its steep ascent and you can only imagine that you are climbing up a slope that seems to be as steep as the slope of the waterfall you just saw.
Christine crossing the water at Gem Pool. This is the point of the hike where the climbing starts getting serious. Below: Adam works his way uphill on the steepest part of the hike; It was seriously steep; One section had a little ladder to help you over the boulder.
We continued to climb up the very steep slope until we reached a great viewpoint at 2.7 miles. Along with the view, there were also multiple waterfalls falling in dramatic cascades. It was here that we were finally able to see that the clouds had moved off and we should have a gorgeous hike to the summit. The unnerving thing was that in order to continue the trail we had to walk across the top of a waterfall with a very precipitous drop to one side Due to the rain, there was no way to rock-hop across. We knew we had to put our feet in the water to make it across, but we couldn’t tell how deep the water was or how fast it moved. As we realized that a false step could have meant a long plummet down, it definitely gave us a gut-check to see if we could make it. We tried to look around for the best way to cross and decided to wait and let a few other hikers attempt it first. After learning what others had done, we followed suit and crossed without any difficulty.
The hike from this point continued to be steep as you climb along some areas of bare, slick rock. Eventually, we began to rise above treeline and were able to see Lakes of the Clouds hut seated on the edge of the ravine. The wind was already picking up and the cold wind had us switching into cold-weather clothes. To the left of the hut was the summit hike to Mount Washington and we could clearly see the Observatory Tower in the distance. We reached Lakes of the Clouds hut at 3.2 miles and decided to go inside to eat a snack.
One little spur trail on the steepest section of climbing led to this large and impressive waterfall called Gorge Falls. Below: Christine picks her way through boulders and across the water; Our first views into the Washington Valley; At the halfway point
Lakes of the Clouds Hut was built here over 100 years ago and has some interesting history. Two AMC members, William Curtis and Allen Ormsbee, were hiking up the Crawford Path to go to an annual AMC meeting at the Summit House on the top of Mount Washington in 1900. They reached what is now Mount Eisenhower and met 60 mph winds and cold temperatures. By the time they reach Mount Monroe, the temperature had plummeted to freezing and the rain became ice. Curtis died at Lakes of the Clouds and Ormsbee pushed on for help before perishing himself only a few hundred yards from the summit station. The storm lasted for 60 hours and their bodies were discovered. The AMC created a wooden shelter first near where Curtis had died. In 1915, the wooden shelter was replaced with a stone shelter and it has since had several additions and improvements made. It can accommodate up to 90 guests per night.
From the shelter, you can see a trail that leads up to Mount Monroe. If you are interested in peak-bagging a few of “the Presidentials”, it is a short but steep hike. We decided to save our energy and just tackle Mount Washington. We continued along the trail and soon reached views of the Lakes of the Clouds, which are actually more like mountaintop ponds than full lakes.
Since we were now above treeline, the hike to the summit of Mount Washington was now just a series of steps across boulders for the remaining 1.3 miles. The wind was incredibly strong and I believe gusts were at least 50 mph, which is considered more of a calm day on the mountain. The wind was blowing up the ravine to the left of our bodies, so there were times that we had to angle ourselves to fight the winds as we pushed onward. The views of the ravine and behind us were more breathtaking with each step. Whenever we stopped to turn around, the wind had our noses running from the cold and it was hard to even talk to each other through the force of the gusts.
Near the top of the headwall, there is a series of several impressive waterfalls and the scariest water crossing we’ve ever done. Below: This trail had so many waterfalls; Our first view of the Mt. Washington summit; Hikers coming out of the ravine.
At 4.5 miles, we reached the summit area. We followed the signs to the summit marker, that was crawling with people. Most people reach Mount Washington by car or by the cog railroad. When you pay to take the Mount Washington auto road, you receive a sticker that states “This Car Climbed Mt. Washington”. We waited our turn to get a picture with the summit sign. Some people were amazed that we had hiked up. We made our way over to the visitor center and snack bar. We had agreed to jokingly meet her parents by the “death plaque”, a plaque that shows a list of the names of people who have died on the mountain. When we arrived at the snack bar area, a group of hikers we had seen earlier on the trail whispered to us “there’s a hiker’s lounge downstairs”. While the upstairs area was crawling with people, the hiker’s lounge was quiet and nearly empty. We had a peaceful time to eat our lunch and then were able to meet her parents in about 30 minutes. From here, we jumped in their vehicle and enjoyed the car ride down the narrow road that snakes down the mountain. We stopped a few times along the way to catch some last views of the Presidential Range before we were back on the road.
The hike up Mount Washington was definitely something that Christine and I felt that we wouldn’t have been able to accomplish several years ago. I can’t think of any other time that I have felt such a sense of accomplishment after reaching this summit. We were so blessed with the great weather and we have already begun talking about how we could do an entire hut-to-hut Presidential traverse.
Christine Says…
With our days in New Hampshire running out and great weather in the forecast, we decided we had to tackle Mt. Washington. With a reputation for fickle weather, ice storms that happen at the height of summer, and gusts of wind that can blow a grown-man sideways, I wasn’t quite sure what to expect. The night before our hike, we were looking at maps and guidebooks and discussing our different route options. Across the living room, my mother was Googling ‘deaths on Mt. Washington‘, ‘failed hikes of Mt. Washington‘ and ‘accidents on Mt. Washington’. Comforting, right? She also told me to make sure I had the phone number for New Hampshire’s Fish and Game department on hand – they do most of the mountain rescues in the state. Her worries and cautiousness got into my head, and I went to bed feeling really nervous about my ability to make it to the top.
Adam approaches Lakes of the Clouds Hut. Below: Inside Lakes of the Clouds; We ate cake!; Wooden racks for carrying supplies.
On the drive to the trailhead, dark blackish clouds completely obscured the mountain. I said to Adam, ‘This is probably a bad idea.’ He reassured me, telling me he was certain the clouds would blow off, the day would be beautiful, and that we would have a great time. I let my worries non-verbally stew in the back of my mind. We parked, geared up and made our way down the trail with several other groups of people.
Within the first mile, we came to a rain-swollen stream with no clear way to cross. The rocks normally used to rock hop were all under rushing water. I tested a few spots, and ended up falling shin deep into water and wrenching my knee. I was feeling discouraged, because the only other potential crossing left was a thin, bouncy, moss-covered log that had fallen across the stream. I have problems with vertigo and balance, so situations like this really push me outside my comfort zone. Adam carried all the expensive camera gear, and I slowly and carefully stepped across that log. Phew! I told Adam if there were lots of crossings like this one, I didn’t think I could do the hike. He offered to turn back, but I told him that I wanted to challenge myself and keep going.
Fortunately, most of the hike followed alongside the stream with only a few much easier crossings along the way. Eventually we reached the Gem Pool. What a gorgeous spot! It’s a crystal clear, green, pool; fed by a cascading waterfall. It would be a great place to take a picnic and go for a swim. We did one more rock hop at the end of the pool and prepared ourselves to do some serious climbing!
Mt. Monroe looks like a small hill above the hut. Below: Mt. Monroe; The Lakes of the Clouds’ namesakes.
About 1600 feet of elevation gain comes in just about a mile of hiking after you pass the Gem Pool. It’s grueling and steep, but both Adam and I were well-prepared with all the hiking and other cardio we’d done to prepare for this trip. We were able to make the ascent without having to take a breather! The only stop we made along the way was the side trail to check out the Gorge Waterfall.
On the climb up, we started seeing glimpses of the valley through the trees. The majestic Mount Washington Hotel looked like a tiny red speck below. We’d come a long way up already! The remainder of the steep climb followed the Ammonoosuc River through the plunging ravine. Even when we couldn’t see the water, we could hear it.
Eventually, the trail exited from the woods onto a wide rock plateau. Above, we could see a waterfall falling in several distinct drops and below, we could see the water crashing over a steep, long drop. We decided to take a break and enjoy the view from the rocks. We sat for a minute taking it all in. At that point, I noticed I didn’t see the trail continuing anywhere. Horror dawned on me when I realized that the trail continued on the other side of the river. We saw two people cross it successfully, but I still wasn’t so sure. The water was fast and a little deep from the rainfall the day before. I had no idea how slick the rock under the water would be. The crossing had just a couple feet of flat width on the downhill side before the water dropped over a 100 feet down into the ravine. A slip at this crossing would almost surely be fatal. I took a moment to hyperventilate and freak out, and then I plunged across. This was followed by another ‘Phew – I’m still ALIVE’ moment.
Adam fights the 50-60 mph winds. Below: The hut grows increasingly tiny; Christine hikes along; There were several rock fields to cross.
After that crossing, the hike was less steep but a lot rockier. The trees were getting smaller and more stunted as we approached the treeline. We could see the summits of both Mt. Washington and Mt. Monroe looming above. Lakes of the Clouds Hut was in view, but distances are so deceptive above treeline. Everything looks so close, but it’s always further than you expect. I guess it’s a bit of an optical illusion when you don’t have trees to compare for scale.
As soon as we broke the treeline, just slightly below the hut, the wind was shockingly strong. I was hiking in long pants and long sleeves, but I had to add my hooded jacket right away. Even so, my face and hands were freezing! I was sure I had packed gloves. I usually keep a spare pair in all my backpacks, but I couldn’t find them anywhere. I ended up paying the premium price to buy a cheap pair of gloves at the hut (only to find the spare pair of gloves in a side pocket that night when we got home).
We took a twenty minute break at the hut and enjoyed some of the baked goods made by the Croo. Adam had pumpkin cake and I had chocolate cake. I had my phone with me, so I decided to take a look at MapMyHike to see how we were progressing. I found that Lakes of the Clouds actually has 3G service, so I posted an Instagram and a Facebook status from the hut. Ah… technology! 🙂
Adam pushes uphill against wind, over rocky terrain. Below: Spectacular Presidential Views; Christine has made a lot of uphill progress; Many cairns mark the way above treeline.
After our snack and rest, we were ready to tackle the last mile and a half of trail to reach the Mt. Washington summit. I can’t even describe how much I enjoyed this portion of the hike! The climb up the Ammonoosuc ravine had been moderately scary, physically challenging and really slippery, but the hike along the Crawford Path was pure, unadulterated hiking joy!
The Crawford Path was built in the 1800’s and originally used as a horse trail to the summit of Mt. Washington. The trail celebrated its 175th anniversary in 1994 and is the oldest, continuously maintained, hiking path in America. I felt so privileged to be walking someplace so beautiful and historic.
We spent some time exploring and photographing the glacial ponds that give Lakes of the Clouds its name. On this particular day, the pools were sapphire blue and covered with scalloped ripples from the brisk wind. It was spectacular and gorgeous.
We toiled along, pushing our bodies against the 50 mph winds. The alpine terrain was breathtaking and otherworldly. I’ve never seen mountain views like the ones I saw in New Hampshire on this trip. Between the walk along Franconia Ridge, and then the hike along the Crawford Path, I had my mind blown twice in one week. These places should be on every American hiker’s bucket list!
We made it to the top! Below: Adam makes the last push to the summit, The Crawford Path is also the Appalachian Trail; The summit was crawling with people who had driven or taken the cog to the summit.
The stretch of trail between the hut and the summit is a rock field. Sometimes the rocks are wide and flat, sometimes they are uneven, loose and pumpkin-sized. The trail isn’t so much a path as it is a series of cairns that keep hikers on course.
At first, the trail between the hut and Mt. Washington was pretty flat, but the final push to the summit required a little more steep climbing. The weather station towers looked so close you could almost touch them, but it turned out they were still about a half mile away.
We could tell we were getting really close when we started seeing more and more people in jeans, sneakers and sweatshirts milling about the trail. These were the car and train people! Eventually the trail emptied us out onto the summit. We passed the historic hotel-turned-museum – Tip Top House – and made our way over to the summit marker. We actually had to wait in line with all the car and train people to have our picture taken at the summit sign. It’s always funny to finish a hike that has a summit that can also be reached by car – Clingmans Dome comes to mind (the high point on the Appalachian Trail).
The cog makes a few daily ascents/descents of Mt. Washington. Below: The crowded summit building; The Mt. Washington Hotel sits below the mountain – what a beautiful day!
After taking our obligatory summit photo, we grabbed some drinks and hot dogs from the summit building’s snack bar and waited in the hiker’s lounge. My parents still hadn’t arrived, so we had about a half hour to kill. It made me wish we actually had taken the time to do the short side-trip climb to the summit of Mt. Monroe when we had been at Lakes of the Clouds. I just didn’t want to leave my parents waiting in case we took longer than expected. I didn’t want them to worry more than they had to.
Every 10 minutes or so, I ran up the stairs to look for my parents. On the third trip up, I spotted my father and my (nervous-looking) mother waiting by the death sign. I know it sounds kind of mean to have them meet us there, but honestly, it’s the easiest ‘landmark’ to find in the summit building. The place is so crowded that you can’t really say ‘meet me by the snack bar, museum or gift shop’. My parents were both relieved and impressed by how quickly we’d made it to the top.
Honestly, other than the two nerve-wracking water crossings, the hike up Mt. Washington was not nearly as difficult as I expected. The elevation gain was challenging, but I think it would be doable for most reasonably fit people. And the walk from Lakes of the Clouds to the summit was a pure pleasure, and definitely one of my most memorable hikes ever!
Difficulty – 5. The steepness of the hike is no joke. The winds and weather possibilities just add to the difficulty.
Trail Conditions – 3.5. The trail is well-maintained, but there were some stream crossings, loose and wet rock that made this tough in some parts.
Views – 5. Once you rise above treeline you have great views of the ravine. The view from the top of The Gorge is also nice.
Waterfalls/streams – 5. You get the rushing waters of the Ammonoosuc River, the Gem Pool, The Gorge waterfall, and Lakes of the Clouds.
Wildlife – 1. We didn’t see much other than squirrels. Some moose have been spotted near the lower parts of the trail.
Ease to Navigate – 4. Junctions were clearly marked. The hike from Lakes of the Clouds to the summit could be difficult on foggy/rainy days, but follow the cairns.
Solitude– 2. On a gorgeous day, there were lots of people. But, due to the danger of hiking this trail, that is probably a good thing to have others nearby. We were always able though to find our own space to enjoy views.
Download a trail map (PDF)
Directions to trailhead: From Interstate 93, take exit 35 to merge on to US-3. Take US-3 for 10.4 miles and then take a right onto US-302 East. In 4.4 miles, take a left on to Base Station Road. Follow this about 5.7 miles until you reach a large gravel parking lot on the right. The trailhead can be found as you entered on the lefthand side of the lot.
* MapMyHike is not necessarily accurate, as the GPS signal fades in and out – but it still provides some fun and interesting information.
This 3.3 mile hike is one of the easiest and most accessible ‘hut hikes’ in the White Mountains. Lonesome Lake is beautiful and the hut provides a nice place to stop for a picnic lunch.
Lonesome Lake is beautiful and one of the easiest, most accessible ‘hut hikes’ in the White Mountains. Below: The trail for Lonesome Lake starts in the campground; Adam climbs the trail; As is the case with most New Hampshire trails, the path to Lonesome Lake is rocky and rooty.
Adam Says…
After our hike on Franconia Ridge, I had to take a day off to let my leg muscles recover. When we were ready to tackle another hike, we decided to do something on the easier side this time that didn’t have nearly as much elevation as our previous hikes. While we were hiking up the Franconia Ridge Trail, we noticed this serene lake in the far distance.
We started off our hike from the opposite side of I-93, so we walked underneath the interstate bridge and followed the signs for the Lonesome Lake hike. This led us into Lafayette Place campground, which has 98 campsites. With such nice weather we were having, it was no surprise that the campground was full. It always feels awkward to me to be walking by campsites while people are still sleeping, eating breakfast, or hanging out. We made our way along quietly and then reached the true trailhead next to campsite #93.
The Lonesome Lake trail consisted of a steady climb through sections that are covered with roots and steep rock steps. At 1.35 miles, we reached the ridge and came upon our first glimpse of Lonesome Lake at a junction point with several other trails. We stopped for a quick breather and to enjoy the view of the lake, a remnant of a glacier that had carved out the mountains. The uphill hiking was over, and we headed left on the Cascade Brook Trail, which winds around the side of the lake. The trail was boggy in many spots, but there were often footbridges, rock steps, or logs to walk on in the muck to make our way across easily. On our way, we passed a croo member from Lonesome Lake who was heading down the mountain with a wooden frame loaded with outgoing refuse from the hut.
The mountains reflect in Lonesome Lake. Below: There are lots of trail junctions when you reach the end of the lake; The trail around the lake is muddy and traversed by planks and stepping stones; Climbing the stairs to Lonesome Lake Hut.
At 1.6 miles, we reached the junction with the Fishin’ Jimmy Trail. We took a right on to this trail and in a short distance we came to a large dock on the lakeside. There were a ton of teenagers on the dock, so we decided to check this out later. Right above the dock was a series of steps that led to the Lonesome Lake Hut. When we arrived in the hut, there was nobody there except for a few croo members. One was cleaning up the kitchen and the other was packing her frame to take down the mountain. We talked to her for a while and found out that they make several trips a week down to the base of the mountain where they meet up with someone to help them resupply for their trip back to the hut.
We rested a while on the back porch of the hut and talked to a family that was visiting from the Netherlands. They were on their way to visit Shenandoah National Park soon, so we gave them some tips on where to stay in the park and some of the things we would recommend they do while in Virginia. The large group of teenagers had cleared out, so we went to the dock to enjoy views of the southern end of the lake (now occupied by several families with toddlers). We made our way back the way we came to finish the out-and-back hike.
The inside of Lonesome Lake Hut is cozy, bright and cheerful. Below: Adam enjoys a nice seat on the large porch overlooking the lake; Whoopie pies and mountain views; The Lonesome Lake dock gets crowded!
We could tell from the people that we saw climbing up that this is a highly-trafficked hike. We hope in the next few years to do a larger hut-to-hut traverse across this area. It was nice to see a possible overnight location in advance. This is an easier hike that most families should be able to do if they take their time.
Christine Says…
After hiking Franconia Ridge, we decided to take a day off and be restful tourists rather than ambitious hikers. We spent the day visiting Dartmouth College, sampling Long Trail Ale, gorging ourselves on Cabot Cheese and watching glassblowers at Simon Pearce. The next morning, we were ready to get back on the trail. Adam’s knees and calf muscles were still bothering him, so we went with the easy hike to Lonesome Lake.
Lonesome Lake is lovely glacial pool sitting between North Kinsman and Cannon Mountains. The initial ascent to the lake is a little steep – about 1000 feet over 1.3 miles, but compared to many other hikes in the area, it’s considered a very easy trail.
When we began our hike, the morning was cold and sort of grey. The forecast called for brilliantly sunny weather, but you just never know what you’re really going to get in the White Mountains. We meandered through the Lafayette Place campground to reach the trailhead. The smell of campfires and cooking bacon was heavy in the air. That smell always makes me so nostalgic for the camping trips of my youth. My mom was a great camp cook – there were always sausages, bacon, pancakes and eggs. Nice memories…
Each hut is run by a ‘Croo’ – mostly college students on summer break. They carry supplies for the hut on their backs using these wooden racks.
The hike up to the small plateau where the lake sits is uphill and pretty, but generally unremarkable. Like most New Hampshire trails, you can expect to see lots of rocks and roots along the way. As you climb, the woods change from predominantly hardwood to a heavier evergreen mix.
At the tail-end of the lake, there was a junction sign with different trail options headed in many different directions. We followed an almost completely flat trail around the perimeter of the lake. We caught lots of glimpses of the water through the trees, but the most memorable feature of this trail was the mud! Thankfully, the trail is well maintained and rocks and planks were strategically situated the entire way, and we never had to get our boots muddy.
At the head of the lake, we crossed a wooden footbridge that came out between a wooden staircase and a lakefront dock. Since the dock was packed with kids from a summer camp group, we decided to check out Lonesome Lake Hut before enjoying the water. We climbed the stairs and found a charming cluster of wooden buildings that make up the ‘hut’. Unlike Greenleaf Hut, which is in a single building, Lonesome Lake Hut is a collection of cabins and a main dining room.
A couple members of the Croo were still cleaning up from breakfast. And of course, Adam managed to snag more free leftover pancakes! If you have a spare minute, check out this fun video about the 2013 hut Croo. If I had known there was such a job opportunity as ‘AMC Croo Member’ when I was in college, I would have leapt at the opportunity. It sure would have been more fun than filing procurement paperwork for the Army Corps of Engineers! (no offense to ACoE).
Christine sports her new knee brace. Below: The beautiful lake; Beginning the climb down; The ranger station at the base of the mountain.
At Lonesome Lake, we met another croo member who was loading up her packboard with empty boxes and other outgoing items to carry down the mountain. She said the trip down is typically a lighter load than the trip up, which includes food and other supplies. The AMC has a fun article about Packboarding Legends. Can you believe some people have carried packboards weighing over 100 pounds? The average is more in the 40-80 pound range, which is still extremely impressive!
After looking around the hut for a few minutes, we found a couple pleasant Adirondack chairs to relax upon. The back porch of Lonesome Lake hut is a great place to idle away a pretty summer afternoon. While we relaxed, the sun came out, making it even nicer for sitting. I shared a whoopie pie with Adam. We also had a very nice conversation with a family visiting from the Netherlands. They were greatly enjoying the expansive, forested terrain of New Hampshire – something they said they have little of at home.
After a while, we made our way back down to the lakeside dock. We found it still crowded, so I took some photos and didn’t linger for long. The hike back went very quickly. We saw lots of families hiking up to spend a night at the hut. I hope we’ll have the opportunity to do a hut stay on our next New Hampshire trip.
Difficulty – 2.5. The climb up was fairly steep, but because of the short distance, you can take your time.
Trail Conditions – 3.5. The trail is well-traveled and in good condition. There are some steeper sections and some worn-out areas that do require careful footing.
Views – 2. You do get views from the lake of the mountains around you, but the height of the mountains around the lake keeps you from getting distant views.
Waterfalls/streams – 4. While you don’t have waterfalls and very limited stream views, you are rewarded with a massive lake on this trail.
Wildlife – 1. We didn’t see anything on this hike other than squirrels.
Ease to Navigate – 3. There are some confusing spots where you wonder where the trail is leaving the campground. Also, the junction at the ridge has a lot of different trails to follow. Read the signs and you should be fine.
Solitude– 1. On a clear day, this hike is likely crawling with people.
Download a trail map (PDF) – Coming soon!
Directions to trailhead: Head north on I-93 until it becomes Franconia Notch Parkway. Pass exit 1 and the exit for the Basin. Take the next exit (for trailhead parking). Park in this parking lot. Leave your car and head underneath the bridge that is I-93. Follow the signs for the Lonesome Lake trailhead, going into the Lafayette Place Campground. The trailhead leaves near campsite #93.
* MapMyHike is not necessarily accurate, as the GPS signal fades in and out – but it still provides some fun and interesting information.