Rocky Mountain

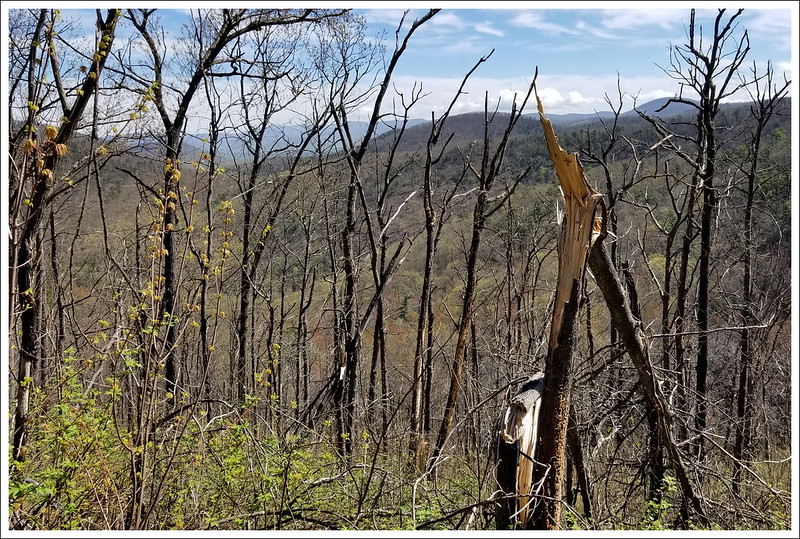
Are you looking for a short hike with great views? This 3.2 mile route takes you through fire and storm-damaged terrain to a stunning vista on Rocky Mountain (not to be confused with Rocky Mount – another nearby hike in Shenandoah).

View the Full Album of Photos From This Hike

Rocky Mountain View
The nice view from Rocky Mountain on the Brown Mountain Trail. Below: The trail starts in an opening in the wall at the Brown Mountain Overlook; The very beginning of the trail has nice views; This area was heavily damaged by the 2016 fire and again by the 2018 ice storm.

Rocky Mountain Start Rocky Mountain Start 2016 Rocky Mount Fire in 2019

Adam Says:

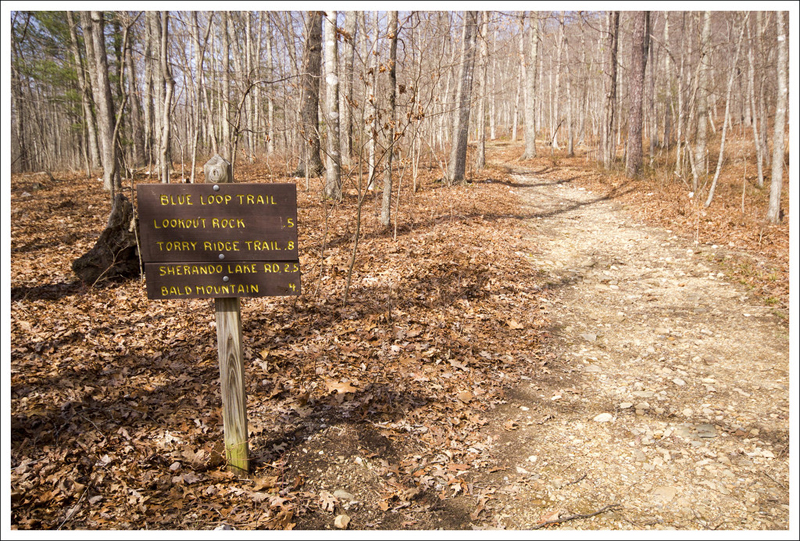
We were trying to find a new hike to cover and I started looking through a PATC map of the southern section of Shenandoah National Park.  I noticed there was a trail off one of the overlooks that we hadn’t done before and then I was sold when I saw the icon they use for views.  Due to some of the twists and turns, it was hard to tell how far the trail was going to be before we got to the views, but we felt this was definitely worth exploring.

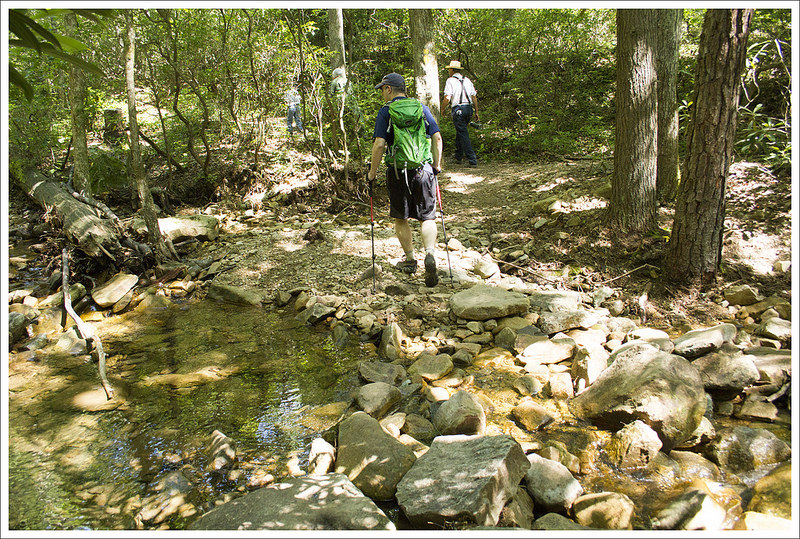
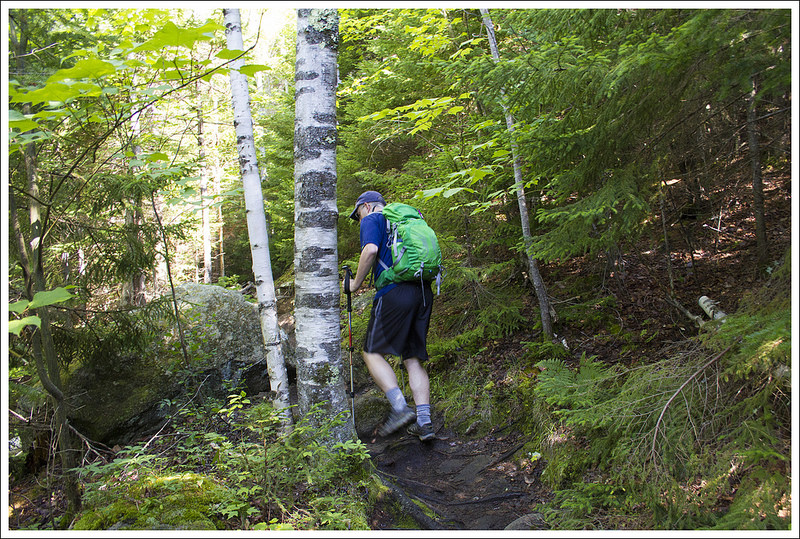
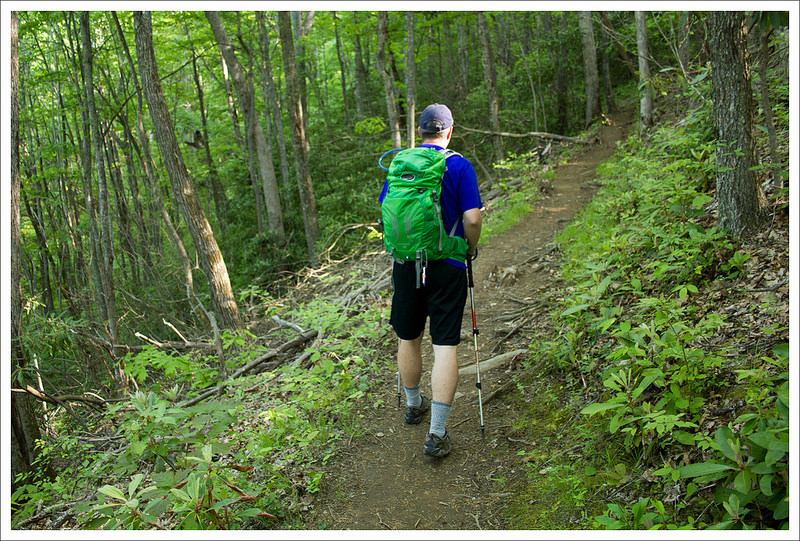
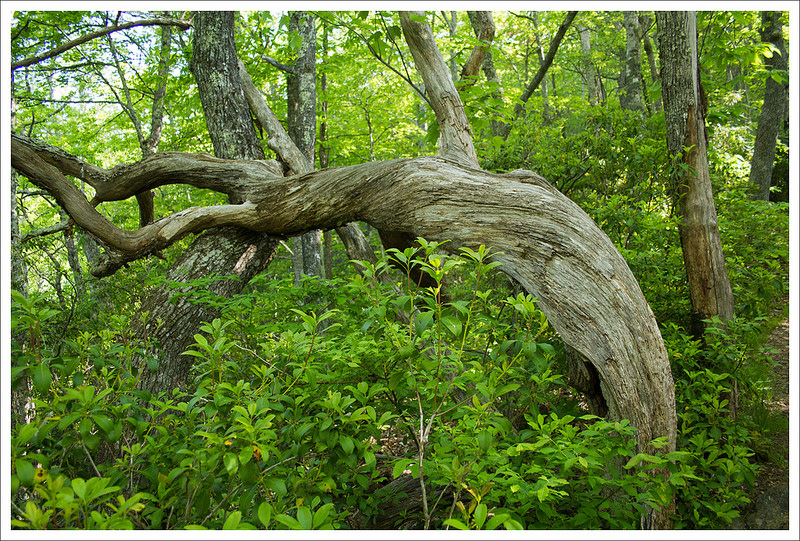
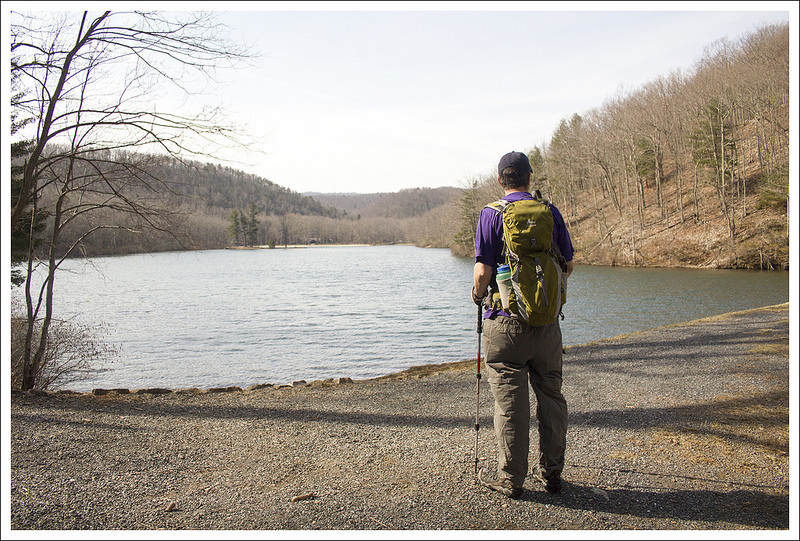
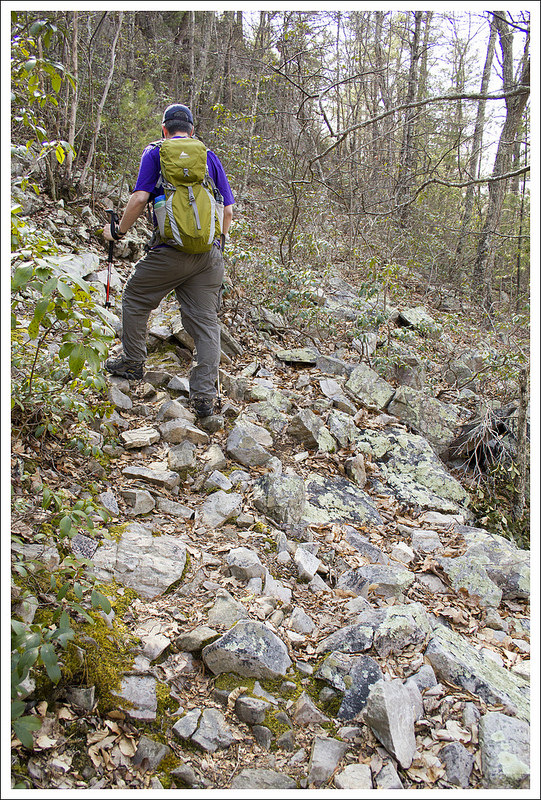
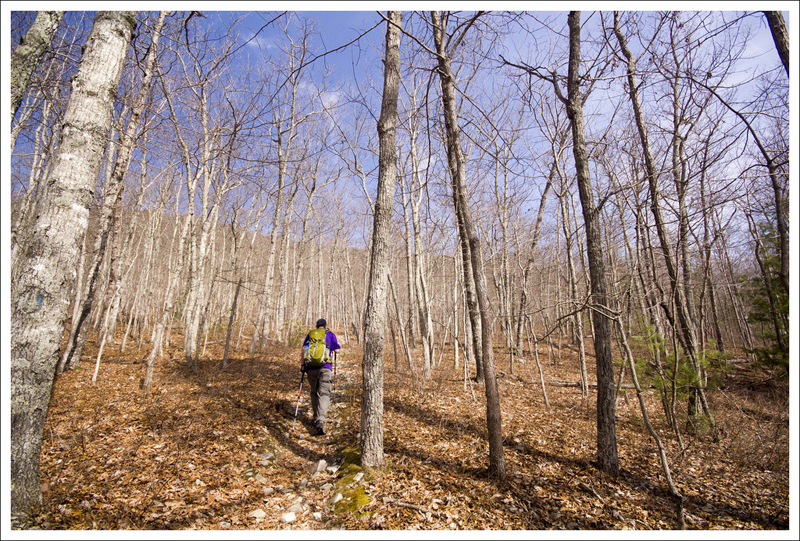
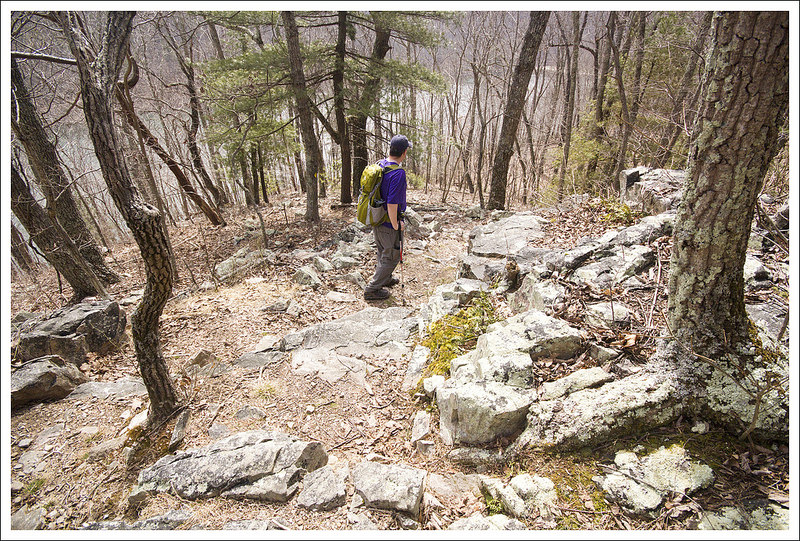
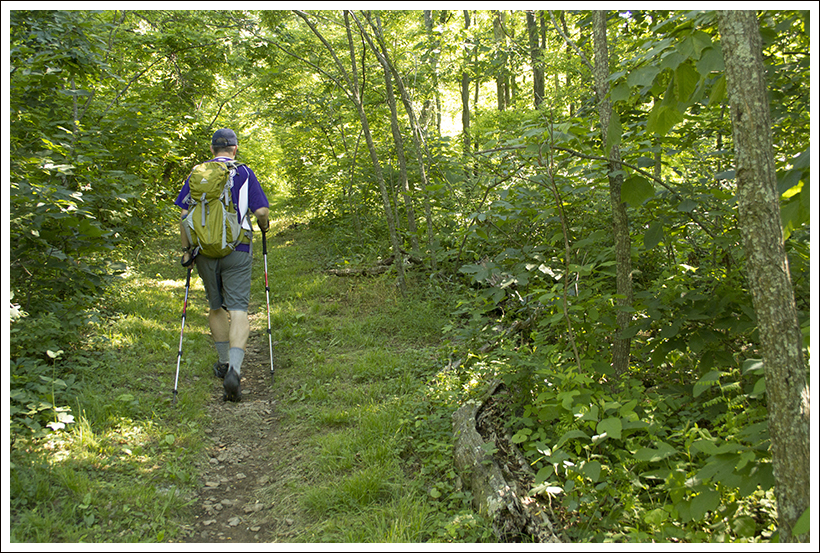
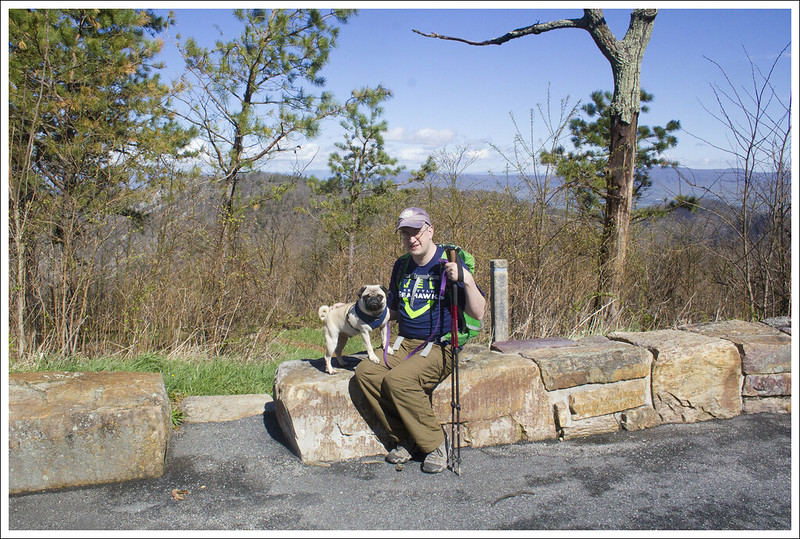
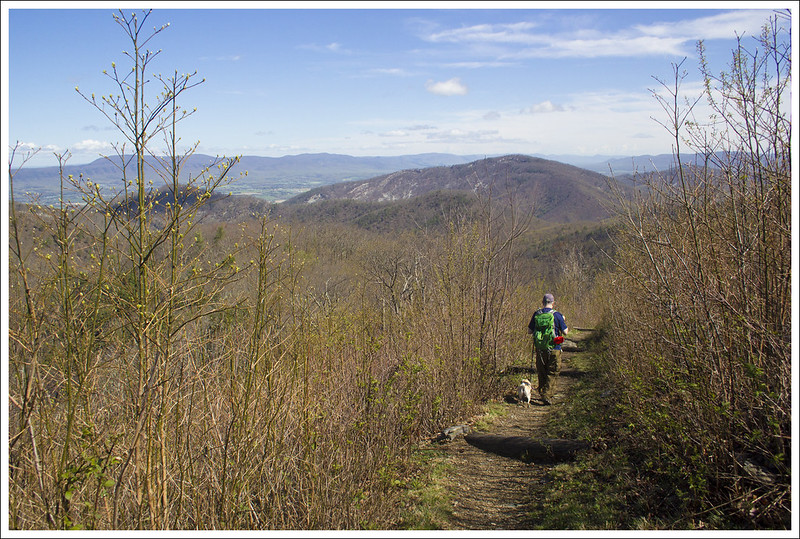
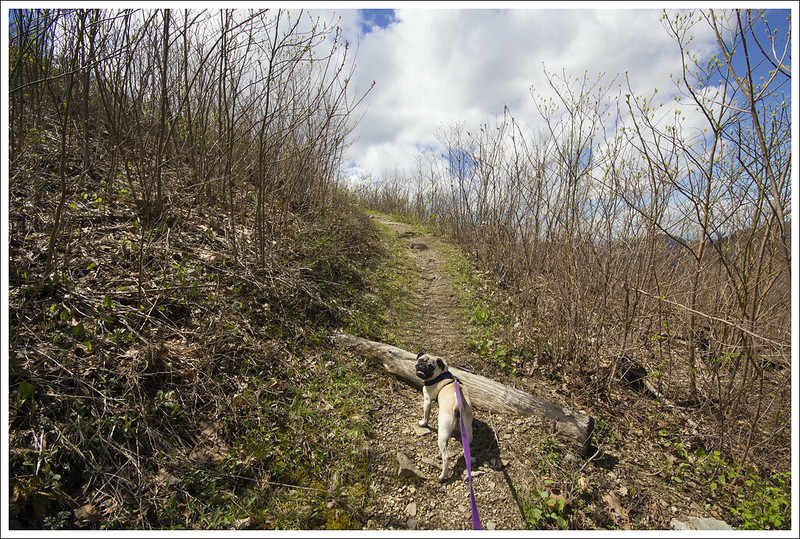
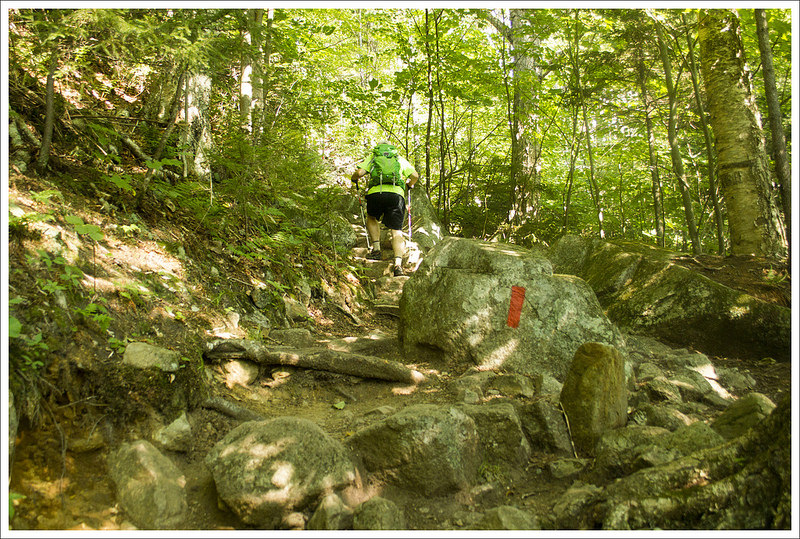
We started off from the Brown Mountain overlook, close to mile 77 on Skyline Drive.  This Brown Mountain trail starts at a break of the rock wall.  The trail winds down and provides some instant views (and you can actually see the rocky outcropping you will reach).  The trail soon ducks down into some more wooded areas and winds down on a steeper descent – keep in mind you have to hike back up at the end of this out-and-back hike.  You will see a lot of the fire damage that hit this area a couple of years ago with charred logs along the way, but nature has bounced back nicely.  At .6 miles, you reach the bottom of your descent and soon reach a junction with the Rocky Mountain Run Trail which takes off to the left (you could make this a larger 10+ mile loop by coming back this way).  Stay on the Brown Mountain Trail and you will begin to ascend again.  The ascent will ultimately take you close to the elevation you started on this hike, but you will have close to one mile to gain that elevation, so you will find the trail more manageable of an ascent at this point.

Brown Mountain Trail
Adam climbs the Brown Mountain Trail. Below: Our start point is marked by a red circle in this photo; Sessile belwort; Dwarf iris.

Start Point Sessile Belwort Dwarf Iris

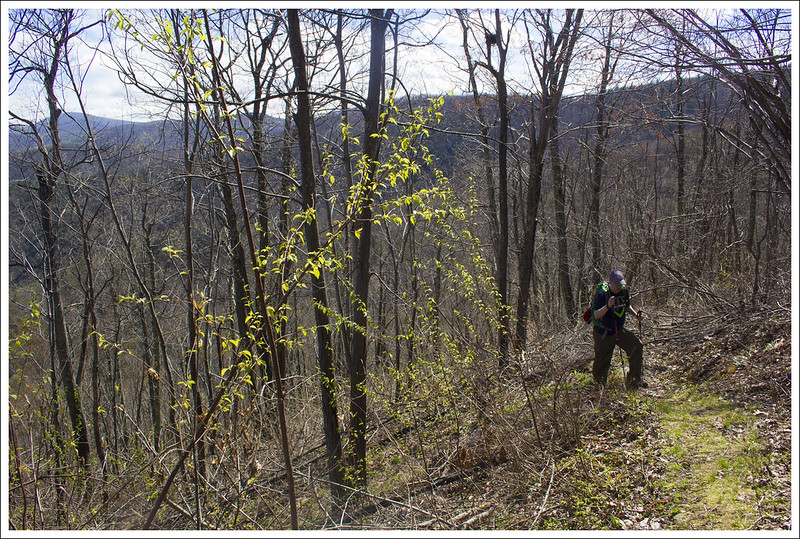
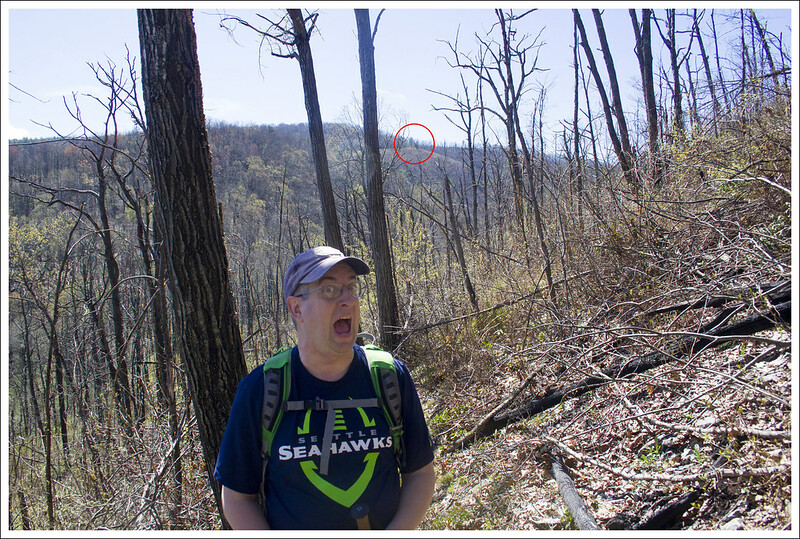
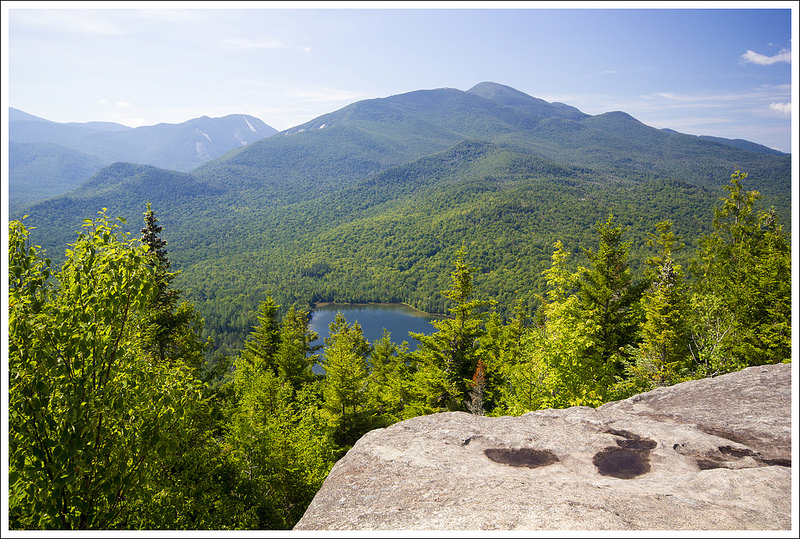
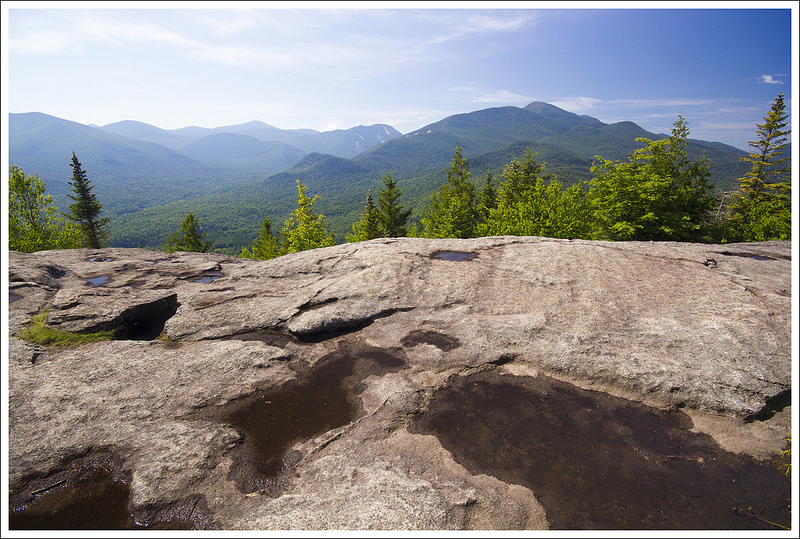
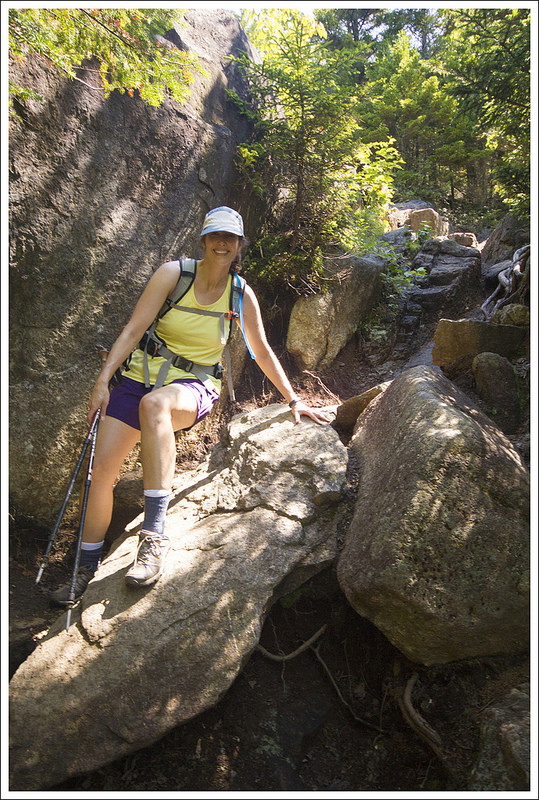
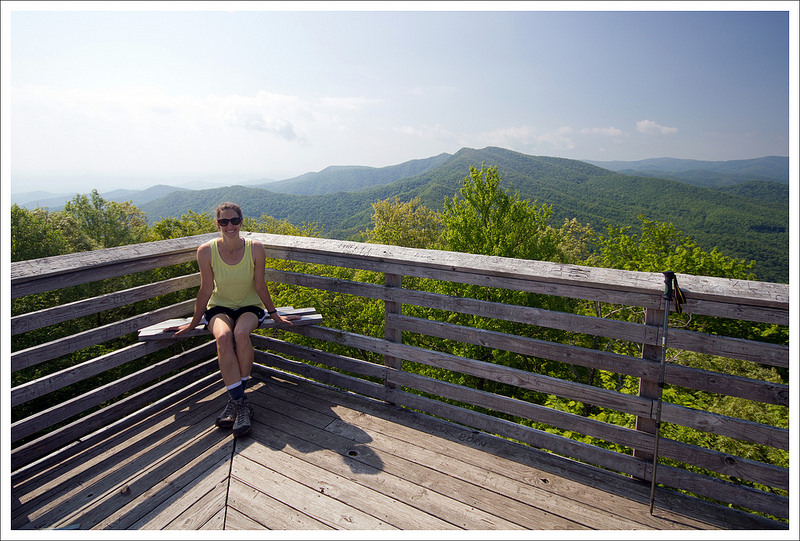
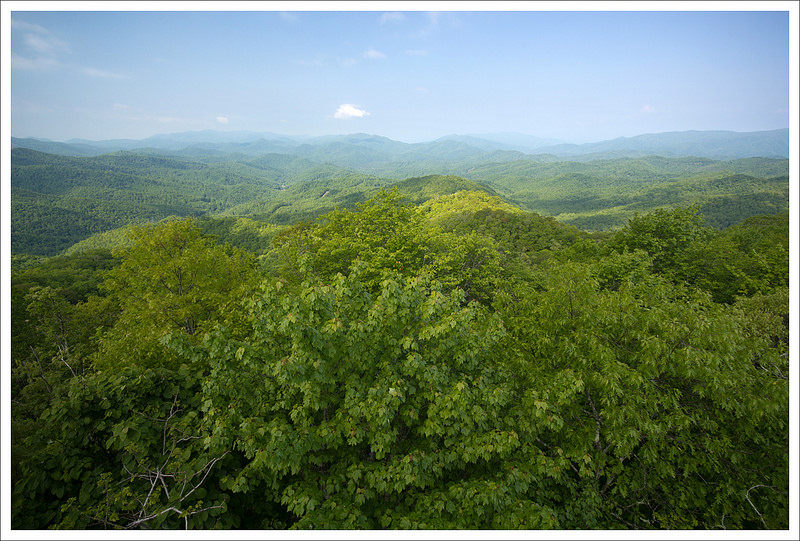
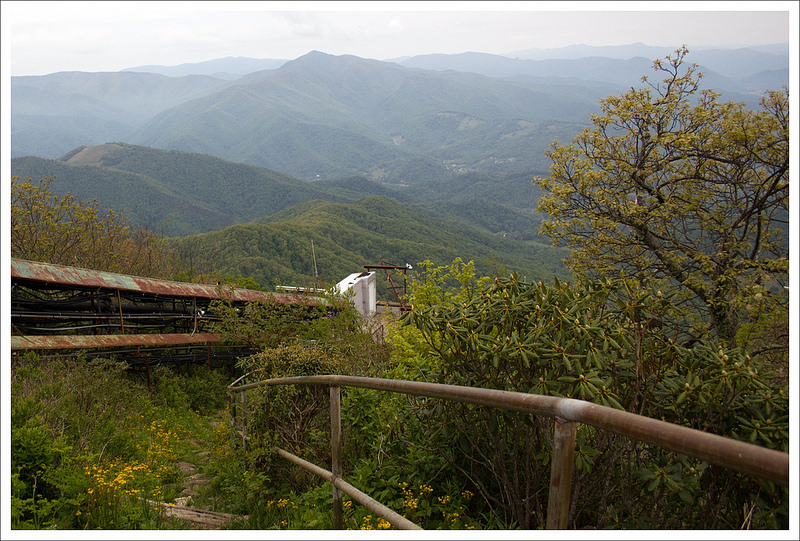
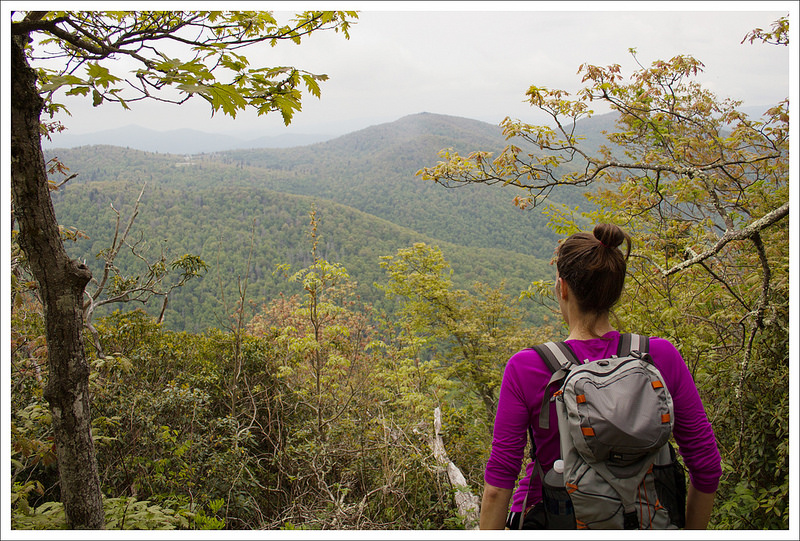
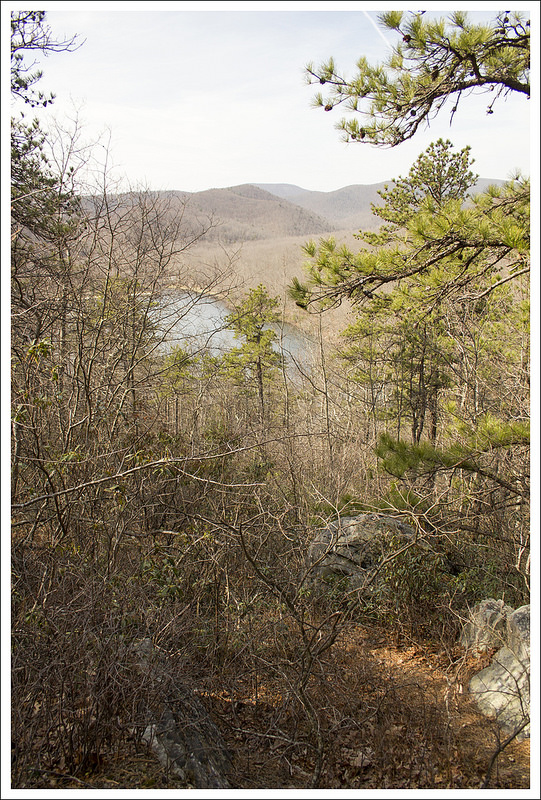
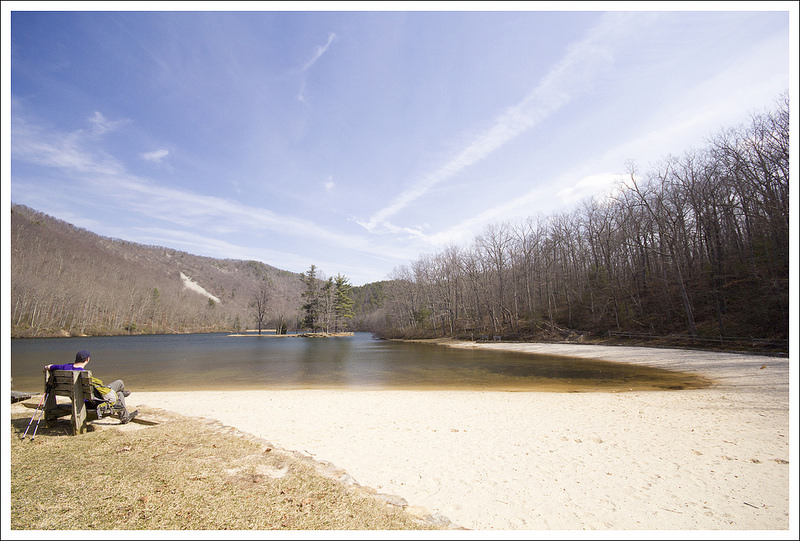
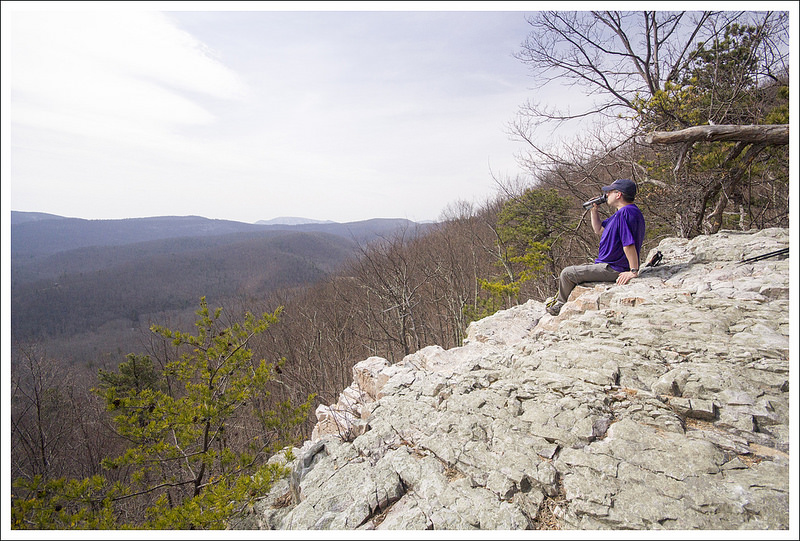
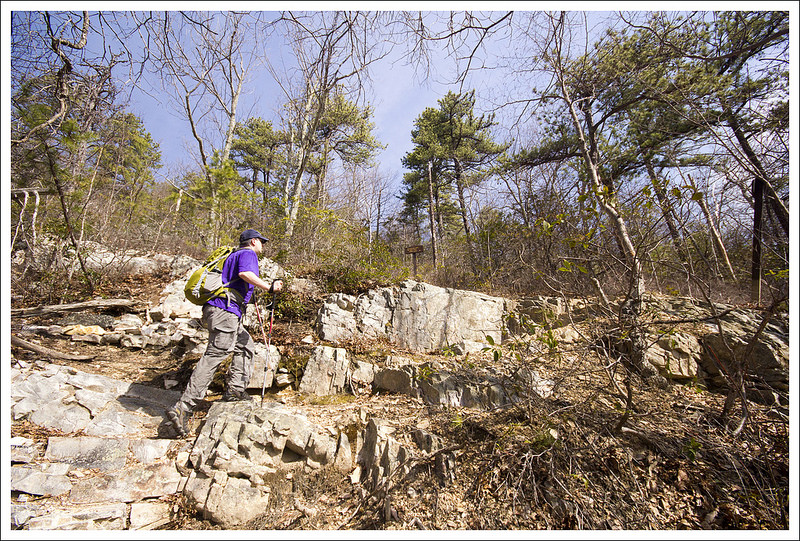
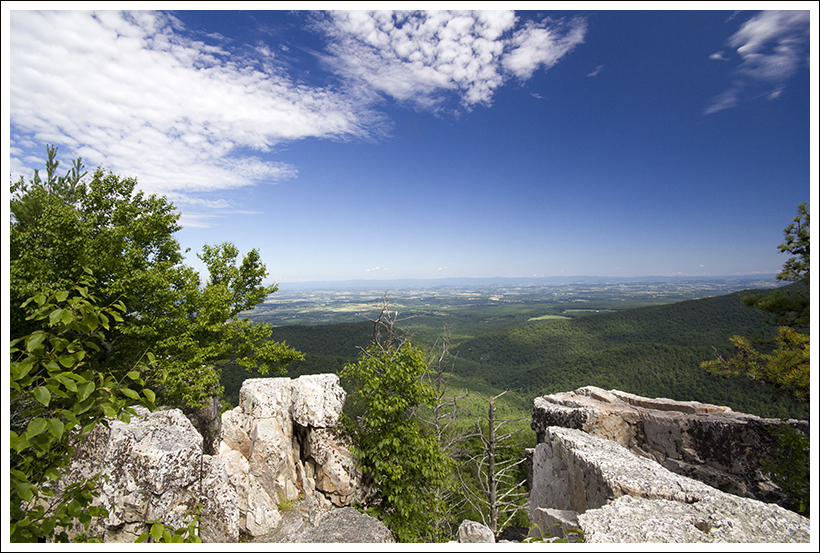
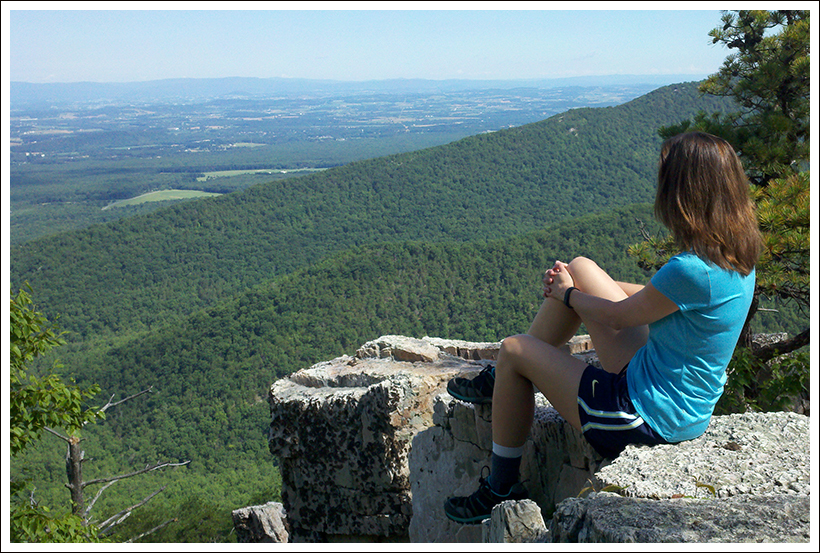
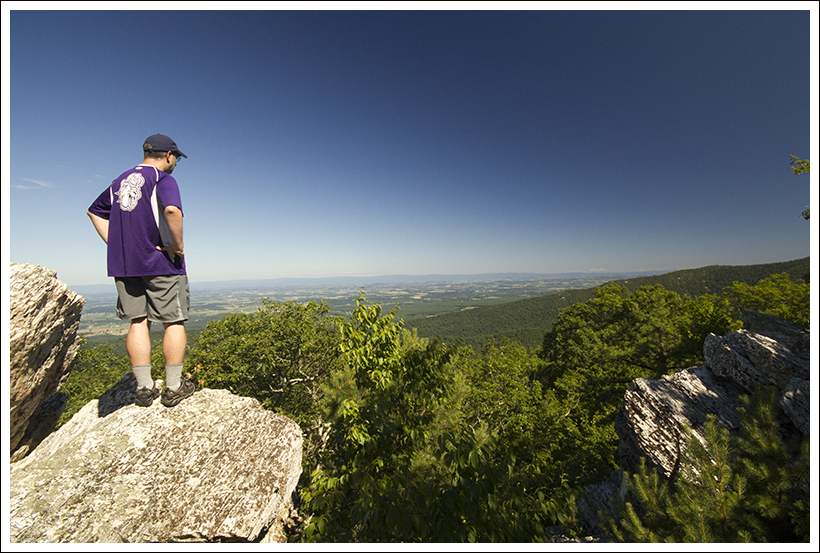
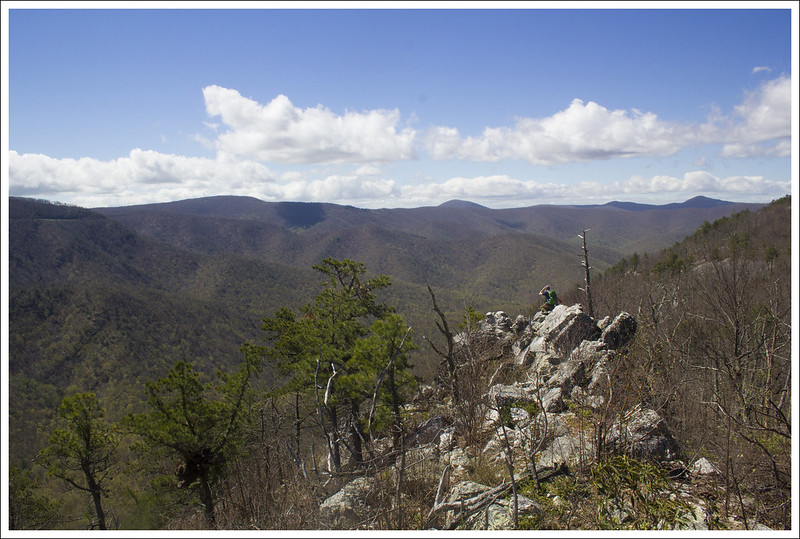
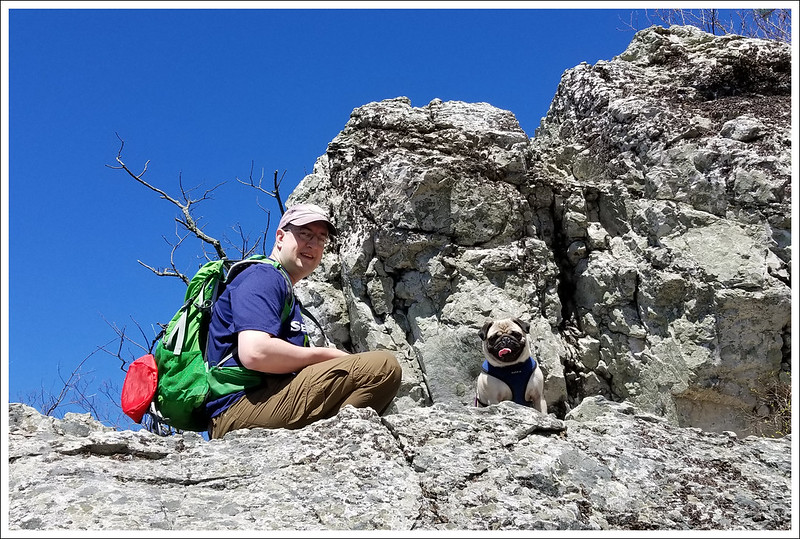
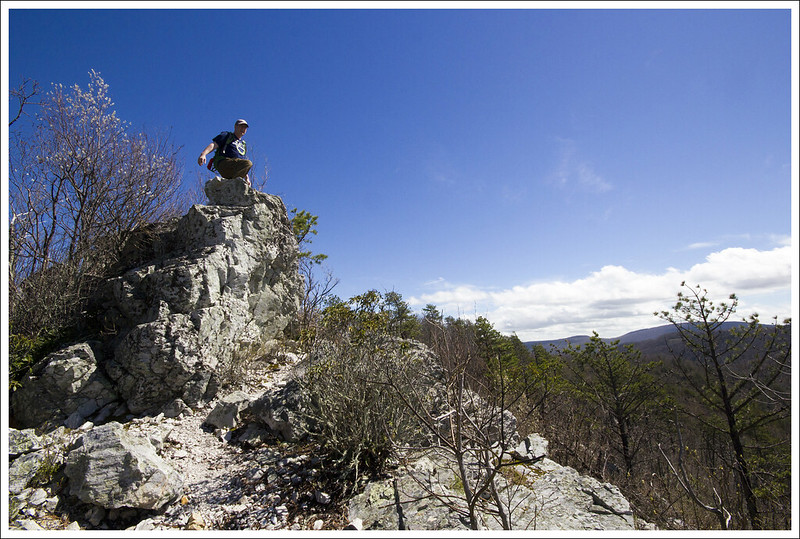
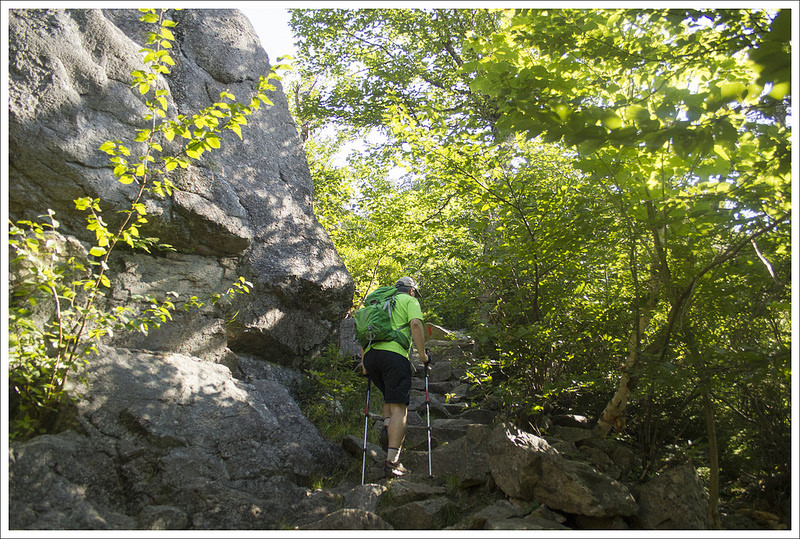
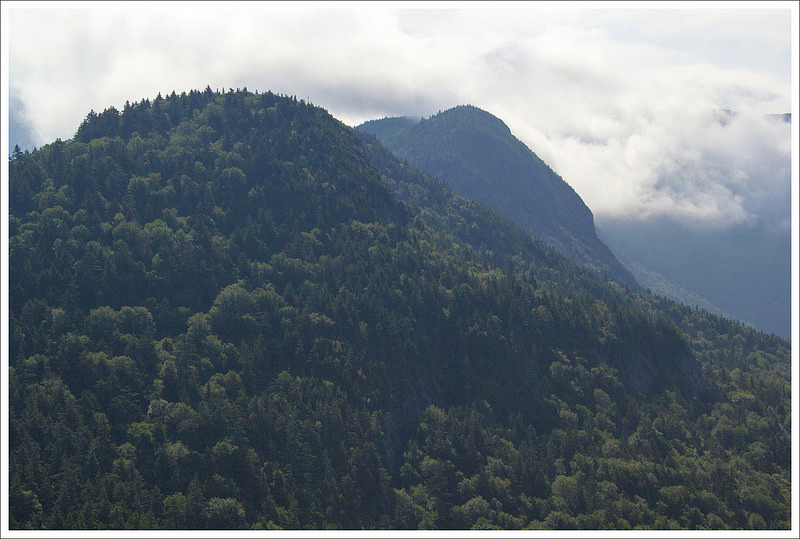
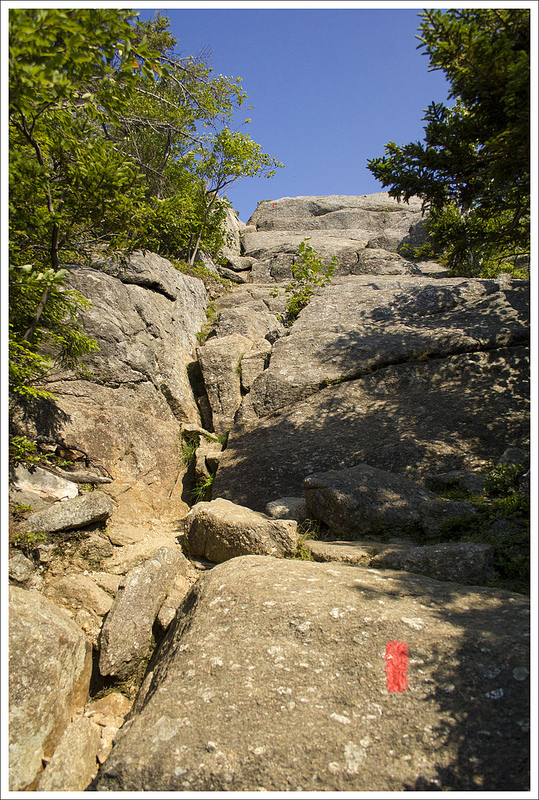
Around the 1.4 mile mark, the trail will begin to level out and become rockier.  You will also be treated to some obstructed views along the way.  At a little over the 1.5 mark, we reached the rocky outcropping of aptly-named Rocky Mountain.  From the stunning viewpoint here, I was able to scramble up carefully up the main rock.  While Christine held Indy, I also ventured a little further along the outcropping to get to another viewpoint, but that was a more treacherous path consisting of stepping on knife-edge footing while finding hand and footholds along the way – definitely not recommended or very safe.  I came back to Indy to let Christine explore a little further.  Indy enjoyed the views and enjoyed a nice bowl of water to quench his thirst before the return hike.  We went back the way we came descending back to the saddle and climbing up the last .6 miles back to the car.  The climb at the end was steep, but short.  We had a great time exploring this area and were surprised to only see two people on the trail.  Since I don’t think this hike is covered very often on hiking websites or books, this has remained a hidden gem (at least until now).

Christine Says: 

This was a really beautiful hike through a fire and ice-damaged section of the park. Views that were probably closed in a few years ago were open and stunning. It also helped that we hiked in April before leaves fully emerged.  I was surprised there were so few people on the trail, because the weather was perfect and this trail connects into the popular Big Run watershed. I expected we would see many people out backpacking, but we only saw two guys.  They were both pretty surprised to see a pug on the trail, and one asked if he could photograph Indy to share with his mom. I swear, Indy is always a conversation starter on hikes!

At the Vista
Adam and Indy enjoyed climbing on the rocks at the viewpoint. Below: The trail was like walking on a balcony; Adam found a perch; Indy never runs out of energy.

Brown Mountain Trail Brown Mountain Trail Indy

While Adam enjoyed climbing around on the rocks, I hiked along the trail a bit further to see if there was anything worth seeing. The trail started to descend into another saddle, so I decided to save exploration for another day. I think there might be some more views along the trail – but probably not as good as the one we saw here.

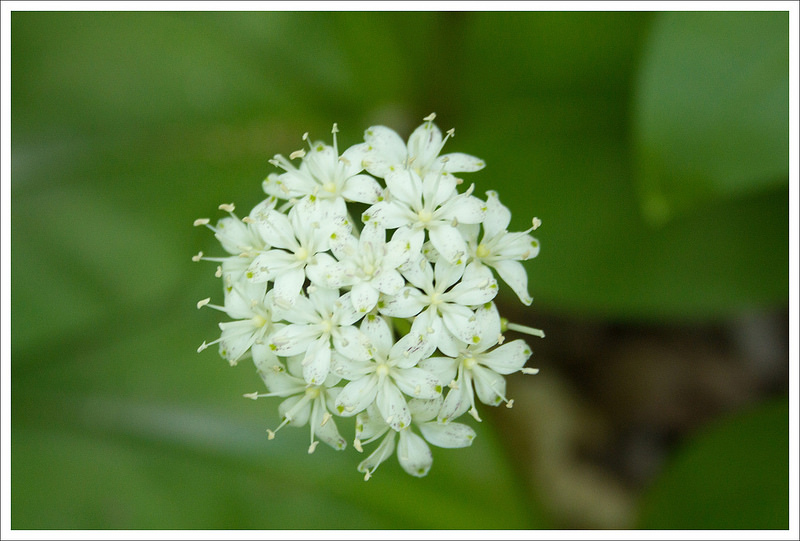
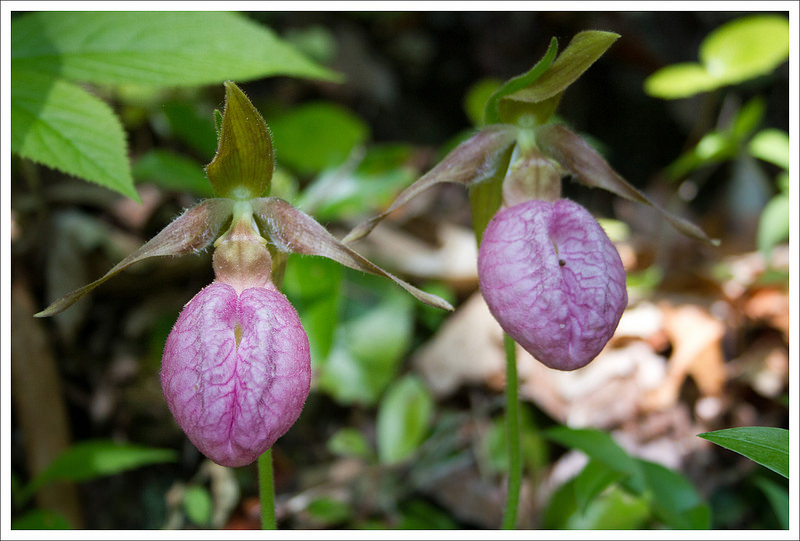
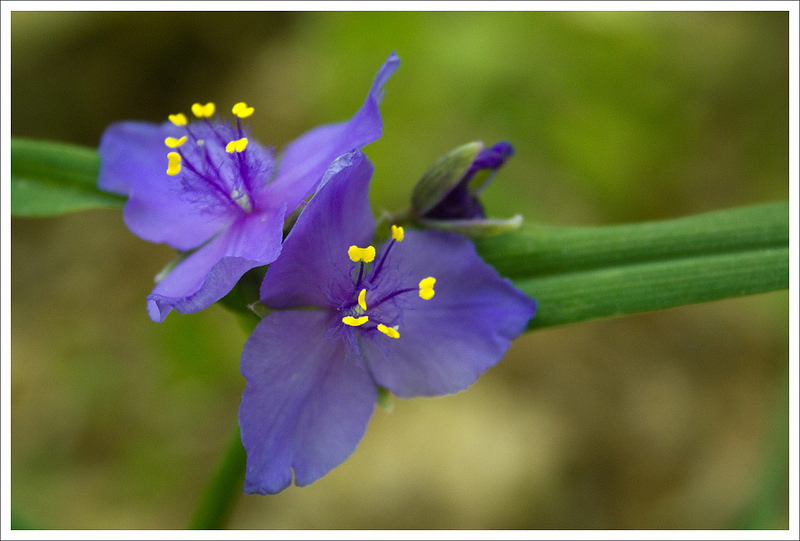
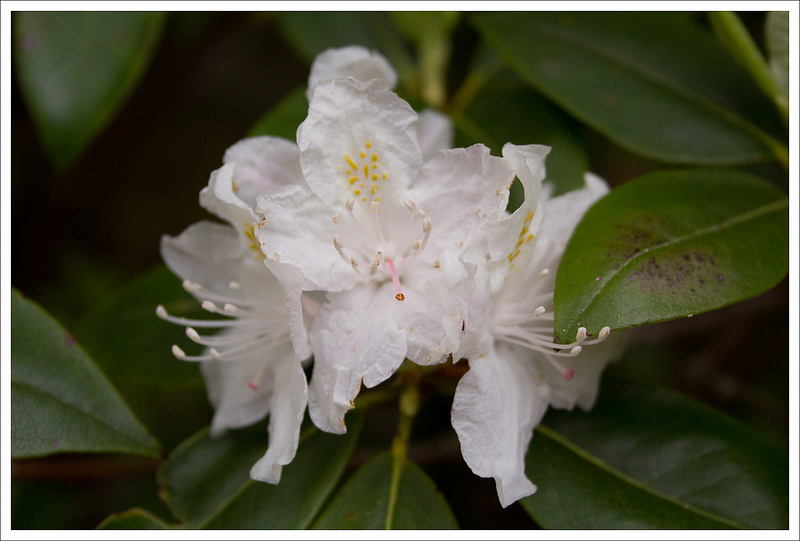
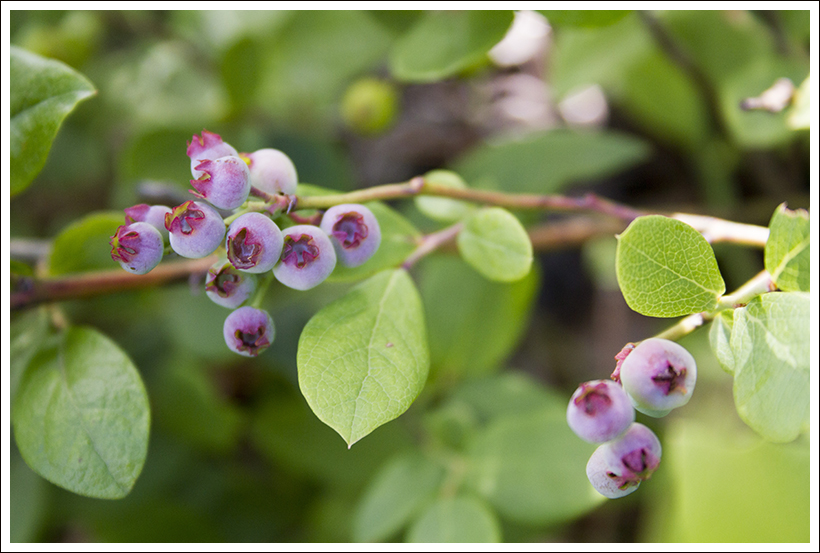
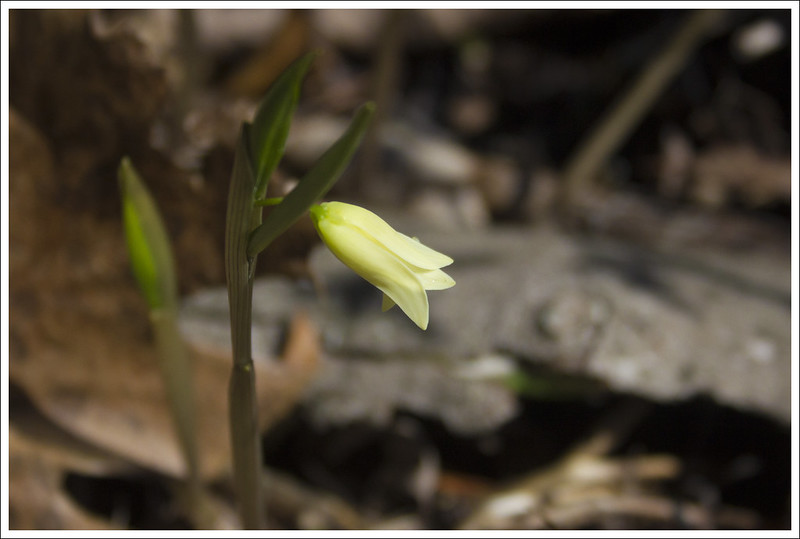
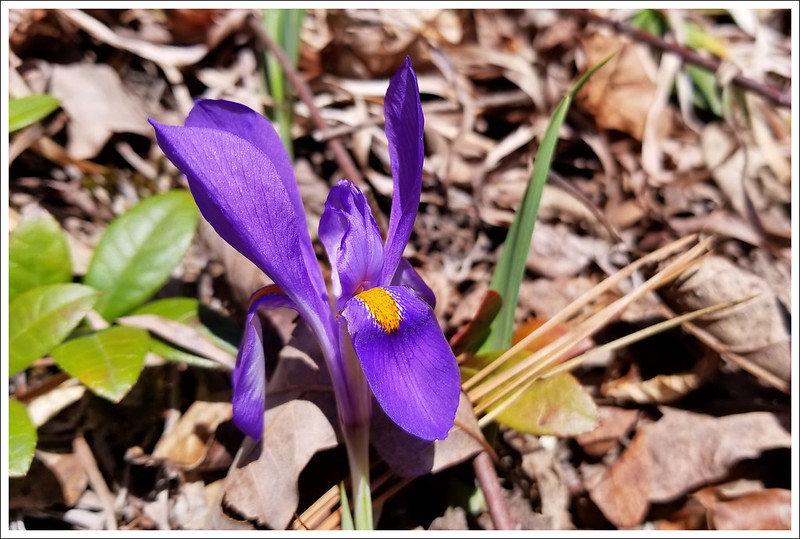
I hiked back up to where Indy and Adam were waiting. We all hiked back the way we came in, enjoying the top-of-the world views. In addition to the vistas, this trail had many beautiful wildflowers. In April, the dwarf irises and sessile belwort were abundant. The hike back was as challenging as the hike out, with moderate climbs on both ends. We were all pretty hot and a little sunburned when we got back to the car, so we decided to cool off with blackberry milkshakes at the Loft Mountain Wayside.  Wouldn’t you know – their shake-making operation was broken AGAIN. This is the third year in a row that Loft has failed to produce my desired blackberry milkshake! This time it was the soft-serve machine that was down; last time it was the blender; and the time before that they were out of blackberry syrup.  Drat!  Oh well… it was still a great day.

Trail Notes

  • Distance – 3.2 miles
  • Elevation Change – 1,168
  • Difficulty –  3. This hike has climbs going both out and back. They’re moderately difficult, but should be doable for most hikers.
  • Trail Conditions – 4. PATC volunteers and other trail crews have worked very hard to clear the trail through this heavily damaged part of the park.
  • Views  4.5.  There were nice views at the start of the hike, along much of the trail, and at the summit.  The view is expansive and impressive.
  • Streams/Waterfalls – 0.  There was no water on this hike – it’s mostly high and dry on the ridge.
  • Wildlife – 3.  We saw a couple deer and quite a bit of bear scat.
  • Ease to Navigate – 4.  Trails are well-marked and thoroughly blazed. There is just one junction to watch for along the hike.
  • Solitude – 3.  All of Shenandoah is popular and busy, but on this beautiful April day, we just saw two backpackers.

Maps

Special note about the map below: We use CalTopo to produce maps for this website.  The CalTopo map for this area did not match the PATC’s map of the same area for trail naming. The CalTopo map labels the trail as Rocky Mountain Trail, but the park sign posts and the PATC map label the trail the Brown Mountain Trail.

Download a full size PDF trail map.
Download the full size PDF elevation profile

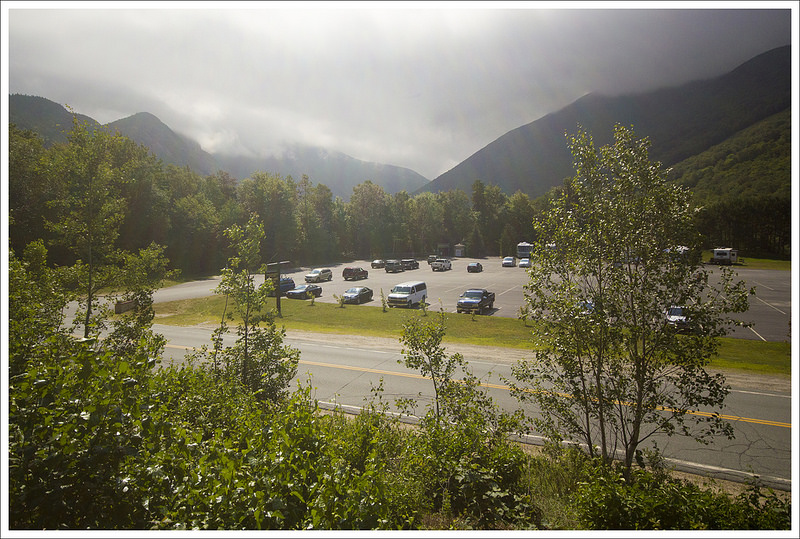
Directions to trailhead: Parking coordinates are 38.292938, -78.657899.  Park at the Brown Mountain Overlook on the west side of Skyline Drive. The trail begins through an opening in the stone wall.

Artists Bluff – Bald Mountain Loop (NH)

Special: New Hampshire Edition

Introductory Guide to Visiting the White Mountains

This easy 1.6 mile hike is a great beginner’s sample of what it’s like to hike in the White Mountains region.  You get great views, rocky summits, and a little bit of rock scrambling.  It’s a popular family hike, so expect a crowd!  We enjoyed the scenery so much, that we returned a second time to hike just the Artists Bluff portion with our little pug, Wookie!

View the Full Album of Photos From This Hike

Artists Bluff
Wookie and Adam take in a great view of Franconia Notch from the viewpoint at Artists Bluff.

Christine Says…

When compared to all the surrounding mountains, Artists Bluff and Bald Mountain are downright tiny – topping out at around 2,300 feet.  However, both summits offer outstanding views and the trail is just rugged enough to provide a fun little challenge. We thought it was a perfect recovery hike after our Vermont backpacking trip just a couple days earlier. We started off by parking in the Echo Lake lot. Exiting the lot, we took a right and walked east along the road (back toward the interstate) for a short distance. Across the road there is a clearly marked path with a sign pointing the direction toward Artists Bluff.

Artists Bluff Climb
There are some short but steep climbs en route to Artists Bluff. Below: The beginning of the hike has a trailhead marker; Adam makes his way through the boulders; The trail is very rocky.

Artists Bluff Trailhead Climbing to Artist Bluff Climbing to Artist Bluff

As you enter the woods, bear to the right. The return arm of the loop trail is to the left. The trail immediately begins a steep climb over rocky terrain. You’ll pass boulders and climb up stone stairs for a couple tenths of a mile. At .25 miles, you’ll reach a large boulder marked with red directional arrows and labels. Follow the marked spur trail to the right out to Artists Bluff. Enjoy the fantastic view of Echo Lake and Cannon Mountain Ski Area. You can see I-93 trailing its way through Franconia Notch. On the eastern side of the highway, you can see towering Mount Lafayette and Eagle Cliff.  If you’re feeling adventurous and energetic, use another day to hike to the summit of Mt. Lafayette and take in the splendor of Franconia Ridge.

After enjoying the views from Artists Bluff, follow the spur trail back to the marked boulder at the junction.  Follow the red blazes in the direction of Bald Mountain. The trail will meander up and down hills, crossing a saddle and climbing a small knob before reaching the Bald Mountain spur.  This junction is about .65 miles into the loop. The spur trail circles around the shoulder of Bald Mountain, climbing gently until you reach the ledges directly beneath the summit.

Artists Bluff Vista
A nice view of Cannon Mountain ski slopes, Echo Lake, and Franconia Notch. Below: The loop junction is well marked; A view across Franconia Notch looking toward the Lincoln and Lafayette; The saddle between Artists Bluff and Bald Mountain.

Blazes and Wayfinding Franconia Ridge Saddle Between Artists Bluff and Bald Mountain

From here, there is a little over a tenth of a mile of steep boulder scrambling. Near the top, you will pass through a brief pine-covered area before stepping out onto an expansive dome of bare rock. Pay attention to where the trail exits the trees and steps out to the view. We kind of lost the way and had to backtrack to find the trail again. It wasn’t a big backtrack, but still worth noting. The view from the summit of Bald Mountain includes the ski area and a little bit of the lake, but it also includes views of mountain ranges to north and glimpses west into Vermont.  It’s really an excellent vista!

After we spent some time enjoying the view all to ourselves – Artists Bluff is infinitely more popular than Bald Mountain – we made our way back down the spur trail.  After returning to the junction with the loop follow the trail downhill for about .3 miles. At this point, you should see the road and alternate parking through the trees.  Turn left, continuing on the loop for .4 miles.  The last .4 miles parallels the road and returns you to where you started at the Echo Lake parking area.

Adam Says…

As Christine mentioned, we hiked this one twice. It’s an easy hike to fit in just about any day you have some extra energy while in the White Mountains. The first time we hiked it, we wanted to make sure it would be OK for Wookie to join us on a future hike. We always like to get him out for a hike or two on our vacations.

We knew there was rain coming later in the first day we hiked it, so we wanted to tackle it early.  The trail up to Artists Bluff is short but steep. There are lots of boulders to scramble up, but if you take your time, most people should be able to handle it.  On the first day, we came across two girls at the summit that were celebrating the view with morning mimosas.  I could tell it was a nice moment for their friendship. We left the summit and backtracked until we veered off to the trail to head towards the Bald Mountain summit. On our way to the second summit, we came across a large family group from New Jersey.  They had decided to do the full loop but skipped the summit of Bald Mountain. We could tell this was a family that didn’t do much planning for hiking, because they had a lot of questions about distance, directions, and terrain. It wasn’t long before we came to the junction where the Bald Mountain summit side trail is marked by a sign.  It was a short, tough scramble up, but once we got to the top the views were great. The wind was incredibly strong that first day, so it was hard to stand straight and actually take a picture.  We could only imagine how strong the wind was on the summit of Mt. Washington, just about an hour’s drive away.

Scramble to Bald Mountain
The scramble to the summit of Bald Mountain is brief, but intense. Notice the red blaze way at the top? Below: The view from Bald Mountain looking toward Cannon Mountain ski area; The view off the back of Bald Mountain looks into Vermont; Christine scrambling down; Back at the parking area.

Bald Mountain View Bald Mountain View into Vermont
Scrambling Down Parking

The views from Artists Bluff are a bit more picturesque with the lake below, but you get a highway view also.  From the summit of Bald Mountain, the views are mostly of mountains beyond.  You also will find that most people only hike to Artists Bluff and don’t take in nearby Bald Mountain, so there is more solitude on that summit.

We made our way back down to the junction and bore right to continue the loop and head back to the car.  When we were almost back, we came across the same family that we had seen earlier.  They were exhausted from the hike and were dreading their walk back to the car at the alternate parking lot.  We offered to give them a ride, but they politely declined.  One of the family members was then going to hike to the car and come back and pick them up.

On the second trip to do this hike, we just did the short trip to Artists Bluff. We were very proud of Wookie tackling the hike without any trouble.  It was so cute to watch him navigate the boulders climbing up and down. On the ascent, his tail was down sometimes as he does when he is feeling less confident, but it was curled tightly on the way down as he was confident he knew the way back.  He truly enjoyed himself up on the top and took in the scenery.  We often wonder what is going through his mind at times, but we could tell that the view made him happy.  We love our little hiking buddy!

Wookie Says...Wookie Says…

It had been quite a while since I’ve been on a new hike.  Whenever I see Adam and Christine put on their hiking clothes and grab their trekking poles, I’m hoping that I can come along.  They usually leave me behind since a lot of hikes are tough on a short-legged pug like me, but this time my luck turned.

I enjoyed the hike up Artists Bluff but some of the boulders were huge. You can always see my quick brain working to find the easiest path up, but there were some steps that were just too large for me.  Adam had to lift me up a few of them and on the return had to carry me down a couple.  I mean, there is no need to overdo things when you have a perfectly capable human to take some of the danger out of it.

At the top, I did look out quite a bit and enjoyed the view.  I was startled to see cars on the highway. This was my first hike ever where I could see and hear cars below, so it had me cock my head to the side as I was trying to figure it all out.  We sat at the top for a good while and enjoyed the view.  It was quite windy at the top, but the scenery was beautiful.  I made my way quickly down in hopes that there would be an extra bowl of food at the end for all of my efforts. Instead of dog food, Christine surprised me with a glazed munchkin from Dunkin Donuts. I gulped it down and settled into a goof nap on the car ride back to grandma’s house.

Wookie at View
I love a beautiful view! Below: But hiking makes me so tired!

Wookie

Trail Notes

  • Distance – 1.6 miles
    (Check out the stats from Map My Hike)*
  • Elevation Change – 433 ft.
  • Difficulty –  2.  Most of this hike is very simple with easy terrain, however the ascent to the summit of Bald Mountain will require scrambling over bare rock.  There are a couple steep, but short, climbs.
  • Trail Conditions – 3.  The trail is generally well maintained and traveled. There will be some rocky areas and muddy areas.
  • Views – 5.  Excellent views from both Artists Bluff and Bald Mountain.  The Bald Mountain view is especially panoramic.
  • Waterfalls/streams – 0.  You will see water in the viewshed, but there is none along the trail.
  • Wildlife – 2.  You will likely see birds, chipmunks, and squirrels.
  • Ease to Navigate – 3. There are several junctions where trails intersect. There are also two places you can begin your hike.  However, everything loops back, so you should find the trail system easy to follow.  Pay attention to where the trail enters/exits the summit area of Bald Mountain.  It is not clearly marked and is easy to lose if you’re not paying attention.
  • Solitude – 0

Download a trail map (PDF)

Directions to trailhead: Parking coordinates are: 44.178537, -71.696247.  There is a large parking area near the entrance to Echo Beach.  To begin the hike, park in the lot.  On foot, take a right onto Profile Road and walk about a tenth of a mile along the road.  The trail begins on the north side of Profile Road.  You will see a sign marking the loop.

MapMyHike is not necessarily accurate, as the GPS signal fades in and out – but it still provides some fun and interesting information.

Hidden Rocks

This 2.5 mile hike passes a small waterfall and two beautiful rock crags.  The views are pretty limited, but it’s still a worthwhile hike in the vicinity of Hone Quarry.  If you visit in early July, the blooming Rosebay rhododendron is impressive!

View the Full Album of Photos From This Hike

Hidden Rocks View
Tony and Adam launched a drone from the top of Hidden Rocks. Below: Adam crosses Rocky Run – a small stream on the hike; The trail splits and makes a lariat loop near this pretty small waterfall; Blooming Rosebay Rhododendron.

Crossing Rocky Run Small Waterfall and Pool on Rocky Run Blooming Rosebay Rhododendron

Adam Says…

Hidden Rocks was truly trying to stay hidden from us.  It took a while for us to find the location of this hike from another website, it was steering us about 35 minutes off course.  We ultimately arrived at the correct parking area and met up with Tony and Linda from Hiking Upward to start our hike for the day.  This hike is relatively easy and if you want to just do a quick, out-and-back hike to the main rock outcropping, you would be looking at around a two mile hike.  We decided to make a loop out of this hike and at the time, there wasn’t a lot of information about this hike.

The hike started from the right of the parking area.  The yellow-blazed trail starts fairly easily and consists of a few ups and downs, reminiscent of a roller coaster before finally descending down to Rocky Run which you will reach at .65 miles.  Crossing the stream, you can see there is a smaller trail that branches to the right, but stick to the left.  You will quickly come into a thick tunnel of rhododendron.  You cross Rocky Run a couple of more times before reaching a small, scenic waterfall at .9 miles.  Here, the trail splits as you will see yellow blazes that go to the left and right of the waterfall.  Take the trail to the right of the waterfall (the left trail will be how you return on the loop) that leads steeply above the waterfall area.

Rock Climber at Hidden Rocks
A rock climber descending Hidden Rocks. Below: Christine and Adam atop Hidden Rocks; Ripening blueberries at the top of the crag; A sideview of Hidden Rocks.

Christine & Adam Atop the Crag Ripening Blueberries Side View of Hidden Rocks

In a short distance, we arrived at the base of the Hidden Rocks face where we came across a man rock climbing and rappelling off the structure.  The trail skirts along the left of the rock base and then climbs steeply up some rocky steps.  At the top of the trail, the trail splits.  Head up to the right on some wooden steps to reach the top of the Hidden Rocks structure that you saw from the base a few moments ago.  There was a campsite at the top and a couple of ledges that you could enjoy the view.

Tony set up his drone to take pictures and video of the area around us.  We were hoping to get some shots of the rock climber, but he had just switched spots on where he wanted to climb, so it took him a long time to position ropes to start his rappel.  Tony let me even steer the drone a bit which was a blast.  Christine and I posed for a high elevation selfie before we packed up the drone and continued our hike.

We went back to where the trail split leading us to the rock outcropping and then continued on the trail.  This part of the trail was less-traveled and narrow.  After skirting along another large rock face, I found a break between two large rock areas and decided to explore.  I had to climb by holding onto rocks and roots, making it not an easily accessible sidetrip that should only be done if you feel capable. I ventured out to the right and left areas of the rock.  The rock to the right led to precarious footing and fearing I was going to look for a handhold and upset a timber rattler, I decided to not go any further on that rock.  On the left rock, I found a way to climb to the very top and found a very small perch to enjoy some views that I thought were better than those on Hidden Rocks.  I called back down to the rest of the group and Tony and Christine decided to climb up also.  We then made our way down the steep decline and joined Linda back on the trail.

The trail descends rather steeply after this point, causing us to take our time make sure we had good footing.  We reached another stream crossing at 1.4 miles and at 1.6 miles we were back at the small waterfall, completing the small lollipop loop of this hike.  We retraced our steps and made it back to our car at 2.5 miles.

Christine Says…

We were thrilled to see Tony and Linda again for the second time in the span of just a few weeks! We were also pleased to have cooler, less humid weather for this hike (compared to the sauna-like conditions we had for our hike at Shrine Mont). The morning started off with a bit of chaos related to bad directions. We originally found the Hidden Rocks hike outlined on the Virginia Wilderness Committee website.  Their write-up included GPS coordinates that took us to some random road – in the middle of nowhere – about 30 minutes from the actual trailhead.  We arrived at their designated coordinates and found ourselves in the totally wrong place with no cell phone service.  Fortunately, Tony and Linda were also running a few minutes late, and we all arrived at the trailhead parking around the same time.

The hike started off over a mini ‘roller coaster’ – with the trail steeply ascending and descending over a series of gullies and washes.  Eventually, we descended a gentle hill down to Rocky Run – a shallow, winding stream.  The trail was shaded by a tunnel of Rosebay Rhododendron that was just starting to bloom.  At about a mile in, the route got a bit confusing when we reached a split in the trail near a small waterfall.  The Virginia Wilderness directions said there was a loop trail, but added that the loop route was not on their map (it’s on ours – see below).  We took a guess and headed steeply uphill on the trail on the right side of the split.  In just a couple tenths of a mile, we arrived at the bottom of a towering rock wall – Hidden Rocks.  There was a local guy rock climbing.  He had a beautiful Vizsla dog – she barked a lot, but was very friendly and hung out with us the entire time we visited the rock.

Hidden Cracks
The second crag on the hikes is known locally as Hidden Cracks. Below: The view from the top of Hidden Cracks; Christine scrambles down Hidden Cracks; We enjoyed beers and Grillizza Pizza after the hike.

The Top of Hidden Cracks Descending Hidden Cracks Grillizza Pizza

To reach the summit of Hidden Rocks, we followed the trail along the left side of the crag, eventually climbing steeply to the top via a small set of constructed stairs.  The top of Hidden Rocks has two outcroppings and a spacious campsite with a fire ring.  The views are limited – all you really see is another hillside of trees across the ravine.  If you’re looking for expansive views of mountains, distant valleys, or the lake in Hone Quarry – this is not the hike for you!  Fortunately, the outcropping still gave Tony enough room to launch his drone.  He was able to get a few cool shots looking back at Hidden Rocks.

From Hidden Rocks, we came back down the stairs and continued following the trail across the ridge.  We passed another towering cliffside on the right – this one called Hidden Cracks.  Adam found a split in the rocks with a jumble of boulders.  We were able to climb to the top and get another view – this one included an obstructed peek at some distant mountains.  Soon after Hidden Cracks, the trail descended, crossed the stream again. We arrived back to the split in the trail that made the loop, passing the small waterfall once again.  From there, we retraced our steps back to the parking area.

After our hike, we headed back into Harrisonburg so that we could take Tony and Linda on a tour of Harrisonburg’s craft beer scene.  We started off at Wolfe Street, then proceeded to Billy Jack’s for lunch.  The day rounded out with stops at Pale Fire and Brothers (with dinner from the Grillizza food truck).  It was a fun day and we really enjoyed exploring this little gem of a hike!

Trail Notes

  • Distance – 2.5 miles
    (Check out the stats from Map My Hike)*
  • Elevation Change –  390 feet
  • Difficulty –  2.  This is doable by most people.  If you do the entire loop, be careful climbing up to the top of the other rock outcropping.  That short climb feels more like a 4-4.5.
  • Trail Conditions –  3.5.  Overall the trail was in great condition, but the lollipop loop part of the trail was not as maintained.
  • Views –  2.5.  The views were nice, but not as expansive as I would have liked since most of your views are blocked by the mountain directly in front.  
  • Waterfalls/streams   2.  Rocky Run was pretty with rhododendron nearby.  The small waterfall creates a peaceful setting.
  • Wildlife – 0.  We didn’t see anything. 
  • Ease to Navigate – 2.5.  There weren’t any signs for junctions which caused us to get confused about which way to go when we first crossed Rocky Run and again at the waterfall junction.
  • Solitude – 4.  This isn’t heavily used, but you may see some people at the top of Hidden Rocks or rock climbing. 

Download a trail map (PDF)

Directions to trailhead: GPS Coordinates for this hike are 38.44813, -79.12205.

MapMyHike is not necessarily accurate, as the GPS signal fades in and out – but it still provides some fun and interesting information.


Mount Jo (NY)

adirondacks

This delightful 2.4 mile hike offers fantastic views of Heart Lake and the High  Peaks!  With under 600 ft of elevation gain and a largely uncomplicated trail, this hike is perfectly suited for novices and young families.  It’s certainly one of the area’s ‘do not miss’ hikes!

View the Full Album of Photos From This Hike

Mount Jo Feature
The summit of Mount Jo offers great views of the High Peaks and Heart Lake.

Christine Says…

After a strenuous day on Giant Mountain, we wanted to keep hiking – but we wanted something sort of laid back for our third day in the Adirondacks.  We settled on Mount Jo – a relatively small peak (2,976′) rising above the shores of Heart Lake.  We had read in multiple guides that Mount Jo offered the scenery of a 4,000 footer with only a fraction of the physical effort.  That sounded perfect for our easy day!

Our hike began at the Heart Lake Program Center, which is the main hub for the Adirondack Mountain Club.  The 700-acre property is home to the Adirondak Loj guest house, lots of rustic camping options, and the High Peaks Information Center. Many of the area’s most popular trailheads are located in the vicinity.  At press time, trailhead parking at Heart Lake was $10.00 a day for non-members (ADK member parking was $5 and all prices went down by half for parking arrivals after noon.) When we visited, the 200-car lot was nearly full by 10 a.m.  We recommend arriving early if you want to set out on any trail from this popular spot.

Heart Lake
Beautiful Heart Lake.  Below:  The information board and trail register; Short Trail or Long Trail?; Adam makes his way up the Long Trail.

Info Board at Mount Jo Long Trail or Short Trail Mount Jo Long Trail

The trailhead for Mount Jo is located across from the entrance station at the end of the snowplow turnaround  The hike started off along a wide path with flat, easy footing. We passed the Heart Lake Nature Museum and an open view of the beautiful lake.  At trailpost #29 (all the junctions on the property are numbered!), turn right onto the Mount Jo trail.  Shortly after the turn, there is an information board and a trail register.  Most trailheads in the Adirondacks have a register for hikers to sign in, leave route details, and then sign out at the conclusion of their hike.  It’s an imperfect system, but definitely helps keep hikers safe in a large and rugged area. About a quarter mile after the register, the trail branches in two directions – ‘short trail’ and ‘long trail’.  Adam and I decided to take the long trail up and the short trail down, allowing us to see unique scenery along a loop.

The long trail was beautiful – shaded by pine trees with footing composed of gnarled roots and rocks.  As we hiked, the trail became steeper and followed a stream bed.  I imagine the stream bed is often dry in summer, but we hiked the morning after thunderstorms, so there was a trickle of water running.  We met a chattering red squirrel along the route – they really are so much cuter than the gray squirrels we have in Virginia.

At the top of the climb, the long and short trails met up again and joined routes to the summit. For a short distance, the trail was practically flat, passing over muddy areas on wooden planks. There was a non-intimidating ladder traversing a slab of granite, followed by a short but steep climb over boulders to the summit.  At the top of Mount Jo, we had superb views of  Heart Lake, Cascade Mountain, Mount Marcy, Algonquin Peak, Mount Colden, Indian Pass, and the Great Range.  With the popularity of Mount Jo and the Heart Lake area, we were surprised to have the summit all to ourselves! We really enjoyed the view!

Red Squirrel
We spotted an adorable red squirrel. Below:  Rock wall on the long trail up Mount Jo; At places the trail followed a stream bed; The trail became increasingly rocky and rooty.

Rock Wall on Mount Jo Hiking in Stream Bed on Mount Jo Rocks and Roots on Mount Jo

After a while, we were joined on the summit by a group of hikers led by one of the ADK’s summer naturalists.  The club really offers a great variety of programs.  We listened to the ranger describe and name the peaks and describe the geology of the area.  I had no idea the Adirondacks had so many landslides and avalanches, but the scars she pointed out on the mountains made it very evident. You can view the named peaks (and learn more about the area) in this interpretive trail guide/map created by the ADK. After a little more time at the top, crowds began to arrive and we decided it was time to make our way down the mountain.

The short trail was a steeper route than the trail we had used to ascend.  There were a lot more rocks to scramble over, but it was still mostly moderate terrain.  We made sure we remembered to sign out in the register when we passed back by the trailhead.  We also made a stop at the Nature Museum.  They had neat, touchable displays demonstrating the flora and fauna present in the Adirondacks.

Mount Jo was the perfect stop for a day of light hiking! Back at the High Peaks Information Center, we bought a couple cold drinks and made our way back to the car.  It was early afternoon, so we decided it was time to get some lunch and check out the town of Lake Placid.  Town turned out to be brutally hot – in the mid 90’s.  All the shop keepers and restaurant employees talked about the unusual heat and how lots of people didn’t have air conditioning.  I guess even when you head north for vacation, sometimes you still can’t escape southern-style heat like we have in Virginia!

Boulder Scramble to Summit of Mount Jo
There was one tricky place to climb near the summit. Below: The long and short trails rejoin near the summit; Wooden planks over muddy areas; Arriving on the summit.

Mount Jo Trail Junction Planks on Mount Jo Mount Jo Summit

Adam Says…

After the tougher hike up Giant Mountain the previous day, we decided on this short but impressive hike up Mount Jo.  This hike is located in the Mount Van Hoevenberg Recreation Area near Heart Lake, a jumpoff point for many great hikes.  The trail starts across from the check-station and runs briefly along the side of Heart Lake.  I always find some of the origins of naming mountains interesting and this mountain has a sad but romantic story –

Henry Van Hoevenberg came to the Adirondacks for the first time in 1877 because of health reasons. While he was up there he met Josephine Schofield from Brooklyn, NY. They climbed Mt. Marcy together and became engaged on the summit. From the summit they spotted a small lake that was about five miles away, they decided that that’s where they would live and build a tourist lodge in the wilderness. Josephine’s parents did not like the whole idea and took their daughter back to Brooklyn. Henry stayed and fulfilled the lovers dream. In 1880 he built the Adirondack Lodge on the shores of the lake. It was the largest log building in the United States at the time and had three stories. He changed the name of the lake from “Clear Pond” to “Heart Lake”. Ha also named the small mountain in the back of his land “Mt Jo” in honor of his lost love. – From summitpost

Descending Mount Jo
Mount Jo had a fantastic view. Below: Adam climbs down the ladder stairs; Christine descends the rocky short trail; There was a bit of scrambling necessary on the short trail descent.

Ladder Descending Mount Jo on Short Trail 2 Descending Mount Jo on Short Trail 3

The trail starts across from the check-station and starts off with a flat footpath that winds through some thick, but beautiful forest.  Bear right at the first junction towards Mt. Jo.  You’ll pass by the Heart Lake Nature Museum and then reach the junction (trailpost #29) that leads up Mt. Jo.  At .5 miles, you will reach another junction that gives you options to take the long path or the short path.  The short path is much steeper, so we opted for the long path, taking the left path up to the summit.

While the long path was easier, it was still fairly steep, having to climb up a rocky path.  Luckily, this is a shorter hike so you can take your time if need be.  At 1.1 miles, we reached the top of the junction with the short path and continued on towards the summit.  The path levels out and it is just a quick .1 mile to reach the summit.  Right before the summit there is a ladder and some other steep rocks to climb.

The views at the summit were outstanding on this clear, but hazy day.  The ledge was fairly wide and we could see part of Heart Lake below with mountains extending above.  I spotted several cedar waxwings that were landing on the tops of all the spruces around us.  Cedar waxwings have always been one of my favorite birds because of their unique facial markings and this was the largest grouping of them I have ever seen.

Descending Mount Jo on Short Trail
The short trail was steeper and rockier than the long trail, but we still had lots of fun! Below: Christine signs us out in the trail register.

Signing Out

We had everything to ourselves for a few minutes before others started arriving – one of the advantages for starting our hike early.  On the way back down, we decided to take the short path at 1.35 miles to enjoy some different scenery.  The short path was much more steep and rocky so I am glad we made the choice to hike down this section instead of up.  We saw many more people coming up as we descended and some were struggling.  We arrived at the bottom of the junction with the short trail at 1.75 miles, having descended over 500 feet in that short span.  We bore left at the junction and made it back the way we came for the rest of the way.  We arrived back at the start at 2.4 miles.

When we got back to the parking lot, we stopped at the ranger station for some cold drinks.  As I was waiting to check out, I overheard an older couple that were talking to the ranger about trying to hike up Mt. Marcy.  We will cover Mt. Marcy in another post, but to put this into perspective it is the highest peak in New York and the most popular route takes at least 14.5 miles to hike it.   It was probably around 1PM, they were wearing jeans, and only had one small liter of water with them.  The man said he also had a bad back, but they really wanted to hike it.  The ranger told them it was an incredibly bad idea and they didn’t have what they needed to prepare themselves for the hike.  After a few minutes, the man came back inside and told the ranger they decided to do something easier (Mt. Jo) and the ranger told them that was a much better idea.  I am sure we would have read the rescue story the next day in the news if they had proceeded.

After the hike, we decided to drive into Lake Placid.  Every American that lived in the 1980s remembers the Winter Olympics held here and the Miracle on Ice when the American hockey team beat the Russians to win gold.  This town still holds the memories of the Olympics and this historic game alive through the stores and shopping – there was even a bakery named Miracle on Icing.  We made our way to Lake Placid Brewery and enjoyed a great lunch and sampled several beers from the brewery.  We walked a little around the shops, but it was extremely hot that day so we decided to return back to the glorious AC in our cabin.

If you are looking for a family hike with great views for minimal effort, look no further than Mt. Jo.

Lake Placid
We had lunch at the Lake Placid Pub and Brewery. Good food and beer!

Lake Placid Beer Samples

Trail Notes

  • Distance – 2.4 miles
    (Check out the stats from Map My Hike)*
  • Elevation Change – 555 ft.
  • Difficulty – 2.5.  While the climb is steep in a few areas, the route is short and mostly easy to moderate.
  • Trail Conditions – 4.  The trail is well maintained and marked.  It is still rocky and slippery in places, like most of the terrain in this area.
  • Views  5.  You get fantastic payoffs for a relatively easy climb.
  • Streams/Waterfalls – 1. There are a couple small trickles of a stream, but nothing noteworthy.  Heart Lake, however, is beautiful!
  • Wildlife – 3. The heavy foot traffic on this trail probably scares away most wildlife, but we did see a garter snake and a red squirrel.
  • Ease to Navigate – 4.  Trails are well marked and generally easy to follow.
  • Solitude – 2.  This is a popular and well-traveled hike.

Download a Trail Map (PDF)

Directions to trailhead: From Lake Placid, go east on Rt. 73 to Adirondac Loj Rd., which is the first right after the ski jumps. The parking lots are 5 miles from Rt. 73. There is a $10/day parking fee. From the parking lot at the High Peaks Information Center at the end of Adirondak Loj Rd. return to the entrance station and find the trail at the far corner of the snowplow turnaround. GPS coordinates for this hike are: 44.1830461,-73.9644678

Wesser Bald (NC)

Special: Smokies Edition

Introductory Guide to Visiting Great Smoky Mountains National Park
(while Wesser Bald is technically outside GSMNP, it’s still part of the greater Smokies region)

This 2.8 mile out-and-back is an easy hike to one of the area’s best viewpoints.  The platform atop the defunct firetower on Wesser Bald offers panoramic views of the spectacular Smokies (and all the other mountains in the area).

View the Full Album of Photos From This Hike

Smokies View from Wesser View
You get classic Smoky Mountain views from the tower atop Wesser Bald.  Below: A sign points the way to Wesser Bald:  The parking area at Tellico Gap provided a view of powerlines and a ‘cloud sea’; The drive into Tellico Gap follows the extremely scenic Otter Creek.  It’s worth stopping to enjoy the rapids and small waterfalls.

Wesser Sign Tellico Gap Stream

Adam Says…

It is nice when you find a hike that the locals rave about.  During our trip to North Carolina, I heard three different people mentioning that we needed to hike Wesser Bald.  After getting to the top, I can see why this is so revered.

When we started off in the morning, it had been storming the night before.  A fog had settled on the lower elevations.  While we were driving, we were curious if we were going to get any views at all.  On our drive there, the cloudy conditions gave us great views along the Nantahala River as we passed several scenic spots and chances to catch some roadside waterfalls and rapids.  We made our way up Otter Creek Road and parked at Tellico Gap, where the Appalachian Trail crossed the road.

When we first parked, we noticed the sign that designated the start of the trail, but we noticed there was a white-blazed trail and a fire road to the left.  We knew our hike was on the white-blazed Appalachian Trail, so we took the trail to the left.   The fire road trail to the right also leads to the tower.  I’m not sure how the conditions are on it, but it did seem to be shorter, since we found a family with kids that left after us beat us back to the parking lot (and they didn’t seem like fast hikers).  The trail passed through a thick brushy area fairly quickly, but most of the trail was in a more opened-up wooded area.  The hike was fairly uphill as it skirted the mountainside, but I didn’t find any of the trail to be incredibly steep.  Instead, it winds There were a few switchbacks towards the end of the hike where it was a little steeper, but the switchbacks save you from going straight up the mountain.

Wesser Bald Trail
Adam walks along the Appalachian Trail en route to Wesser Bald.  Below: A cool, bent tree along the trail; Mountain laurel were just starting to bloom; In fact, there were many wildflowers blooming.

Bent Tree Mountain Laurels Wildflowers

When we reached the top of the spur trail at 1.3 miles, there was a great viewpoint that gives you a small sample.  If you are not willing to climb the fire tower, this would be the best views you would get on this hike.  As you reach the top, take a right and you’ll reach the fire tower in a short distance.  Make your way back to complete the out-and-back or you could press pass the fire tower to take the fire road back to make it a loop.

When we reached the fire tower, we could hear a couple people at the top of the tower.  Christine quickly made her way up.  I, on the other hand, needed to psych myself up.  As you’ve probably seen in many pictures, I don’t mind getting out on rocks that are on the edge of a huge precipice; however, I don’t trust man-made structures when it comes to heights.  I trust nature over man.  I went up halfway and then I could start to see the sky through the gaps in the stairs and I just turned back around.  But from the bottom, I could hear Christine and the others at the top of how beautiful everything was and I knew I needed to force myself to get up there.  So, I took a second attempt and made it up.  Christine and the others at the top applauded my efforts for overcoming my fear.  I’m so glad I made it to the top, because the scenery was breathtaking and some of the best mountain views I’ve ever seen.   We stayed up there a while and talked to a few different groups of people that made it up after we did.

After we made it back, we decided to head to the Nantahala Outdoor Center.  We had a nice lunch at the River’s End and then we enjoyed a beer at Big Wesser BBQ & Brew, while watching kayakers and whitewater rafts go down the river.  This is always one of our favorite spots while visiting near the Smokies and it is definitely a place you can spend hours during the afternoon.   You can also hike from Tellico Gap to the Nantahala Outdoor Center on the Appalachian Trail for a one-way total of 7.5 miles if you want to do a shuttle option.

If you are interested in geocaching, there are three you can find on the trail:

Christine Says…

The forecast for our week in the Smokies didn’t look good – stormy, rainy and unsettled every single day from Sunday to the next Saturday. So, when we woke up to dense fog on Monday morning, we weren’t completely surprised. However, the hourly forecast on weather.com made it look like the fog might burn off. We hoped that the odds would be in our favor, and headed off to hike a trail we’d been eying for a while. Wesser Bald is a short, moderate 1.4 mile hike along the AT to an old fire tower overlooking the southern Appalachians. It’s a spectacular view if you’re lucky enough to hit the spot on a clear day.

From Tellico Gap, we followed the AT as it made gradual, sweeping switchbacks through beautiful, lush forest. The trail was lined with wildflowers and blooming azaleas/rhododendron. I think I saw more pink lady slippers on this hike than I’ve ever seen anywhere else. It was gorgeous. The azaleas came in white, pink and orange and the rhododendron bloomed in their classic bright pinkish-purple color. I also spotted wild strawberries and some gorgeous purple spiderwort.

First View
Christine enjoys the first view along the trail. This spot is at the head of the spur trail to the tower.  Below: The fire tower is two stories high;  The stairs are open and a little rickety; Christine atop the fire tower.

Fire Tower Climbing On Top the Tower

The humidity took some getting used to! Even though it wasn’t particularly hot, the day was windless and the air was completely saturated. By the time we got to the top, I looked like I’d been dunked in a pool! Just before reaching the tower, we passed a nice view looking toward the Smokies and Fontana Dam. Near the overlook, a short spur trail took us to the top of Wesser Bald. This bald is no longer actually a bald – it’s been let go and returned to the natural forest environment. So while the view has closed in from the base of the tower, the view from the two-story viewing platform is superb!

I climbed up to the top and said WOW! Adam didn’t feel comfortable with the open, rattling stairs, so he hung out at the bottom while I chatted with a couple at the top. They had hiked up earlier from the NOC and were waiting to meet up with their son, who was on a solo backpacking trip. They were really fun to talk to – both were veteran AT thru-hikers and REI employees. We talked about favorite spots on the AT and chatted a bit about gear. I always love meeting people like them on the trail!

View from the Tower
Views from the Wesser Bald fire tower are majestic. Below: There were many pink lady’s slippers along the trail; Spiderwort: Christine enjoys a post-hike shandy at the Big Wesser Brew & BBQ at the Nantahala Outdoor Center.

Lady's Slippers Spiderwort Nantahala Outdoor Center

While we were chatting, Adam mustered the courage to climb to the top of the tower. He was so glad he did, too! The views really blew both of us away! Even though it was hazy, we could still see for miles in every direction. We spent a long while atop the tower, enjoying the views and the fresh mountain air.

After a while, we decided it was time to make our way down and seek out some lunch. One of our repeat stops ever time we visit the Smokies is the Nantahala Outdoor Center. We enjoy lunch at the Riverside Cafe, browsing the nice outdoor gear store, and (of course) drinking a few beers by the river at Big Wesser. It’s so fun to sit at an umbrella table, drink a nice craft beer and watch kayakers shooting through the rapids. It’s also a great place to people-watch in general. While we were sitting and enjoying our drinks, the skies opened up and dumped a huge amount of rain in just a few minutes. I’m sure glad we had the rain at the NOC instead of on top Wesser Bald!

Trail Notes

  • Distance – 2.8 miles out-and-back
  • Elevation Change – 777 feet.
  • Difficulty – 2.  The trail is mostly uphill, but not too steep.
  • Trail Conditions –  4.  The trail was in great shape and the footing was fairly solid.
  • Views – 5.  Absolutely spectacular views from the fire tower and another nice view right before the tower.
  • Streams/Waterfalls – 0.  Non-existent. 
  • Wildlife – 1.  We only saw some birds along the way. 
  • Ease to Navigate –  3.  The confusion of the fire road at the beginning gives it a lower score, but other than that you should be fine.  Follow the white-blazed AT. 
  • Solitude – 2.5.  Popular with locals, but this wouldn’t get the traffic that a hike in the nearby Smokies would. 

Download a Trail Map (PDF)

Directions to trailhead:   From Bryson City, follow US 19/74 for 20 miles.  Turn left on Wayah Road and follow it for five miles. Turn left on Otter Creek Road and drive 4.1 miles to Tellico Gap. The road is paved for the first 2.8 miles. At the crest of the hill, you will see the AT crossing and several parking spots.  Follow the signs to Wesser Bald.

Mt. Pisgah (NC)

North Carolina Hikes

This 3 mile out-and-back leads to the towering (literally) summit of 5,721 ft Mt. Pisgah.  Due to the short length and proximity to lodging, a camp store, and a picnic area, this trail is exceedingly popular with families.  The summit offers some nice views, but the presence of a huge television tower detracts from the natural beauty of the area.

View the Full Album of Photos From This Hike

Mt. Pisgah Summit
The TV tower definitely detracts from the scenic beauty of Mt. Pisgah.  Below: The trail to the top is short, but it gets steep and rocky in places;  Not the prettiest of summits.

Pisgah Trail At the Top of Mt. Pisgah

Christine Says…

Our second day in Asheville was just a half day, but we wanted to get a little more hiking in along the Blue Ridge Parkway before making our way down to Bryson City and the Smokies. Breakfast was at the popular Sunny Point Cafe. We got there just a couple minutes before they opened and were able to snag the last open table for two! It’s a very popular spot, so be prepared to get there early or have a long wait.

After breakfast, we headed up to the parkway to climb Mount Pisgah. Our book talked about great views, but described the hike as ‘strenuous’. In fact, there was a warning sign at the trailhead indicating that the hike was tough and steep. It actually only climbs about 700 feet, but it does so in a short distance. I suppose the warning is necessary for novice hikers or people who think they’re just out for a casual stroll.

The hike started out from a parking lot atop the Buck Springs Tunnel. There are actually a couple trailheads in that area – Mt. Pisgah, Shut-In Trail and the Buck Springs Trail. To get to the Pisgah Trail, drive to the far end of the parking lot.

Blooming Rhododendron
The rhododendrons and azaleas were blooming when we visited. Below: The Mt. Pisgah trailhead;  Hiking along the flatter, easier part of the trail; Spring blooms!

Trailhead Hiking Along the Pisgah Trail Blooming

The hike started off gentle and flat – just a pleasant walk through the woods. We could see the conical summit of Pisgah, replete with its television tower, looming through the trees. The trail made a sweeping turn at around .4 miles and began a steady uphill climb. It was rocky and rough at times, but overall a moderate ascent. A couple tenths of a mile before the summit, we came across one nice view across the mountains.

After the nice view, we made the final push to the top. The summit has a wooden viewing platform and a serious eyesore of a television tower. I know they’re necessary, but I wish they could have put it on a less scenic, more remote peak! All that metal really ruins the scenic beauty of such an impressive summit.

We sat on the summit for a while. The views would have been pretty nice, but the day was overcast and hazy, so that took away some of the majesty from the experience. I think we were also the only people on the summit without kids! Mt. Pisgah is clearly a very popular family hike! There were more three-year-olds on that mountain top than any other demographic. I guess it makes sense – the hike is short, moderate and doesn’t have any steep drop-offs — perfect for a family with small children.

We hiked down the way we came, making speedy work of the descent.  Now… on to the Smokies!

First View
There was one nice view from the trail before we reached the summit of Pisgah.

Adam Says…

When we’re on vacation, we  like to alternate  longer hikes with shorter hikes to make sure we still have energy at the end of our trip.  When we were researching  different hikes to do near Asheville, NC, we came across Mt. Pisgah.  With it being such a short hike and the trailhead being sort of en route to our next town stop, we thought this was a winner.  We also read about wonderful views from the top so we figured it would be a high payoff for minimal effort.

The trail started off following a slight incline for the first few tenths of a mile.  Then the trail went up more steeply in elevation and can be challenging at times.  But, since the hike is pretty short, it is attainable by most people.  We saw more families hiking on this trail with little children than anywhere else.  While many of the kids were walking the trail in the beginning, we found most of them were being carried by the time they reached the summit.

Summit of Mt. Pisgah
Yes… the summit is a little disappointing. Below: A steeper, rockier section of the trail; The viewing platform atop Mt. Pisgah; Hazy views from the summit.

Rocky Climb Mt. Pisgah Viewing Platform View from Mt. Pisgah

We arrived at the top in well under an hour.  The tower was such an eyesore and we both were thinking this would be so much nicer of a hike without the 339-foot tower there.  The wooden platform allowed for about 270-degree views (90 degrees taken up by the tower).  While it was hazy, I could tell that on a clear day you would be able to see for quite a distance.

The origin of the name of the mountain comes from the Bible.  The Reverend James Hall is attributed to being the first to call this area as “Pisgah”, taken from the biblical reference to the peak where Moses viewed the promised land.  The Pisgah National Forest was historically owned by the Vanderbilts (who built the nearby Biltmore House in Asheville).  500,000 acres were sold to the government by the Vanderbilts as an effort to help preserve this land.

If you are interested in geocaching, there are several to find on this trail:

Parkway View
You can see the parking area and the Blue Ridge Parkway from the summit of Mt. Pisgah.

While this hike does have some nice views from the top, we were a little disappointed by the size of the tower and the popularity of the trail.  As Christine mentioned, it would have been nice to have this on a more remote mountain (and also not the namesake for the entire National Forest).

Trail Notes

  • Distance – 3 miles
  • Elevation Change – 700 ft
  • Difficulty – 1.5.  This trail is short with a moderate ascent.
  • Trail Conditions –  4.  The trail was generally in good condition.
  • Views –  3.5 – Typically views from a peak like this would get higher marks, but the tower is such a distraction.
  • Streams/Waterfalls –  0.  None
  • Wildlife – 1.  Maybe some birds and squirrels.
  • Ease to Navigate –  5.  There is only one trail to the top, and it’s very easy to follow.
  • Solitude – 1.  This trail is popular and heavily traveled.

Download a Trail Map (PDF)

Directions to trailhead:   From Asheville, take the Blue Ridge Parkway south to the Mount Pisgah Parking Area, on the left, at milepost 407.6. Park at the second parking area.

Sherando Lake Loop

This relatively easy 2.5 mile loop goes around Sherando Lake and follows a short spur to a great mountain view!

View the Full Album of Photos From This Hike

Sherando Lake
Sherando Lake is a popular camping/swimming area for locals. It’s just several miles off the Blue Ridge Parkway.

Adam Says…

This has been quite the harsh winter for snow and cold temperatures.  And when it hasn’t been too cold, it seems to have been raining.  So, we were glad to get out on a nice day to get a little exercise outdoors for a change.

Sherando Lake is a multi-purpose recreation area.  In nice weather, you will see people swimming, fishing, camping, and hiking.   To visit, there is a fee per vehicle – check out their fee schedule.   The area is officially open from early April through October.  The road gates are often closed during the off season based on weather.   There is camping available if you wanted to make a nice weekend trip, but reservations should be made in advance.

We started off our hike from the Fisherman’s Parking Area.  There were a few other vehicles there also, but they were all there for the fishing.  The lake is stocked with trout throughout the year.  Facing the lake, we started our hike on the left by heading up the Cliff Trail.  This trail was a short gradual climb with a few switchbacks before the trail levels out.  About .4 miles into the hike, there is a small outlook to the right from a rock that gives you a few obstructed views from the lake.  Continuing on the trail, it begins to descend and the lake gets back into view.  At .8 miles, you reach the lakeside and see the sign that shows the junction with the Lakeside Trail (a trail that wraps around the lake).   We took a few minutes to go out onto the sand and enjoy the views of the lake.   I saw a wood duck escorting a few ducklings on the far banks of the lake.

Dam End
The fisherman’s parking lot is located at the dam end of the lake. It is where our hike begins. Below: The trail starts off rocky; Overlook View.

Rocky Uphill Overlook Rock

We walked back behind the large building/gift shop, crossed a couple of bridges and rejoined the trail on the northwestern side of the bank.  We took the blue-blazed Blue Loop Trail, leading us past a few campsite areas before climbing up into the woods.  The trail is rockier, especially in the beginning, than the Cliff Trail and is steeper.  The trail climbed through a few switchbacks.  At 1.5 miles, you reach a junction shortly after a switchback with the Dam Trail.  This will be your return route.  Continue up the Blue Loop Trail, which begins to take an uphill climb to the left up the mountain.  At 1.75 miles, you reach Lookout Rock.  We took some time there to enjoy the view and then went back the way we came until we reached the junction with the Dam Trail.  We took this trail to the left, which leads steeply down the mountain.  You begin to see the lake through the trees again and we reached the lakeside around 2.25 miles.  We continued on the trail until it reached a small bridge that crossed over the dam stream and led back to the parking lot.

Enjoying the View
Adam takes in a beach/lake view. Below: Services are typically open April through October; Trails are well marked; Adam hikes the Blue Loop Trail.

Sherando Beach Area trailsystem uphill

One thing that was going through my mind during the hike is this would be great for a family outing.  Grab your family for a quick hike followed by a picnic by the lake.  Make a weekend of it if you want to do some camping, swimming, and fishing.

Christine Says…

I enjoy playing in the snow, but I’m very ready for warmer weather. I want to see flowers blooming. I want to feel warm sunshine on my face. I’m so ready to see a canopy of green across the mountaintops.  I have spring fever.  So, I was especially thankful for a particularly warm and sunny Saturday because it gave us a chance to get out and hike.

We chose Sherando Lake, mainly because it was nearby and easy. It would have been a great day to go on a longer hike, but Adam was still getting over a bad cold.  And I was not willing to spend more than an hour in the car. I had spent the past two weekends in a 12-passenger van, making a 15 hour ride to and from the Florida panhandle and was still a bit road weary.

Lookout Rock
Lookout Rock provides a nice view of the valley, lake and mountains. Below: Adam climbs his way toward Lookout Rock; Checking out the view, Making the descent.

Climb View descent

My trip to Florida was a service-learning trip with a group of nine JMU students.  We traveled to a Nature Conservancy preserve – Apalachicola Bluffs & Ravines to do a week’s worth of environmental work.  We camped, we hiked, we learned about the local ecosystem, and most importantly – we planted 90,000 plugs of native wiregrass seed that will be used to restore the natural habitat of that part of Florida.  It was hard work, but I think we made a difference. We even had one free day on our trip. We chose to spend it spotting manatees, gators, and other wildlife at Wakulla Springs State Park.  If you want to see more photos and read more about my service trip, I’ve uploaded a large set of captioned photos to my Flickr account.

Now, back to Sherando Lake!  I had been to the lake a couple times before, but had never actually taken the time to hike any of the trails in the area. I was pleasantly surprised by the trail system.  There is something for everyone – a practically flat trail that goes along the lake shore, a steeper trail around the lake that offers a couple nice views, and a connection into the larger, longer trail system along the Blue Ridge Parkway.

I liked sitting on the sand and enjoying the pretty lake view, and I really enjoyed climbing up to Lookout Rock on the Blue Loop Trail.  The rocky outcropping provides a nice view of the lake and the mountains beyond.  Although the snow was gone on the trails we walked, we could still see plenty of snow on the distant, higher ridges.

Spillway
The hike ends after crossing a cement bridge over the spillway. Below: The stream leading away from the lake; Christine crossing the concrete bridge, Blue Mountain Brewery food and brewery.

Stream Bridge Blue Mountain Brewey Blue Mountain

The walk back down from Lookout Rock was really steep and slick, especially with the thick bed of dry, fallen leaves.  Once we reached the bottom of the descent, we crossed a concrete bridge beneath the spillway and returned to our car.  We finished hiking a little bit before noon, so we decided to make the short drive to have lunch at Blue Mountain Brewery (near Afton Mountain).  They have great food and great beer.  Adam enjoyed a flight of nine different beers and I tried their Daugava Baltic Porter.  I think everyone in central Virginia had the same idea to visit the brewery for an outdoor lunch.  The place was packed, but it was a perfect ending to the day.

Trail Notes

  • Distance – 2.5 miles
    (Check out the stats from Map My Hike)*
  • Elevation Change – 998 ft.
  • Difficulty –  2.  The uphill to the Lookout Rock is a little steep, but overall most people should be able to do it.
  • Trail Conditions – 4.  This is well-traveled, so you should find the trail to be in good shape. 
  • Views  3.  Nice views of the lake from Lookout Rock and mountains around.  Some obstruction, but overall a decent view. 
  • Streams/Waterfalls – 2.  There is a small man-made water dam that creates a nice fall look.  The lake creates a picturesque setting. 
  • Wildlife – 2.  You shouldn’t expect a lot of larger wildlife.  We saw a pileated woodpecker swooping across our car when we arrived.
  • Ease to Navigate – 4.  The only place you may need to figure out is where to pick up the trail after going to the other side of the lake.
  • Solitude –1.  On a nice day, you’ll see plenty of people here.  Most will be near the lake, but expect some people at Lookout Rock. 

Download a Trail Map (PDF)

Directions to trailhead:  From I-64, take Exit 96 just east of Stuarts Draft. Go south on State Route 624, which becomes State Route 664 at Lyndhurst. Continue south on State Route 664 approximately 8 miles to the entrance to the Sherando Lake Recreation Area on the right. The gatehouse is approximately 0.5 miles ahead which will take the fee for your vehicle.  Past the gatehouse, you’ll take a right to the fisherman’s parking lot.  Park there and make your way to the left for the Cliff Trail.

MapMyHike is not necessarily accurate, as the GPS signal fades in and out – but it still provides some fun and interesting information.

Elk Run Trail

We walked a beautiful two-mile snowshoe loop on this lovely network of trails in Elkton, Va.

View the Full Album of Photos From This Hike

Adam Snowshoeing
Adam walks along the Elk Run Trail.

Map  Barn

Christine Says…

We finally got a significant snowfall!  The first day of the storm, we were snowbound at home.  We spent the day digging out and hanging out.  But early the next morning, after the snowfall stopped, we headed over to the Elk Run Trails. The trails, maintained by the Hurricane Running Club, are primarily intended for cross country running and walking.  However, under a heavy bed of snow, they’re simply perfect for snowshoeing.

We parked our car at the Elkton Community Center and set out from the trailhead on the west side of the center.  For much of the first mile, the trail follows parallel to Elk Run Stream.  While you can see houses on the far bed of the stream, the trail still offers a lovely wooded setting.  On this particular day; the deep, soft snow made for slow, arduous progress.

The only climbing on the walk comes as you approach the back side of the Kite Mansion.  One short climb takes you past an old spring house.  Then a shorter, but steeper, ascent brings you up to the east side of the house.  We walked across the columned front of the house and picked the trail back up on the other side.

Snowshoeing
Adam makes his way across the meadow behind the community center.

Elk Run Christine Snowshoeing

A brief descent brings you back to a dirt road that parallels Route 33.  The trail is completely flat and passes through a tunnel of hemlocks and pines.  Eventually you come out on the road, just east of the community center.  From there, we popped off our snowshoes and walked the brief 10th of a mile back to our car.

It was a wonderful morning in the snow!

Adam Says…

When the weather wants to dump a lot of snow on the ground and you feel like you couldn’t hike anytime soon, grab some snowshoes and hit the trail.  We have been on this Elk Run trail system before in dry conditions, but this trail seems made for snowshoeing.

The only map you can find of this trail system is on the photo link above.  You can pick up a copy yourself at the Elkton Community Center during normal business hours.  Our trip consisted of doing the entire orange trail starting from the west end, but included the green loop trail that takes you up to the Kite house.  We parked at the Elkton Community Center and went behind the building.

We spotted the orange blaze across the field behind the building that denoted the start of the trail system.  The trail was untouched (minus a few squirrel tracks) when we hit the trail and we quickly realized how tough snowshoeing over a foot of fresh snow could truly be.  After a short time, we decided to shed some layers since we were working up a sweat from the effort.  The trail started off with a long scenic walk alongside the Elk Run.

The Kite Mansion
The Kite Mansion.

Christine Approaches  Adam and the Stream

At about .9 miles, the trail begins to start up an ascent and you can then join the green-blazed trail.  Take this up a steep but short hill and at the top of the hill take a right.  This will lead you to the front of the Kite House.

Continue to cross in front of the Kite House and you will see the trail pick up again, going steeply downhill.  At the bottom, you come to a larger trail junction.  We took the orange-blazed trail again, which takes you through a wooded section behind Elkton Middle School.  After about .5 miles, the trail widens and then eventually leads to a road.  Take a right here and follow this back to Elkton Community Center, where you parked.

Trail Notes

  • Distance – 2 miles
    (Check out the stats from Map My Hike)*
  • Elevation Change – 100 ft.
  • Difficulty –  1.  The trail is almost completely flat.  However, in deep, unbroken snow, you should expect more of a challenge.
  • Trail Conditions – 4.5.  Wide, flat and well groomed – may be muddy.
  • Views  0.  You’re in the woods the whole time.
  • Streams/Waterfalls – 2.  Elk Run is pretty, but is often obscured by brush.
  • Wildlife – 1.  You’ll likely see a variety of birds and possibly deer.  We saw a beautiful red fox when we walked the trail on Thanksgiving day.
  • Ease to Navigate – 3.5.   There are tons of inter-connected trails.  They’re blazed but unnamed.  Everything loops back, so it would be hard to get lost.
  • Solitude – 4.  Typically, you’ll only see a few people on this trail.

Directions to trailhead:  From I-81, take exit 247 towards US-33E heading towards Elkton, VA.  Follow this 15.6 miles before taking the ramp to the right to US-340N.  Take the first right and you will see the Dairy Queen to the right.  Directly across the road from Dairy Queen is the Elkton Community Center.  Park your car here.  Behind the building, you will see the orange blaze which signifies the start of the orange-blazed trail.

MapMyHike is not necessarily accurate, as the GPS signal fades in and out – but it still provides some fun and interesting information.

Murphy-Chambers Farm – Harpers Ferry

This 2.2 mile route is more of a historic stroll than a true hike, but it’s definitely worth doing if you’re in Harpers Ferry and don’t have time for more significant hikes, like Weaverton Cliff, Loudon Heights or Maryland Heights.

Cannons on Murphy Farm
This short hike has a lot of interesting history. Below:  Meeting Jennifer Pharr Davis, Brew Davis and baby Charley; Berries on the trail; The beginning of the route.

ATC Talk Berries Trailhead

Adam Says…

We took a trip to Harpers Ferry, WV primarily to meet Jennifer Pharr-Davis, the current record-holder with the fastest time to hike the Appalachian Trail.  She was giving a talk at the Appalachian Trail Conservancy to promote her new book, Called Again,  and talk about her experiences hiking the Appalachian Trail.  The center holds archives of all the thru-hikers that have made it to this halfway point and while we waited for her talk to begin, we browsed around the center and looked through the photo archives to find some of our friends that had thru-hiked in years past.  We found Jennifer’s talk to be truly inspirational and she took several questions about her experience.

After leaving the center, we decided to take advantage of being in the area and headed to Harpers Ferry National Historic Park.  We drove up to the Visitor Center.  At the gate, there was a line of cars and one car was taking a long time to get through.  While I wasn’t feeling particularly patient either, the car in front of us was shouting for the car ahead to move along.  When this car finally got to the gate, they yelled at the park ranger for being too thorough with the other people’s questions.  They ended up just turning around since they were too mad to enjoy the park.  We felt so bad that the park ranger had to take this abuse.  We paid our $10 entry fee and parked near the Visitor Center.  We talked to the staff there and asked for an idea for a quick hike.  The staff member recommended this hike to us, since she said this had some of the nicest views of the Shenandoah River.  We filled up our water bottles and began our hike.

River View
A view of the river. Below; Stairs climb into the woods at the beginning of the hike; First views; Cannon

Steps View from Trail Cannon

The temperature was scorching this day and we hit the trail in the peak of the afternoon heat.  We both talked about how much we hate the heat of the summer.  Give me fall or spring hiking days any time over humid, hot summer days.

The trail starts from behind the restrooms of the Visitors Center and across the main road.  As soon as you cross the cross the road, the trail bears a sharp left, skirting the tree line.  The trail then goes deeper into the woods and begins a descent including a sharp switchback.  At about .25 miles, the trail crosses a bridge over the small creek and then begins a short climb uphill.  Once you reach the top, the trail opens up to houses on the right and a large field on the left.  We took a sharp left, which hugged the tree line down a path that was cut into the tall grass.  The shade of the trees gave us a little protection from the sun beating down, but it wasn’t quite enough.  At .5 miles, the trail approaches the back of the Murphy-Chambers House.  We decided to continue on and see the house on the return trip.  We continued along the trail and at .9 miles, we reached the John Brown Fort foundation.  John Brown was such an interesting character in American history and I remember writing a paper in college about his activist behavior.   A short distance from the foundation, the trail dips into the woods for the view of the Shenandoah River.  You get a nice view of the river and we weren’t surprised to see large rafts floating down the river.  We continued from this point to take a right at the next junction (rather than continuing on to the earthworks) to head back to the Murphy-Chambers House.  The trail follows a rather straight path and there wasn’t any shade to be found from the sun at this point.  At 1.2 miles, we reached an area of cannons and learned about how Confederate General A.P. Hill maneuvered his troops to a fortified position on this hill.

From here we continued on the trail which led to a gate keeping an unpaved road from going any further.  There is a parking lot here and a path to the right leads to the Murphy-Chambers House.  The Union took over this farm in 1862, ousting the Chambers Family.  While he tried to claim restitution for his property, there is no evidence that he was ever paid.  In 1869, Alexander Murphy re-established the farm.

We continued along the trail on the unpaved road until we reached the junction again that led back into the woods at 1.5 miles.  We followed the trail back to the Visitor Center and our car.  While the day was incredibly hot, it was nice to get out and stretch our legs and learn a little about the history that shaped this area.

Christine Says…

If the weather had been cooler or if we’d had more time, we would have opted to take one of the longer hike options in the area.  But after spending Saturday visiting Charlottesville-area wineries (Horton and Barboursville), touring James Madison’s Montpelier and enjoying a huge dinner at the Barbeque Exchange, we got a very late start on Sunday morning.  So late, in fact, that we were worried about making it to Jennifer Pharr Davis’ talk in time.  The original plan had been to have a leisurely lunch in downtown Harpers Ferry and then make our way to the ATC.  As it turned out, we ended up wolfing down Subway in Charles Town and making it to the talk just in time.

Murphy Farm
The Murphy-Chambers Farm; Adam checks out route options, John Brown historical site; Rafters

Checking the Map John Brown Historical Site Rafters

Jennifer’s talk was everything I hoped it would be and more!  I will never be a tenth of the athlete that she is, but she inspires me to get out there and challenge myself.  She loves the Appalachian Trail, and despite all the amazing places she has hiked, the AT is still her favorite.  Some people might think that setting a speed record on the trail would preclude appreciating or enjoying the beauty and the experience of nature.

But after hearing her speak and reading Called Again, I believe she found new levels of beauty, love, and personal fulfillment.  People hike the trail for a variety of reasons – to see scenery and wildlife, to engage in self-discovery, to challenge oneself physically or to form/deepen personal relationships.  Jennifer may have flown across the trail in a mere 46 days, but she still had all the experiences you would expect a person to have along the way.   I really enjoyed Jennifer’s first book Becoming Odyssa, but Called Again was even more rewarding.  I also added Brew Davis’ book (Jennifer’s husband) to my reading queue.  I expect his side of the story to be equally fascinating!

Fawn
We spotted a cute fawn. Below:  The return arm of the loop; Adam at the ATC.

Path ATC Adam

OK… now on to the hike!  Adam has already done such a thorough job describing the route and points of interest, that I really don’t have much to add.  I will echo his sentiments about the heat.  I felt like I was going to melt into a pool of sweat on the trail.  The day we were there was the beginning of one of the only really hot weeks we’ve had this summer. It was probably in the low nineties, but it was humid, windless and sunny, so the heat index was 101.  I really don’t like to hike when it’s above the mid 80s, so this wasn’t a particularly fun hiking day.  Even if there had been more time to explore the area, I don’t think I would have wanted to do a longer hike in this heat.

Nevertheless, I enjoyed the views of the river and the historical attractions.  If it had been cooler, I would have taken more time to read informational placards.  My favorite part of the hike was spotting a fawn grazing in the field.  From a distance, I saw a brown hump in the grass.  I asked Adam, ‘Is that an animal of some kind?’.  He thought it was a rock and headed over to read about the cannon on display.  I tiptoed along with my camera and found that the ‘rock’ was actually an adorable spotted fawn.  We made eye contact for a brief moment before he flashed his white tail and bounded off into the trees.

We made our way quickly back to the car where I chugged more water and blasted the air conditioning.  The outdoor temp thermometer on our car said 107.  I know that was mostly from leaving the car sitting in the sun… but still!  This short hike in the heat added even more to the anticipation about our upcoming ten day trip north!  Our next five posts are going to be out-of-staters!  We’ll be taking you to the rugged, exciting, spectacular high peaks of New Hampshire!

Trail Notes

  • Distance2.2 miles
  • Elevation Change – negligble
  • Difficulty –  1.  The trail was not very difficult and only had a little bit of elevation change on the hike.
  • Trail Conditions – 4.  The trail is well-established and didn’t have very difficult footing.  Most of the trail is on grass or gravel.
  • Views – 1.5.  The views of the Shenandoah River were somewhat obstructed with trees around. 
  • Streams/Waterfalls – 2.  You do get one heightened view of the Shenandoah River from this point.
  • Wildlife – 2.  I believe we were fairly lucky to see a fawn on the trail.  I would expect to see field birds here for any bird-watchers.
  • Ease to Navigate – 4.  The trails mostly inter-connect here, so you shouldn’t get lost.
  • Solitude – 4.  My guess is that most people that visit the Visitor Center do not hike up to this area, but you may see some people at the Murphy-Chambers House. 

Directions to trailhead:  From Charles Town, WV head north for about 4.5 miles.  Turn right on Shoreline Drive (about .8 miles past Millville Road).  The entrance fee station is just ahead and the large parking area is to the right.  Walk up to the Visitor Center and the trail is across the road behind the bathrooms.

Calvary Rocks & Chimney Rock

If you’re looking for a short, easy hike in the vicinity of the Riprap trail (southern district – Shenandoah National Park), the 3.4 mile walk to Calvary Rocks and Chimney Rock is a great option.  It follows the same route as the 10-mile Riprap circuit, but turns around right after two excellent viewpoints.

NPS Riprap Area Trail Map

View from Chimney Rock
The view from the second viewpoint along this short, pleasant hike. Below: Adam at the trailhead; Hiking the AT; along the AT

Trailhead Walking the AT

Christine Says…

After our long hiking trip to North Caroline and Tennessee, I came home with a really sore knee.  Every step I took, it felt like someone was sticking an ice pick into the soft tissue under my kneecap.  Even after a week’s rest, it didn’t feel better, so I reluctantly made an appointment with an orthopedist.  He couldn’t find anything obviously wrong, so he diagnosed it as a bit of IT-band syndrome, a bit of inflamed cartilage and maybe the beginnings of arthritis.  I was given orders to cross-train… which is essentially code-speak for ‘do something other than hiking‘.  Bah!   So, I spent most of June and July in the gym, doing cardio equipment and weights.  I only managed to hit the trail a few times – all short and easy hikes. This walk to Calvary Rocks and Chimney Rock was one of those hikes.

It was a beautiful, sunny, crisp day for midsummer.  We set out in the morning and had the trail almost completely to ourselves.  The hike started off in the same parking lot as the longer Riprap loop hike.  The hike follows the Appalachian Trail uphill for almost a half mile before intersecting with the Riprap trail.

At the junction, turn left onto the Riprap trail.  The first viewpoint, Calvary Rocks comes shortly after passing a small talus slope.  There are two small outcroppings of rocks at this viewpoint.  It’s pretty, but in my opinion, the second view from Chimney Rock is the nicer of the two.

Taking in the view.
Taking in the view. Below: Flowers blooming along the trail; A bug finds shelter; Ripening blueberries; Indian pipes.

Wildflowers Wildflowers
Blueberries Indian Pipes

The second view comes several tenths of a mile past Calvary Rocks.  The view is great and this outcropping is a bit more expansive.  There are lots of places to scramble around.  There were also a ton of blueberries growing around Chimney Rock.  Most of them weren’t ripe, but I found a few that were dark purplish-blue and sweet-tart!

We lingered on the rocks for a while before heading back the way we came.  It was great to be out on the trail after so many days of doing indoor workouts, and (thankfully) my knee held up pretty well!

Adam Says…

This truly hasn’t been a typical summer in Virginia.  I remember brutal, hot, muggy summers in which we never could feel we could escape the heat.  Luckily, this summer has been much cooler.  The bugs have also not been as bad this year, which has made hiking much more pleasant.

This was a test for Christine’s knee to see if she could take another hike after just a little rest.  The amount of hiking we did in the Smokies demanded for some time off, but I was glad her knee was cooperative on this hike.

Calvary Rocks
Calvary Rocks are geologically different looking than most of Shenandoah’s rocks. Below: Views!

Views Views Views

We started from the parking lot and began our hike uphill on the white-blazed Appalachian Trail.  In about .4 miles, you reach the junction with the Riprap Trail.  Take a left here and the trail goes down steeply before ascending.  Around 1.2 miles, you will reach your first viewpoint of Calvary Rocks.  There are some very nice views here, but not a lot of room to spread out if there are others on the trail.  Continue from here along the trail and around 1.7 miles, you will reach Chimney Rock.  Chimney Rock has great views and a little more room to enjoy the views with others or stop to eat a snack.

Along the trail, Christine was complimenting me on my ability to be able to find indian pipes.  She is definitely the wildflower expert between the two of us, but for some reason I tend to spot indian pipes before she does.  We found a few nice specimens along the trail.

Buck
Handsome buck near the trailhead.

We lingered for a short while to enjoy the views on such a nice summer day.  We made our way back the same way on the return trip.  If you would like some nice views with little effort, this is hike in the south district of Shenandoah National Park that shouldn’t be missed.

Trail Notes

  • Distance – 3.4 miles
    (Check out the stats from Map My Hike)*
  • Elevation Change – around 680 feet
  • Difficulty – 2. This hike is short and easy without much climbing or descending.
  • Trail Conditions – 4. The trail was in great shape.
  • Views4. The views are nice, but they aren’t panoramic,
  • Waterfalls/streams – 0. None. If you want to see streams, you’ll have to do the full Riprap loop.
  • Wildlife – 2. We saw a nice looking buck near the trailhead.  Bears are known to frequent this area.
  • Ease to Navigate – 3. The trail is well-marked and there is just one trail junction.
  • Solitude – 3. We didn’t see many people at all on this hike!

Directions to trailhead:
From Skyline Drive, park on the western side at mile marker 90.  There is a parking lot specifically for Riprap hikers.

* MapMyHike is not necessarily accurate, as the GPS signal fades in and out – but it still provides some fun and interesting information.